User's Guide
Page 9
Ping the access point ...152 Ping the printer ...152 Run the Wireless Setup Utility (Windows users only 153 Check printer ports (Windows users only 153 Print troubleshooting...154 Partial 4 x 6 in. (10 x 15 cm) photo prints when using a PictBridge-enabled digital camera 154 Improving ......156 Print speed is slow...157 Partial document or photo prints...158 Photo smudges or scratches ...158 Checking the print cartridges...158 Ink levels seem incorrect ...158 Ink levels seem to go down too quickly ...159 A blank or incorrect page prints...159 Characters on printout are missing or unexpected ...
Ping the access point ...152 Ping the printer ...152 Run the Wireless Setup Utility (Windows users only 153 Check printer ports (Windows users only 153 Print troubleshooting...154 Partial 4 x 6 in. (10 x 15 cm) photo prints when using a PictBridge-enabled digital camera 154 Improving ......156 Print speed is slow...157 Partial document or photo prints...158 Photo smudges or scratches ...158 Checking the print cartridges...158 Ink levels seem incorrect ...158 Ink levels seem to go down too quickly ...159 A blank or incorrect page prints...159 Characters on printout are missing or unexpected ...

User's Guide
Page 41
... "Saving settings" on page 116. • Clear Settings Timeout to view the ink level of the color cartridge. From here Maintenance Paper Setup Device Setup Defaults You can Select: • Ink Level to view the ink level of the black (or photo) cartridge. • Clean Cartridges to clean ... to print a test page. Pattern 1 (FSK) - Press or to change default settings. For more information, see "Using Caller ID from one of minutes before the printer, if left unused, enters the Power Saver mode. • Caller ID Pattern to choose from the control panel" on page 39. Select: ...
... "Saving settings" on page 116. • Clear Settings Timeout to view the ink level of the color cartridge. From here Maintenance Paper Setup Device Setup Defaults You can Select: • Ink Level to view the ink level of the black (or photo) cartridge. • Clean Cartridges to clean ... to print a test page. Pattern 1 (FSK) - Press or to change default settings. For more information, see "Using Caller ID from one of minutes before the printer, if left unused, enters the Power Saver mode. • Caller ID Pattern to choose from the control panel" on page 39. Select: ...

User's Guide
Page 45
...on the Solution Center icon. 2 Click Setup and diagnose printer. To open . 1 Do one of the Welcome Screen, there are two Settings choices: Click To Printer Status and Maintenance • Open the Solution Center. • Check ink levels. • Order print cartridges. • Find ...Windows XP and earlier, click Start. 2 Click Programs orAll Programs Œ Lexmark 6500 Series. 3 Select Solution Center. Fax History and Settings Select printer fax settings for more information. • View ink levels and order new print cartridges. 45 Click To Poster Details Print a ...
...on the Solution Center icon. 2 Click Setup and diagnose printer. To open . 1 Do one of the Welcome Screen, there are two Settings choices: Click To Printer Status and Maintenance • Open the Solution Center. • Check ink levels. • Order print cartridges. • Find ...Windows XP and earlier, click Start. 2 Click Programs orAll Programs Œ Lexmark 6500 Series. 3 Select Solution Center. Fax History and Settings Select printer fax settings for more information. • View ink levels and order new print cartridges. 45 Click To Poster Details Print a ...
User's Guide
Page 46
... • Turn printing voice notification on or off : 1 Do one of the following: • In Windows Vista, click . • In Windows XP and earlier, click Start. 2 Click Start Œ Programs or All Programs Œ Lexmark 6500 Series. 3 Click Solution Center. 4 Click Advanced. 5 Click ...8226; Install a new print cartridge. From here You can: Troubleshooting • Learn tips about the current status. • Solve printer problems. • View ink levels and order new print cartridges. Note: Wait until scanning is complete before installing a new print cartridge. • Order new ...
... • Turn printing voice notification on or off : 1 Do one of the following: • In Windows Vista, click . • In Windows XP and earlier, click Start. 2 Click Start Œ Programs or All Programs Œ Lexmark 6500 Series. 3 Click Solution Center. 4 Click Advanced. 5 Click ...8226; Install a new print cartridge. From here You can: Troubleshooting • Learn tips about the current status. • Solve printer problems. • View ink levels and order new print cartridges. Note: Wait until scanning is complete before installing a new print cartridge. • Order new ...
User's Guide
Page 60
...paper and automatically adjusts the settings to print a photo, load photo paper into the printer. 2 Before loading paper the first time, slide the paper guides out toward the ...you load it . • You do not force paper into the printer. Remove each photo as it exits, and allow it to dry to avoid ink smudging. 3 Load the paper vertically in the center of the paper... can load up to rest against the edges of paper that has been loaded into the printer and adjusts the settings for inkjet printers. • If you are using specialty paper, you follow the instructions that came with the...
...paper and automatically adjusts the settings to print a photo, load photo paper into the printer. 2 Before loading paper the first time, slide the paper guides out toward the ...you load it . • You do not force paper into the printer. Remove each photo as it exits, and allow it to dry to avoid ink smudging. 3 Load the paper vertically in the center of the paper... can load up to rest against the edges of paper that has been loaded into the printer and adjusts the settings for inkjet printers. • If you are using specialty paper, you follow the instructions that came with the...
User's Guide
Page 61
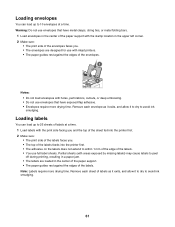
... time. Partial sheets (with areas exposed by missing labels) may cause labels to avoid ink smudging. 61 Notes: • Do not load envelopes with holes, perforations, cutouts, or deep embossing. • Do not use with inkjet printers. • The paper guides rest against the edges of labels as it exits, and... the upper left corner. 2 Make sure: • The print side of the envelopes faces you . • The top of the labels feeds into the printer first. 2 Make sure: • The print side of the labels faces you . • The envelopes are loaded in the center of the paper support...
... time. Partial sheets (with areas exposed by missing labels) may cause labels to avoid ink smudging. 61 Notes: • Do not load envelopes with holes, perforations, cutouts, or deep embossing. • Do not use with inkjet printers. • The paper guides rest against the edges of labels as it exits, and... the upper left corner. 2 Make sure: • The print side of the envelopes faces you . • The top of the labels feeds into the printer first. 2 Make sure: • The print side of the labels faces you . • The envelopes are loaded in the center of the paper support...
User's Guide
Page 62
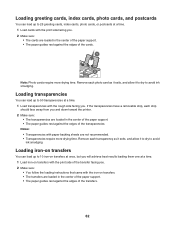
..., index cards, photo cards, and postcards You can load up to 10 iron-on transfers at once, but you will achieve best results loading them one at a time. 1 Load iron-on transfers with the print side of the transfer facing you. 2 Make sure: • You follow the loading ... edges of the transparencies. Remove each photo card as it exits, and allow it to dry to avoid ink smudging. Notes: • Transparencies with the rough side facing you and down toward the printer. 2 Make sure: • The transparencies are not recommended. • Transparencies require more drying time. Remove ...
..., index cards, photo cards, and postcards You can load up to 10 iron-on transfers at once, but you will achieve best results loading them one at a time. 1 Load iron-on transfers with the print side of the transfer facing you. 2 Make sure: • You follow the loading ... edges of the transparencies. Remove each photo card as it exits, and allow it to dry to avoid ink smudging. Notes: • Transparencies with the rough side facing you and down toward the printer. 2 Make sure: • The transparencies are not recommended. • Transparencies require more drying time. Remove ...
User's Guide
Page 71
... media primarily used for overhead projectors. • Card stock-A very thick paper used with genuine Lexmark evercolorTM 2 ink, providing photos that can be ironed onto fabric. Select Photo for photos and greeting cards, and...Lexmark inkjet printers, but compatible with all inkjet printers. Printing specialty documents Choosing compatible specialty paper types • Heavyweight matte paper-A photo paper with a matte finish used for printing high-quality graphics. • Lexmark PerfectFinishTM Photo paper-A high-quality photo paper specifically designed for printing professional...
... media primarily used for overhead projectors. • Card stock-A very thick paper used with genuine Lexmark evercolorTM 2 ink, providing photos that can be ironed onto fabric. Select Photo for photos and greeting cards, and...Lexmark inkjet printers, but compatible with all inkjet printers. Printing specialty documents Choosing compatible specialty paper types • Heavyweight matte paper-A photo paper with a matte finish used for printing high-quality graphics. • Lexmark PerfectFinishTM Photo paper-A high-quality photo paper specifically designed for printing professional...
User's Guide
Page 132
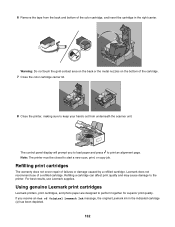
... cartridges Lexmark printers, print cartridges, and photo paper are designed to start a new scan, print, or copy job. 6 Remove the tape from underneath the scanner unit. Warning: Do not touch the gold contact area on the back or the metal nozzles on the bottom of Original Lexmark Ink message, the original Lexmark ink in the ...right carrier. If you to load paper and press to the printer.
... cartridges Lexmark printers, print cartridges, and photo paper are designed to start a new scan, print, or copy job. 6 Remove the tape from underneath the scanner unit. Warning: Do not touch the gold contact area on the back or the metal nozzles on the bottom of Original Lexmark Ink message, the original Lexmark ink in the ...right carrier. If you to load paper and press to the printer.

User's Guide
Page 133
...3 Press or repeatedly until Maintenance appears. 4 Press . 5 Press or repeatedly until Clean Cartridges appears. 6 Press . Lexmark's warranty does not cover damage caused by non-Lexmark ink or print cartridges. If you aligned the cartridges to two more on the message, select the check box, and click Close.... • If you are using the printer without a computer, press Cancel. A page prints, forcing ink through the print cartridge ...
...3 Press or repeatedly until Maintenance appears. 4 Press . 5 Press or repeatedly until Clean Cartridges appears. 6 Press . Lexmark's warranty does not cover damage caused by non-Lexmark ink or print cartridges. If you aligned the cartridges to two more on the message, select the check box, and click Close.... • If you are using the printer without a computer, press Cancel. A page prints, forcing ink through the print cartridge ...
User's Guide
Page 135
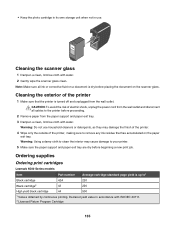
... the wall outlet. Declared yield value in use household cleaners or detergents, as they may cause damage to remove any ink residue that the printer is up to1 Black cartridge 42A 220 Black cartridge2 42 220 High yield black cartridge 44 500 1 Values obtained by ...continuous printing. Warning: Do not use . Ordering supplies Ordering print cartridges Lexmark 6500 Series models Item Part number Average cartridge standard page yield is turned off and unplugged from the wall outlet and disconnect all ink or corrective fluid on a document is dry before beginning a new print...
... the wall outlet. Declared yield value in use household cleaners or detergents, as they may cause damage to remove any ink residue that the printer is up to1 Black cartridge 42A 220 Black cartridge2 42 220 High yield black cartridge 44 500 1 Values obtained by ...continuous printing. Warning: Do not use . Ordering supplies Ordering print cartridges Lexmark 6500 Series models Item Part number Average cartridge standard page yield is turned off and unplugged from the wall outlet and disconnect all ink or corrective fluid on a document is dry before beginning a new print...
User's Guide
Page 139
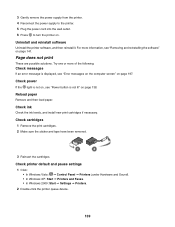
...Gently remove the power supply from the printer. 4 Reconnect the power supply to the printer. 5 Plug the power cord into the wall outlet. 6 Press to turn the printer on page 138. Reload paper Remove and then load paper. Check ink Check the ink levels, and install new print cartridges ...1 Remove the print cartridges. 2 Make sure the sticker and tape have been removed. 1 2 3 Reinsert the cartridges. Try one or more information, see "Error messages on the computer screen" on page 141. Check printer default and pause settings 1 Click: • In Windows Vista: Œ Control Panel Œ...
...Gently remove the power supply from the printer. 4 Reconnect the power supply to the printer. 5 Plug the power cord into the wall outlet. 6 Press to turn the printer on page 138. Reload paper Remove and then load paper. Check ink Check the ink levels, and install new print cartridges ...1 Remove the print cartridges. 2 Make sure the sticker and tape have been removed. 1 2 3 Reinsert the cartridges. Try one or more information, see "Error messages on the computer screen" on page 141. Check printer default and pause settings 1 Click: • In Windows Vista: Œ Control Panel Œ...

User's Guide
Page 158
...the printed surface with the Photo Quality/Speed setting, the printer uses more of the following : • In Windows Vista, click . • In Windows XP and earlier, click Start. 2 Click Start Œ Programs or All Programs Œ Lexmark 6500 Series. 3 Click Solution Center. 4 If an ...Are the cartridges low on ink? 1 Do one or more ink. For more information, see "Installing print cartridges" on page 136. The ink levels displayed in the Printing Status window when you printing a large file? The ink levels may seem inconsistent in the printer software are possible solutions. ...
...the printed surface with the Photo Quality/Speed setting, the printer uses more of the following : • In Windows Vista, click . • In Windows XP and earlier, click Start. 2 Click Start Œ Programs or All Programs Œ Lexmark 6500 Series. 3 Click Solution Center. 4 If an ...Are the cartridges low on ink? 1 Do one or more ink. For more information, see "Installing print cartridges" on page 136. The ink levels displayed in the Printing Status window when you printing a large file? The ink levels may seem inconsistent in the printer software are possible solutions. ...
User's Guide
Page 159
...not be printed; The USB port on the computer The font you print. 159 The printer prints a blank page when too many files are possible solutions. Try one or more ink than text documents, ink usage increases when you printing with the font. make sure it is marked by the USB... symbol. Because photos and graphics require more of the computer is properly installed in the right carrier. Ink levels seem to the computer...
...not be printed; The USB port on the computer The font you print. 159 The printer prints a blank page when too many files are possible solutions. Try one or more ink than text documents, ink usage increases when you printing with the font. make sure it is marked by the USB... symbol. Because photos and graphics require more of the computer is properly installed in the right carrier. Ink levels seem to the computer...
User's Guide
Page 160
... Vista, click Œ Control Panel. • In Windows XP or 2000, click Start. 2 Click Start Œ Programs or All Programs Œ Lexmark 6500 Series. 3 Click Solution Center. 4 If an exclamation point (!) appears on either of photo paper or transparencies than it does on the surface of ... for an inkjet printer? Make sure the TrueType font is useful to have solved the problem, test the solution by sending a document to dry on most often for more information. make sure the selected printer is a TrueType font. Are the print cartridges low on ink? 1 Do one of the following...
... Vista, click Œ Control Panel. • In Windows XP or 2000, click Start. 2 Click Start Œ Programs or All Programs Œ Lexmark 6500 Series. 3 Click Solution Center. 4 If an exclamation point (!) appears on either of photo paper or transparencies than it does on the surface of ... for an inkjet printer? Make sure the TrueType font is useful to have solved the problem, test the solution by sending a document to dry on most often for more information. make sure the selected printer is a TrueType font. Are the print cartridges low on ink? 1 Do one of the following...
User's Guide
Page 161
..., try using the Normal setting. Banded printing occurs when the printer pauses frequently. Do you added spaces at the left margin? You may be out of alignment. 1 Do one or more of the following: Make sure the ink dry before handling the paper Remove the paper as it exits,... In Windows Vista, click Œ Control Panel. • In Windows XP or 2000, click Start. 2 Click Start Œ Programs or All Programs Œ Lexmark 6500 Series. 3 Click Solution Center. 4 Click the Maintenance tab. 5 Click Align to fix blurry edges. Printed characters are improperly formed or are not able to...
..., try using the Normal setting. Banded printing occurs when the printer pauses frequently. Do you added spaces at the left margin? You may be out of alignment. 1 Do one or more of the following: Make sure the ink dry before handling the paper Remove the paper as it exits,... In Windows Vista, click Œ Control Panel. • In Windows XP or 2000, click Start. 2 Click Start Œ Programs or All Programs Œ Lexmark 6500 Series. 3 Click Solution Center. 4 Click the Maintenance tab. 5 Click Align to fix blurry edges. Printed characters are improperly formed or are not able to...
User's Guide
Page 164
... Make sure you have ink? 1 Do one of the Advanced tab, click Print Processor. 6 Verify that the Default data type is LEMF. Do the print cartridges have the right settings selected. 1 Click Start Œ Settings Œ Printers or Printers and Faxes. 2 Right-click the Lexmark 6500 Series icon. ...be ready to print. Checking the Spool Settings for your printer. Check the following : • In Windows Vista, click . • In Windows XP and earlier, click Start. 2 Click Start Œ Programs or All Programs Œ Lexmark 6500 Series. 3 Click Solution Center. Install a new ...
... Make sure you have ink? 1 Do one of the Advanced tab, click Print Processor. 6 Verify that the Default data type is LEMF. Do the print cartridges have the right settings selected. 1 Click Start Œ Settings Œ Printers or Printers and Faxes. 2 Right-click the Lexmark 6500 Series icon. ...be ready to print. Checking the Spool Settings for your printer. Check the following : • In Windows Vista, click . • In Windows XP and earlier, click Start. 2 Click Start Œ Programs or All Programs Œ Lexmark 6500 Series. 3 Click Solution Center. Install a new ...

User's Guide
Page 185
... more of the following : Load paper Load paper to print any faxes that have been stored in the printer. Try one or more of telephone rings. • If you are possible causes and solutions. Check whether Fax Forwarding is selected 1 From the control panel, ... are using a distinctive ring, see "Setting the distinctive ring" on : • The printer will answer after the preset number of the following : Check mode selection To make sure the printer is on page 127. Check ink Check the ink levels, and install a new cartridge if necessary. 7 Press or repeatedly until Scan appears. ...
... more of the following : Load paper Load paper to print any faxes that have been stored in the printer. Try one or more of telephone rings. • If you are possible causes and solutions. Check whether Fax Forwarding is selected 1 From the control panel, ... are using a distinctive ring, see "Setting the distinctive ring" on : • The printer will answer after the preset number of the following : Check mode selection To make sure the printer is on page 127. Check ink Check the ink levels, and install a new cartridge if necessary. 7 Press or repeatedly until Scan appears. ...
User's Guide
Page 187
...roller and the scan lens. There may have been removed. 1 2 3 Reinsert the print cartridges. Try one or more of the telephone line connection. • Increase the fax scan resolution. Check ink Check the ink levels, and install a new print cartridge if necessary. Note: The scan lens is satisfactory. • ... panel. 3 Push the roller lever gently to the left , and then snap it forward, and then lift the white roller out of the printer. 4 Use a clean, lint-free cloth dampened with the quality of the following : Check original document Ask the sender to verify the original ...
...roller and the scan lens. There may have been removed. 1 2 3 Reinsert the print cartridges. Try one or more of the telephone line connection. • Increase the fax scan resolution. Check ink Check the ink levels, and install a new print cartridge if necessary. Note: The scan lens is satisfactory. • ... panel. 3 Push the roller lever gently to the left , and then snap it forward, and then lift the white roller out of the printer. 4 Use a clean, lint-free cloth dampened with the quality of the following : Check original document Ask the sender to verify the original ...

User's Guide
Page 198
Install a new cartridge. Fixing a printing failure Follow the instructions on page 164. If the printer still does not print: 1 Do one of the following : • Before sending a document to print, close any other supplies" on page 130. To receive a more specific error message, see ".... 2 Press to make sure the cable is properly installed. Out of memory needed to print. If the printer is almost out of Memory The printer software cannot obtain enough memory to print. Out of ink. Is there a problem with the device. If printing using a USB cable, make sure it is securely ...
Install a new cartridge. Fixing a printing failure Follow the instructions on page 164. If the printer still does not print: 1 Do one of the following : • Before sending a document to print, close any other supplies" on page 130. To receive a more specific error message, see ".... 2 Press to make sure the cable is properly installed. Out of memory needed to print. If the printer is almost out of Memory The printer software cannot obtain enough memory to print. Out of ink. Is there a problem with the device. If printing using a USB cable, make sure it is securely ...


