User Guide
Page 2
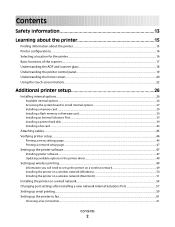
......30 Installing an Internal Solutions Port...33 Installing a printer hard disk ...39 Installing a fax card ...43 Attaching cables...45 Verifying printer setup...46 Printing a menu settings page...46 Printing a network setup page ...47 Setting up the printer software...47 Installing printer software ...47 Updating available options in the printer driver...48 Setting up...
......30 Installing an Internal Solutions Port...33 Installing a printer hard disk ...39 Installing a fax card ...43 Attaching cables...45 Verifying printer setup...46 Printing a menu settings page...46 Printing a network setup page ...47 Setting up the printer software...47 Installing printer software ...47 Updating available options in the printer driver...48 Setting up...
User Guide
Page 46
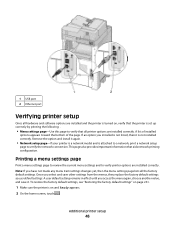
... This page also provides important information that all the factory default settings. Remove the option and install it is attached to a network, print a network setup page to verify printer options are installed correctly. Note: If you select and save it. Printing a menu settings page Print ...default settings. A user default setting remains in effect until you installed is not listed, then it again. • Network setup page-If your printer is a network model and is not installed correctly. To restore the factory default settings, see "Restoring the factory default settings" on ...
... This page also provides important information that all the factory default settings. Remove the option and install it is attached to a network, print a network setup page to verify printer options are installed correctly. Note: If you select and save it. Printing a menu settings page Print ...default settings. A user default setting remains in effect until you installed is not listed, then it again. • Network setup page-If your printer is a network model and is not installed correctly. To restore the factory default settings, see "Restoring the factory default settings" on ...
User Guide
Page 47
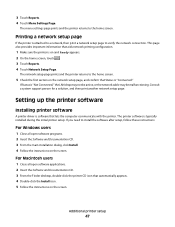
...programs. 2 Insert the Software and Documentation CD. 3 From the main installation dialog, click Install. 4 Follow the instructions on the network setup page, and confirm that lets the computer communicate with the printer. If you need to the home screen. 5 Check the first ...section on the screen. Printing a network setup page If the printer is attached to a network, then print a network setup page to the home screen. Consult a system support person for a solution, and then print another network setup page. Setting up the printer software Installing printer software ...
...programs. 2 Insert the Software and Documentation CD. 3 From the main installation dialog, click Install. 4 Follow the instructions on the network setup page, and confirm that lets the computer communicate with the printer. If you need to the home screen. 5 Check the first ...section on the screen. Printing a network setup page If the printer is attached to a network, then print a network setup page to the home screen. Consult a system support person for a solution, and then print another network setup page. Setting up the printer software Installing printer software ...

User Guide
Page 55
... 47. 3 Locate the printer IP address in the TCP/IP section of your CD or DVD drive. Additional printer setup 55 For information on printing a network setup page, see "Printing a network setup page" on the computer: 1 Insert the Software and Documentation CD in the list of discovered printers, click Add Port... to complete the installation. Note: To configure the printer using a static IP address, using IPv6, or to the printer. 2 Print the network setup page from the list of the agreement. 6 Select a Destination, and then click Continue. 7 From the Easy Install screen, click Install.
... 47. 3 Locate the printer IP address in the TCP/IP section of your CD or DVD drive. Additional printer setup 55 For information on printing a network setup page, see "Printing a network setup page" on the computer: 1 Insert the Software and Documentation CD in the list of discovered printers, click Add Port... to complete the installation. Note: To configure the printer using a static IP address, using IPv6, or to the printer. 2 Print the network setup page from the list of the agreement. 6 Select a Destination, and then click Continue. 7 From the Easy Install screen, click Install.
User Guide
Page 57
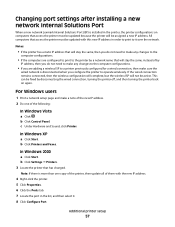
... of the printer, then update all of them with this new IP address in order to print to operate wirelessly. For Windows users 1 Print a network setup page and make any changes to the computer configurations. • If you configure the printer to it . 8 Click Configure Port. b Click Control ...the wireless ISP will stay the same, instead of the following: In Windows Vista a Click . Changing port settings after installing a new network Internal Solutions Port When a new network Lexmark Internal Solutions Port (ISP) is installed in the printer, the printer configurations on again.
... of the printer, then update all of them with this new IP address in order to print to operate wirelessly. For Windows users 1 Print a network setup page and make any changes to the computer configurations. • If you configure the printer to it . 8 Click Configure Port. b Click Control ...the wireless ISP will stay the same, instead of the following: In Windows Vista a Click . Changing port settings after installing a new network Internal Solutions Port When a new network Lexmark Internal Solutions Port (ISP) is installed in the printer, the printer configurations on again.

User Guide
Page 58
...pop-up menu, choose AppleTalk. e Select the printer from the list. c Double-click Printer Setup Utility or Print Center. b Click Print & Fax. For Mac users 1 Print a network setup page and make a note of the network setup page. d From the Printer List, click Add. e Select the printer from the list.... and earlier a From the Go menu, choose Applications. e Choose the Default Browser tab. You can find the new IP address on the network setup page you are configuring access for computers on a different subnet than the printer. 3 Add the printer: • For IP printing: In ...
...pop-up menu, choose AppleTalk. e Select the printer from the list. c Double-click Printer Setup Utility or Print Center. b Click Print & Fax. For Mac users 1 Print a network setup page and make a note of the network setup page. d From the Printer List, click Add. e Select the printer from the list.... and earlier a From the Go menu, choose Applications. e Choose the Default Browser tab. You can find the new IP address on the network setup page you are configuring access for computers on a different subnet than the printer. 3 Add the printer: • For IP printing: In ...

User Guide
Page 70
Note: If you do not know the IP address of the printer, then print a network setup page and locate the IP address in the TCP/IP section. 2 Click Settings. 3 Click Fax Settings. 4 Click Analog Fax Setup. 5 Click inside the Station Number box, and then enter the printer fax number. 7 Click Submit. ...the designated fax name and fax number printed on outgoing faxes: 1 Type the printer IP address into the address field of the printer, then print a network setup page and locate the IP address in the TCP/IP section. 2 Click Links & Index. 3 Click Set Date and Time. 4 Click inside the Manually...
Note: If you do not know the IP address of the printer, then print a network setup page and locate the IP address in the TCP/IP section. 2 Click Settings. 3 Click Fax Settings. 4 Click Analog Fax Setup. 5 Click inside the Station Number box, and then enter the printer fax number. 7 Click Submit. ...the designated fax name and fax number printed on outgoing faxes: 1 Type the printer IP address into the address field of the printer, then print a network setup page and locate the IP address in the TCP/IP section. 2 Click Links & Index. 3 Click Set Date and Time. 4 Click inside the Manually...
User Guide
Page 71
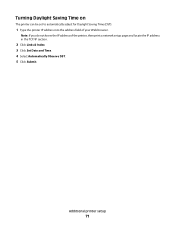
Note: If you do not know the IP address of your Web browser. Additional printer setup 71 Turning Daylight Saving Time on The printer can be set to automatically adjust for Daylight Saving Time (DST): 1 Type the printer IP address into the address field of the printer, then print a network setup page and locate the IP address in the TCP/IP section. 2 Click Links & Index. 3 Click Set Date and Time. 4 Select Automatically Observe DST. 5 Click Submit.
Note: If you do not know the IP address of your Web browser. Additional printer setup 71 Turning Daylight Saving Time on The printer can be set to automatically adjust for Daylight Saving Time (DST): 1 Type the printer IP address into the address field of the printer, then print a network setup page and locate the IP address in the TCP/IP section. 2 Click Links & Index. 3 Click Set Date and Time. 4 Select Automatically Observe DST. 5 Click Submit.

User Guide
Page 84
... that they must be properly processed if an inaccurate Paper Type is changed, the menus display the new name instead of the printer, then print a network setup page and locate the IP address in the TCP/IP section. 2 Click Settings. 3 Under Default Settings, click Paper Menu. 4 Click Custom Names. 5 Type a name for...
... that they must be properly processed if an inaccurate Paper Type is changed, the menus display the new name instead of the printer, then print a network setup page and locate the IP address in the TCP/IP section. 2 Click Settings. 3 Under Default Settings, click Paper Menu. 4 Click Custom Names. 5 Type a name for...
User Guide
Page 106
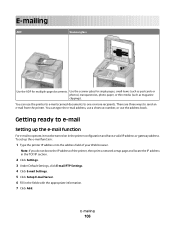
...e-mail scanned documents to e-mail Setting up the e-mail function: 1 Type the printer IP address into the address field of the printer, then print a network setup page and locate the IP address in the TCP/IP section. 2 Click Settings. 3 Under Default Settings, click E-mail/FTP Settings. 4 Click E-mail Settings.... 5 Click Setup E-mail Server. 6 Fill in the printer configuration and have a valid IP address or gateway address. There are three ways to operate, it must be...
...e-mail scanned documents to e-mail Setting up the e-mail function: 1 Type the printer IP address into the address field of the printer, then print a network setup page and locate the IP address in the TCP/IP section. 2 Click Settings. 3 Under Default Settings, click E-mail/FTP Settings. 4 Click E-mail Settings.... 5 Click Setup E-mail Server. 6 Fill in the printer configuration and have a valid IP address or gateway address. There are three ways to operate, it must be...
User Guide
Page 107
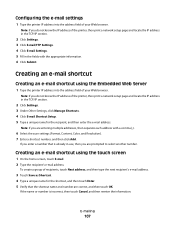
...If you are entering multiple addresses, then separate each address with the appropriate information. 6 Click Submit. To create a group of the printer, then print a network setup page and locate the IP address in the fields with a comma (,). 6 Select the scan settings (Format, Content, Color, and Resolution). 7 Enter a.... Note: If you are prompted to select another number. Note: If you do not know the IP address of the printer, then print a network setup page and locate the IP address in the TCP/IP section. 2 Click Settings. 3 Click E-mail/FTP Settings. 4 Click E-mail Settings. 5...
...If you are entering multiple addresses, then separate each address with the appropriate information. 6 Click Submit. To create a group of the printer, then print a network setup page and locate the IP address in the fields with a comma (,). 6 Select the scan settings (Format, Content, Color, and Resolution). 7 Enter a.... Note: If you are prompted to select another number. Note: If you do not know the IP address of the printer, then print a network setup page and locate the IP address in the TCP/IP section. 2 Click Settings. 3 Click E-mail/FTP Settings. 4 Click E-mail Settings. 5...

User Guide
Page 113
..., and then enter the fax number. If you are prompted to send a fax, you do not know the IP address of the printer, then print a network setup page and locate the IP address in use the PostScript printer driver for the group. Note: If you do not have an ID and password...
..., and then enter the fax number. If you are prompted to send a fax, you do not know the IP address of the printer, then print a network setup page and locate the IP address in use the PostScript printer driver for the group. Note: If you do not have an ID and password...
User Guide
Page 116
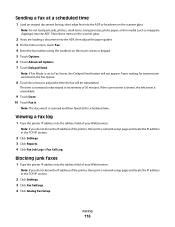
...the printer IP address into the address field of 30 minutes. Note: If you do not know the IP address of the printer, then print a network setup page and locate the IP address in increments of your Web browser. Note: The document is unavailable. 9 Touch Done. 10 Touch Fax it. ...Viewing a fax log 1 Type the printer IP address into the address field of the printer, then print a network setup page and locate the IP address in the Fax Queue. 8 Touch the arrows to Fax Server, the Delayed Send button will be transmitted. Note: Do...
...the printer IP address into the address field of 30 minutes. Note: If you do not know the IP address of the printer, then print a network setup page and locate the IP address in increments of your Web browser. Note: The document is unavailable. 9 Touch Done. 10 Touch Fax it. ...Viewing a fax log 1 Type the printer IP address into the address field of the printer, then print a network setup page and locate the IP address in the Fax Queue. 8 Touch the arrows to Fax Server, the Delayed Send button will be transmitted. Note: Do...
User Guide
Page 119
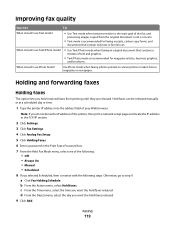
... printer IP address into the address field of your Web browser. Note: If you do not know the IP address of the printer, then print a network setup page and locate the IP address in the TCP/IP section. 2 Click Settings. 3 Click Fax Settings. 4 Click Analog Fax... Setup. 5 Click Holding Faxes. 6 Enter a password in the Print Faxes Password box. 7 From the Held Fax Mode menu, select one of the following: • Off • ...
... printer IP address into the address field of your Web browser. Note: If you do not know the IP address of the printer, then print a network setup page and locate the IP address in the TCP/IP section. 2 Click Settings. 3 Click Fax Settings. 4 Click Analog Fax... Setup. 5 Click Holding Faxes. 6 Enter a password in the Print Faxes Password box. 7 From the Held Fax Mode menu, select one of the following: • Off • ...
User Guide
Page 120
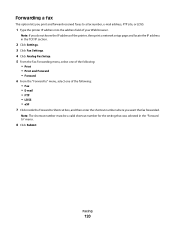
... inside the Forward to Shortcut box, and then enter the shortcut number where you do not know the IP address of the printer, then print a network setup page and locate the IP address in the "Forward to " menu, select one of your Web browser. Note: The shortcut number must be a valid... shortcut number for the setting that was selected in the TCP/IP section. 2 Click Settings. 3 Click Fax Settings. 4 Click Analog Fax Setup. 5 From the Fax Forwarding menu, select one of the following: • Print • Print and Forward • Forward 6 From the "Forward to " menu. 8 ...
... inside the Forward to Shortcut box, and then enter the shortcut number where you do not know the IP address of the printer, then print a network setup page and locate the IP address in the "Forward to " menu, select one of your Web browser. Note: The shortcut number must be a valid... shortcut number for the setting that was selected in the TCP/IP section. 2 Click Settings. 3 Click Fax Settings. 4 Click Analog Fax Setup. 5 From the Fax Forwarding menu, select one of the following: • Print • Print and Forward • Forward 6 From the "Forward to " menu. 8 ...
User Guide
Page 122
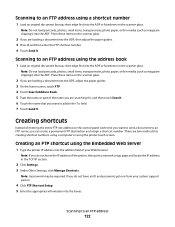
...guides. 3 On the home screen, touch FTP. 4 Touch Search Address Book. 5 Type the name or part of the printer, then print a network setup page and locate the IP address in the TCP/IP section. 2 Click Settings. 3 Under Other Settings, click Manage Shortcuts. Creating shortcuts Instead of ...your system support person. 4 Click FTP Shortcut Setup. 5 Enter the appropriate information into the ADF or facedown on the control panel each time you want to add to the To: field. 7...
...guides. 3 On the home screen, touch FTP. 4 Touch Search Address Book. 5 Type the name or part of the printer, then print a network setup page and locate the IP address in the TCP/IP section. 2 Click Settings. 3 Under Other Settings, click Manage Shortcuts. Creating shortcuts Instead of ...your system support person. 4 Click FTP Shortcut Setup. 5 Enter the appropriate information into the ADF or facedown on the control panel each time you want to add to the To: field. 7...
User Guide
Page 126
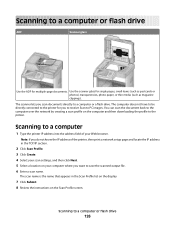
... 1 Type the printer IP address into the address field of your computer where you do not know the IP address of the printer, then print a network setup page and locate the IP address in the Scan Profile list on the display. 7 Click Submit. 8 Review the instructions on the Scan Profile screen. The... on the computer and then downloading the profile to a computer or flash drive 126 You can scan the document back to the computer over the network by creating a scan profile on your Web browser. Note: If you want to PC images. The scanner lets you to receive Scan to save the...
... 1 Type the printer IP address into the address field of your computer where you do not know the IP address of the printer, then print a network setup page and locate the IP address in the Scan Profile list on the display. 7 Click Submit. 8 Review the instructions on the Scan Profile screen. The... on the computer and then downloading the profile to a computer or flash drive 126 You can scan the document back to the computer over the network by creating a scan profile on your Web browser. Note: If you want to PC images. The scanner lets you to receive Scan to save the...
User Guide
Page 151
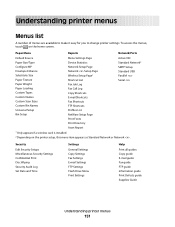
... Envelope Enhance Substitute Size Paper Texture Paper Weight Paper Loading Custom Types Custom Names Custom Scan Sizes Custom Bin Names Universal Setup Bin Setup Menu Settings Page Device Statistics Network Setup Page Network Setup Page Wireless Setup Page1 Shortcut List Fax Job Log Fax Call Log Copy Shortcuts E-mail Shortcuts Fax Shortcuts FTP Shortcuts Profiles List NetWare...
... Envelope Enhance Substitute Size Paper Texture Paper Weight Paper Loading Custom Types Custom Names Custom Scan Sizes Custom Bin Names Universal Setup Bin Setup Menu Settings Page Device Statistics Network Setup Page Network Setup Page Wireless Setup Page1 Shortcut List Fax Job Log Fax Call Log Copy Shortcuts E-mail Shortcuts Fax Shortcuts FTP Shortcuts Profiles List NetWare...

User Guide
Page 165
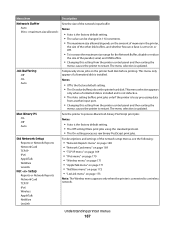
... Notes: • This menu item is available when a wireless card is installed and Lexmark Document Solutions Suite is installed. • This menu item appears only for network printers or printers connected to print servers. Understanding printer menus 165 Prints a report containing ... a report containing information about the network printer settings, such as the TCP/IP address information Note: This menu item appears only for network printers or printers connected to print servers. Menu item Network Setup Page Network Setup Page Wireless Setup Page Shortcut List Fax Job Log Fax...
... Notes: • This menu item is available when a wireless card is installed and Lexmark Document Solutions Suite is installed. • This menu item appears only for network printers or printers connected to print servers. Understanding printer menus 165 Prints a report containing ... a report containing information about the network printer settings, such as the TCP/IP address information Note: This menu item appears only for network printers or printers connected to print servers. Menu item Network Setup Page Network Setup Page Wireless Setup Page Shortcut List Fax Job Log Fax...
User Guide
Page 167
Std Network Setup Reports or Network Reports Network Card TCP/IP IPv6 AppleTalk NetWare LexLink Net Setup Reports or Network Reports Network Card TCP/IP IPv6 Wireless AppleTalk NetWare LexLink For descriptions and settings of the network setup menus, see the following: • "Network Reports menu" on page 168 • "Network Card ...Auto Temporarily stores jobs on page 173 Note: The Wireless menu appears only when the printer is connected to a wireless network. Understanding printer menus 167 Mac Binary PS On Off Auto Sets the printer to process Macintosh binary PostScript print jobs ...
Std Network Setup Reports or Network Reports Network Card TCP/IP IPv6 AppleTalk NetWare LexLink Net Setup Reports or Network Reports Network Card TCP/IP IPv6 Wireless AppleTalk NetWare LexLink For descriptions and settings of the network setup menus, see the following: • "Network Reports menu" on page 168 • "Network Card ...Auto Temporarily stores jobs on page 173 Note: The Wireless menu appears only when the printer is connected to a wireless network. Understanding printer menus 167 Mac Binary PS On Off Auto Sets the printer to process Macintosh binary PostScript print jobs ...


