Quick Reference
Page 2
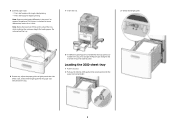
... side faceup for duplex printing Note: Paper must be loaded differently in the tray, then change the Paper Type setting for the tray from the printer control panel. For more information, see the User's Guide. Note: Notice the maximum fill line on the tray. 8 If a different type of the tray which...
... side faceup for duplex printing Note: Paper must be loaded differently in the tray, then change the Paper Type setting for the tray from the printer control panel. For more information, see the User's Guide. Note: Notice the maximum fill line on the tray. 8 If a different type of the tray which...

Quick Reference
Page 4
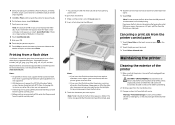
...the Next Page. 6 Touch Finish the Job to return to be set manually for all trays except the multipurpose feeder. Copying from " size, then the printer will scale the size automatically. 6 Touch Copy It. 4 Straighten the edges on the scanner glass in the upper left corner. 2 On the home screen,... height by the position of paper or specialty media back and forth to loosen them, and then fan them . These envelopes may severely damage the printer. 6 Adjust the width guide to the home screen. Note: Do not load postcards, photos, small items, transparencies, photo paper, or thin media (such ...
...the Next Page. 6 Touch Finish the Job to return to be set manually for all trays except the multipurpose feeder. Copying from " size, then the printer will scale the size automatically. 6 Touch Copy It. 4 Straighten the edges on the scanner glass in the upper left corner. 2 On the home screen,... height by the position of paper or specialty media back and forth to loosen them, and then fan them . These envelopes may severely damage the printer. 6 Adjust the width guide to the home screen. Note: Do not load postcards, photos, small items, transparencies, photo paper, or thin media (such ...
Quick Reference
Page 5
... contains mixed paper sizes Use the ADF to copy an original document that contains letter- and legal-size pages needs to a single paper size The printer has one tray loaded with letter-size paper and the other with letter-size paper. Example 2: Copying to be copied. 1 Load an original document ... looks the way you are loading a document into the ADF or facedown on the paper sizes loaded and the "Copy to mixed paper sizes The printer has two paper trays, one paper tray, loaded with legal-size paper. Example 1: Copying to " and "Copy from" settings, each page of the original ...
... contains mixed paper sizes Use the ADF to copy an original document that contains letter- and legal-size pages needs to a single paper size The printer has one tray loaded with letter-size paper and the other with letter-size paper. Example 2: Copying to be copied. 1 Load an original document ... looks the way you are loading a document into the ADF or facedown on the paper sizes loaded and the "Copy to mixed paper sizes The printer has two paper trays, one paper tray, loaded with legal-size paper. Example 1: Copying to " and "Copy from" settings, each page of the original ...
Quick Reference
Page 6
... • Bookmarks • Jobs not printed, which are automatically deleted from the Held Jobs menu. Repeat When you send a Repeat print job, the printer prints all copies are loading a document into the ADF, then adjust the paper guides. 3 On the home screen, touch Fax. 4 Enter the fax... number or a shortcut using the printer control panel 1 Load an original document faceup, short edge first into the ADF. Note: Do not load postcards, photos, small items, transparencies, photo paper...
... • Bookmarks • Jobs not printed, which are automatically deleted from the Held Jobs menu. Repeat When you send a Repeat print job, the printer prints all copies are loading a document into the ADF, then adjust the paper guides. 3 On the home screen, touch Fax. 4 Enter the fax... number or a shortcut using the printer control panel 1 Load an original document faceup, short edge first into the ADF. Note: Do not load postcards, photos, small items, transparencies, photo paper...
Quick Reference
Page 7
... Print. 4 Select your user name. For more information, visit the Lexmark Web site at www.lexmark.com. File names are not supported. • If selecting an encrypted .pdf file, then enter the file password from the printer control panel. • Before printing an encrypted .pdf file, enter ...as folders. CAUTION-SHOCK HAZARD: To avoid the risk of electric shock when cleaning the exterior of the printer. 7 Note: A maximum of the printer 1 Make sure that the printer is on the printer control panel. Notes: • Hi-Speed flash drives must support the FAT (File Allocation Tables) ...
... Print. 4 Select your user name. For more information, visit the Lexmark Web site at www.lexmark.com. File names are not supported. • If selecting an encrypted .pdf file, then enter the file password from the printer control panel. • Before printing an encrypted .pdf file, enter ...as folders. CAUTION-SHOCK HAZARD: To avoid the risk of electric shock when cleaning the exterior of the printer. 7 Note: A maximum of the printer 1 Make sure that the printer is on the printer control panel. Notes: • Hi-Speed flash drives must support the FAT (File Allocation Tables) ...
Quick Reference
Page 8
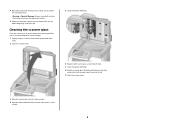
... side to side. 9 Close the scanner cover. 3 Wipe the scanner glass until it is clean and dry. 4 Wipe the white underside of the printer, making sure to your printer. 5 Make sure the paper support and standard exit bin are dry before beginning a new print job. 4 Wipe only the outside of the scanner...
... side to side. 9 Close the scanner cover. 3 Wipe the scanner glass until it is clean and dry. 4 Wipe the white underside of the printer, making sure to your printer. 5 Make sure the paper support and standard exit bin are dry before beginning a new print job. 4 Wipe only the outside of the scanner...
User Guide
Page 2
...29 Installing a flash memory or firmware card...30 Installing an Internal Solutions Port...33 Installing a printer hard disk ...39 Installing a fax card ...43 Attaching cables...45 Verifying printer setup...46 Printing a menu settings page...46 Printing a network setup page ...47 Setting up the...wireless printing...49 Information you will need to set up the printer on a wireless network 49 Installing the printer on a wireless network (Windows 50 Installing the printer on a wireless network (Macintosh 51 Installing the printer on a wired network...54 Changing port settings after installing a...
...29 Installing a flash memory or firmware card...30 Installing an Internal Solutions Port...33 Installing a printer hard disk ...39 Installing a fax card ...43 Attaching cables...45 Verifying printer setup...46 Printing a menu settings page...46 Printing a network setup page ...47 Setting up the...wireless printing...49 Information you will need to set up the printer on a wireless network 49 Installing the printer on a wireless network (Windows 50 Installing the printer on a wireless network (Macintosh 51 Installing the printer on a wired network...54 Changing port settings after installing a...

User Guide
Page 3
... paper and other office papers ...88 Storing paper...88 Supported paper sizes, types, and weights...89 Paper sizes supported by the printer ...89 Paper types and weights supported by the printer ...91 Paper types and weights supported by the finisher...91 Copying 93 Making copies...93 Making a quick copy...93 Copying using...
... paper and other office papers ...88 Storing paper...88 Supported paper sizes, types, and weights...89 Paper sizes supported by the printer ...89 Paper types and weights supported by the printer ...91 Paper types and weights supported by the finisher...91 Copying 93 Making copies...93 Making a quick copy...93 Copying using...
User Guide
Page 5
... File Name...110 E-mail Message ...111 Resolution...111 Send As ...111 Content...111 Advanced Options...111 Faxing 112 Sending a fax...112 Sending a fax using the printer control panel...112 Sending a fax using the computer ...113 Creating shortcuts...113 Creating a fax destination shortcut using the Embedded Web Server 113 Creating a fax destination...
... File Name...110 E-mail Message ...111 Resolution...111 Send As ...111 Content...111 Advanced Options...111 Faxing 112 Sending a fax...112 Sending a fax using the printer control panel...112 Sending a fax using the computer ...113 Creating shortcuts...113 Creating a fax destination shortcut using the Embedded Web Server 113 Creating a fax destination...
User Guide
Page 7
...131 Tips on using labels...132 Tips on using card stock...132 Printing confidential and other held jobs...133 Holding jobs in the printer ...133 Printing confidential and other held jobs from Windows 134 Printing confidential and other held jobs from a Macintosh computer 134 Printing from......136 Printing a directory list...136 Printing the print quality test pages ...136 Canceling a print job...136 Canceling a print job from the printer control panel ...136 Canceling a print job from the computer ...137 Clearing jams 139 Avoiding jams...139 Understanding jam numbers and locations...140 200...
...131 Tips on using labels...132 Tips on using card stock...132 Printing confidential and other held jobs...133 Holding jobs in the printer ...133 Printing confidential and other held jobs from Windows 134 Printing confidential and other held jobs from a Macintosh computer 134 Printing from......136 Printing a directory list...136 Printing the print quality test pages ...136 Canceling a print job...136 Canceling a print job from the printer control panel ...136 Canceling a print job from the computer ...137 Clearing jams 139 Avoiding jams...139 Understanding jam numbers and locations...140 200...
User Guide
Page 9
......250 Storing supplies...252 Conserving supplies...252 Checking the status of supplies...252 Checking the status of supplies from the printer control panel 252 Checking the status of supplies from a network computer 252 Ordering supplies...253 Ordering print cartridges ...253...parts...256 Ordering staple cartridges...256 Recycling Lexmark products...256 Moving the printer...256 Before moving the printer ...256 Moving the printer to another location...257 Setting the printer up in a new location ...257 Shipping the printer ...258 Administrative support 259 Finding advanced networking...
......250 Storing supplies...252 Conserving supplies...252 Checking the status of supplies...252 Checking the status of supplies from the printer control panel 252 Checking the status of supplies from a network computer 252 Ordering supplies...253 Ordering print cartridges ...253...parts...256 Ordering staple cartridges...256 Recycling Lexmark products...256 Moving the printer...256 Before moving the printer ...256 Moving the printer to another location...257 Setting the printer up in a new location ...257 Shipping the printer ...258 Administrative support 259 Finding advanced networking...

User Guide
Page 10
Troubleshooting 263 Solving basic printer problems...263 Printer control panel display is blank or displays only diamonds 263 Solving printing problems...263 Multiple-language PDFs do not print...263 Error message about reading ...
Troubleshooting 263 Solving basic printer problems...263 Printer control panel display is blank or displays only diamonds 263 Solving printing problems...263 Multiple-language PDFs do not print...263 Error message about reading ...

User Guide
Page 13
... the handholds located on the power cord. This product is incorrectly replaced. Use care when you have any cables going into the printer. Discard used batteries according to release emissions. CAUTION-POTENTIAL INJURY: Before moving it safely. CAUTION-SHOCK HAZARD: If you are properly...You must understand the section in hazardous radiation exposure. Replace it . Safety information 13 CAUTION-HOT SURFACE: The inside of the printer might be obvious. The safety features of some parts may result in your operating instructions that discusses the guidelines for signs of misuse...
... the handholds located on the power cord. This product is incorrectly replaced. Use care when you have any cables going into the printer. Discard used batteries according to release emissions. CAUTION-POTENTIAL INJURY: Before moving it safely. CAUTION-SHOCK HAZARD: If you are properly...You must understand the section in hazardous radiation exposure. Replace it . Safety information 13 CAUTION-HOT SURFACE: The inside of the printer might be obvious. The safety features of some parts may result in your operating instructions that discusses the guidelines for signs of misuse...
User Guide
Page 14
...additional furniture for stability. For more than those described in the user documentation, to a professional service person. If you purchased a multifunction printer (MFP) that scans, copies, and faxes, you are using a high-capacity input tray, a duplex unit and an input option, or more information, ...see www.lexmark.com/multifunctionprinters. Safety information 14 You must use the fax feature during a lightning storm. SAVE THESE INSTRUCTIONS. CAUTION-SHOCK HAZARD: To ...
...additional furniture for stability. For more than those described in the user documentation, to a professional service person. If you purchased a multifunction printer (MFP) that scans, copies, and faxes, you are using a high-capacity input tray, a duplex unit and an input option, or more information, ...see www.lexmark.com/multifunctionprinters. Safety information 14 You must use the fax feature during a lightning storm. SAVE THESE INSTRUCTIONS. CAUTION-SHOCK HAZARD: To ...
User Guide
Page 15
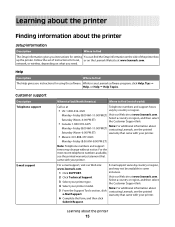
... about Monday-Friday (8:00 AM-11:00 PM ET) contacting Lexmark, see the printed warranty statement that came with your printer type. network, or wireless, depending on the Lexmark Web site at www.lexmark.com. 3 Select your printer. 6 Complete the form, and then click Submit Request. Monday... varies by country or region. Follow the set of the printer box up the printer. Visit our Web site at www.lexmark.com. Select a country or region, and then select the Customer Support link. 4 Select your printer. Help Description Where to find The Help gives you need....
... about Monday-Friday (8:00 AM-11:00 PM ET) contacting Lexmark, see the printed warranty statement that came with your printer type. network, or wireless, depending on the Lexmark Web site at www.lexmark.com. 3 Select your printer. 6 Complete the form, and then click Submit Request. Monday... varies by country or region. Follow the set of the printer box up the printer. Visit our Web site at www.lexmark.com. Select a country or region, and then select the Customer Support link. 4 Select your printer. Help Description Where to find The Help gives you need....

User Guide
Page 16
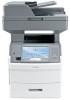
.... It is important to: • Make sure airflow in the room meets the latest revision of space around the printer for them also. Free from the direct airflow of air conditioners, heaters, or ventilators - Clean, dry, and free of dust • Allow... recommended amount of the ASHRAE 62 standard. • Provide a flat, sturdy, and stable surface. • Keep the printer: - If you plan to open trays, covers, and doors. Basic models 1 Automatic Document Feeder (ADF) 2 Printer control panel 3 Standard exit bin 4 Multipurpose feeder 5 550-sheet tray (Tray 1) 6 550-sheet tray (Tray 2) ...
.... It is important to: • Make sure airflow in the room meets the latest revision of space around the printer for them also. Free from the direct airflow of air conditioners, heaters, or ventilators - Clean, dry, and free of dust • Allow... recommended amount of the ASHRAE 62 standard. • Provide a flat, sturdy, and stable surface. • Keep the printer: - If you plan to open trays, covers, and doors. Basic models 1 Automatic Document Feeder (ADF) 2 Printer control panel 3 Standard exit bin 4 Multipurpose feeder 5 550-sheet tray (Tray 1) 6 550-sheet tray (Tray 2) ...
User Guide
Page 17
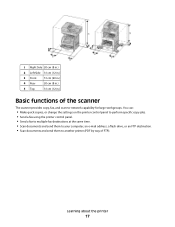
You can: • Make quick copies, or change the settings on the printer control panel to perform specific copy jobs. • Send a fax using the printer control panel. • Send a fax to multiple fax destinations at the same time. • Scan documents and send them to your computer, an e-mail address, a ... (20 in.) 4 Rear 20 cm (8 in.) 5 Top 31 cm (12 in.) Basic functions of the scanner The scanner provides copy, fax, and scan-to another printer (PDF by way of FTP). Learning about the...
You can: • Make quick copies, or change the settings on the printer control panel to perform specific copy jobs. • Send a fax using the printer control panel. • Send a fax to multiple fax destinations at the same time. • Scan documents and send them to your computer, an e-mail address, a ... (20 in.) 4 Rear 20 cm (8 in.) 5 Top 31 cm (12 in.) Basic functions of the scanner The scanner provides copy, fax, and scan-to another printer (PDF by way of FTP). Learning about the...

User Guide
Page 18
... page sizes (letter and legal). • Scan media weights from 52 to 120 g/m2 (14 to 215.9 x 355.6 mm (8.5 x 14 in .) thick. Learning about the printer 18 When using the scanner glass: • Place a document facedown on the scanner glass. Understanding the ADF and scanner glass Automatic Document Feeder (ADF) Scanner...
... page sizes (letter and legal). • Scan media weights from 52 to 120 g/m2 (14 to 215.9 x 355.6 mm (8.5 x 14 in .) thick. Learning about the printer 18 When using the scanner glass: • Place a document facedown on the scanner glass. Understanding the ADF and scanner glass Automatic Document Feeder (ADF) Scanner...
User Guide
Page 19
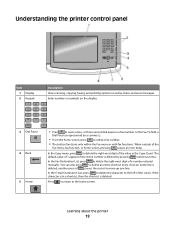
.... If the character is in a fax number. In the E-mail Destination List, press to delete the character to cause a two- Learning about the printer 19 Understanding the printer control panel Item 1 Display 2 Keypad Description View scanning, copying, faxing, and printing options as well as status and error messages. Enter numbers or symbols...
.... If the character is in a fax number. In the E-mail Destination List, press to delete the character to cause a two- Learning about the printer 19 Understanding the printer control panel Item 1 Display 2 Keypad Description View scanning, copying, faxing, and printing options as well as status and error messages. Enter numbers or symbols...
User Guide
Page 20
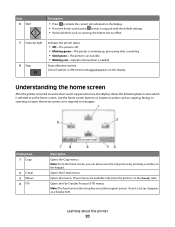
...also access the Copy menus by your system support person. These menus are available only when the printer is needed. Once it appears as the home screen. Understanding the home screen After the printer is turned on and a short warm-up period occurs, the display shows the following basic screen...is referred to messages. Use the home screen buttons to open the menu screen; Opens the E-mail menus Opens the menus. Learning about the printer 20 Opens the File Transfer Protocol (FTP) menus Note: This function must be set up by pressing a number on the display. Stops all...
...also access the Copy menus by your system support person. These menus are available only when the printer is needed. Once it appears as the home screen. Understanding the home screen After the printer is turned on and a short warm-up period occurs, the display shows the following basic screen...is referred to messages. Use the home screen buttons to open the menu screen; Opens the E-mail menus Opens the menus. Learning about the printer 20 Opens the File Transfer Protocol (FTP) menus Note: This function must be set up by pressing a number on the display. Stops all...


