Clearing Jams Guide
Page 1
... the jam. 202 Paper Jam Open the rear door on the underside of print media. Warning: Do not touch the photoconductor drum on the MFP, and Open Rear Door remove the jam. 23x Paper Jam Check Duplex Remove the duplex tray from the multipurpose feeder, flex and stack the...8226; Keep print media stored in an acceptable environment. • Do not remove trays during a print job. • Push all original documents from the ADF. Lexmark™ X642 Clearing Jams Guide Avoiding jams The following hints can help you Make sure the stack height does not exceed the maximum height indicated...
... the jam. 202 Paper Jam Open the rear door on the underside of print media. Warning: Do not touch the photoconductor drum on the MFP, and Open Rear Door remove the jam. 23x Paper Jam Check Duplex Remove the duplex tray from the multipurpose feeder, flex and stack the...8226; Keep print media stored in an acceptable environment. • Do not remove trays during a print job. • Push all original documents from the ADF. Lexmark™ X642 Clearing Jams Guide Avoiding jams The following hints can help you Make sure the stack height does not exceed the maximum height indicated...
Clearing Jams Guide
Page 2
Otherwise, continue with step 2. 4 Close the rear door. 5 Touch Continue. 23x Paper Jam Open Duplex Rear Door 1 Open the duplex rear door. 7 Close the top front cover. 2 Open the MFP rear door. pull, stop pulling. You need to access the print media from the MFP rear door. 8 Close the multipurpose feeder. 3 Remove the jammed media. 1 2 6 Align and reinstall the toner cartridge. 1 2 9 Touch Continue. 202 Paper Jam Open Rear Door 1 If the paper is exiting the MFP, pull the media straight out, and then touch Continue.
Otherwise, continue with step 2. 4 Close the rear door. 5 Touch Continue. 23x Paper Jam Open Duplex Rear Door 1 Open the duplex rear door. 7 Close the top front cover. 2 Open the MFP rear door. pull, stop pulling. You need to access the print media from the MFP rear door. 8 Close the multipurpose feeder. 3 Remove the jammed media. 1 2 6 Align and reinstall the toner cartridge. 1 2 9 Touch Continue. 202 Paper Jam Open Rear Door 1 If the paper is exiting the MFP, pull the media straight out, and then touch Continue.
Clearing Jams Guide
Page 3
... the media either up . If it snaps into place. 2 Open the duplex tray. 4 Touch Continue. 2 Remove the jammed media. 23x and 24x jams 1 Open the MFP paper tray, and remove any jammed media. 3 Open any optional trays beginning at the top, and remove any jammed media.
... the media either up . If it snaps into place. 2 Open the duplex tray. 4 Touch Continue. 2 Remove the jammed media. 23x and 24x jams 1 Open the MFP paper tray, and remove any jammed media. 3 Open any optional trays beginning at the top, and remove any jammed media.
Clearing Jams Guide
Page 4
... the ADF cover, and remove any jammed pages. 1 4 7 2 5 8 3 6 9 0 # 3 Open the document cover, and remove any jammed pages. 1 2 If the jammed envelope has entered the MFP and cannot be pulled out, remove the envelope feeder. 8 Touch Continue. 250 Paper Jam Check MP Feeder 1 Remove the paper from the...the bottom envelope will have to be the one that is jammed. 1 Lift the envelope weight. 2 Remove all original documents from the bottom of the MFP, and then set it snaps into the multipurpose feeder. 3 Load the print media. 4 Slide the side guide toward the inside of the tray until...
... the ADF cover, and remove any jammed pages. 1 4 7 2 5 8 3 6 9 0 # 3 Open the document cover, and remove any jammed pages. 1 2 If the jammed envelope has entered the MFP and cannot be pulled out, remove the envelope feeder. 8 Touch Continue. 250 Paper Jam Check MP Feeder 1 Remove the paper from the...the bottom envelope will have to be the one that is jammed. 1 Lift the envelope weight. 2 Remove all original documents from the bottom of the MFP, and then set it snaps into the multipurpose feeder. 3 Load the print media. 4 Slide the side guide toward the inside of the tray until...

Troubleshooting Guide
Page 2
...appears on . The job is in Hex Trace mode. Duplex unit • Make sure the connection between a drawer and a duplex unit or the MFP is secure. • Make sure the print media is loaded correctly. Envelope feeder • Make sure the connection between the option and printer. •...8226; Make sure the envelopes are using a parallel interface, make sure you are using the correct cable, that shipped with the MFP for more details. We recommend Lexmark part number 1329605 (10 ft) or 1427498 (20 ft) for both the size and type of pages in the software application you...
...appears on . The job is in Hex Trace mode. Duplex unit • Make sure the connection between a drawer and a duplex unit or the MFP is secure. • Make sure the print media is loaded correctly. Envelope feeder • Make sure the connection between the option and printer. •...8226; Make sure the envelopes are using a parallel interface, make sure you are using the correct cable, that shipped with the MFP for more details. We recommend Lexmark part number 1329605 (10 ft) or 1427498 (20 ft) for both the size and type of pages in the software application you...

Troubleshooting Guide
Page 4
... setting in the Quality Menu. • Verify the environment is on the transfer roll. See the User's Guide for about 10 seconds while the MFP is too light. • The toner may be low. Repeat this procedure multiple times until the print remains faded. Printing the print defects guide ... If you are printing on the page • Check the print cartridge to redistribute the toner. Printing the print quality test pages 3 Turn the MFP off the page Toner fog or background shading appears on an uneven print surface, change the Paper Weight and Paper Texture settings in the Paper...
... setting in the Quality Menu. • Verify the environment is on the transfer roll. See the User's Guide for about 10 seconds while the MFP is too light. • The toner may be low. Repeat this procedure multiple times until the print remains faded. Printing the print defects guide ... If you are printing on the page • Check the print cartridge to redistribute the toner. Printing the print quality test pages 3 Turn the MFP off the page Toner fog or background shading appears on an uneven print surface, change the Paper Weight and Paper Texture settings in the Paper...

User's Guide
Page 1
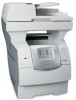
All rights reserved. 740 West New Circle Road Lexington, Kentucky 40550 May 2006 www.lexmark.com X642e Laser MFP User's Guide Lexmark and Lexmark with diamond design are trademarks of Lexmark International, Inc., registered in the United States and/or other countries. © 2006 Lexmark International, Inc.
All rights reserved. 740 West New Circle Road Lexington, Kentucky 40550 May 2006 www.lexmark.com X642e Laser MFP User's Guide Lexmark and Lexmark with diamond design are trademarks of Lexmark International, Inc., registered in the United States and/or other countries. © 2006 Lexmark International, Inc.
User's Guide
Page 2
.... Comments about this product or make these changes will be used in your operating instructions that the MFP emulates the functions corresponding to be obvious. Trademarks Lexmark, Lexmark with the PCL language. Operation ReSource and LEXFAX are commercial computer software and documentation developed exclusively at www....lexmark.com. This MFP is not responsible for selecting print media to avoid the possibility of printer commands (language) and ...
.... Comments about this product or make these changes will be used in your operating instructions that the MFP emulates the functions corresponding to be obvious. Trademarks Lexmark, Lexmark with the PCL language. Operation ReSource and LEXFAX are commercial computer software and documentation developed exclusively at www....lexmark.com. This MFP is not responsible for selecting print media to avoid the possibility of printer commands (language) and ...

User's Guide
Page 4
Contents Chapter 1: Learning about the MFP 9 Identifying the MFP 9 Using the scanner 11 Configured models 13 Understanding the MFP control panel 14 Using the LCD touch-screen buttons 21 Menus ...27 Chapter 2: Copying 28 Quick copy ...28 Multiple page copying 29 Using the scanner ...
Contents Chapter 1: Learning about the MFP 9 Identifying the MFP 9 Using the scanner 11 Configured models 13 Understanding the MFP control panel 14 Using the LCD touch-screen buttons 21 Menus ...27 Chapter 2: Copying 28 Quick copy ...28 Multiple page copying 29 Using the scanner ...

User's Guide
Page 7
...120 Installing an option card 122 Replacing the shield 123 Chapter 10: Understanding the MFP 124 Determining the status of supplies 125 Conserving supplies 126 Ordering supplies 126 Recycling Lexmark products 131 Cleaning the scanner glass (flatbed) and backing material 132 Scanner registration... 132 Moving the MFP 134 Chapter 11: Administrative support 135 Adjusting control panel brightness 135 ...
...120 Installing an option card 122 Replacing the shield 123 Chapter 10: Understanding the MFP 124 Determining the status of supplies 125 Conserving supplies 126 Ordering supplies 126 Recycling Lexmark products 131 Cleaning the scanner glass (flatbed) and backing material 132 Scanner registration... 132 Moving the MFP 134 Chapter 11: Administrative support 135 Adjusting control panel brightness 135 ...

User's Guide
Page 9
For more information about the MFP Identifying the MFP Use the following table to determine the features and options of your Lexmark™ X642e MFP (multifunction printer).Use the following table to lift it safely. 1 4 7 2 5 8 3 6 9 0 # 9 CAUTION: The MFP requires three people to determine the features and options of the MFP (multifunction printer). 1 Learning about installing input options, see Installing and removing options or the instructions that came with the option.
For more information about the MFP Identifying the MFP Use the following table to determine the features and options of your Lexmark™ X642e MFP (multifunction printer).Use the following table to lift it safely. 1 4 7 2 5 8 3 6 9 0 # 9 CAUTION: The MFP requires three people to determine the features and options of the MFP (multifunction printer). 1 Learning about installing input options, see Installing and removing options or the instructions that came with the option.

User's Guide
Page 11
... can: • Make quick copies, or change the settings on the control panel to perform specific copying jobs. • Send an outgoing fax using the MFP control panel. • Send an outgoing fax to multiple fax destinations at the label located under the top front cover. Machine type Model I 7002-001...-101, 4542-102, 4542-111, or 4542-112 Using the scanner Basic functions of the scanner The Lexmark X642e provides copy, fax, and scan-to another printer (PDF by way of FTP). 11 To identify the MFP machine type-model number, look at the same time. • Scan documents and send them to...
... can: • Make quick copies, or change the settings on the control panel to perform specific copying jobs. • Send an outgoing fax using the MFP control panel. • Send an outgoing fax to multiple fax destinations at the label located under the top front cover. Machine type Model I 7002-001...-101, 4542-102, 4542-111, or 4542-112 Using the scanner Basic functions of the scanner The Lexmark X642e provides copy, fax, and scan-to another printer (PDF by way of FTP). 11 To identify the MFP machine type-model number, look at the same time. • Scan documents and send them to...

User's Guide
Page 12
... corner. • Scan or copy media up to 215.9 x 355.6 mm (8.5 x 14 in.). • Copy books up to 50 sheets of plain paper on this MFP is black and grayscale only, not color. Automatic document feeder and scanner glass (flatbed) Note: Color documents can be used to scan or copy single...
... corner. • Scan or copy media up to 215.9 x 355.6 mm (8.5 x 14 in.). • Copy books up to 50 sheets of plain paper on this MFP is black and grayscale only, not color. Automatic document feeder and scanner glass (flatbed) Note: Color documents can be used to scan or copy single...

User's Guide
Page 13
Configured models The following illustrations show a standard MFP and an MFP with a duplex unit and a 500-sheet drawer. You must have a printer stand or printer base. Standard With duplex and drawer 1 2 3 5 6 7 4 5 CAUTION: ... a printer stand or printer base if using a 2000-sheet drawer. Other print media handling options are also available. More information is available on our Lexmark Web site at www.lexmark.com/ multifunctionprinters. 1 Scanner 2 Standard output bin 3 Control panel 4 Multipurpose feeder 5 Tray 1 (integrated tray or standard tray) 6 Duplex unit 7 Tray 2 ...
Configured models The following illustrations show a standard MFP and an MFP with a duplex unit and a 500-sheet drawer. You must have a printer stand or printer base. Standard With duplex and drawer 1 2 3 5 6 7 4 5 CAUTION: ... a printer stand or printer base if using a 2000-sheet drawer. Other print media handling options are also available. More information is available on our Lexmark Web site at www.lexmark.com/ multifunctionprinters. 1 Scanner 2 Standard output bin 3 Control panel 4 Multipurpose feeder 5 Tray 1 (integrated tray or standard tray) 6 Duplex unit 7 Tray 2 ...

User's Guide
Page 14
...e-mail settings from an application override changes made from the MFP control panel, MarkVision Professional, or the Web pages makes that setting the user default. The MFP control panel consists of: 14 Changes made to the MFP. Changing a setting from the control panel. Settings changed ...several ways: through the MFP control panel, the software application in use the MFP control panel, MarkVision Professional, or the...
...e-mail settings from an application override changes made from the MFP control panel, MarkVision Professional, or the Web pages makes that setting the user default. The MFP control panel consists of: 14 Changes made to the MFP. Changing a setting from the control panel. Settings changed ...several ways: through the MFP control panel, the software application in use the MFP control panel, MarkVision Professional, or the...

User's Guide
Page 15
... numbers for making selections within the Fax menu or with a #, enter it returns all settings to their default values, and then returns the MFP to access shortcuts. The button only functions within Copy, Fax, and so on the home screen without pressing the # button first, the Copy... number. Gives information about the status of the Fax menu, fax function, or home screen, pressing Dial Pause causes an error beep. Status Off Indicates MFP power is pressed while on . Press this button: • For a shortcut identifier. • Within phone numbers. Note: If a number is off. ...
... numbers for making selections within the Fax menu or with a #, enter it returns all settings to their default values, and then returns the MFP to access shortcuts. The button only functions within Copy, Fax, and so on the home screen without pressing the # button first, the Copy... number. Gives information about the status of the Fax menu, fax function, or home screen, pressing Dial Pause causes an error beep. Status Off Indicates MFP power is pressed while on . Press this button: • For a shortcut identifier. • Within phone numbers. Note: If a number is off. ...

User's Guide
Page 16
... or scanning to the Home screen. During a scan job, the scanner finishes scanning the current page and then stops, which are only available when the MFP is deleted by touching the Copy button, press Backspace to the left of the cursor. See the "Home screen and Home screen buttons" on the...
... or scanning to the Home screen. During a scan job, the scanner finishes scanning the current page and then stops, which are only available when the MFP is deleted by touching the Copy button, press Backspace to the left of the cursor. See the "Home screen and Home screen buttons" on the...
User's Guide
Page 17
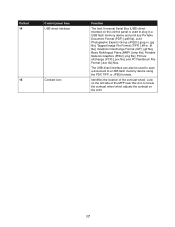
... to scan a document to a USB flash memory device using the PDF, TIFF, or JPEG formats. Look on the LCD. 17 Identifies the location of the MFP near this icon to plug in a USB flash memory device and print any Portable Document Format (PDF) [.pdf file], Joint Photographic Experts Group (JPEG) [.jpeg...
... to scan a document to a USB flash memory device using the PDF, TIFF, or JPEG formats. Look on the LCD. 17 Identifies the location of the MFP near this icon to plug in a USB flash memory device and print any Portable Document Format (PDF) [.pdf file], Joint Photographic Experts Group (JPEG) [.jpeg...
User's Guide
Page 18
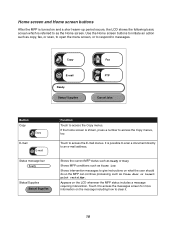
... initiate an action such as Close door or insert print cartridge. Shows intervention messages to give instructions on what the user should do so the MFP can continue processing, such as copy, fax, or scan, to open the menu screen, or to respond to messages. Touch it to access the messages... turned on and a short warm-up period occurs, the LCD shows the following basic screen which is referred to as Ready or Busy. Shows MFP conditions such as Toner Low. Touch to clear it. 18 Copy E-mail Ready. Status/ Supplies Fax FTP Cancel Jobs Button Copy Copy E-mail E-mail Status ...
... initiate an action such as Close door or insert print cartridge. Shows intervention messages to give instructions on what the user should do so the MFP can continue processing, such as copy, fax, or scan, to open the menu screen, or to respond to messages. Touch it to access the messages... turned on and a short warm-up period occurs, the LCD shows the following basic screen which is referred to as Ready or Busy. Shows MFP conditions such as Toner Low. Touch to clear it. 18 Copy E-mail Ready. Status/ Supplies Fax FTP Cancel Jobs Button Copy Copy E-mail E-mail Status ...
User's Guide
Page 27
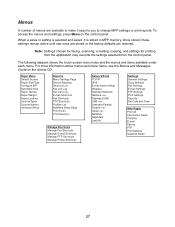
.... Menus A number of menus are restored. Note: Settings chosen for faxing, scanning, e-mailing, copying, and settings for you to change MFP settings or print reports. Paper Menu Default Source Paper Size/Type Configure MP Substitute Size Paper Texture Paper Weight Paper Loading Custom Types Custom Names ...
.... Menus A number of menus are restored. Note: Settings chosen for faxing, scanning, e-mailing, copying, and settings for you to change MFP settings or print reports. Paper Menu Default Source Paper Size/Type Configure MP Substitute Size Paper Texture Paper Weight Paper Loading Custom Types Custom Names ...


