User's Guide
Page 3
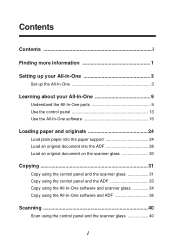
... 28 Load an original document on the scanner glass 30 Copying 31 Copy using the control panel and the scanner glass 31 Copy using the control panel and the ADF 33 Copy using the All-In-One software and scanner glass 34 Copy using the All-In-One software and ADF 36 Scanning 40 Scan... using the control panel and the scanner glass 40 i
... 28 Load an original document on the scanner glass 30 Copying 31 Copy using the control panel and the scanner glass 31 Copy using the control panel and the ADF 33 Copy using the All-In-One software and scanner glass 34 Copy using the All-In-One software and ADF 36 Scanning 40 Scan... using the control panel and the scanner glass 40 i
User's Guide
Page 4
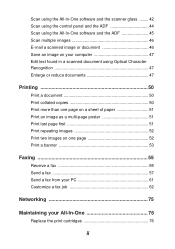
Scan using the All-In-One software and the scanner glass ........ 42 Scan using the control panel and the ADF 44 Scan using the All-In-One software and the ADF 45 Scan multiple images 46 E-mail ... 47 Enlarge or reduce documents 47 Printing 50 Print a document 50 Print collated copies 50 Print more than one page on a sheet of paper 51 Print an image as a multi-page poster 51 Print last page... first 51 Print repeating images 52 Print two images on one page 52 Print a banner 53 Faxing 55 Receive a fax 55 Send a fax 57 Send a fax from ...
Scan using the All-In-One software and the scanner glass ........ 42 Scan using the control panel and the ADF 44 Scan using the All-In-One software and the ADF 45 Scan multiple images 46 E-mail ... 47 Enlarge or reduce documents 47 Printing 50 Print a document 50 Print collated copies 50 Print more than one page on a sheet of paper 51 Print an image as a multi-page poster 51 Print last page... first 51 Print repeating images 52 Print two images on one page 52 Print a banner 53 Faxing 55 Receive a fax 55 Send a fax 57 Send a fax from ...

User's Guide
Page 5
Align the print cartridges 81 Improve print quality 82 Preserve the print cartridges 85 Clean the scanner glass 85 Order supplies 86 Troubleshooting 87 Setup troubleshooting 87 General troubleshooting 87 More troubleshooting options 103 Fax troubleshooting 104 iii
Align the print cartridges 81 Improve print quality 82 Preserve the print cartridges 85 Clean the scanner glass 85 Order supplies 86 Troubleshooting 87 Setup troubleshooting 87 General troubleshooting 87 More troubleshooting options 103 Fax troubleshooting 104 iii
User's Guide
Page 15
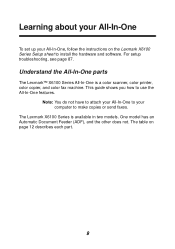
...have to attach your All-In-One to your All-In-One, follow the instructions on page 12 describes each part. 9 The table on the Lexmark X6100 Series Setup sheet to make copies or send faxes. The Lexmark X6100 Series is a color scanner, color printer, color copier, and color fax machine. Learning... about your All-In-One To set up your computer to install the hardware and ...
...have to attach your All-In-One to your All-In-One, follow the instructions on page 12 describes each part. 9 The table on the Lexmark X6100 Series Setup sheet to make copies or send faxes. The Lexmark X6100 Series is a color scanner, color printer, color copier, and color fax machine. Learning... about your All-In-One To set up your computer to install the hardware and ...

User's Guide
Page 17
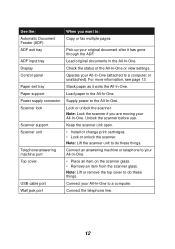
Scanner unit Scanner lock Scanner support USB cable port Telephone/answering machine port Power supply connector Wall jack port 11
Scanner unit Scanner lock Scanner support USB cable port Telephone/answering machine port Power supply connector Wall jack port 11
User's Guide
Page 18
..., see page 13. Connect the telephone line. 12 Load paper in the All-In-One. Unlock the scanner before use. Note: Lift or remove the top cover to the All-In-One. Lock or unlock the scanner. Note: Lock the scanner if you want to: Copy or fax multiple pages. Connect your All-In...-One. • Place an item on the scanner glass. • Remove an item from the scanner glass. Keep the scanner unit open. • Install or change...
..., see page 13. Connect the telephone line. 12 Load paper in the All-In-One. Unlock the scanner before use. Note: Lift or remove the top cover to the All-In-One. Lock or unlock the scanner. Note: Lock the scanner if you want to: Copy or fax multiple pages. Connect your All-In...-One. • Place an item on the scanner glass. • Remove an item from the scanner glass. Keep the scanner unit open. • Install or change...

User's Guide
Page 35
For help, see "Using Print Properties" on the scanner glass. Note: You cannot load small images in Print Properties. Note: You can load A4, Letter, or legal size paper into the ADF text side up. Place small images on page 19. 29 Note: Make sure you select paper type and paper size in the ADF.
For help, see "Using Print Properties" on the scanner glass. Note: You cannot load small images in Print Properties. Note: You can load A4, Letter, or legal size paper into the ADF text side up. Place small images on page 19. 29 Note: Make sure you select paper type and paper size in the ADF.
User's Guide
Page 36
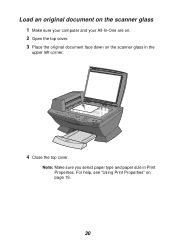
Load an original document on the scanner glass 1 Make sure your computer and your All-In-One are on. 2 Open the top cover. 3 Place the original document face down on page 19. 30 For help, see "Using Print Properties" on the scanner glass in Print Properties. Note: Make sure you select paper type and paper size in the upper left corner. 4 Close the top cover.
Load an original document on the scanner glass 1 Make sure your computer and your All-In-One are on. 2 Open the top cover. 3 Place the original document face down on page 19. 30 For help, see "Using Print Properties" on the scanner glass in Print Properties. Note: Make sure you select paper type and paper size in the upper left corner. 4 Close the top cover.

User's Guide
Page 37
Copy using the control panel and the scanner glass 1 Make sure your All-In-One to copy in several ways. Copying You can use your All-In-One is on. 2 Open the top cover. 31
Copy using the control panel and the scanner glass 1 Make sure your All-In-One to copy in several ways. Copying You can use your All-In-One is on. 2 Open the top cover. 31

User's Guide
Page 38
Make sure the top of the document faces left. 4 Close the top cover, and then load paper in the upper left corner. 3 Place the item you want to copy face down on the scanner glass in the paper support. 5 From the Mode area on the control panel, press Copy to enter copy mode. 32
Make sure the top of the document faces left. 4 Close the top cover, and then load paper in the upper left corner. 3 Place the item you want to copy face down on the scanner glass in the paper support. 5 From the Mode area on the control panel, press Copy to enter copy mode. 32
User's Guide
Page 40
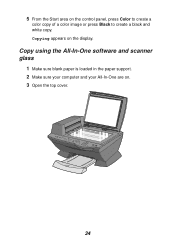
Copy using the All-In-One software and scanner glass 1 Make sure blank paper is loaded in the paper support. 2 Make sure your computer and your All-In-One are on the display. Copying appears on . 3 Open the top cover. 34 5 From the Start area on the control panel, press Color to create a color copy of a color image or press Black to create a black and white copy.
Copy using the All-In-One software and scanner glass 1 Make sure blank paper is loaded in the paper support. 2 Make sure your computer and your All-In-One are on the display. Copying appears on . 3 Open the top cover. 34 5 From the Start area on the control panel, press Color to create a color copy of a color image or press Black to create a black and white copy.
User's Guide
Page 41
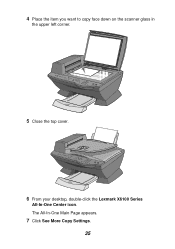
4 Place the item you want to copy face down on the scanner glass in the upper left corner. 5 Close the top cover. 6 From your desktop, double-click the Lexmark X6100 Series All-In-One Center icon. The All-In-One Main Page appears. 7 Click See More Copy Settings. 35
4 Place the item you want to copy face down on the scanner glass in the upper left corner. 5 Close the top cover. 6 From your desktop, double-click the Lexmark X6100 Series All-In-One Center icon. The All-In-One Main Page appears. 7 Click See More Copy Settings. 35
User's Guide
Page 44
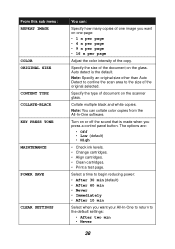
...: • After 30 min (default) • After 60 min • Never • Immediately • After 10 min Select when you want on the scanner glass. Note: Specify an original size other than Auto Detect to confine the scan area to the default settings: • After two min • Never... 38 Note: You can : Specify how many copies of one page: • 1 x per page • 4 x per page • 9 x per page • 16 x per page Adjust the color intensity of the original selected. From...
...: • After 30 min (default) • After 60 min • Never • Immediately • After 10 min Select when you want on the scanner glass. Note: Specify an original size other than Auto Detect to confine the scan area to the default settings: • After two min • Never... 38 Note: You can : Specify how many copies of one page: • 1 x per page • 4 x per page • 9 x per page • 16 x per page Adjust the color intensity of the original selected. From...
User's Guide
Page 46
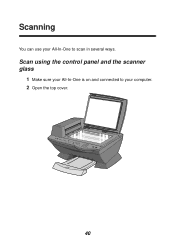
Scan using the control panel and the scanner glass 1 Make sure your computer. 2 Open the top cover. 40 Scanning You can use your All-In-One to your All-In-One is on and connected to scan in several ways.
Scan using the control panel and the scanner glass 1 Make sure your computer. 2 Open the top cover. 40 Scanning You can use your All-In-One to your All-In-One is on and connected to scan in several ways.

User's Guide
Page 47
3 Place the item you want to scan face down on the scanner glass in the upper left corner. 4 Close the top cover. 5 From the Mode area on the control panel, press Scan to put the All-In-One in scan mode. 6 Press the right arrow button to scroll through the list of possible programs to which you can scan. 41
3 Place the item you want to scan face down on the scanner glass in the upper left corner. 4 Close the top cover. 5 From the Mode area on the control panel, press Scan to put the All-In-One in scan mode. 6 Press the right arrow button to scroll through the list of possible programs to which you can scan. 41
User's Guide
Page 48
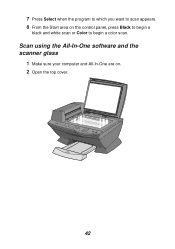
7 Press Select when the program to which you want to begin a color scan. Scan using the All-In-One software and the scanner glass 1 Make sure your computer and All-In-One are on the control panel, press Black to begin a black and white scan or Color to scan appears. 8 From the Start area on . 2 Open the top cover. 42
7 Press Select when the program to which you want to begin a color scan. Scan using the All-In-One software and the scanner glass 1 Make sure your computer and All-In-One are on the control panel, press Black to begin a black and white scan or Color to scan appears. 8 From the Start area on . 2 Open the top cover. 42
User's Guide
Page 49
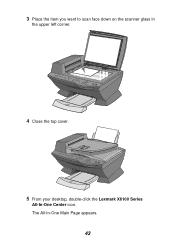
The All-In-One Main Page appears. 43 3 Place the item you want to scan face down on the scanner glass in the upper left corner. 4 Close the top cover. 5 From your desktop, double-click the Lexmark X6100 Series All-In-One Center icon.
The All-In-One Main Page appears. 43 3 Place the item you want to scan face down on the scanner glass in the upper left corner. 4 Close the top cover. 5 From your desktop, double-click the Lexmark X6100 Series All-In-One Center icon.
User's Guide
Page 52
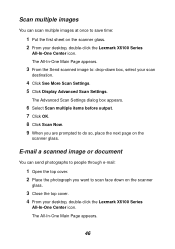
... e-mail: 1 Open the top cover. 2 Place the photograph you are prompted to save time: 1 Put the first sheet on the scanner glass. 2 From your desktop, double-click the Lexmark X6100 Series All-In-One Center icon. The Advanced Scan Settings dialog box appears. 6 Select Scan multiple items before output. 7 Click OK. 8 Click Scan...
... e-mail: 1 Open the top cover. 2 Place the photograph you are prompted to save time: 1 Put the first sheet on the scanner glass. 2 From your desktop, double-click the Lexmark X6100 Series All-In-One Center icon. The Advanced Scan Settings dialog box appears. 6 Select Scan multiple items before output. 7 Click OK. 8 Click Scan...
User's Guide
Page 54
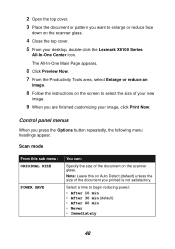
...Specify the size of your new image. 9 When you are finished customizing your desktop, double-click the Lexmark X6100 Series All-In-One Center icon. Select a time to begin reducing power: • After 10 min • After 30... min (default) • After 60 min • Never • Immediately 48 The All-In-One Main Page appears. 6 Click Preview Now. 7 From the Productivity Tools area, select Enlarge or reduce an image. ...on the screen to select the size of the document on the scanner glass. 2 Open the top cover. 3 Place the document or pattern you want to enlarge or reduce ...
...Specify the size of your new image. 9 When you are finished customizing your desktop, double-click the Lexmark X6100 Series All-In-One Center icon. Select a time to begin reducing power: • After 10 min • After 30... min (default) • After 60 min • Never • Immediately 48 The All-In-One Main Page appears. 6 Click Preview Now. 7 From the Productivity Tools area, select Enlarge or reduce an image. ...on the screen to select the size of the document on the scanner glass. 2 Open the top cover. 3 Place the document or pattern you want to enlarge or reduce ...
User's Guide
Page 61
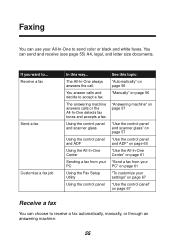
..." on page 57 Using the control panel and scanner glass "Use the control panel and scanner glass" on page 57 Using the control panel "Use the control panel and ADF and ADF" on page 60 Using the All-In-One Center "Use the All-In-One Center" on page 61 Sending a fax from your... "Send a fax from your PC PC" on page 61 Using the Fax Setup Utility "To customize your All-In-One to receive a fax automatically, manually, or through an answering machine. 55 "Automatically" on page 67 Receive a fax You can choose to send color or black...
..." on page 57 Using the control panel and scanner glass "Use the control panel and scanner glass" on page 57 Using the control panel "Use the control panel and ADF and ADF" on page 60 Using the All-In-One Center "Use the All-In-One Center" on page 61 Sending a fax from your... "Send a fax from your PC PC" on page 61 Using the Fax Setup Utility "To customize your All-In-One to receive a fax automatically, manually, or through an answering machine. 55 "Automatically" on page 67 Receive a fax You can choose to send color or black...


