User's Guide
Page 1
X6100 Series User's Guide for Windows • "Learning about your All-In-One" on page 9 Information about the printer parts and software. • "Networking" on page 75 How to use your All-In-One in a network environment. • "Maintaining your All-In-One" on page 76 Caring for your print cartridges and ordering supplies. • "Troubleshooting" on page 87 Information about setup problems, error messages, print quality problems, paper jams, and much more. www.lexmark.com
X6100 Series User's Guide for Windows • "Learning about your All-In-One" on page 9 Information about the printer parts and software. • "Networking" on page 75 How to use your All-In-One in a network environment. • "Maintaining your All-In-One" on page 76 Caring for your print cartridges and ordering supplies. • "Troubleshooting" on page 87 Information about setup problems, error messages, print quality problems, paper jams, and much more. www.lexmark.com
User's Guide
Page 4
... Optical Character Recognition 47 Enlarge or reduce documents 47 Printing 50 Print a document 50 Print collated copies 50 Print more than one page on a sheet of paper 51 Print an image as a multi-page poster 51 Print last page first 51 Print repeating images 52 Print two images on one page 52 Print a banner 53 Faxing 55 Receive a fax 55 Send...
... Optical Character Recognition 47 Enlarge or reduce documents 47 Printing 50 Print a document 50 Print collated copies 50 Print more than one page on a sheet of paper 51 Print an image as a multi-page poster 51 Print last page first 51 Print repeating images 52 Print two images on one page 52 Print a banner 53 Faxing 55 Receive a fax 55 Send...

User's Guide
Page 5
Align the print cartridges 81 Improve print quality 82 Preserve the print cartridges 85 Clean the scanner glass 85 Order supplies 86 Troubleshooting 87 Setup troubleshooting 87 General troubleshooting 87 More troubleshooting options 103 Fax troubleshooting 104 iii
Align the print cartridges 81 Improve print quality 82 Preserve the print cartridges 85 Clean the scanner glass 85 Order supplies 86 Troubleshooting 87 Setup troubleshooting 87 General troubleshooting 87 More troubleshooting options 103 Fax troubleshooting 104 iii
User's Guide
Page 7
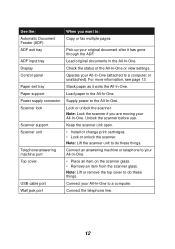
...troubleshooting The Help provides information on your All-In-One hardware and software and information on setup troubleshooting. To access the help: Click the Lexmark X6100 Series All-In-One Center icon on using the All-In-One software. Resource Box contents Setup sheet User's Guide ...helpful resources. Finding more information Your All-In-One comes with your All-In-One: • Power supply • Line cord • Setup sheet • Installation software CD • User's Guide • Black print cartridge • Color print cartridge The setup sheet provides instructions on how to...
...troubleshooting The Help provides information on your All-In-One hardware and software and information on setup troubleshooting. To access the help: Click the Lexmark X6100 Series All-In-One Center icon on using the All-In-One software. Resource Box contents Setup sheet User's Guide ...helpful resources. Finding more information Your All-In-One comes with your All-In-One: • Power supply • Line cord • Setup sheet • Installation software CD • User's Guide • Black print cartridge • Color print cartridge The setup sheet provides instructions on how to...
User's Guide
Page 18
... to a computer. For more information, see page 13. Load paper in the All-In-One. Connect the telephone line. 12 Lock or unlock the scanner. Keep the scanner unit open. • Install or change print cartridges. • Lock or unlock the scanner. Supply power to do these things. Operate... your All-In-One to a computer or unattached). Note: Lift or remove the top cover to the All-In...
... to a computer. For more information, see page 13. Load paper in the All-In-One. Connect the telephone line. 12 Lock or unlock the scanner. Keep the scanner unit open. • Install or change print cartridges. • Lock or unlock the scanner. Supply power to do these things. Operate... your All-In-One to a computer or unattached). Note: Lift or remove the top cover to the All-In...
User's Guide
Page 19
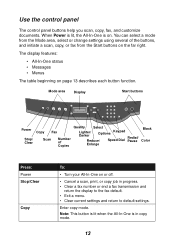
... and initiate a scan, copy, or fax from the Start buttons on . The display features: • All-In-One status • Messages • Menus The table beginning on or off. • Cancel a scan, print, or copy job in copy mode. 13 Note: This button is lit when the All-In...settings using several of Copies Quality Select Lighter/ Darker Options Keypad Reduce/ Speed Dial Redial/ Pause Enlarge Black Color Press: Power Stop/Clear Copy To: • Turn your All-In-One on page 13 describes each button function. Use the control panel The control panel buttons help you scan, ...
... and initiate a scan, copy, or fax from the Start buttons on . The display features: • All-In-One status • Messages • Menus The table beginning on or off. • Cancel a scan, print, or copy job in copy mode. 13 Note: This button is lit when the All-In...settings using several of Copies Quality Select Lighter/ Darker Options Keypad Reduce/ Speed Dial Redial/ Pause Enlarge Black Color Press: Power Stop/Clear Copy To: • Turn your All-In-One on page 13 describes each button function. Use the control panel The control panel buttons help you scan, ...
User's Guide
Page 22
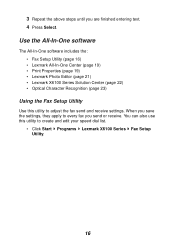
... Series Fax Setup Utility. 16 Use the All-In-One software The All-In-One software includes the: • Fax Setup Utility (page 16) • Lexmark All-In-One Center (page 19) • Print Properties (page 19) • Lexmark Photo Editor (page 21) • Lexmark X6100 Series Solution Center (page 22) • Optical Character Recognition (page 23...
... Series Fax Setup Utility. 16 Use the All-In-One software The All-In-One software includes the: • Fax Setup Utility (page 16) • Lexmark All-In-One Center (page 19) • Print Properties (page 19) • Lexmark Photo Editor (page 21) • Lexmark X6100 Series Solution Center (page 22) • Optical Character Recognition (page 23...
User's Guide
Page 24
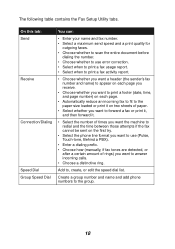
... Connection/Dialing Speed Dial Group Speed Dial You can: • Enter your name and fax number. • Select a maximum send speed and a print quality for outgoing faxes. • Choose whether to scan the entire document before dialing the number. • Choose whether to use error correction. &#...8226; Select when to print a fax usage report. • Select when to print a fax activity report. • Choose whether you want a header (the sender's fax number and name) to appear on ...
... Connection/Dialing Speed Dial Group Speed Dial You can: • Enter your name and fax number. • Select a maximum send speed and a print quality for outgoing faxes. • Choose whether to scan the entire document before dialing the number. • Choose whether to use error correction. &#...8226; Select when to print a fax usage report. • Select when to print a fax activity report. • Choose whether you want a header (the sender's fax number and name) to appear on ...
User's Guide
Page 25
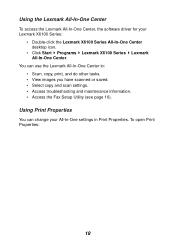
You can change your Lexmark X6100 Series: • Double-click the Lexmark X6100 Series All-In-One Center desktop icon. • Click Start Programs Lexmark X6100 Series Lexmark All-In-One Center. Using Print Properties You can use the Lexmark All-In-One Center to: • Scan, copy, print, and do other tasks. •...and scan settings. • Access troubleshooting and maintenance information. • Access the Fax Setup Utility (see page 16). To open Print Properties: 19 Using the Lexmark All-In-One Center To access the Lexmark All-In-One Center, the software driver for your All-In...
You can change your Lexmark X6100 Series: • Double-click the Lexmark X6100 Series All-In-One Center desktop icon. • Click Start Programs Lexmark X6100 Series Lexmark All-In-One Center. Using Print Properties You can use the Lexmark All-In-One Center to: • Scan, copy, print, and do other tasks. •...and scan settings. • Access troubleshooting and maintenance information. • Access the Fax Setup Utility (see page 16). To open Print Properties: 19 Using the Lexmark All-In-One Center To access the Lexmark All-In-One Center, the software driver for your All-In...

User's Guide
Page 26
1 With your document open, click File Print. 2 In the Print dialog box, click Properties, Preferences, Options, or Setup (depending on your program or operating system). The Print Properties screen appears. 20
1 With your document open, click File Print. 2 In the Print dialog box, click Properties, Preferences, Options, or Setup (depending on your program or operating system). The Print Properties screen appears. 20
User's Guide
Page 27
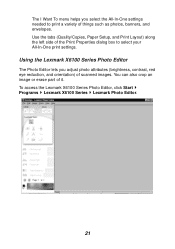
... Photo Editor lets you select the All-In-One settings needed to select your All-In-One print settings. You can also crop an image or erase part of it. To access the Lexmark X6100 Series Photo Editor, click Start Programs Lexmark X6100 Series Lexmark Photo Editor. 21 Use the tabs (Quality/...Copies, Paper Setup, and Print Layout) along the left side of the Print Properties dialog...
... Photo Editor lets you select the All-In-One settings needed to select your All-In-One print settings. You can also crop an image or erase part of it. To access the Lexmark X6100 Series Photo Editor, click Start Programs Lexmark X6100 Series Lexmark Photo Editor. 21 Use the tabs (Quality/...Copies, Paper Setup, and Print Layout) along the left side of the Print Properties dialog...
User's Guide
Page 28
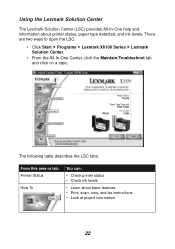
... • Check ink levels • Learn about printer status, paper type detected, and ink levels. Using the Lexmark Solution Center The Lexmark Solution Center (LSC) provides All-In-One help and information about basic features. • Print, scan, copy, and fax instructions. • Look at project information. 22 There are two ways to open...
... • Check ink levels • Learn about printer status, paper type detected, and ink levels. Using the Lexmark Solution Center The Lexmark Solution Center (LSC) provides All-In-One help and information about basic features. • Print, scan, copy, and fax instructions. • Look at project information. 22 There are two ways to open...
User's Guide
Page 29
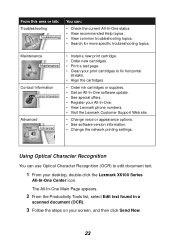
...Edit text found in a scanned document (OCR). 3 Follow the steps on your desktop, double-click the Lexmark X6100 Series All-In-One Center icon. From this area or tab: Troubleshooting You can use Optical Character Recognition (OCR) to fix ...One. • View Lexmark phone numbers. • Visit the Lexmark Customer Support Web site. • Change voice or appearance options. • See software version information. • Change the network printing settings. Maintenance Contact Information Advanced • Install a new print cartridge. • Order new cartridges. • Print...
...Edit text found in a scanned document (OCR). 3 Follow the steps on your desktop, double-click the Lexmark X6100 Series All-In-One Center icon. From this area or tab: Troubleshooting You can use Optical Character Recognition (OCR) to fix ...One. • View Lexmark phone numbers. • Visit the Lexmark Customer Support Web site. • Change voice or appearance options. • See software version information. • Change the network printing settings. Maintenance Contact Information Advanced • Install a new print cartridge. • Order new cartridges. • Print...

User's Guide
Page 30
First, learn how to copy, scan, print, and fax. Note: Do not force the paper into the paper support 1 Place the paper against the right side of the paper support. Load plain paper into the All-In-One. 2 Squeeze and slide the paper guide to load paper into your All-In-One are the copy, scan, print, and fax functions. Then, read on to learn how to the left edge of the paper. 24 Loading paper and originals The basic functions of your All-In-One with the following instructions.
First, learn how to copy, scan, print, and fax. Note: Do not force the paper into the paper support 1 Place the paper against the right side of the paper support. Load plain paper into the All-In-One. 2 Squeeze and slide the paper guide to load paper into your All-In-One are the copy, scan, print, and fax functions. Then, read on to learn how to the left edge of the paper. 24 Loading paper and originals The basic functions of your All-In-One with the following instructions.

User's Guide
Page 32
Note: Once the All-In-One begins printing, wait until you can see the leading edge of the banner exiting the All-In-One, and then carefully unfold the paper down to the floor in front of the All-In-One. 26
Note: Once the All-In-One begins printing, wait until you can see the leading edge of the banner exiting the All-In-One, and then carefully unfold the paper down to the floor in front of the All-In-One. 26

User's Guide
Page 33
Note: You can load a single transparency into the All-In-One first. 10 envelopes • The print side of the envelopes faces you. • The envelopes are loaded vertically against the right side of the paper support. • The paper guide rests ... feed the top of the letterhead into the paper support without removing plain paper. 10 greeting cards, index cards, postcards, or photo cards • The print side of the cards faces you . • The paper guide rests against the left edge of the photo paper. 10 transparencies • The rough side...
Note: You can load a single transparency into the All-In-One first. 10 envelopes • The print side of the envelopes faces you. • The envelopes are loaded vertically against the right side of the paper support. • The paper guide rests ... feed the top of the letterhead into the paper support without removing plain paper. 10 greeting cards, index cards, postcards, or photo cards • The print side of the cards faces you . • The paper guide rests against the left edge of the photo paper. 10 transparencies • The rough side...
User's Guide
Page 34
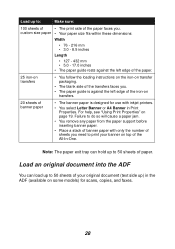
...paper from the paper support before inserting banner paper. • Place a stack of banner paper with inkjet printers. • You select Letter Banner or A4 Banner in the ADF (available on some models) .... 28 Note: The paper exit tray can load up to : Make sure: 100 sheets of • The print side of the paper faces you. custom size paper • Your paper size fits within these dimensions: Width •... document into the ADF You can hold up to print your original document (text side up) in Print Properties. For help, see "Using Print Properties" on page 19. Load up to 50 ...
...paper from the paper support before inserting banner paper. • Place a stack of banner paper with inkjet printers. • You select Letter Banner or A4 Banner in the ADF (available on some models) .... 28 Note: The paper exit tray can load up to : Make sure: 100 sheets of • The print side of the paper faces you. custom size paper • Your paper size fits within these dimensions: Width •... document into the ADF You can hold up to print your original document (text side up) in Print Properties. For help, see "Using Print Properties" on page 19. Load up to 50 ...

User's Guide
Page 35
Note: Make sure you select paper type and paper size in the ADF. For help, see "Using Print Properties" on the scanner glass. Place small images on page 19. 29 Note: You cannot load small images in Print Properties. Note: You can load A4, Letter, or legal size paper into the ADF text side up.
Note: Make sure you select paper type and paper size in the ADF. For help, see "Using Print Properties" on the scanner glass. Place small images on page 19. 29 Note: You cannot load small images in Print Properties. Note: You can load A4, Letter, or legal size paper into the ADF text side up.
User's Guide
Page 36
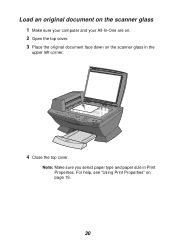
Note: Make sure you select paper type and paper size in the upper left corner. 4 Close the top cover. For help, see "Using Print Properties" on the scanner glass in Print Properties. Load an original document on the scanner glass 1 Make sure your computer and your All-In-One are on. 2 Open the top cover. 3 Place the original document face down on page 19. 30
Note: Make sure you select paper type and paper size in the upper left corner. 4 Close the top cover. For help, see "Using Print Properties" on the scanner glass in Print Properties. Load an original document on the scanner glass 1 Make sure your computer and your All-In-One are on. 2 Open the top cover. 3 Place the original document face down on page 19. 30
User's Guide
Page 44
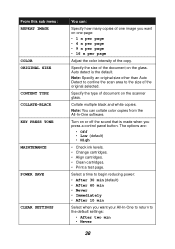
.... • Align cartridges. • Clean cartridges. • Print a test page. Note: You can : Specify how many copies of one page: • 1 x per page • 4 x per page • 9 x per page • 16 x per page Adjust the color intensity of document on the glass. Specify the size of the ... SIZE CONTENT TYPE COLLATE-BLACK KEY PRESS TONE MAINTENANCE POWER SAVE CLEAR SETTINGS You can collate color copies from the All-In-One software. Turn on one image you press a control panel button. Select a time to begin reducing power: • After 30 min (default) • After 60 ...
.... • Align cartridges. • Clean cartridges. • Print a test page. Note: You can : Specify how many copies of one page: • 1 x per page • 4 x per page • 9 x per page • 16 x per page Adjust the color intensity of document on the glass. Specify the size of the ... SIZE CONTENT TYPE COLLATE-BLACK KEY PRESS TONE MAINTENANCE POWER SAVE CLEAR SETTINGS You can collate color copies from the All-In-One software. Turn on one image you press a control panel button. Select a time to begin reducing power: • After 30 min (default) • After 60 ...


