
User's Guide
Page 12
Note: Special setup option shown on the All-In-One to the telephone wall jack. 3 Connect a phone cord from the wall jack port on page 56 for manual receive modes. 6
Note: Special setup option shown on the All-In-One to the telephone wall jack. 3 Connect a phone cord from the wall jack port on page 56 for manual receive modes. 6
User's Guide
Page 14
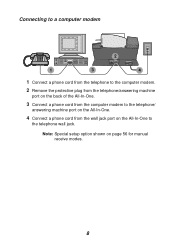
Note: Special setup option shown on the All-In-One to the telephone wall jack. Connecting to a computer modem 2 1 3 4 1 Connect a phone cord from the telephone to the computer modem. 2 Remove the protective plug from the telephone/answering machine port on the back of the All-In-One. 3 Connect a phone cord from the computer modem to the telephone/ answering machine port on the All-In-One. 4 Connect a phone cord from the wall jack port on page 56 for manual receive modes. 8
Note: Special setup option shown on the All-In-One to the telephone wall jack. Connecting to a computer modem 2 1 3 4 1 Connect a phone cord from the telephone to the computer modem. 2 Remove the protective plug from the telephone/answering machine port on the back of the All-In-One. 3 Connect a phone cord from the computer modem to the telephone/ answering machine port on the All-In-One. 4 Connect a phone cord from the wall jack port on page 56 for manual receive modes. 8
User's Guide
Page 24
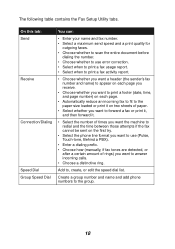
... the first try. • Select the phone line format you want to use (Pulse, Touch-tone, Behind a PBX). • Enter a dialing prefix. • Choose how (manually, if fax tones are detected, or after a certain amount of rings) you want to , create, or edit the speed dial list. The following table contains...
... the first try. • Select the phone line format you want to use (Pulse, Touch-tone, Behind a PBX). • Enter a dialing prefix. • Choose how (manually, if fax tones are detected, or after a certain amount of rings) you want to , create, or edit the speed dial list. The following table contains...
User's Guide
Page 61
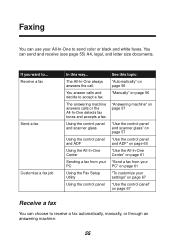
... answers the call. "Automatically" on page 56 The answering machine answers calls or the All-In-One detects fax tones and accepts a fax. "Manually" on page 56 You answer calls and decide to accept a fax. "Answering machine" on page 57 Using the control panel and scanner glass "Use ...a fax from your PC PC" on page 61 Using the Fax Setup Utility "To customize your All-In-One to send color or black and white faxes. You can choose to receive a fax automatically, manually, or through an answering machine. 55 Faxing You can use your settings" on page 67 Using the control...
... answers the call. "Automatically" on page 56 The answering machine answers calls or the All-In-One detects fax tones and accepts a fax. "Manually" on page 56 You answer calls and decide to accept a fax. "Answering machine" on page 57 Using the control panel and scanner glass "Use ...a fax from your PC PC" on page 61 Using the Fax Setup Utility "To customize your All-In-One to send color or black and white faxes. You can choose to receive a fax automatically, manually, or through an answering machine. 55 Faxing You can use your settings" on page 67 Using the control...
User's Guide
Page 62
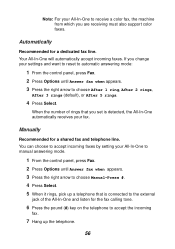
...accept the incoming fax. 7 Hang up a telephone that is detected, the All-In-One automatically receives your fax. Manually Recommended for a dedicated fax line. Note: For your All-In-One to receive a color fax, the machine from which you change your settings and want to reset to automatic answering... a shared fax and telephone line. If you are receiving must also support color faxes. Your All-In-One will automatically accept incoming faxes. You can choose to accept incoming faxes by setting your All-In-One to manual answering mode. 1 From the control panel, press Fax. 2 Press Options ...
...accept the incoming fax. 7 Hang up a telephone that is detected, the All-In-One automatically receives your fax. Manually Recommended for a dedicated fax line. Note: For your All-In-One to receive a color fax, the machine from which you change your settings and want to reset to automatic answering... a shared fax and telephone line. If you are receiving must also support color faxes. Your All-In-One will automatically accept incoming faxes. You can choose to accept incoming faxes by setting your All-In-One to manual answering mode. 1 From the control panel, press Fax. 2 Press Options ...
User's Guide
Page 71
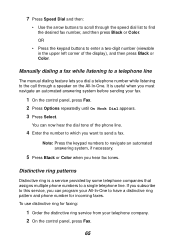
...two-digit number (viewable in the upper left corner of the phone line. 4 Enter the number to which you can program your All-In-One to send a fax. It is a service provided by some telephone companies that assigns multiple phone numbers to the call through the speed dial ... the control panel, press Fax. 65 Note: Press the keypad numbers to navigate an automated answering system, if necessary. 5 Press Black or Color when you dial a telephone number while listening to a single telephone line. Manually dialing a fax while listening to find the desired fax number, and then press Black or...
...two-digit number (viewable in the upper left corner of the phone line. 4 Enter the number to which you can program your All-In-One to send a fax. It is a service provided by some telephone companies that assigns multiple phone numbers to the call through the speed dial ... the control panel, press Fax. 65 Note: Press the keypad numbers to navigate an automated answering system, if necessary. 5 Press Black or Color when you dial a telephone number while listening to a single telephone line. Manually dialing a fax while listening to find the desired fax number, and then press Black or...
User's Guide
Page 74
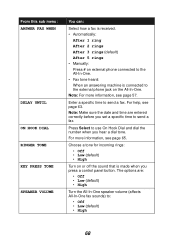
... to send a fax. Note: Make sure the date and time are : • Off • Low (default) • High Turn the All-In-One speaker volume (affects All-In-One fax sounds) to send a fax. Enter a specific time to : • Off • Low (default) • High 68 Note: For more information... PRESS TONE SPEAKER VOLUME You can: Select how a fax is received. • Automatically: After 1 ring After 2 rings After 3 rings (default) After 5 rings • Manually: Press # on the All-In-One. Press Select to use On Hook Dial and dial the number when you set a specific time to the All-In...
... to send a fax. Note: Make sure the date and time are : • Off • Low (default) • High Turn the All-In-One speaker volume (affects All-In-One fax sounds) to send a fax. Enter a specific time to : • Off • Low (default) • High 68 Note: For more information... PRESS TONE SPEAKER VOLUME You can: Select how a fax is received. • Automatically: After 1 ring After 2 rings After 3 rings (default) After 5 rings • Manually: Press # on the All-In-One. Press Select to use On Hook Dial and dial the number when you set a specific time to the All-In...
User's Guide
Page 110
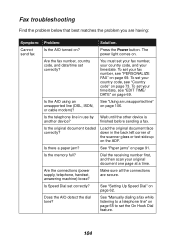
Press the Power button. You must set the On Hook Dial feature. 104 finished before sending a fax. See "Paper jams" on page 106. See "Manually dialing a fax while listening to set your fax number, your country code, and your time/date. To set your fax number, see "PERSONALIZE FAX" on ... AIO turned on page 69. The power light comes on page 62. Are the fax number, country code, and date/time set your original document one page at a time. To set correctly? Is the AIO using an unsupported line (DSL, ISDN, or cable modem)? Is the telephone line in the back...
Press the Power button. You must set the On Hook Dial feature. 104 finished before sending a fax. See "Paper jams" on page 106. See "Manually dialing a fax while listening to set your fax number, your country code, and your time/date. To set your fax number, see "PERSONALIZE FAX" on ... AIO turned on page 69. The power light comes on page 62. Are the fax number, country code, and date/time set your original document one page at a time. To set correctly? Is the AIO using an unsupported line (DSL, ISDN, or cable modem)? Is the telephone line in the back...


