Troubleshooting Guide
Page 4
... been programmed for the fax machine. Cannot scan from a computer These are using DSL, connect to dial. • As an alternative, dial the telephone number manually.
... been programmed for the fax machine. Cannot scan from a computer These are using DSL, connect to dial. • As an alternative, dial the telephone number manually.
User's Guide
Page 8
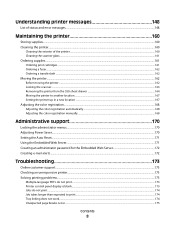
... location...167 Setting the printer up in a new location ...167 Adjusting the color registration...168 Adjusting the color registration automatically...168 Adjusting the color registration manually...168 Administrative support 170 Locking the administrator menus...170 Adjusting Power Saver...170 Setting the Auto Reset...171 Using the Embedded Web Server...171 Creating...
... location...167 Setting the printer up in a new location ...167 Adjusting the color registration...168 Adjusting the color registration automatically...168 Adjusting the color registration manually...168 Administrative support 170 Locking the administrator menus...170 Adjusting Power Saver...170 Setting the Auto Reset...171 Using the Embedded Web Server...171 Creating...
User's Guide
Page 18
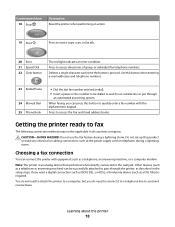
... (such as the power supply cord or telephone, during a lightning storm. Use this button when entering e-mail addresses and telephone numbers. 23 Redial/Pause 24 Manual Dial 25 Phone Book • Dial the last fax number entered (redial). • Insert a pause in the setup steps. Other devices (such as a telephone or...
... (such as the power supply cord or telephone, during a lightning storm. Use this button when entering e-mail addresses and telephone numbers. 23 Redial/Pause 24 Manual Dial 25 Phone Book • Dial the last fax number entered (redial). • Insert a pause in the setup steps. Other devices (such as a telephone or...

User's Guide
Page 64
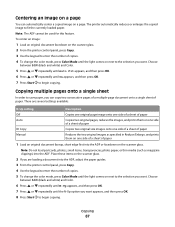
... or repeatedly until Document Type appears, and then press OK. 7 Press or repeatedly until the size ratio you want appears, or press or repeatedly to manually select the size you want. You can reduce the image to 25% of its original size. 8 Press Start to the selection you want. Place these...
... or repeatedly until Document Type appears, and then press OK. 7 Press or repeatedly until the size ratio you want appears, or press or repeatedly to manually select the size you want. You can reduce the image to 25% of its original size. 8 Press Start to the selection you want. Place these...
User's Guide
Page 67
... until the light comes on the scanner glass. There are loading a document into the ADF or facedown on next to enter the number of paper Manual Reduces the two original images as magazine clippings) into the ADF. Place these items on the scanner glass. 2 If you are several settings available: N-Up...
... until the light comes on the scanner glass. There are loading a document into the ADF or facedown on next to enter the number of paper Manual Reduces the two original images as magazine clippings) into the ADF. Place these items on the scanner glass. 2 If you are several settings available: N-Up...
User's Guide
Page 80
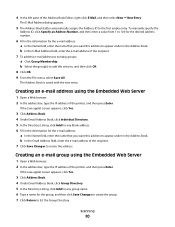
... create the group. 7 Click Return to list the Group Directory. 4 In the left pane of the recipient. 7 Click Save Changes to create the address. To manually specify the Address ID, click Specify an Address Number, and then enter a value from 1 to 100 for the desired address number. 6 Fill in the Address...
... create the group. 7 Click Return to list the Group Directory. 4 In the left pane of the recipient. 7 Click Save Changes to create the address. To manually specify the Address ID, click Specify an Address Number, and then enter a value from 1 to 100 for the desired address number. 6 Fill in the Address...

User's Guide
Page 87
When finished, choose No, and then press Function appears. Faxing 87 Inserting a pause in a fax number Some fax numbers require one manually dialed number in the same broadcast. 1 Make sure the printer is on and is connected to a working phone line. 2 Load an original document faceup, short ...
When finished, choose No, and then press Function appears. Faxing 87 Inserting a pause in a fax number Some fax numbers require one manually dialed number in the same broadcast. 1 Make sure the printer is on and is connected to a working phone line. 2 Load an original document faceup, short ...
User's Guide
Page 88
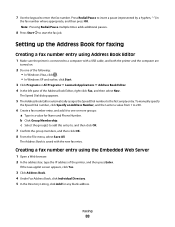
.... To manually specify the Speed Dial number, click Specify an Address Number, and then enter a value from 1 to 200. 6 Create a fax number entry, and add it to one of the following: • In Windows Vista, click . • In Windows XP and earlier, click Start. 3 Click Programs or All Programs Œ Lexmark Applications...
.... To manually specify the Speed Dial number, click Specify an Address Number, and then enter a value from 1 to 200. 6 Create a fax number entry, and add it to one of the following: • In Windows Vista, click . • In Windows XP and earlier, click Start. 3 Click Programs or All Programs Œ Lexmark Applications...

User's Guide
Page 89
... Do one of the following: • In Windows Vista, click . • In Windows XP and earlier, click Start. 3 Click Programs or All Programs Œ Lexmark Applications Œ Address Book Editor. 4 In the left side of the screen, click Add to add them to a computer with a USB cable, and both the... Name appears, and then press OK. 8 Use the keypad to type the name, and then press OK. 9 Press or repeatedly until Select Function appears. To manually specify the Group ID, click Specify an Address Number, and then enter a value from 1 to 6. 6 Type a group name. 7 Click Group Membership. 8 ...
... Do one of the following: • In Windows Vista, click . • In Windows XP and earlier, click Start. 3 Click Programs or All Programs Œ Lexmark Applications Œ Address Book Editor. 4 In the left side of the screen, click Add to add them to a computer with a USB cable, and both the... Name appears, and then press OK. 8 Use the keypad to type the name, and then press OK. 9 Press or repeatedly until Select Function appears. To manually specify the Group ID, click Specify an Address Number, and then enter a value from 1 to 6. 6 Type a group name. 7 Click Group Membership. 8 ...
User's Guide
Page 124
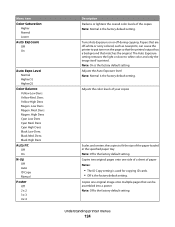
... specified paper tray Note: Off is the factory default setting. Dens Magen. Dens Black High Dens Auto Fit Off On N-Up Off Auto ID Copy Manual Poster Off 2 x 2 3 x 3 4 x 4 Description Darkens or lightens the overall color levels of the copies Note: Normal is the factory default setting. Dens Yellow High Dens Magen...
... specified paper tray Note: Off is the factory default setting. Dens Magen. Dens Black High Dens Auto Fit Off On N-Up Off Auto ID Copy Manual Poster Off 2 x 2 3 x 3 4 x 4 Description Darkens or lightens the overall color levels of the copies Note: Normal is the factory default setting. Dens Yellow High Dens Magen...
User's Guide
Page 145
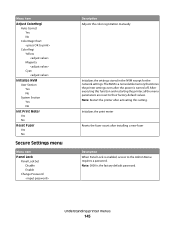
... Yes No Reset Fuser Yes No Secure Settings menu Menu item Panel Lock Panel Lock Set Disable Enable Change Password Description Adjusts the color registration manually Initializes the settings stored in the NVM except for the network settings.
... Yes No Reset Fuser Yes No Secure Settings menu Menu item Panel Lock Panel Lock Set Disable Enable Change Password Description Adjusts the color registration manually Initializes the settings stored in the NVM except for the network settings.

User's Guide
Page 168
On the Color Registration Chart, locate the lines to Select Function. Maintaining the printer 168 Adjusting the color registration manually You can fine-tune color registration by performing a manual adjustment: 1 From the printer control panel, press System. 2 Press or repeatedly until Admin appears, and then press OK. 3 Press or repeatedly until Maintenance appears...
On the Color Registration Chart, locate the lines to Select Function. Maintaining the printer 168 Adjusting the color registration manually You can fine-tune color registration by performing a manual adjustment: 1 From the printer control panel, press System. 2 Press or repeatedly until Admin appears, and then press OK. 3 Press or repeatedly until Maintenance appears...
User's Guide
Page 182
... installed correctly. MAKE SURE THE OPTION IS INSTALLED In Print Properties, verify that you want to dial. • As an alternative, dial the telephone number manually. When Replace Print Cartridge Soon appears or when the print becomes faded, you the fax to: • Check that the quality of the following : CAN...
... installed correctly. MAKE SURE THE OPTION IS INSTALLED In Print Properties, verify that you want to dial. • As an alternative, dial the telephone number manually. When Replace Print Cartridge Soon appears or when the print becomes faded, you the fax to: • Check that the quality of the following : CAN...

User's Guide
Page 199
...;s connectés à des sources d'alimentation CA. This equipment may constitute a nuisance to the same number within the following are spaced such that any single manual call initiation, and • The equipment shall go on the equipment associated with all operating conditions, of warranty. Le numéro REN (ringer equivalence...
...;s connectés à des sources d'alimentation CA. This equipment may constitute a nuisance to the same number within the following are spaced such that any single manual call initiation, and • The equipment shall go on the equipment associated with all operating conditions, of warranty. Le numéro REN (ringer equivalence...
User's Guide
Page 203
... months later provided that the warranty period for any supplies and for any maintenance items included with Lexmark user's guides, manuals, instructions or guidance -Unsuitable physical or operating environment -Maintenance by anyone other than Lexmark or a Lexmark authorized servicer -Operation of a product beyond repair, or if the product is defaced, altered, in need of...
... months later provided that the warranty period for any supplies and for any maintenance items included with Lexmark user's guides, manuals, instructions or guidance -Unsuitable physical or operating environment -Maintenance by anyone other than Lexmark or a Lexmark authorized servicer -Operation of a product beyond repair, or if the product is defaced, altered, in need of...
User's Guide
Page 209
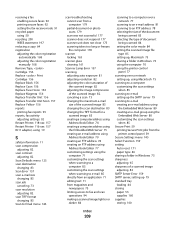
... mode 91 recycled paper using 50 recycling 200 WEEE statement 197 reducing a copy 64 registration adjusting the color registration automatically 168 adjusting the color registration manually 168 Remove Tape, Cartridge 156 Replace Print Cartridge 156 Replace Black 156 Replace Cyan 156 Replace Fuser Soon 156 Replace Magenta 156 Replace Transfer Unit...
... mode 91 recycled paper using 50 recycling 200 WEEE statement 197 reducing a copy 64 registration adjusting the color registration automatically 168 adjusting the color registration manually 168 Remove Tape, Cartridge 156 Replace Print Cartridge 156 Replace Black 156 Replace Cyan 156 Replace Fuser Soon 156 Replace Magenta 156 Replace Transfer Unit...
Quick Reference
Page 4
.... 2 Click Properties, Preferences, Options, or Setup. 3 Adjust the settings. 4 Click OK. 5 Click OK or Print. Place these items on one side of a sheet of paper Manual Reduces the two original images as magazine clippings) into the ADF. There are loading a document into the ADF. Faxing Sending a fax using the scanner glass...
.... 2 Click Properties, Preferences, Options, or Setup. 3 Adjust the settings. 4 Click OK. 5 Click OK or Print. Place these items on one side of a sheet of paper Manual Reduces the two original images as magazine clippings) into the ADF. There are loading a document into the ADF. Faxing Sending a fax using the scanner glass...


