User's Guide
Page 3
Contents Introduction 13 Finding information about the printer...13 Operating system notice...16 Safety information 17 Setting up the printer 18 Checking the box contents...18 Setting up the printer for standalone use...19 Understanding the parts of the printer...25 Getting the printer ready to fax...27 Using an RJ11 adapter ...27 Choosing a fax connection...30 Connecting to an answering machine...31 Connecting directly to a telephone wall jack ...32 Connecting directly to a telephone wall jack in Germany 33 Connecting to a computer with a modem...34 Connecting to a telephone ...35 Setting...
Contents Introduction 13 Finding information about the printer...13 Operating system notice...16 Safety information 17 Setting up the printer 18 Checking the box contents...18 Setting up the printer for standalone use...19 Understanding the parts of the printer...25 Getting the printer ready to fax...27 Using an RJ11 adapter ...27 Choosing a fax connection...30 Connecting to an answering machine...31 Connecting directly to a telephone wall jack ...32 Connecting directly to a telephone wall jack in Germany 33 Connecting to a computer with a modem...34 Connecting to a telephone ...35 Setting...

User's Guide
Page 4
Checking the port setting...48 Configure network printers...49 Connect to network printer...49 Loading paper and original documents 50 Loading paper...50 Using the automatic paper type sensor...50 Loading envelopes...51 Loading labels...51 Loading greeting cards, index cards, photo cards, and postcards 52 Loading transparencies...52 Loading iron-on transfers...52 Loading custom-size paper...53 Loading banner paper...53 Loading original documents into the Automatic Document Feeder 53 Loading original documents on the scanner glass 55 Printing 57 Printing basic documents...57 Printing a ...
Checking the port setting...48 Configure network printers...49 Connect to network printer...49 Loading paper and original documents 50 Loading paper...50 Using the automatic paper type sensor...50 Loading envelopes...51 Loading labels...51 Loading greeting cards, index cards, photo cards, and postcards 52 Loading transparencies...52 Loading iron-on transfers...52 Loading custom-size paper...53 Loading banner paper...53 Loading original documents into the Automatic Document Feeder 53 Loading original documents on the scanner glass 55 Printing 57 Printing basic documents...57 Printing a ...
User's Guide
Page 5
......67 Inserting a memory card ...67 Inserting a flash drive ...68 Understanding the Photo Card menu...69 Understanding the PictBridge menu...71 Transferring photos ...72 Changing the Lexmark Productivity Studio preferences 74 Editing photos...75 Cropping a photo ...75 Rotating a photo ...75 Changing the Resolution / Size of a photo...76 Applying One-Click Auto Fixes...
......67 Inserting a memory card ...67 Inserting a flash drive ...68 Understanding the Photo Card menu...69 Understanding the PictBridge menu...71 Transferring photos ...72 Changing the Lexmark Productivity Studio preferences 74 Editing photos...75 Cropping a photo ...75 Rotating a photo ...75 Changing the Resolution / Size of a photo...76 Applying One-Click Auto Fixes...
User's Guide
Page 6
Copying 87 Making a copy...87 Copying photos...87 Copying a photo using the computer...88 Adjusting copy quality...89 Making a copy lighter or darker...89 Collating copies using the control panel...89 Repeating an image on one page...90 Enlarging or reducing an image...90 Understanding the Copy menu...91 Modifying the Copy settings...91 Scanning 93 Scanning a document...93 Scanning a document using the computer...93 Scanning text for editing...94 Scanning images for editing...94 Scanning a photo to the Library...95 Scanning multiple photos at one time using the computer 95 Creating a PDF ...
Copying 87 Making a copy...87 Copying photos...87 Copying a photo using the computer...88 Adjusting copy quality...89 Making a copy lighter or darker...89 Collating copies using the control panel...89 Repeating an image on one page...90 Enlarging or reducing an image...90 Understanding the Copy menu...91 Modifying the Copy settings...91 Scanning 93 Scanning a document...93 Scanning a document using the computer...93 Scanning text for editing...94 Scanning images for editing...94 Scanning a photo to the Library...95 Scanning multiple photos at one time using the computer 95 Creating a PDF ...
User's Guide
Page 7
... reports...119 Maintaining the printer 120 Replacing print cartridges...120 Installing print cartridges...120 Removing a used print cartridge ...121 Refilling print cartridges...122 Using genuine Lexmark print cartridges...122 Aligning print cartridges...122 Cleaning the print cartridge nozzles...123 Wiping the print cartridge nozzles and contacts 123 Preserving the print cartridges...
... reports...119 Maintaining the printer 120 Replacing print cartridges...120 Installing print cartridges...120 Removing a used print cartridge ...121 Refilling print cartridges...122 Using genuine Lexmark print cartridges...122 Aligning print cartridges...122 Cleaning the print cartridge nozzles...123 Wiping the print cartridge nozzles and contacts 123 Preserving the print cartridges...
User's Guide
Page 8
... not install...129 Page does not print...130 Solving printer communication problems ...131 Understanding Warning levels ...132 Removing and reinstalling the software ...132 Enabling the USB port...132 Print troubleshooting...133 Improving print quality ...133 Poor text and graphic quality...134 Poor quality at the edges of the page...135 Print...
... not install...129 Page does not print...130 Solving printer communication problems ...131 Understanding Warning levels ...132 Removing and reinstalling the software ...132 Enabling the USB port...132 Print troubleshooting...133 Improving print quality ...133 Poor text and graphic quality...134 Poor quality at the edges of the page...135 Print...
User's Guide
Page 9
... a PictBridge-enabled digital camera 153 Jams and misfeeds troubleshooting...154 How to clear and avoid paper jams...154 Paper jam in the Automatic Document Feeder (ADF)...154 Paper jam in the printer...155 Paper jam in the paper support...156 Paper or specialty media misfeeds...156 Printer does not feed paper...
... a PictBridge-enabled digital camera 153 Jams and misfeeds troubleshooting...154 How to clear and avoid paper jams...154 Paper jam in the Automatic Document Feeder (ADF)...154 Paper jam in the printer...155 Paper jam in the paper support...156 Paper or specialty media misfeeds...156 Printer does not feed paper...
User's Guide
Page 10
Photo must fit on page...176 PictBridge communications error...176 Please remove camera to use your memory card...176 Some photos removed from card by host...176 Problems reading the memory card...176 Error messages on the computer screen...177 Clearing error messages...177 Left/Right Cartridge Missing...177 Communication not available...177 General Printing Problem ...178 Ink Low ...178 Out of Memory...178 Out of Paper...178 Fixing a printing failure...178 Unsupported file types found ...179 Black Cartridge replacement required...179 Color Cartridge replacement required...179 Black and ...
Photo must fit on page...176 PictBridge communications error...176 Please remove camera to use your memory card...176 Some photos removed from card by host...176 Problems reading the memory card...176 Error messages on the computer screen...177 Clearing error messages...177 Left/Right Cartridge Missing...177 Communication not available...177 General Printing Problem ...178 Ink Low ...178 Out of Memory...178 Out of Paper...178 Fixing a printing failure...178 Unsupported file types found ...179 Black Cartridge replacement required...179 Color Cartridge replacement required...179 Black and ...
User's Guide
Page 13
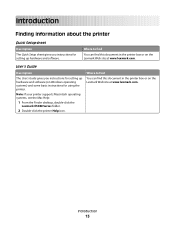
.... Note: If your printer supports Macintosh operating systems, see the Mac Help: 1 From the Finder desktop, double-click the Lexmark X5400 Series folder. 2 Double-click the printer Help icon. Where to find You can find this document in the printer box or on Windows operating ... you instructions for setting up hardware and software. User's Guide Description The User's Guide gives you instructions for setting up hardware and software (on the Lexmark Web site at www.lexmark.com. Introduction 13
.... Note: If your printer supports Macintosh operating systems, see the Mac Help: 1 From the Finder desktop, double-click the Lexmark X5400 Series folder. 2 Double-click the printer Help icon. Where to find You can find this document in the printer box or on Windows operating ... you instructions for setting up hardware and software. User's Guide Description The User's Guide gives you instructions for setting up hardware and software (on the Lexmark Web site at www.lexmark.com. Introduction 13
User's Guide
Page 14
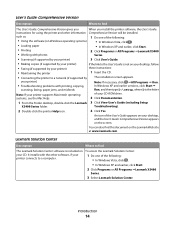
...8226; In Windows Vista, click . • In Windows XP and earlier, click Start. 2 Click Programs or All Programs ŒLexmark X5400 Series. 3 Select Lexmark Solution Center. In Windows XP and earlier versions, click Start Œ scanning, faxing, paper jams, and misfeeds Run, and then type...Vista, click . • Loading paper • In Windows XP and earlier, click Start. • Printing 2 Click Programs or All Programs ŒLexmark X5400 • Working with photos Series. • Scanning (if supported by your printer) 3 Click User's Guide. • Making copies (if ...
...8226; In Windows Vista, click . • In Windows XP and earlier, click Start. 2 Click Programs or All Programs ŒLexmark X5400 Series. 3 Select Lexmark Solution Center. In Windows XP and earlier versions, click Start Œ scanning, faxing, paper jams, and misfeeds Run, and then type...Vista, click . • Loading paper • In Windows XP and earlier, click Start. • Printing 2 Click Programs or All Programs ŒLexmark X5400 • Working with photos Series. • Scanning (if supported by your printer) 3 Click User's Guide. • Making copies (if ...
User's Guide
Page 15
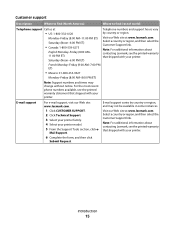
... the Support Tools section, click e- Visit our Web site at www.lexmark.com. For the most recent phone numbers available, see the printed warranty that shipped with your printer. Note: For additional information about contacting Lexmark, see the printed warranty that shipped with your printer. E-mail support ...For e-mail support, visit our Web site: www.lexmark.com. 1 Click CUSTOMER SUPPORT. 2 Click Technical Support. 3 Select your printer family. 4 Select your printer. Select a country or region, and then...
... the Support Tools section, click e- Visit our Web site at www.lexmark.com. For the most recent phone numbers available, see the printed warranty that shipped with your printer. Note: For additional information about contacting Lexmark, see the printed warranty that shipped with your printer. E-mail support ...For e-mail support, visit our Web site: www.lexmark.com. 1 Click CUSTOMER SUPPORT. 2 Click Technical Support. 3 Select your printer family. 4 Select your printer. Select a country or region, and then...
User's Guide
Page 16
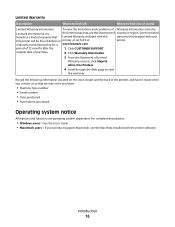
... ready when you contact us so that shipped with the printer software. materials and workmanship for a www.lexmark.com. original date of purchase. 2 Click Warranty Information. 3 From the Statement of Limited Warranty section, click Inkjet & All-In-One Printers. 4 Scroll through the Web page to find (US) Where to view the warranty...
... ready when you contact us so that shipped with the printer software. materials and workmanship for a www.lexmark.com. original date of purchase. 2 Click Warranty Information. 3 From the Statement of Limited Warranty section, click Inkjet & All-In-One Printers. 4 Scroll through the Web page to find (US) Where to view the warranty...

User's Guide
Page 17
...approved to meet strict global safety standards with this product or make any electrical or cabling connections, such as furniture and walls. Lexmark is near the product and easily accessible. Refer service or repairs, other replacement parts. Inspect the power cord regularly for the use... the fax feature during a lightning storm. CAUTION-SHOCK HAZARD: Do not use of specific Lexmark components. The safety features of misuse. Do not set up this product or the manufacturer's authorized replacement power supply and power supply ...
...approved to meet strict global safety standards with this product or make any electrical or cabling connections, such as furniture and walls. Lexmark is near the product and easily accessible. Refer service or repairs, other replacement parts. Inspect the power cord regularly for the use... the fax feature during a lightning storm. CAUTION-SHOCK HAZARD: Do not use of specific Lexmark components. The safety features of misuse. Do not set up this product or the manufacturer's authorized replacement power supply and power supply ...
User's Guide
Page 18
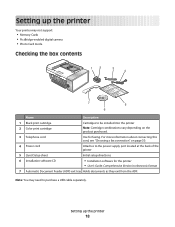
... print cartridge Cartridges to be installed into the printer 2 Color print cartridge Note: Cartridge combinations vary depending on page 30. 4 Power cord Attaches to purchase a USB cable separately. Setting up the printer 18 Setting up the printer Your printer may need to the power supply port located at the back of..., see "Choosing a fax connection" on the product purchased. 3 Telephone cord Use for the printer • User's Guide: Comprehensive Version in electronic format 7 Automatic Document Feeder (ADF) exit tray Holds documents as they exit from the...
... print cartridge Cartridges to be installed into the printer 2 Color print cartridge Note: Cartridge combinations vary depending on page 30. 4 Power cord Attaches to purchase a USB cable separately. Setting up the printer 18 Setting up the printer Your printer may need to the power supply port located at the back of..., see "Choosing a fax connection" on the product purchased. 3 Telephone cord Use for the printer • User's Guide: Comprehensive Version in electronic format 7 Automatic Document Feeder (ADF) exit tray Holds documents as they exit from the...
User's Guide
Page 19
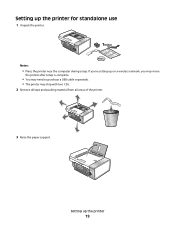
Setting up the printer 19 Setting up the printer for standalone use 1 Unpack the printer. 1 2 3 Notes: • Place the printer near the computer during setup. If you're setting up on a wireless network, you may move the printer after setup is complete. • You may need to purchase a USB cable separately. • The printer may ship with two CDs. 2 Remove all tape and packing material from all areas of the printer. 3 Raise the paper support.
Setting up the printer 19 Setting up the printer for standalone use 1 Unpack the printer. 1 2 3 Notes: • Place the printer near the computer during setup. If you're setting up on a wireless network, you may move the printer after setup is complete. • You may need to purchase a USB cable separately. • The printer may ship with two CDs. 2 Remove all tape and packing material from all areas of the printer. 3 Raise the paper support.

User's Guide
Page 20
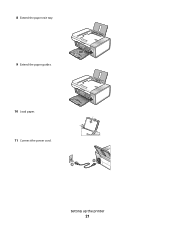
Setting up the printer 20 4 Insert the back end of the Automatic Document Feeder exit tray. 5 Snap in the front end of the Automatic Document Feeder exit tray. 6 Raise the control panel. 7 If needed, install the correct control panel for your language.
Setting up the printer 20 4 Insert the back end of the Automatic Document Feeder exit tray. 5 Snap in the front end of the Automatic Document Feeder exit tray. 6 Raise the control panel. 7 If needed, install the correct control panel for your language.
User's Guide
Page 21
Setting up the printer 21 8 Extend the paper exit tray. 9 Extend the paper guides. 10 Load paper. 1 2 11 Connect the power cord.
Setting up the printer 21 8 Extend the paper exit tray. 9 Extend the paper guides. 10 Load paper. 1 2 11 Connect the power cord.
User's Guide
Page 22
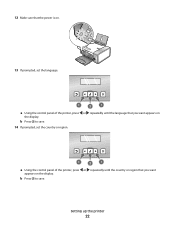
12 Make sure that you want appears on the display. a Using the control panel of the printer, press or repeatedly until the country or region that the power is on the display. b Press to save . b Press to save . 14 If prompted, set the language. a Using the control panel of the printer, press or repeatedly until the language that you want appears on . 13 If prompted, set the country or region. Setting up the printer 22
12 Make sure that you want appears on the display. a Using the control panel of the printer, press or repeatedly until the country or region that the power is on the display. b Press to save . b Press to save . 14 If prompted, set the language. a Using the control panel of the printer, press or repeatedly until the language that you want appears on . 13 If prompted, set the country or region. Setting up the printer 22
User's Guide
Page 23
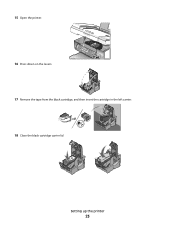
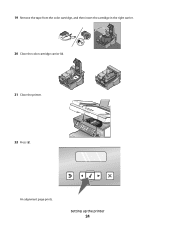
15 Open the printer. 16 Press down on the levers. 17 Remove the tape from the black cartridge, and then insert the cartridge in the left carrier. 18 Close the black cartridge carrier lid Setting up the printer 23
15 Open the printer. 16 Press down on the levers. 17 Remove the tape from the black cartridge, and then insert the cartridge in the left carrier. 18 Close the black cartridge carrier lid Setting up the printer 23
User's Guide
Page 24
Setting up the printer 24 19 Remove the tape from the color cartridge, and then insert the cartridge in the right carrier. 20 Close the color cartridge carrier lid. 21 Close the printer. 22 Press . An alignment page prints.
Setting up the printer 24 19 Remove the tape from the color cartridge, and then insert the cartridge in the right carrier. 20 Close the color cartridge carrier lid. 21 Close the printer. 22 Press . An alignment page prints.
