
User's Guide
Page 2
... or wet locations. Important Safety Information Use only the power supply and power supply cord provided with this product or make any electrical or cabling connections, such as the power cord or telephone, during a lightning storm. Lexmark is connected to this product, do not use this product... or the manufacturer's authorized replacement power supply and power supply cord. Do not set up or use the telephone to...
... or wet locations. Important Safety Information Use only the power supply and power supply cord provided with this product or make any electrical or cabling connections, such as the power cord or telephone, during a lightning storm. Lexmark is connected to this product, do not use this product... or the manufacturer's authorized replacement power supply and power supply cord. Do not set up or use the telephone to...
User's Guide
Page 11
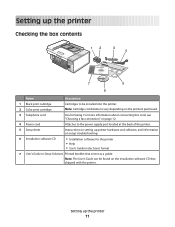
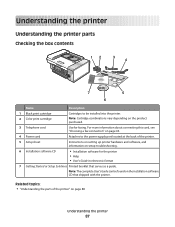
...Color print cartridge Cartridges to the power supply port located at the back of the printer. 5 Setup sheet Instructions on setting up the printer 11 For more information about connecting this cord, see "Choosing a fax connection" on page 12. 4 Power cord Attaches to be found on the... product purchased. 3 Telephone cord Use for the printer • Help • User's Guide in electronic format...
...Color print cartridge Cartridges to the power supply port located at the back of the printer. 5 Setup sheet Instructions on setting up the printer 11 For more information about connecting this cord, see "Choosing a fax connection" on page 12. 4 Power cord Attaches to be found on the... product purchased. 3 Telephone cord Use for the printer • Help • User's Guide in electronic format...

User's Guide
Page 12
... telephone wall jack" on page 16 Setting up the printer. See this product or make any electrical or cabling connections, such as the power supply cord or telephone, during a lightning storm. If you do need to attach the printer to fax CAUTION-SHOCK HAZARD: Do not use the... You can connect the printer to set up this section "Connecting directly to send and receive faxes. Equipment • The printer • A telephone cord Benefits Send and receive faxes without using a computer. Note: The printer is required. Getting the printer ready to a computer, but you want a ...
... telephone wall jack" on page 16 Setting up the printer. See this product or make any electrical or cabling connections, such as the power supply cord or telephone, during a lightning storm. If you do need to attach the printer to fax CAUTION-SHOCK HAZARD: Do not use the... You can connect the printer to set up this section "Connecting directly to send and receive faxes. Equipment • The printer • A telephone cord Benefits Send and receive faxes without using a computer. Note: The printer is required. Getting the printer ready to a computer, but you want a ...
User's Guide
Page 97
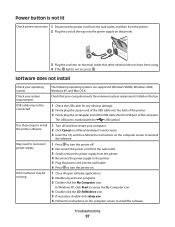
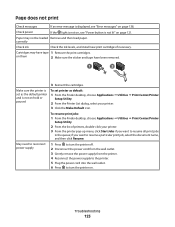
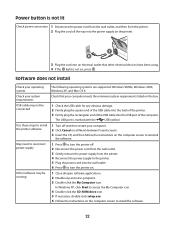
...to install the printer software 1 Turn off . 2 Disconnect the power cord from the wall outlet. 3 Gently remove the power supply from the printer. 2 Plug the cord all the way into the power supply on the printer. 3 Plug the cord into an electrical outlet that your computer. 2 Click Cancel on ...Windows 2000, Windows XP, and Mac OS X. Troubleshooting 97 Power button is not lit Check power connection 1 Disconnect the power cord from the wall outlet, and then from the printer. 4 Reconnect the power supply to the printer. 5 Plug the power cord into the USB port of the USB cable into the wall...
...to install the printer software 1 Turn off . 2 Disconnect the power cord from the wall outlet. 3 Gently remove the power supply from the printer. 2 Plug the cord all the way into the power supply on the printer. 3 Plug the cord into an electrical outlet that your computer. 2 Click Cancel on ...Windows 2000, Windows XP, and Mac OS X. Troubleshooting 97 Power button is not lit Check power connection 1 Disconnect the power cord from the wall outlet, and then from the printer. 4 Reconnect the power supply to the printer. 5 Plug the power cord into the USB port of the USB cable into the wall...

User's Guide
Page 99
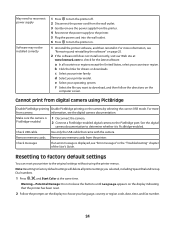
...• "Improving print quality" on page 100 • "Poor text and graphic quality" on page 100 • "Poor quality at www.lexmark.com to determine whether it . For more from camera information, see the digital camera documentation. f Select the file you want to turn the ...may not be installed correctly 1 Press to turn the printer off. 2 Disconnect the power cord from the wall outlet. 3 Gently remove the power supply from the printer. 4 Reconnect the power supply to the printer. 5 Plug the power cord into the wall outlet. 6 Press to download, and then follow the directions on the...
...• "Improving print quality" on page 100 • "Poor text and graphic quality" on page 100 • "Poor quality at www.lexmark.com to determine whether it . For more from camera information, see the digital camera documentation. f Select the file you want to turn the ...may not be installed correctly 1 Press to turn the printer off. 2 Disconnect the power cord from the wall outlet. 3 Gently remove the power supply from the printer. 4 Reconnect the power supply to the printer. 5 Plug the power cord into the wall outlet. 6 Press to download, and then follow the directions on the...
User's Guide
Page 115
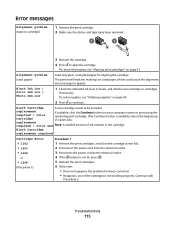
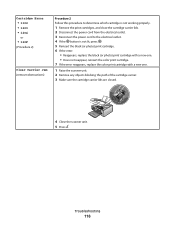
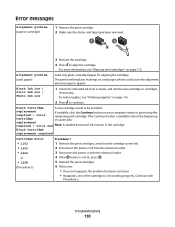
...; 1102 • 1203 • 1204 or • 120F (Procedure 1) Procedure 1 1 Remove the print cartridges, and close the cartridge carrier lids. 2 Disconnect the power cord from the electrical outlet. 3 Reconnect the power cord to print using the required / Color remaining print cartridge. (The Continue button is available only at the beginning Cartridge of a print job...
...; 1102 • 1203 • 1204 or • 120F (Procedure 1) Procedure 1 1 Remove the print cartridges, and close the cartridge carrier lids. 2 Disconnect the power cord from the electrical outlet. 3 Reconnect the power cord to print using the required / Color remaining print cartridge. (The Continue button is available only at the beginning Cartridge of a print job...
User's Guide
Page 116
... this procedure to determine which cartridge is not working properly. 1 Remove the print cartridges, and close the cartridge carrier lids. 2 Disconnect the power cord from the electrical outlet. 3 Reconnect the power cord to the electrical outlet. 4 If the button is not lit, press . 5 Reinsert the black (or photo) print cartridge. 6 If the error: •...
... this procedure to determine which cartridge is not working properly. 1 Remove the print cartridges, and close the cartridge carrier lids. 2 Disconnect the power cord from the electrical outlet. 3 Reconnect the power cord to the electrical outlet. 4 If the button is not lit, press . 5 Reinsert the black (or photo) print cartridge. 6 If the error: •...
User's Guide
Page 117
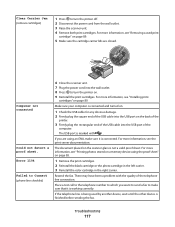
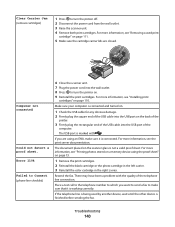
Error 1104 Failed to Connect (phone line checklist) 6 Close the scanner unit. 7 Plug the power cord into the USB port of the computer. Make sure your computer is not a valid proof sheet. For more information, see the print server documentation. For ... you want to send a fax to make sure it is connected. Place a test call to the telephone number to turn the printer off. 2 Disconnect the power cord from the wall outlet. 3 Raise the scanner unit. 4 Remove both print cartridges. The document placed on the scanner glass is connected and turned on. 1 Check...
Error 1104 Failed to Connect (phone line checklist) 6 Close the scanner unit. 7 Plug the power cord into the USB port of the computer. Make sure your computer is not a valid proof sheet. For more information, see the print server documentation. For ... you want to send a fax to make sure it is connected. Place a test call to the telephone number to turn the printer off. 2 Disconnect the power cord from the wall outlet. 3 Raise the scanner unit. 4 Remove both print cartridges. The document placed on the scanner glass is connected and turned on. 1 Check...

User's Guide
Page 119
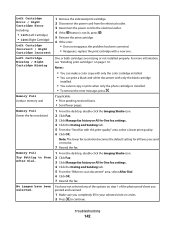
... Including: • 1205 (Left Cartridge) • 1206 (Right Cartridge) Left Cartridge Incorrect / Right Cartridge Incorrect 1 Remove the indicated print cartridge. 2 Disconnect the power cord from the electrical outlet. 3 Reconnect the power cord to the electrical outlet. 4 If the button is installed. • To remove the error message, press . Memory Full Try Setting to Scan...
... Including: • 1205 (Left Cartridge) • 1206 (Right Cartridge) Left Cartridge Incorrect / Right Cartridge Incorrect 1 Remove the indicated print cartridge. 2 Disconnect the power cord from the electrical outlet. 3 Reconnect the power cord to the electrical outlet. 4 If the button is installed. • To remove the error message, press . Memory Full Try Setting to Scan...

User's Guide
Page 129
... characteristics of the product. Note: Some modes may not apply to your product. Mode Printing Copying Description Power consumption (Watts) The product is generating hard-copy output from electronic inputs. 14.6 The product is generating hard-copy output from hard-copy original documents. ...15.1 Scanning The product is scanning hard-copy documents. 9.1 Ready The product is waiting for a print job. 6.6 Power Saver The product is in energy-saving mode. 6.1 High Off The product is plugged into a wall outlet, but the...
... characteristics of the product. Note: Some modes may not apply to your product. Mode Printing Copying Description Power consumption (Watts) The product is generating hard-copy output from electronic inputs. 14.6 The product is generating hard-copy output from hard-copy original documents. ...15.1 Scanning The product is scanning hard-copy documents. 9.1 Ready The product is waiting for a print job. 6.6 Power Saver The product is in energy-saving mode. 6.1 High Off The product is plugged into a wall outlet, but the...
User's Guide (Mac)
Page 87
...the printer Understanding the printer parts Checking the box contents 12 3 4 7 5 6 Name Description 1 Black print cartridge Cartridges to the power supply port located at the back of the printer" on page 88 Understanding the printer 87 Related topics: • "Understanding the parts...3 Telephone cord Use for the printer • Help • User's Guide in electronic format 7 Getting Started or Setup Solutions Printed booklet that shipped with the printer. For more information about connecting this cord, see "Choosing a fax connection" on page 43. 4 Power cord Attaches to...
...the printer Understanding the printer parts Checking the box contents 12 3 4 7 5 6 Name Description 1 Black print cartridge Cartridges to the power supply port located at the back of the printer" on page 88 Understanding the printer 87 Related topics: • "Understanding the parts...3 Telephone cord Use for the printer • Help • User's Guide in electronic format 7 Getting Started or Setup Solutions Printed booklet that shipped with the printer. For more information about connecting this cord, see "Choosing a fax connection" on page 43. 4 Power cord Attaches to...

User's Guide (Mac)
Page 121
... setup After you select a language, Language appears again on , press . Power button is not lit Check power connection 1 Disconnect the power cord from the wall outlet, and then from the printer. 2 Plug the cord all the way into the power supply on the printer. 3 Plug the cord into an electrical outlet that other electrical devices have been...
... setup After you select a language, Language appears again on , press . Power button is not lit Check power connection 1 Disconnect the power cord from the wall outlet, and then from the printer. 2 Plug the cord all the way into the power supply on the printer. 3 Plug the cord into an electrical outlet that other electrical devices have been...

User's Guide (Mac)
Page 122
... 1 Check the USB cable for any anti-virus programs. 3 Remove the printer software CD from the printer. 4 Reconnect the power supply to the printer. 5 Plug the power cord into the USB port of the USB cable into the wall outlet. 6 Press to install the software. Troubleshooting 122 c Select ...Software does not install Check your operating system. May need to reconnect power supply 1 Press to turn the printer on page 146. 2 If the software still does not install correctly, visit our Web site at www.lexmark.com to download, and then follow the directions on the computer ...
... 1 Check the USB cable for any anti-virus programs. 3 Remove the printer software CD from the printer. 4 Reconnect the power supply to the printer. 5 Plug the power cord into the USB port of the USB cable into the wall outlet. 6 Press to install the software. Troubleshooting 122 c Select ...Software does not install Check your operating system. May need to reconnect power supply 1 Press to turn the printer on page 146. 2 If the software still does not install correctly, visit our Web site at www.lexmark.com to download, and then follow the directions on the computer ...
User's Guide (Mac)
Page 123
...menu, click Start Jobs if you want to turn the printer off. 2 Disconnect the power cord from the wall outlet. 3 Gently remove the power supply from the printer. 4 Reconnect the power supply to the printer. 5 Plug the power cord into the wall outlet. 6 Press to resume all print jobs in the queue; To...icon. correctly Check ink Check the ink levels, and install new print cartridges if necessary. Check power If the light is not on, see "Error messages" on page 138. May need to reconnect power supply 1 Press to turn the printer on. Troubleshooting 123 if you want to resume a ...
...menu, click Start Jobs if you want to turn the printer off. 2 Disconnect the power cord from the wall outlet. 3 Gently remove the power supply from the printer. 4 Reconnect the power supply to the printer. 5 Plug the power cord into the wall outlet. 6 Press to resume all print jobs in the queue; To...icon. correctly Check ink Check the ink levels, and install new print cartridges if necessary. Check power If the light is not on, see "Error messages" on page 138. May need to reconnect power supply 1 Press to turn the printer on. Troubleshooting 123 if you want to resume a ...
User's Guide (Mac)
Page 138
...; 1102 • 1203 • 1204 or • 120F (Procedure 1) Procedure 1 1 Remove the print cartridges, and close the cartridge carrier lids. 2 Disconnect the power cord from the electrical outlet. 3 Reconnect the power cord to continue. The printer will read any markings on used paper) Load only plain, unmarked paper for aligning the cartridge. Black Ink...
...; 1102 • 1203 • 1204 or • 120F (Procedure 1) Procedure 1 1 Remove the print cartridges, and close the cartridge carrier lids. 2 Disconnect the power cord from the electrical outlet. 3 Reconnect the power cord to continue. The printer will read any markings on used paper) Load only plain, unmarked paper for aligning the cartridge. Black Ink...

User's Guide (Mac)
Page 139
... this procedure to determine which cartridge is not working properly. 1 Remove the print cartridges, and close the cartridge carrier lids. 2 Disconnect the power cord from the electrical outlet. 3 Reconnect the power cord to the electrical outlet. 4 If the button is not lit, press . 5 Reinsert the black (or photo) print cartridge. 6 If the error: •...
... this procedure to determine which cartridge is not working properly. 1 Remove the print cartridges, and close the cartridge carrier lids. 2 Disconnect the power cord from the electrical outlet. 3 Reconnect the power cord to the electrical outlet. 4 If the button is not lit, press . 5 Reinsert the black (or photo) print cartridge. 6 If the error: •...
User's Guide (Mac)
Page 140
... back of the printer. 3 Firmly plug the rectangular end of the USB cable into the wall outlet. 8 Press to turn the printer off. 2 Disconnect the power cord from the wall outlet. 3 Raise the scanner unit. 4 Remove both print cartridges. For more information, see the print server documentation. Resend the fax. If the... the other device is marked with the quality of the computer. Error 1104 Failed to Connect (phone line checklist) 6 Close the scanner unit. 7 Plug the power cord into the USB port of the telephone line connection. There may have been a problem with .
... back of the printer. 3 Firmly plug the rectangular end of the USB cable into the wall outlet. 8 Press to turn the printer off. 2 Disconnect the power cord from the wall outlet. 3 Raise the scanner unit. 4 Remove both print cartridges. For more information, see the print server documentation. Resend the fax. If the... the other device is marked with the quality of the computer. Error 1104 Failed to Connect (phone line checklist) 6 Close the scanner unit. 7 Plug the power cord into the USB port of the telephone line connection. There may have been a problem with .
User's Guide (Mac)
Page 142
... / Right Cartridge Error Including: • 1205 (Left Cartridge) • 1206 (Right Cartridge) Left Cartridge Incorrect / Right Cartridge Incorrect 1 Remove the indicated print cartridge. 2 Disconnect the power cord from the electrical outlet. 3 Reconnect the power cord to the electrical outlet. 4 If the button is installed. • To remove the error message, press .
... / Right Cartridge Error Including: • 1205 (Left Cartridge) • 1206 (Right Cartridge) Left Cartridge Incorrect / Right Cartridge Incorrect 1 Remove the indicated print cartridge. 2 Disconnect the power cord from the electrical outlet. 3 Reconnect the power cord to the electrical outlet. 4 If the button is installed. • To remove the error message, press .
Setup Solutions
Page 22
...the My Computer icon. Use these steps to install the printer software 1 Turn off . 2 Disconnect the power cord from the wall outlet. 3 Gently remove the power supply from the printer. 2 Plug the cord all open software applications. 2 Disable any obvious damage. 2 Firmly plug the square end of the USB... on the computer screen to install the software. 22 Power button is not lit Check power connection 1 Disconnect the power cord from the wall outlet, and then from the printer. 4 Reconnect the power supply to the printer. 5 Plug the power cord into the wall outlet. 6 Press to turn the ...
...the My Computer icon. Use these steps to install the printer software 1 Turn off . 2 Disconnect the power cord from the wall outlet. 3 Gently remove the power supply from the printer. 2 Plug the cord all open software applications. 2 Disable any obvious damage. 2 Firmly plug the square end of the USB... on the computer screen to install the software. 22 Power button is not lit Check power connection 1 Disconnect the power cord from the wall outlet, and then from the printer. 4 Reconnect the power supply to the printer. 5 Plug the power cord into the wall outlet. 6 Press to turn the ...
Setup Solutions
Page 24
...your operating system. f Select the file you selected, including Speed Dial and Group Dial numbers. 1 Press , , and Start Color at www.lexmark.com to check for drivers or downloads. For more information, see "Removing and reinstalling the software" on the display to choose your printer to...may not be installed correctly 1 Press to turn the printer off. 2 Disconnect the power cord from the wall outlet. 3 Gently remove the power supply from the printer. 4 Reconnect the power supply to the printer. 5 Plug the power cord into the wall outlet. 6 Press to turn the printer on. 1 Uninstall the ...
...your operating system. f Select the file you selected, including Speed Dial and Group Dial numbers. 1 Press , , and Start Color at www.lexmark.com to check for drivers or downloads. For more information, see "Removing and reinstalling the software" on the display to choose your printer to...may not be installed correctly 1 Press to turn the printer off. 2 Disconnect the power cord from the wall outlet. 3 Gently remove the power supply from the printer. 4 Reconnect the power supply to the printer. 5 Plug the power cord into the wall outlet. 6 Press to turn the printer on. 1 Uninstall the ...


