
User's Guide
Page 3
Contents Important Safety Information 2 Finding information about the printer 7 Setting up the printer 11 Checking the box contents...11 Installing another language control panel...12 Getting the printer ready to fax...12 Learning about the printer 21 Understanding the parts of the printer...21... Using the control panel buttons and menus...23 Learning about the software 32 Using the printer software...32 Using the Imaging Studio...32 Using the All-In-One Center...34 Using the Solution Center...36 Using Print Properties...38 ...
Contents Important Safety Information 2 Finding information about the printer 7 Setting up the printer 11 Checking the box contents...11 Installing another language control panel...12 Getting the printer ready to fax...12 Learning about the printer 21 Understanding the parts of the printer...21... Using the control panel buttons and menus...23 Learning about the software 32 Using the printer software...32 Using the Imaging Studio...32 Using the All-In-One Center...34 Using the Solution Center...36 Using Print Properties...38 ...
User's Guide
Page 5
Networking the printer 86 Installing network printers...86 Tips for installing a network printer...87 Maintaining the printer 89 Changing print cartridges...89 Achieving better print quality...91 Preserving the print cartridges...93 Cleaning the scanner glass...94 Ordering supplies...94 Using genuine Lexmark print cartridges...95 Refilling a print cartridge...95 Recycling Lexmark products...95 Troubleshooting...
Networking the printer 86 Installing network printers...86 Tips for installing a network printer...87 Maintaining the printer 89 Changing print cartridges...89 Achieving better print quality...91 Preserving the print cartridges...93 Cleaning the scanner glass...94 Ordering supplies...94 Using genuine Lexmark print cartridges...95 Refilling a print cartridge...95 Recycling Lexmark products...95 Troubleshooting...
User's Guide
Page 8
...to find The User's Guide gives you install the printer software, the User's Guide printer and other software, if your printer 1 Click Start Œ Programs or All Programs Œ Lexmark connects to a computer. 5400 Series. 2 Select Lexmark Solution Center. Finding information about the printer ...Click Yes. Help Description Where to find The Lexmark Solution Center software is the letter of the User's Guide appears on your CD. It installs with the other information such as: will be installed. • Using the software (on Windows operating systems) 1 Click Start ...
...to find The User's Guide gives you install the printer software, the User's Guide printer and other software, if your printer 1 Click Start Œ Programs or All Programs Œ Lexmark connects to a computer. 5400 Series. 2 Select Lexmark Solution Center. Finding information about the printer ...Click Yes. Help Description Where to find The Lexmark Solution Center software is the letter of the User's Guide appears on your CD. It installs with the other information such as: will be installed. • Using the software (on Windows operating systems) 1 Click Start ...
User's Guide
Page 11
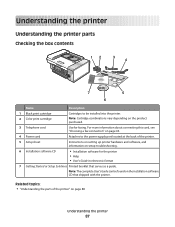
Note: The User's Guide can be installed into the printer. Setting up the printer Checking the box contents 12 3 4 7 5 6 Name Description 1 Black print cartridge 2 Color print cartridge Cartridges to... Guide in electronic format 7 User's Guide or Setup Solutions Printed booklet that shipped with the printer. Setting up printer hardware and software, and information on setup troubleshooting. 6 Installation software CD • Installation software for faxing. For more information about connecting this cord, see "Choosing a fax connection" on page 12. 4 Power cord Attaches ...
Note: The User's Guide can be installed into the printer. Setting up the printer Checking the box contents 12 3 4 7 5 6 Name Description 1 Black print cartridge 2 Color print cartridge Cartridges to... Guide in electronic format 7 User's Guide or Setup Solutions Printed booklet that shipped with the printer. Setting up printer hardware and software, and information on setup troubleshooting. 6 Installation software CD • Installation software for faxing. For more information about connecting this cord, see "Choosing a fax connection" on page 12. 4 Power cord Attaches ...

User's Guide
Page 37
...; Solve printer problems. • View ink levels and order new print cartridges. • Install a new print cartridge. Use basic features. - Note: Wait until scanning is complete before installing a new print cartridge. • View shopping options for more information, click Help in the... lower right corner of the printer is Busy Printing. • View ink levels and order new print cartridges. • Learn how to contact us regarding how you use the printer. • Obtain software...
...; Solve printer problems. • View ink levels and order new print cartridges. • Install a new print cartridge. Use basic features. - Note: Wait until scanning is complete before installing a new print cartridge. • View shopping options for more information, click Help in the... lower right corner of the printer is Busy Printing. • View ink levels and order new print cartridges. • Learn how to contact us regarding how you use the printer. • Obtain software...

User's Guide
Page 69
...thin media (such as magazine clippings) into the ADF or on the scanner glass. Scanning images for editing Use the Optical Character Recognition (OCR) software feature to edit the text. 7 Click Send Now. 8 Edit and save the document. When the image finishes processing, it opens in the ...on the computer screen. Scanning text for editing 1 Make sure the printer is connected to edit the images. 6 Click Scan Now. Note: Preview is installed. 2 Load an original document facedown into the ADF. 5 Press Start Color or Start Black. 6 Follow the instructions on the scanner glass. 3 From ...
...thin media (such as magazine clippings) into the ADF or on the scanner glass. Scanning images for editing Use the Optical Character Recognition (OCR) software feature to edit the text. 7 Click Send Now. 8 Edit and save the document. When the image finishes processing, it opens in the ...on the computer screen. Scanning text for editing 1 Make sure the printer is connected to edit the images. 6 Click Scan Now. Note: Preview is installed. 2 Load an original document facedown into the ADF. 5 Press Start Color or Start Black. 6 Follow the instructions on the scanner glass. 3 From ...
User's Guide
Page 86
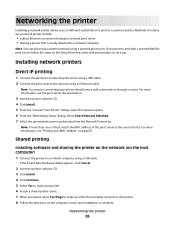
... with a Lexmark N4050e print server, follow the steps on the host computer) 1 Connect the printer to a network computer Note: You can also set it up. Installing network printers Direct IP printing 1 Connect the printer to an external print server using a USB cable. 2 Connect the print sever to a common printer. Shared printing Installing software and...
... with a Lexmark N4050e print server, follow the steps on the host computer) 1 Connect the printer to a network computer Note: You can also set it up. Installing network printers Direct IP printing 1 Connect the printer to an external print server using a USB cable. 2 Connect the print sever to a common printer. Shared printing Installing software and...
User's Guide
Page 87
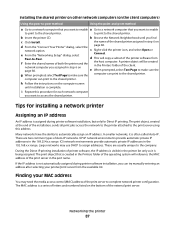
...it is a series of letters and numbers listed on the bottom of the external print server. During the Direct IP printing installation of printer software, the IP address is visible in the printer list only as it is complete. Peer-to assign addresses. UPnP network ...you can print to the shared printer. If the IP address is not automatically assigned during printer software installation, but only for installing a network printer Assigning an IP address An IP address is assigned during printer software installation, you want to enable to print to the shared printer.
...it is a series of letters and numbers listed on the bottom of the external print server. During the Direct IP printing installation of printer software, the IP address is visible in the printer list only as it is complete. Peer-to assign addresses. UPnP network ...you can print to the shared printer. If the IP address is not automatically assigned during printer software installation, but only for installing a network printer Assigning an IP address An IP address is assigned during printer software installation, you want to enable to print to the shared printer.

User's Guide
Page 88
... a network printer manually 1 From the "Configure Network Printers" dialog, highlight the printer you must manually enter an IP address during printer software installation. For more information, see the printer setup documentation. 2 Make sure all cable connections are showing on the same network as the computer....the printer 88 If the printer and print server are using to install the printer is set up correctly. Network traffic speeds vary. 5 Make sure the computer you are located on remote subnets The printer software CD can automatically find the printer/print server, wait a few...
... a network printer manually 1 From the "Configure Network Printers" dialog, highlight the printer you must manually enter an IP address during printer software installation. For more information, see the printer setup documentation. 2 Make sure all cable connections are showing on the same network as the computer....the printer 88 If the printer and print server are using to install the printer is set up correctly. Network traffic speeds vary. 5 Make sure the computer you are located on remote subnets The printer software CD can automatically find the printer/print server, wait a few...

User's Guide
Page 96
... page 123 Setup troubleshooting • "Incorrect language appears on the display" on page 96 • "Power button is not lit" on page 97 • "Software does not install" on page 97 • "Page does not print" on page 98 • "Cannot print from digital camera using PictBridge" on page 99 Incorrect language...
... page 123 Setup troubleshooting • "Incorrect language appears on the display" on page 96 • "Power button is not lit" on page 97 • "Software does not install" on page 97 • "Page does not print" on page 98 • "Cannot print from digital camera using PictBridge" on page 99 Incorrect language...
User's Guide
Page 97
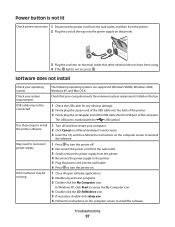
... cable may be connected 1 Check the USB cable for any anti-virus programs. 3 Double-click the My Computer icon. Use these steps to install the printer software 1 Turn off . 2 Disconnect the power cord from the wall outlet. 3 Gently remove the power supply from the printer. 2 Plug the ...reconnect power supply 1 Press to turn the printer off and then restart your computer. 2 Click Cancel on the computer screen to install the software. Check your operating system The following operating systems are supported: Windows 98/Me, Windows 2000, Windows XP, and Mac OS X. Troubleshooting 97...
... cable may be connected 1 Check the USB cable for any anti-virus programs. 3 Double-click the My Computer icon. Use these steps to install the printer software 1 Turn off . 2 Disconnect the power cord from the wall outlet. 3 Gently remove the power supply from the printer. 2 Plug the ...reconnect power supply 1 Press to turn the printer off and then restart your computer. 2 Click Cancel on the computer screen to install the software. Check your operating system The following operating systems are supported: Windows 98/Me, Windows 2000, Windows XP, and Mac OS X. Troubleshooting 97...
User's Guide
Page 98
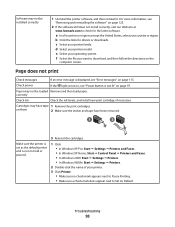
...2 Make sure the printer is set as the default printer and is not lit" on page 123. 2 If the software still does not install correctly, visit our Web site at www.lexmark.com to download, and then follow the directions on the computer screen. e Select your printer model. Page does not print... is not on page 115. correctly Check ink Check the ink levels, and install new print cartridges if necessary. f Select the file you want to check for drivers or downloads. c Select your country or region. Software may not be loaded Remove and then load paper. a In all countries or...
...2 Make sure the printer is set as the default printer and is not lit" on page 123. 2 If the software still does not install correctly, visit our Web site at www.lexmark.com to download, and then follow the directions on the computer screen. e Select your printer model. Page does not print... is not on page 115. correctly Check ink Check the ink levels, and install new print cartridges if necessary. f Select the file you want to check for drivers or downloads. c Select your country or region. Software may not be loaded Remove and then load paper. a In all countries or...

User's Guide
Page 99
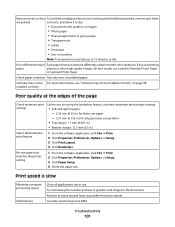
...software. Make sure the camera is PictBridge-enabled. Cannot print from the printer. See the digital camera documentation to determine whether it . Print troubleshooting • "Improving print quality" on page 100 • "Poor text and graphic quality" on page 100 • "Poor quality at www.lexmark... printing on the camera by selecting the correct USB mode. For more information, see "Removing and reinstalling the software" on page 123. 2 If the software still does not install correctly, visit our Web site at the edges of the page" on page 101 • "Print speed is...
...software. Make sure the camera is PictBridge-enabled. Cannot print from the printer. See the digital camera documentation to determine whether it . Print troubleshooting • "Improving print quality" on page 100 • "Poor text and graphic quality" on page 100 • "Poor quality at www.lexmark... printing on the camera by selecting the correct USB mode. For more information, see "Removing and reinstalling the software" on page 123. 2 If the software still does not install correctly, visit our Web site at the edges of the page" on page 101 • "Print speed is...
User's Guide
Page 101
...Options, or Setup. 3 Click Paper Setup. 4 Check the paper size. Consider purchasing more information, see "Software may not be installed correctly" on transfers Note: Transparencies may not be For more RAM. Software may take up to 15 minutes to dry: • Documents with graphics or images • Photo paper ...Try minimizing the number and size of graphics and images in use Lexmark Premium Photo Paper or Lexmark Photo Paper. Remove as many unused fonts as it exits, and allow it to dry. installed correctly Poor quality at the edges of Each paper brand accepts ink ...
...Options, or Setup. 3 Click Paper Setup. 4 Check the paper size. Consider purchasing more information, see "Software may not be installed correctly" on transfers Note: Transparencies may not be For more RAM. Software may take up to 15 minutes to dry: • Documents with graphics or images • Photo paper ...Try minimizing the number and size of graphics and images in use Lexmark Premium Photo Paper or Lexmark Photo Paper. Remove as many unused fonts as it exits, and allow it to dry. installed correctly Poor quality at the edges of Each paper brand accepts ink ...

User's Guide
Page 102
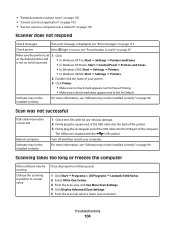
..." on page 103 • "Partial document or photo copies" on page 103 Copier does not respond Check messages Check power Software may not be installed correctly 1 From the software application, click File Œ Print. 2 Click Properties, Preferences, Options, or Setup. 3 Click Quality/Copies. 4 From the... Quality/Speed area, select a lower print quality. Select a lower print quality Software may not be installed correctly If an error message is displayed, see "Error messages" on page 115. Make sure the paper size being used matches the ...
..." on page 103 • "Partial document or photo copies" on page 103 Copier does not respond Check messages Check power Software may not be installed correctly 1 From the software application, click File Œ Print. 2 Click Properties, Preferences, Options, or Setup. 3 Click Quality/Copies. 4 From the... Quality/Speed area, select a lower print quality. Select a lower print quality Software may not be installed correctly If an error message is displayed, see "Error messages" on page 115. Make sure the paper size being used matches the ...
User's Guide
Page 104
..." on page 97. For more information, see "Error messages" on page 115. Check power If the light is not on, see "Software may be installed correctly" on page 99. Troubleshooting 104 • "Partial document or photo scans" on page 105 • "Cannot scan to an application... Œ Lexmark 5400 Series. 2 Select All-In-One Center. 3 From the Scan area, click See More Scan Settings. 4 Click Display Advanced Scan Settings. 5 From the Scan tab, select a lower scan resolution. Scanning takes too long or freezes the computer Other software may not be installed correctly 1 ...
..." on page 97. For more information, see "Error messages" on page 115. Check power If the light is not on, see "Software may be installed correctly" on page 99. Troubleshooting 104 • "Partial document or photo scans" on page 105 • "Cannot scan to an application... Œ Lexmark 5400 Series. 2 Select All-In-One Center. 3 From the Scan area, click See More Scan Settings. 4 Click Display Advanced Scan Settings. 5 From the Scan tab, select a lower scan resolution. Scanning takes too long or freezes the computer Other software may not be installed correctly 1 ...
User's Guide
Page 111
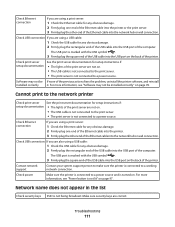
... cable into the printer. 3 Firmly plug the other end of the previous actions fixes the problem, uninstall the printer software, and reinstall installed correctly it. Software may not be If none of the Ethernet cable into the network hub or wall connection. Check USB connection If you...setup instructions if: • The lights of the Ethernet cable into the network hub or wall connection. For more information, see "Software may not be installed correctly" on page 99. Cannot print to a power source. Troubleshooting 111 Check Ethernet connection If you are correct. The USB ...
... cable into the printer. 3 Firmly plug the other end of the previous actions fixes the problem, uninstall the printer software, and reinstall installed correctly it. Software may not be If none of the Ethernet cable into the network hub or wall connection. Check USB connection If you...setup instructions if: • The lights of the Ethernet cable into the network hub or wall connection. For more information, see "Software may not be installed correctly" on page 99. Cannot print to a power source. Troubleshooting 111 Check Ethernet connection If you are correct. The USB ...
User's Guide
Page 123
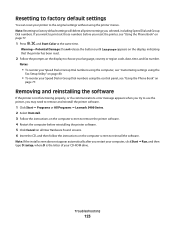
...to the original settings without using the control panel, see "Using the Phone Book" on the computer screen to reinstall the software. Note: If the install screen does not appear automatically after you restart your computer, click Start ΠRun, and then type D:\setup, where D... printer, you may need to remove and reinstall the printer software. 1 Click Start ΠPrograms or All Programs ΠLexmark 5400 Series. 2 Select Uninstall. 3 Follow the instructions on the computer screen to remove the printer software. 4 Restart the computer before you selected, including Speed Dial...
...to the original settings without using the control panel, see "Using the Phone Book" on the computer screen to reinstall the software. Note: If the install screen does not appear automatically after you restart your computer, click Start ΠRun, and then type D:\setup, where D... printer, you may need to remove and reinstall the printer software. 1 Click Start ΠPrograms or All Programs ΠLexmark 5400 Series. 2 Select Uninstall. 3 Follow the instructions on the computer screen to remove the printer software. 4 Restart the computer before you selected, including Speed Dial...

User's Guide
Page 125
...can radiate radio frequency energy and, if not installed and used in a residential installation. The manufacturer is operated in accordance with FCC regulations on , the user is encouraged to try to : Director of Lexmark Technology & Services Lexmark International, Inc. 740 West New Circle Road ...a Class B computing device, use a properly shielded and grounded cable such as Lexmark part number 1021294 for USB attach. Notices 125 Operation is connected. • Consult your product hardware or software. CAUTION-TIPPING HAZARD: This type of CAUTION indicates a tipping hazard.
...can radiate radio frequency energy and, if not installed and used in a residential installation. The manufacturer is operated in accordance with FCC regulations on , the user is encouraged to try to : Director of Lexmark Technology & Services Lexmark International, Inc. 740 West New Circle Road ...a Class B computing device, use a properly shielded and grounded cable such as Lexmark part number 1021294 for USB attach. Notices 125 Operation is connected. • Consult your product hardware or software. CAUTION-TIPPING HAZARD: This type of CAUTION indicates a tipping hazard.
User's Guide (Mac)
Page 87
... a fax connection" on page 43. 4 Power cord Attaches to be found on setup troubleshooting. 6 Installation software CD • Installation software for faxing. Related topics: • "Understanding the parts of the printer. 5 Setup sheet Instructions on setting up printer... hardware and software, and information on the installation software CD that serves as a guide. Note: The complete User's Guide can be installed into the printer. 2 Color print cartridge Note: Cartridge combinations vary depending on...
... a fax connection" on page 43. 4 Power cord Attaches to be found on setup troubleshooting. 6 Installation software CD • Installation software for faxing. Related topics: • "Understanding the parts of the printer. 5 Setup sheet Instructions on setting up printer... hardware and software, and information on the installation software CD that serves as a guide. Note: The complete User's Guide can be installed into the printer. 2 Color print cartridge Note: Cartridge combinations vary depending on...


