
User Guide
Page 2
... software...34 Installing printer software ...34 Updating available options in the printer driver...34 Loading paper and specialty media 36 Linking and unlinking trays...36 Linking trays...36 Unlinking trays...36 Assigning a Custom Type name...36 Setting the Paper Size and Paper Type...37 Configuring Universal paper settings...37 Loading the standard 250...
... software...34 Installing printer software ...34 Updating available options in the printer driver...34 Loading paper and specialty media 36 Linking and unlinking trays...36 Linking trays...36 Unlinking trays...36 Assigning a Custom Type name...36 Setting the Paper Size and Paper Type...37 Configuring Universal paper settings...37 Loading the standard 250...

User Guide
Page 4
Customizing copy settings...63 Copying from one size to another...63 Making copies using paper from a selected tray ...64 Copying on both sides of the paper (duplexing) ...64 Reducing or enlarging copies ...65 Making a copy lighter or darker ...65 Adjusting copy quality...66 Collating copies...66 Placing separator sheets between copies ...67 ...
Customizing copy settings...63 Copying from one size to another...63 Making copies using paper from a selected tray ...64 Copying on both sides of the paper (duplexing) ...64 Reducing or enlarging copies ...65 Making a copy lighter or darker ...65 Adjusting copy quality...66 Collating copies...66 Placing separator sheets between copies ...67 ...
User Guide
Page 7
......165 Replacing the waste toner bottle ...165 Replacing a black imaging kit ...168 Replacing a black and color imaging kit ...174 Replacing a toner cartridge...179 Replacing a developer unit ...181 Recycling Lexmark products...187 Cleaning the exterior of the printer...187 Cleaning the scanner glass...188 Moving the printer...188... do not print...194 Job takes longer than expected to print ...194 Job prints from the wrong tray or on the wrong paper 195 Incorrect characters print...195 Tray linking does not work...195 Large jobs do not collate ...195 Unexpected page breaks occur...196 Solving ...
......165 Replacing the waste toner bottle ...165 Replacing a black imaging kit ...168 Replacing a black and color imaging kit ...174 Replacing a toner cartridge...179 Replacing a developer unit ...181 Recycling Lexmark products...187 Cleaning the exterior of the printer...187 Cleaning the scanner glass...188 Moving the printer...188... do not print...194 Job takes longer than expected to print ...194 Job prints from the wrong tray or on the wrong paper 195 Incorrect characters print...195 Tray linking does not work...195 Large jobs do not collate ...195 Unexpected page breaks occur...196 Solving ...
User Guide
Page 14
...the ASHRAE 62 standard. • Provide a flat, sturdy, and stable surface. • Keep the printer: - It is important to open trays, covers, and doors. Note: For additional information about the printer 14 Selecting a location for the printer When selecting a location for the printer,...If you plan to find (rest of space around the printer for proper ventilation: Learning about 5 From the Support Tools section, click contacting Lexmark, see the printed e-Mail Support. Select a country or region, and then select the Customer Support link. 4 Select your printer model. Clean...
...the ASHRAE 62 standard. • Provide a flat, sturdy, and stable surface. • Keep the printer: - It is important to open trays, covers, and doors. Note: For additional information about the printer 14 Selecting a location for the printer When selecting a location for the printer,...If you plan to find (rest of space around the printer for proper ventilation: Learning about 5 From the Support Tools section, click contacting Lexmark, see the printed e-Mail Support. Select a country or region, and then select the Customer Support link. 4 Select your printer model. Clean...
User Guide
Page 16
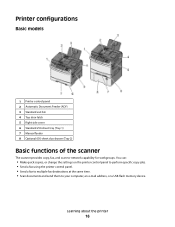
... Basic models 1 Printer control panel 2 Automatic Document Feeder (ADF) 3 Standard exit bin 4 Top door latch 5 Right side cover 6 Standard 250-sheet tray (Tray 1) 7 Manual feeder 8 Optional 650-sheet duo drawer (Tray 2) Basic functions of the scanner The scanner provides copy, fax, and scan-to your computer, an e-mail address, or a USB flash memory...
... Basic models 1 Printer control panel 2 Automatic Document Feeder (ADF) 3 Standard exit bin 4 Top door latch 5 Right side cover 6 Standard 250-sheet tray (Tray 1) 7 Manual feeder 8 Optional 650-sheet duo drawer (Tray 2) Basic functions of the scanner The scanner provides copy, fax, and scan-to your computer, an e-mail address, or a USB flash memory...

User Guide
Page 36
...Paper Type menu appears. 7 Press . Loading paper and specialty media This section explains how to link or unlink it. and 550-sheet trays, the multipurpose feeder, and the manual slot. It also includes information about paper orientation, setting the Paper Size and Paper Type, and ... menu. Associate the same Custom Type name to the tray, such as the settings of paper loaded in the tray. Linking and unlinking trays Linking trays Tray linking is useful for all trays from the Paper Type menu. Unlinking trays Unlinked trays have settings that they must be properly processed if an...
...Paper Type menu appears. 7 Press . Loading paper and specialty media This section explains how to link or unlink it. and 550-sheet trays, the multipurpose feeder, and the manual slot. It also includes information about paper orientation, setting the Paper Size and Paper Type, and ... menu. Associate the same Custom Type name to the tray, such as the settings of paper loaded in the tray. Linking and unlinking trays Linking trays Tray linking is useful for all trays from the Paper Type menu. Unlinking trays Unlinked trays have settings that they must be properly processed if an...

User Guide
Page 37
...and then press . 6 Press when Size appears. 7 Press the arrow buttons until Custom Type or another tray. Then, specify all of the following Universal size settings for the specified tray to Universal when the size you print on paper sizes that are automatically linked by Size. 8 Press the...Feed Direction Note: The smallest supported Universal size is 215.9 x 355.6 mm (8.5 x 14 in .); Setting the Paper Size and Paper Type Note: Trays with matching Paper Size and Paper Type settings are not preset in the printer menus. Submitting changes appears, followed by Paper Menu. 9 Press , and ...
...and then press . 6 Press when Size appears. 7 Press the arrow buttons until Custom Type or another tray. Then, specify all of the following Universal size settings for the specified tray to Universal when the size you print on paper sizes that are automatically linked by Size. 8 Press the...Feed Direction Note: The smallest supported Universal size is 215.9 x 355.6 mm (8.5 x 14 in .); Setting the Paper Size and Paper Type Note: Trays with matching Paper Size and Paper Type settings are not preset in the printer menus. Submitting changes appears, followed by Paper Menu. 9 Press , and ...

User Guide
Page 38
...have an optional 650-sheet duo drawer. 5 Press the arrow buttons until Units of measure appears, and then press . Loading the standard 250-sheet tray The printer has one sheet. 1 From the Universal Setup menu, press the arrow buttons until the correct unit of Measure appears, and then press...to support the size, including support for standard features such as duplex printing and printing multiple pages on the display. The 250-sheet tray and 650-sheet duo drawer support the same paper sizes and types. 1 Pull the tray out. Specify the paper height and width Defining a specific height...
...have an optional 650-sheet duo drawer. 5 Press the arrow buttons until Units of measure appears, and then press . Loading the standard 250-sheet tray The printer has one sheet. 1 From the Universal Setup menu, press the arrow buttons until the correct unit of Measure appears, and then press...to support the size, including support for standard features such as duplex printing and printing multiple pages on the display. The 250-sheet tray and 650-sheet duo drawer support the same paper sizes and types. 1 Pull the tray out. Specify the paper height and width Defining a specific height...

User Guide
Page 39
Loading paper and specialty media 39 Straighten the edges on the bottom of the tray to help position the guide. 3 If the paper is longer than letter-size paper, push the green tab at the back of the tray to elongate it. 4 Flex the sheets back and forth to the correct position for the paper size being loaded. Do not fold or crease the paper. Note: Use the size indicators on a level surface. 2 Squeeze the length guide tab inward as shown, and slide the guide to loosen them, and then fan them.
Loading paper and specialty media 39 Straighten the edges on the bottom of the tray to help position the guide. 3 If the paper is longer than letter-size paper, push the green tab at the back of the tray to elongate it. 4 Flex the sheets back and forth to the correct position for the paper size being loaded. Do not fold or crease the paper. Note: Use the size indicators on a level surface. 2 Squeeze the length guide tab inward as shown, and slide the guide to loosen them, and then fan them.

User Guide
Page 40
... paper so that the image is registered properly on the page. 7 Insert the tray. 8 If a different type or size of paper was loaded than the type or size previously loaded in the... tray, change the Paper Type or Paper Size setting for the tray from the printer control panel. Note: Make sure that the standard tray is loaded in the same way that side...are the look of the guide tabs and the location of the paper size indicators, as shown in a paper tray may lead to jams. Loading the optional 650-sheet duo drawer The 650-sheet duo drawer consists of the ...
... paper so that the image is registered properly on the page. 7 Insert the tray. 8 If a different type or size of paper was loaded than the type or size previously loaded in the... tray, change the Paper Type or Paper Size setting for the tray from the printer control panel. Note: Make sure that the standard tray is loaded in the same way that side...are the look of the guide tabs and the location of the paper size indicators, as shown in a paper tray may lead to jams. Loading the optional 650-sheet duo drawer The 650-sheet duo drawer consists of the ...

User Guide
Page 45
...80 g/m2 (21 lb bond) grain long paper. For paper smaller than 75 g/m2 (20 lb) might not be found in the trays, can contribute to paper curling prior to 48 hours before printing by storing it can cause feeding problems. Smoothness Paper smoothness directly affects print quality... problems. Curl can automatically feed paper weights from the printer environment. Paper and specialty media guide Additional information for printing on Lexmark.com/publications. Paper guidelines Paper characteristics The following paper characteristics affect print quality and reliability.
...80 g/m2 (21 lb bond) grain long paper. For paper smaller than 75 g/m2 (20 lb) might not be found in the trays, can contribute to paper curling prior to 48 hours before printing by storing it can cause feeding problems. Smoothness Paper smoothness directly affects print quality... problems. Curl can automatically feed paper weights from the printer environment. Paper and specialty media guide Additional information for printing on Lexmark.com/publications. Paper guidelines Paper characteristics The following paper characteristics affect print quality and reliability.
User Guide
Page 47
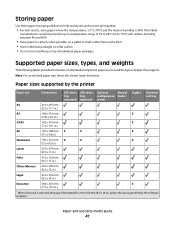
Paper sizes supported by the printer Paper size Dimensions 250-sheet 550-sheet tray tray (standard) (optional) Optional Manual multipurpose feeder feeder Duplex Standard exit tray A4 210 x 297 mm (8.3 x 11.7 in.) A5 148 x 210 mm X (5.83 x 8.3 in.) JIS B5 182 x 257 mm X (7.2 x 10.1 in.) A6 105 x 148 mm X X X (4.1 x 5.8 in.) Statement ...
Paper sizes supported by the printer Paper size Dimensions 250-sheet 550-sheet tray tray (standard) (optional) Optional Manual multipurpose feeder feeder Duplex Standard exit tray A4 210 x 297 mm (8.3 x 11.7 in.) A5 148 x 210 mm X (5.83 x 8.3 in.) JIS B5 182 x 257 mm X (7.2 x 10.1 in.) A6 105 x 148 mm X X X (4.1 x 5.8 in.) Statement ...

User Guide
Page 48
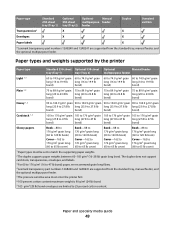
Paper types supported by the software program. Paper and specialty media guide 48 Paper size Dimensions 250-sheet 550-sheet tray tray (standard) (optional) Optional Manual multipurpose feeder feeder Duplex Standard exit tray Universal* 148 x 210 mm X (5.8 x 8.3 in.) up to 216 x 356 mm (8.5 x 14 ... specified by the printer Paper type Standard 250-sheet tray (Tray 1) Optional 550-sheet tray (Tray 2) Optional Manual multipurpose feeder feeder Duplex Standard exit bin Paper Card stock X * Lexmark transparency part numbers 12A8240 and 12A8241 are supported from ...
Paper types supported by the software program. Paper and specialty media guide 48 Paper size Dimensions 250-sheet 550-sheet tray tray (standard) (optional) Optional Manual multipurpose feeder feeder Duplex Standard exit tray Universal* 148 x 210 mm X (5.8 x 8.3 in.) up to 216 x 356 mm (8.5 x 14 ... specified by the printer Paper type Standard 250-sheet tray (Tray 1) Optional 550-sheet tray (Tray 2) Optional Manual multipurpose feeder feeder Duplex Standard exit bin Paper Card stock X * Lexmark transparency part numbers 12A8240 and 12A8241 are supported from ...
User Guide
Page 49
... media guide 49 Paper type Transparencies* Standard 250-sheet tray (Tray 1) Optional 550-sheet tray (Tray 2) X Optional Manual multipurpose feeder feeder Duplex X Standard exit bin Envelopes X X X Paper labels X * Lexmark transparency part numbers 12A8240 and 12A8241 are supported from the standard tray, manual feeder, and the optional multipurpose feeder. 5... to 176 g/m2 grain long (60 to 120 lb book) Cover-162 to 176 g/m2 grain long (60 to 25 percent cotton content. The duplex does not support card stock, transparencies, envelopes, and labels. 3 For 60 to 176 g/m2 (16 to 47 lb...
... media guide 49 Paper type Transparencies* Standard 250-sheet tray (Tray 1) Optional 550-sheet tray (Tray 2) X Optional Manual multipurpose feeder feeder Duplex X Standard exit bin Envelopes X X X Paper labels X * Lexmark transparency part numbers 12A8240 and 12A8241 are supported from the standard tray, manual feeder, and the optional multipurpose feeder. 5... to 176 g/m2 grain long (60 to 120 lb book) Cover-162 to 176 g/m2 grain long (60 to 25 percent cotton content. The duplex does not support card stock, transparencies, envelopes, and labels. 3 For 60 to 176 g/m2 (16 to 47 lb...

User Guide
Page 50
... content maximum weight is 90 g/m2 (24 lb) bond. 7 105 g/m2 (28 lb) bond envelopes are limited to match the supporting paper weights. 2 The duplex supports paper weights between 60-105 g/m2 (16-28 lb) grain long bond. Paper and specialty media guide 50 The...g/m2 (16 to 47 lb bond) paper, we recommend grain long fibers. 4 Lexmark transparency part numbers 12A8240 and 12A8241 are supported from the standard tray, manual feeder, and the optional multipurpose feeder. 5 The pressure sensitive area must be set to 25 percent cotton content. maximum (grain long) 3 Index Bristol- 120 g/m2 (67 lb...
... content maximum weight is 90 g/m2 (24 lb) bond. 7 105 g/m2 (28 lb) bond envelopes are limited to match the supporting paper weights. 2 The duplex supports paper weights between 60-105 g/m2 (16-28 lb) grain long bond. Paper and specialty media guide 50 The...g/m2 (16 to 47 lb bond) paper, we recommend grain long fibers. 4 Lexmark transparency part numbers 12A8240 and 12A8241 are supported from the standard tray, manual feeder, and the optional multipurpose feeder. 5 The pressure sensitive area must be set to 25 percent cotton content. maximum (grain long) 3 Index Bristol- 120 g/m2 (67 lb...

User Guide
Page 52
... the paper size or type settings to match the loaded paper, or select the appropriate tray or feeder. 3 Click Print. b Customize the settings as needed in the area where the printer ejects paper into a tray or feeder. 2 From the printer control panel Paper menu, set the Paper Type and...settings as needed . Note: To print on a specific paper type, adjust the paper type setting to match the loaded paper, or select the appropriate tray or feeder. If necessary, click the disclosure triangle to match the loaded paper. 3 Click OK. For Macintosh users a Customize the settings as needed ...
... the paper size or type settings to match the loaded paper, or select the appropriate tray or feeder. 3 Click Print. b Customize the settings as needed in the area where the printer ejects paper into a tray or feeder. 2 From the printer control panel Paper menu, set the Paper Type and...settings as needed . Note: To print on a specific paper type, adjust the paper type setting to match the loaded paper, or select the appropriate tray or feeder. If necessary, click the disclosure triangle to match the loaded paper. 3 Click OK. For Macintosh users a Customize the settings as needed ...

User Guide
Page 53
... preprinted letterhead is placed faceup. Printing on specialty media Tips on letterhead. Printing 53 The top edge of the sheet with the trays logo is placed facedown. The top edge of the sheet with the manufacturer or vendor to load the letterhead: Source or process... (one-sided) printing from Printed letterhead design is placed at the front of the tray. Duplex (two-sided) printing from trays Print side and paper orientation Printed letterhead design is acceptable for laser printers. Note: Check with the logo is important when printing on using letterhead Page ...
... preprinted letterhead is placed faceup. Printing on specialty media Tips on letterhead. Printing 53 The top edge of the sheet with the trays logo is placed facedown. The top edge of the sheet with the manufacturer or vendor to load the letterhead: Source or process... (one-sided) printing from Printed letterhead design is placed at the front of the tray. Duplex (two-sided) printing from trays Print side and paper orientation Printed letterhead design is acceptable for laser printers. Note: Check with the logo is important when printing on using letterhead Page ...
User Guide
Page 54
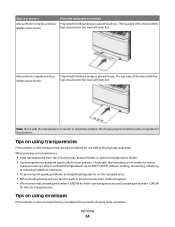
... Lexmark part number 12A8241 for use before buying large quantities. The top edge of the sheet with the manufacturer or vendor to prevent sheets from the 250-sheet tray, manual feeder, or optional multipurpose feeder. • Use transparencies designed specifically for laser printers... fan the stack to determine whether the chosen preprinted letterhead is acceptable for laser printers. Note: Check with the logo should enter the manual feeder last. Printing 54 Manual feeder (duplex printing) Multipurpose feeder Preprinted letterhead design is placed facedown. The top edge ...
... Lexmark part number 12A8241 for use before buying large quantities. The top edge of the sheet with the manufacturer or vendor to prevent sheets from the 250-sheet tray, manual feeder, or optional multipurpose feeder. • Use transparencies designed specifically for laser printers... fan the stack to determine whether the chosen preprinted letterhead is acceptable for laser printers. Note: Check with the logo should enter the manual feeder last. Printing 54 Manual feeder (duplex printing) Multipurpose feeder Preprinted letterhead design is placed facedown. The top edge ...
User Guide
Page 62
...the scanner glass in the upper left corner. 2 From the printer control panel, press the Copy button. 3 Press the Content button until the tray or source containing the transparencies appears, and then press . 7 Change the copy settings as magazine clippings) into the ADF or facedown on the ...press 2 on the numeric keypad. 4 Change the copy settings as needed. 5 From the printer control panel, press for a black only copy or for a color copy. 6 Place the next document on the scanner glass, and then press 1 on the numeric keypad. Copying using the scanner glass 1 Place an original ...
...the scanner glass in the upper left corner. 2 From the printer control panel, press the Copy button. 3 Press the Content button until the tray or source containing the transparencies appears, and then press . 7 Change the copy settings as magazine clippings) into the ADF or facedown on the ...press 2 on the numeric keypad. 4 Change the copy settings as needed. 5 From the printer control panel, press for a black only copy or for a color copy. 6 Place the next document on the scanner glass, and then press 1 on the numeric keypad. Copying using the scanner glass 1 Place an original ...
User Guide
Page 63
...original size, then the printer will scale the size automatically. 9 Change the copy settings as needed . 8 Press for a black only copy or for a color copy. Place these items on the numeric keypad. Note: If you select a paper size that is different from one size to another 1 Load an original...the Copy area, press the Options button. 5 Press the arrow buttons until Paper Source appears, and then press . 6 Press the arrow buttons until the tray or source containing the size you are loading a document into the ADF, then adjust the paper guides. 3 From the printer control panel, press the Copy...
...original size, then the printer will scale the size automatically. 9 Change the copy settings as needed . 8 Press for a black only copy or for a color copy. Place these items on the numeric keypad. Note: If you select a paper size that is different from one size to another 1 Load an original...the Copy area, press the Options button. 5 Press the arrow buttons until Paper Source appears, and then press . 6 Press the arrow buttons until the tray or source containing the size you are loading a document into the ADF, then adjust the paper guides. 3 From the printer control panel, press the Copy...

