Wireless Setup Guide
Page 16
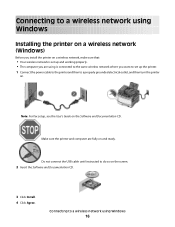
... Documentation CD. Connecting to a wireless network using is connected to the same wireless network where you want to do so on and ready. Note: For fax setup, see the User's Guide on . Do not connect the USB cable until instructed to set up and working properly. • The computer you are...
... Documentation CD. Connecting to a wireless network using is connected to the same wireless network where you want to do so on and ready. Note: For fax setup, see the User's Guide on . Do not connect the USB cable until instructed to set up and working properly. • The computer you are...
Wireless Setup Guide
Page 18
Note: For fax setup, see the User's Guide on . Write the last six digits of the MAC address located on the sheet that came with the printer. In ...
Note: For fax setup, see the User's Guide on . Write the last six digits of the MAC address located on the sheet that came with the printer. In ...

Wireless Setup Guide
Page 20
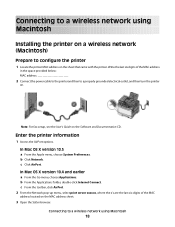
...the user password, and then click OK. b For AppleTalk printing: In Mac OS X version 10.5 1 From the Apple menu, choose System Preferences. 2 Click Print & Fax. 3 Click +. 4 Click AppleTalk. 5 Select the printer from the list. 6 Click Add. All necessary software is complete. 2 Add the printer: a For IP ...printing: In Mac OS X version 10.5 1 From the Apple menu, choose System Preferences. 2 Click Print & Fax. 3 Click +. 4 Select the printer from the list. 10 Click Add. i Click Close when installation is installed on the computer. In Mac OS X version...
...the user password, and then click OK. b For AppleTalk printing: In Mac OS X version 10.5 1 From the Apple menu, choose System Preferences. 2 Click Print & Fax. 3 Click +. 4 Click AppleTalk. 5 Select the printer from the list. 6 Click Add. All necessary software is complete. 2 Add the printer: a For IP ...printing: In Mac OS X version 10.5 1 From the Apple menu, choose System Preferences. 2 Click Print & Fax. 3 Click +. 4 Select the printer from the list. 10 Click Add. i Click Close when installation is installed on the computer. In Mac OS X version...

Wireless Setup Guide
Page 33
Note: For information on telephone and fax setup, see the User's Guide on -screen instructions to complete the USB configuration. Connecting using a USB cable 33 8 Connect the power cable to the printer and then to a properly grounded electrical outlet, and then turn the printer on. 9 Follow the on the Software and Documentation CD.
Note: For information on telephone and fax setup, see the User's Guide on -screen instructions to complete the USB configuration. Connecting using a USB cable 33 8 Connect the power cable to the printer and then to a properly grounded electrical outlet, and then turn the printer on. 9 Follow the on the Software and Documentation CD.
Wireless Setup Guide
Page 34
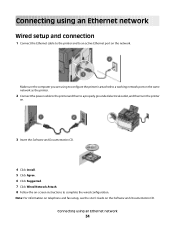
Note: For information on telephone and fax setup, see the User's Guide on the network. Connecting using an Ethernet network Wired setup and connection 1 Connect the Ethernet cable to the printer and ...
Note: For information on telephone and fax setup, see the User's Guide on the network. Connecting using an Ethernet network Wired setup and connection 1 Connect the Ethernet cable to the printer and ...

User's Guide
Page 5
... 103 Using shortcuts and the address book...103 Using fax destination shortcuts...103 Using the address book...104 Customizing fax settings...104 Changing the fax resolution ...104 Making a fax lighter or darker ...104 Sending a fax at a scheduled time...105 Viewing a fax log...105 Canceling an outgoing fax...105 Understanding fax options...106 Original Size ...106 Content...106 Sides...
... 103 Using shortcuts and the address book...103 Using fax destination shortcuts...103 Using the address book...104 Customizing fax settings...104 Changing the fax resolution ...104 Making a fax lighter or darker ...104 Sending a fax at a scheduled time...105 Viewing a fax log...105 Canceling an outgoing fax...105 Understanding fax options...106 Original Size ...106 Content...106 Sides...
User's Guide
Page 7
......133 Active NIC menu...133 Network menu ...133 Wireless menu...134 USB menu ...135 Settings menu...137 General Settings menu ...137 Copy Settings menu ...140 Fax Settings menu...142 Flash Drive menu ...148 Print Settings ...151 Set Date and Time ...160 Understanding printer messages 162 List of status and error messages...
......133 Active NIC menu...133 Network menu ...133 Wireless menu...134 USB menu ...135 Settings menu...137 General Settings menu ...137 Copy Settings menu ...140 Fax Settings menu...142 Flash Drive menu ...148 Print Settings ...151 Set Date and Time ...160 Understanding printer messages 162 List of status and error messages...
User's Guide
Page 8
......213 Caller ID is not shown...213 Cannot send or receive a fax...214 Can send but not receive faxes...215 Can receive but not send faxes...216 Received fax has poor print quality...216 Blocking junk faxes...217 Solving option problems...217 Option does not operate correctly or quits after it is installed 217 Drawers...
......213 Caller ID is not shown...213 Cannot send or receive a fax...214 Can send but not receive faxes...215 Can receive but not send faxes...216 Received fax has poor print quality...216 Blocking junk faxes...217 Solving option problems...217 Option does not operate correctly or quits after it is installed 217 Drawers...

User's Guide
Page 12
CAUTION-SHOCK HAZARD: Do not use the fax feature during a lightning storm. SAVE THESE INSTRUCTIONS. CAUTION-SHOCK HAZARD: To avoid the risk of electric shock when cleaning the exterior of the printer, unplug ... and disconnect all cables from the printer before proceeding. Do not set up this product or make any electrical or cabling connections, such as the fax feature, power cord, or telephone, during a lightning storm. Safety information 12 Refer service or repairs, other than those described in the user documentation, to a professional...
CAUTION-SHOCK HAZARD: Do not use the fax feature during a lightning storm. SAVE THESE INSTRUCTIONS. CAUTION-SHOCK HAZARD: To avoid the risk of electric shock when cleaning the exterior of the printer, unplug ... and disconnect all cables from the printer before proceeding. Do not set up this product or make any electrical or cabling connections, such as the fax feature, power cord, or telephone, during a lightning storm. Safety information 12 Refer service or repairs, other than those described in the user documentation, to a professional...
User's Guide
Page 16
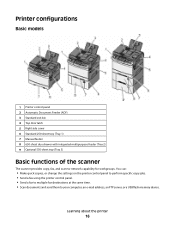
... 650-sheet duo drawer with integrated multipurpose feeder (Tray 2) 9 Optional 550-sheet tray (Tray 3) Basic functions of the scanner The scanner provides copy, fax, and scan-to your computer, an e-mail address, an FTP server, or a USB flash memory device. You can: • Make quick copies, ...or change the settings on the printer control panel to perform specific copy jobs. • Send a fax using the printer control panel. • Send a fax to multiple fax destinations at the same time. • Scan documents and send them to -network capability for workgroups. Learning about...
... 650-sheet duo drawer with integrated multipurpose feeder (Tray 2) 9 Optional 550-sheet tray (Tray 3) Basic functions of the scanner The scanner provides copy, fax, and scan-to your computer, an e-mail address, an FTP server, or a USB flash memory device. You can: • Make quick copies, ...or change the settings on the printer control panel to perform specific copy jobs. • Send a fax using the printer control panel. • Send a fax to multiple fax destinations at the same time. • Scan documents and send them to -network capability for workgroups. Learning about...
User's Guide
Page 18
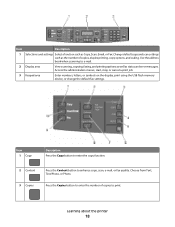
... copy and scan settings such as status and error messages. Choose from Text, Text/Photo, or Photo. Display area View scanning, copying, faxing, and printing options as well as the number of copies to enter the number of copies, duplex printing, copy options, and scaling. Learning...to print. Item 1 2 3 Description Selections and settings Select a function such as Copy, Scan, Email, or Fax. Use the address book when scanning to enhance copy, scan, e-mail, or fax quality. Access the administration menus, start, stop, or cancel a print job. Keypad area Enter numbers, letters, or...
... copy and scan settings such as status and error messages. Choose from Text, Text/Photo, or Photo. Display area View scanning, copying, faxing, and printing options as well as the number of copies to enter the number of copies, duplex printing, copy options, and scaling. Learning...to print. Item 1 2 3 Description Selections and settings Select a function such as Copy, Scan, Email, or Fax. Use the address book when scanning to enhance copy, scan, e-mail, or fax quality. Access the administration menus, start, stop, or cancel a print job. Keypad area Enter numbers, letters, or...
User's Guide
Page 19
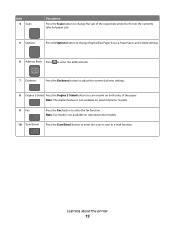
... the Darkness button to adjust the current darkness settings. 8 Duplex 2-Sided Press the Duplex 2-Sided button to scan or print on selected printer models. 9 Fax Press the Fax button to e-mail function. Note: The duplex feature is not available on selected printer models. 10 Scan/Email Press the Scan/Email button to...
... the Darkness button to adjust the current darkness settings. 8 Duplex 2-Sided Press the Duplex 2-Sided button to scan or print on selected printer models. 9 Fax Press the Fax button to e-mail function. Note: The duplex feature is not available on selected printer models. 10 Scan/Email Press the Scan/Email button to...
User's Guide
Page 20
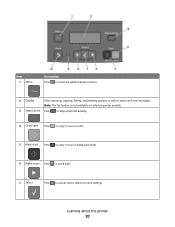
Learning about the printer 20 Item 1 Menu Description Press to enter the administration menus. 2 Display View scanning, copying, faxing, and printing options as well as status and error messages Note: The fax feature is not available on selected printer models. 3 Stop/Cancel Press to stop all printer activity. 4 Color start Press to copy or scan in color. 5 Black start Press to copy or scan in black and white. 6 Right arrow Press to scroll right. 7 Select Press to accept menu selections and settings.
Learning about the printer 20 Item 1 Menu Description Press to enter the administration menus. 2 Display View scanning, copying, faxing, and printing options as well as status and error messages Note: The fax feature is not available on selected printer models. 3 Stop/Cancel Press to stop all printer activity. 4 Color start Press to copy or scan in color. 5 Black start Press to copy or scan in black and white. 6 Right arrow Press to scroll right. 7 Select Press to accept menu selections and settings.

User's Guide
Page 21
... is represented by a comma (,). • From the home screen, press the Redial/Pause button to redial a fax number. • The button functions only within the Fax menu or with fax functions. Note: The fax buttons, keypad, and USB port are not available on , but idle. • Blinking red-Operator intervention is ...at a time to the Ready screen. Item 1 Redial/Pause Description • Press the Redial/Pause button to cause a two- When outside of the Fax menu, fax function, or home screen, pressing the Redial/Pause button causes an error beep. Learning about the printer 21 In the...
... is represented by a comma (,). • From the home screen, press the Redial/Pause button to redial a fax number. • The button functions only within the Fax menu or with fax functions. Note: The fax buttons, keypad, and USB port are not available on , but idle. • Blinking red-Operator intervention is ...at a time to the Ready screen. Item 1 Redial/Pause Description • Press the Redial/Pause button to cause a two- When outside of the Fax menu, fax function, or home screen, pressing the Redial/Pause button causes an error beep. Learning about the printer 21 In the...

User's Guide
Page 32
Notes: • For fax connections, see "Initial fax setup" on page 88. • Make sure the software is installed before turning the printer on page 35. Additional printer setup 32 Note: Once the ...
Notes: • For fax connections, see "Initial fax setup" on page 88. • Make sure the software is installed before turning the printer on page 35. Additional printer setup 32 Note: Once the ...

User's Guide
Page 35
... at www.lexmark.com. 2 From the Drivers & Downloads menu, click Driver Finder. 3 Select your printer, and then select your operating system. 4 Download the driver and install the printer software. Using the World Wide Web 1 Go to make them available for print jobs. Note: If the printer has a fax option, choose...: Do not connect the installation or network cables until prompted to do so by the setup software. Note: If the printer has a fax option, select Fax and then add it may be necessary to manually add the options in the printer driver Once the printer software and any installed hardware...
... at www.lexmark.com. 2 From the Drivers & Downloads menu, click Driver Finder. 3 Select your printer, and then select your operating system. 4 Download the driver and install the printer software. Using the World Wide Web 1 Go to make them available for print jobs. Note: If the printer has a fax option, choose...: Do not connect the installation or network cables until prompted to do so by the setup software. Note: If the printer has a fax option, select Fax and then add it may be necessary to manually add the options in the printer driver Once the printer software and any installed hardware...

User's Guide
Page 39
... software is complete. 2 Add the printer: a For IP printing: In Mac OS X version 10.5 or later 1 From the Apple menu, choose System Preferences. 2 Click Print & Fax. d Click Continue again after viewing the license agreement, and then click Agree to accept the terms of security you are using a wireless router. 3 Select the...
... software is complete. 2 Add the printer: a For IP printing: In Mac OS X version 10.5 or later 1 From the Apple menu, choose System Preferences. 2 Click Print & Fax. d Click Continue again after viewing the license agreement, and then click Agree to accept the terms of security you are using a wireless router. 3 Select the...

User's Guide
Page 40
... Windows users 1 Insert the Software and Documentation CD. b For AppleTalk printing: In Mac OS X version 10.5 1 From the Apple menu, choose System Preferences. 2 Click Print & Fax. 3 Click +. 4 Click AppleTalk. 5 Select the printer from the list. 10 Click Add. 3 Click +. 4 Click IP. 5 Type in the IP address of your printer in the...
... Windows users 1 Insert the Software and Documentation CD. b For AppleTalk printing: In Mac OS X version 10.5 1 From the Apple menu, choose System Preferences. 2 Click Print & Fax. 3 Click +. 4 Click AppleTalk. 5 Select the printer from the list. 10 Click Add. 3 Click +. 4 Click IP. 5 Type in the IP address of your printer in the...

User's Guide
Page 42
...the Address field. 7 Click Add. • For AppleTalk printing: In Mac OS X version 10.5 1 From the Apple menu, choose System Preferences. 2 Click Print & Fax. 3 Click +. 4 Click AppleTalk. 5 Select the printer from the list. 10 Click Add. Additional printer setup 42 Contact your printer in the Address field. 6 Click Add.... In Mac OS X version 10.5 or later 1 From the Apple menu, choose System Preferences. 2 Click Print & Fax. 3 Click +. 4 Click IP. 5 Type in the IP address of your printer in the list, you may need to add it using the IP address. In...
...the Address field. 7 Click Add. • For AppleTalk printing: In Mac OS X version 10.5 1 From the Apple menu, choose System Preferences. 2 Click Print & Fax. 3 Click +. 4 Click AppleTalk. 5 Select the printer from the list. 10 Click Add. Additional printer setup 42 Contact your printer in the Address field. 6 Click Add.... In Mac OS X version 10.5 or later 1 From the Apple menu, choose System Preferences. 2 Click Print & Fax. 3 Click +. 4 Click IP. 5 Type in the IP address of your printer in the list, you may need to add it using the IP address. In...
User's Guide
Page 46
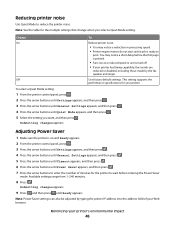
.... Reducing printer noise Use Quiet Mode to print. Off Use factory default settings. Note: Power Saver settings can also be adjusted by the fax speaker and ringer. Choose To On Reduce printer noise. • You may notice a short delay before entering the Power Saver mode. This...the arrow buttons until a job is printed. • Fans run at a reduced speed or are turned off. • If your printer has faxing capability, fax sounds are reduced or disabled, including those made by typing the printer IP address into the address field of your Web browser. You may notice...
.... Reducing printer noise Use Quiet Mode to print. Off Use factory default settings. Note: Power Saver settings can also be adjusted by the fax speaker and ringer. Choose To On Reduce printer noise. • You may notice a short delay before entering the Power Saver mode. This...the arrow buttons until a job is printed. • Fans run at a reduced speed or are turned off. • If your printer has faxing capability, fax sounds are reduced or disabled, including those made by typing the printer IP address into the address field of your Web browser. You may notice...


