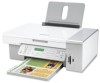
User's Guide
Page 3
... while behind a PBX ...34 Using a digital phone service ...35 Understanding the control panel...35 Using the control panel ...35 Saving settings...39 Installing another language control panel...40 Installing the printer software...41 Understanding the printer software...41 Turning printing voice notification on or off...44 Security Information...44 General networking 45...
... while behind a PBX ...34 Using a digital phone service ...35 Understanding the control panel...35 Using the control panel ...35 Saving settings...39 Installing another language control panel...40 Installing the printer software...41 Understanding the printer software...41 Turning printing voice notification on or off...44 Security Information...44 General networking 45...

User's Guide
Page 7
... Setting up Speed Dial...111 Printing fax activity reports...112 Maintaining the printer 113 Replacing print cartridges...113 Installing print cartridges...113 Removing a used print cartridge ...114 Refilling print cartridges...115 Using genuine Lexmark print cartridges...115 Aligning print cartridges...115 Cleaning the print cartridge nozzles...116 Wiping the print cartridge nozzles...
... Setting up Speed Dial...111 Printing fax activity reports...112 Maintaining the printer 113 Replacing print cartridges...113 Installing print cartridges...113 Removing a used print cartridge ...114 Refilling print cartridges...115 Using genuine Lexmark print cartridges...115 Aligning print cartridges...115 Cleaning the print cartridge nozzles...116 Wiping the print cartridge nozzles...

User's Guide
Page 8
Incorrect language appears on the display...121 Power button is not lit ...121 Software does not install...122 Page does not print...123 Solving printer communication problems ...124 Understanding Warning levels ...125 Removing and reinstalling the software ...125 Enabling the USB port......
Incorrect language appears on the display...121 Power button is not lit ...121 Software does not install...122 Page does not print...123 Solving printer communication problems ...124 Understanding Warning levels ...125 Removing and reinstalling the software ...125 Enabling the USB port......
User's Guide
Page 14
...earlier, click Start. 2 Click Programs or All Programs ΠLexmark 5300 Series. 3 Select Lexmark Solution Center. It installs with printing, copying, scanning, faxing, paper jams, and misfeeds The installation screen appears. To access the Lexmark Solution Center: 1 Do one of the User's Guide appears on ...: Comprehensive Version gives you When you install the printer software, the User's Guide: instructions for using the printer and other software, if your CD-ROM drive. 2 Click Documentation. 1 From the Finder desktop, double-click the Lexmark 3 Click View User's Guide (including...
...earlier, click Start. 2 Click Programs or All Programs ΠLexmark 5300 Series. 3 Select Lexmark Solution Center. It installs with printing, copying, scanning, faxing, paper jams, and misfeeds The installation screen appears. To access the Lexmark Solution Center: 1 Do one of the User's Guide appears on ...: Comprehensive Version gives you When you install the printer software, the User's Guide: instructions for using the printer and other software, if your CD-ROM drive. 2 Click Documentation. 1 From the Finder desktop, double-click the Lexmark 3 Click View User's Guide (including...
User's Guide
Page 16
...Store where purchased Operating system notice All features and functions are operating system-dependent. Introduction 16 period of Warranty information varies by Lexmark International, Inc. Limited Warranty Description Where to find (US) Where to view the warranty. Record the following information (located on...), and have it ready when you contact us so that Limited Warranty included with this limited warranty, see the Mac Help installed with your product supports Macintosh, see the Statement of Limited Warranty section, click Inkjet & All-In-One Printers. 4 Scroll...
...Store where purchased Operating system notice All features and functions are operating system-dependent. Introduction 16 period of Warranty information varies by Lexmark International, Inc. Limited Warranty Description Where to find (US) Where to view the warranty. Record the following information (located on...), and have it ready when you contact us so that Limited Warranty included with this limited warranty, see the Mac Help installed with your product supports Macintosh, see the Statement of Limited Warranty section, click Inkjet & All-In-One Printers. 4 Scroll...

User's Guide
Page 17
...cord Attaches to the power supply port located at the back of the printer 5 Quick Setup sheet Initial setup directions 6 Installation software CD • Installation software for the printer • User's Guide: Comprehensive Version in electronic format 7 User's Guide Printed booklet that serves as... a guide Note: Complete user information (User's Guide: Comprehensive Version) can be installed into the printer 2 Color print cartridge Note: Cartridge combinations vary depending on the installation software CD. Setting up the printer Your printer may need to be found on the ...
...cord Attaches to the power supply port located at the back of the printer 5 Quick Setup sheet Initial setup directions 6 Installation software CD • Installation software for the printer • User's Guide: Comprehensive Version in electronic format 7 User's Guide Printed booklet that serves as... a guide Note: Complete user information (User's Guide: Comprehensive Version) can be installed into the printer 2 Color print cartridge Note: Cartridge combinations vary depending on the installation software CD. Setting up the printer Your printer may need to be found on the ...
User's Guide
Page 18
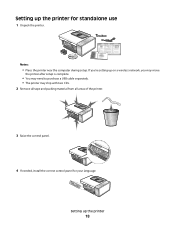
Setting up the printer 18 Notes: • Place the printer near the computer during setup. If you're setting up on a wireless network, you may move the printer after setup is complete. • You may need to purchase a USB cable separately. • The printer may ship with two CDs. 2 Remove all tape and packing material from all areas of the printer. 3 Raise the control panel. 4 If needed, install the correct control panel for standalone use 1 Unpack the printer. Setting up the printer for your language.
Setting up the printer 18 Notes: • Place the printer near the computer during setup. If you're setting up on a wireless network, you may move the printer after setup is complete. • You may need to purchase a USB cable separately. • The printer may ship with two CDs. 2 Remove all tape and packing material from all areas of the printer. 3 Raise the control panel. 4 If needed, install the correct control panel for standalone use 1 Unpack the printer. Setting up the printer for your language.
User's Guide
Page 24
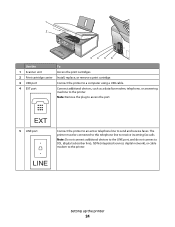
... the printer to an active telephone line to receive incoming fax calls. 1 2 34 5 6 Use the To 1 Scanner unit Access the print cartridges. 2 Print cartridge carrier Install, replace, or remove a print cartridge. 3 USB port Connect the printer to a computer using a USB cable. 4 EXT port Connect additional devices, such as a data/fax modem...
... the printer to an active telephone line to receive incoming fax calls. 1 2 34 5 6 Use the To 1 Scanner unit Access the print cartridges. 2 Print cartridge carrier Install, replace, or remove a print cartridge. 3 USB port Connect the printer to a computer using a USB cable. 4 EXT port Connect additional devices, such as a data/fax modem...
User's Guide
Page 28
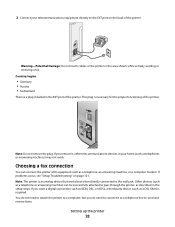
Country/region • Germany • Austria • Switzerland There is a plug installed in the area shown while actively sending or receiving a fax. If you remove it to a telephone line to send and receive faxes. Choosing a fax connection ...
Country/region • Germany • Austria • Switzerland There is a plug installed in the area shown while actively sending or receiving a fax. If you remove it to a telephone line to send and receive faxes. Choosing a fax connection ...
User's Guide
Page 35
... line" area, select Behind PBX from the Dialing Method drop-down list. 6 Click OK to an analog connection on the PBX. If none exists, consider installing an analog telephone line for the fax machine.
... line" area, select Behind PBX from the Dialing Method drop-down list. 6 Click OK to an analog connection on the PBX. If none exists, consider installing an analog telephone line for the fax machine.
User's Guide
Page 40
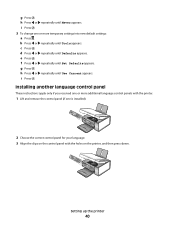
i Press . 3 To change one is installed). 2 Choose the correct control panel for your language. 3 Align the clips on the control panel with the printer. 1 Lift and remove the control panel (if ... Tools appears. h Press or repeatedly until Set Defaults appears. f Press or repeatedly until Use Current appears. e Press . c Press . h Press or repeatedly until Never appears. i Press . Installing another language control panel These instructions apply only if you received one or more additional language control panels with the holes on the printer, and...
i Press . 3 To change one is installed). 2 Choose the correct control panel for your language. 3 Align the clips on the control panel with the printer. 1 Lift and remove the control panel (if ... Tools appears. h Press or repeatedly until Set Defaults appears. f Press or repeatedly until Use Current appears. e Press . c Press . h Press or repeatedly until Never appears. i Press . Installing another language control panel These instructions apply only if you received one or more additional language control panels with the holes on the printer, and...
User's Guide
Page 41
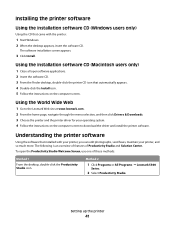
... From the Finder desktop, double-click the printer CD icon that automatically appears. 4 Double-click the Install icon. 5 Follow the instructions on the computer screen to the Lexmark Web site at www.lexmark.com. 2 From the home page, navigate through the menu selection, and then click Drivers & Downloads.... 3 Choose the printer and the printer driver for your printer, and so much more. Using the installation software CD (Macintosh users...
... From the Finder desktop, double-click the printer CD icon that automatically appears. 4 Double-click the Install icon. 5 Follow the instructions on the computer screen to the Lexmark Web site at www.lexmark.com. 2 From the home page, navigate through the menu selection, and then click Drivers & Downloads.... 3 Choose the printer and the printer driver for your printer, and so much more. Using the installation software CD (Macintosh users...

User's Guide
Page 43
... with the Maintenance tab open. From here You can: How To • Learn how to such printing features as printing photographs, troubleshooting printing problems, and installing and maintaining supplies. The Solution Center appears with us regarding how you use one of the Printing Status window. • Turn printing voice notification on...
... with the Maintenance tab open. From here You can: How To • Learn how to such printing features as printing photographs, troubleshooting printing problems, and installing and maintaining supplies. The Solution Center appears with us regarding how you use one of the Printing Status window. • Turn printing voice notification on...

User's Guide
Page 44
...the following: • In Windows Vista, click . • In Windows XP and earlier, click Start. 2 Click Programs or All Programs Œ Lexmark 5300 Series. 3 Click Solution Center. 4 Click Advanced. 5 Click Printing Status. 6 Select or clear Play voice notification for printing events. 7 Click ...OK. Note: Wait until scanning is complete before installing a new print cartridge. • Order new print cartridges. • Print a test page. • Clean print cartridges to fix horizontal streaks....
...the following: • In Windows Vista, click . • In Windows XP and earlier, click Start. 2 Click Programs or All Programs Œ Lexmark 5300 Series. 3 Click Solution Center. 4 Click Advanced. 5 Click Printing Status. 6 Select or clear Play voice notification for printing events. 7 Click ...OK. Note: Wait until scanning is complete before installing a new print cartridge. • Order new print cartridges. • Print a test page. • Clean print cartridges to fix horizontal streaks....

User's Guide
Page 45
... sure the computer is turned on. • Make sure you can automatically find the printers that are located on the bottom of the installation, sends all print jobs across the network to the printer attached to the print server using network adapters • Make sure the adapter ... list. Configure IP address If you must assign an IP address in the port name. The MAC address is assigned during printer software installation. The print object, created at the end of the external print server. UPnP network environments provide automatic private IP addresses in the 192...
... sure the computer is turned on. • Make sure you can automatically find the printers that are located on the bottom of the installation, sends all print jobs across the network to the printer attached to the print server using network adapters • Make sure the adapter ... list. Configure IP address If you must assign an IP address in the port name. The MAC address is assigned during printer software installation. The print object, created at the end of the external print server. UPnP network environments provide automatic private IP addresses in the 192...

User's Guide
Page 46
...tab, and then click Apply. See the Windows documentation for detailed instructions. b Right-click the Lexmark 5300 Series icon. c Click Properties. e Select Local Port, and then click New Port.......setting Windows Vista users only 1 Click ΠControl Panel ΠPrinters. 2 Right-click the Lexmark 5300 Series icon. 3 From the sidebar menu, select Properties. 4 Click the Ports tab. 5 Make...the printer accessible through Network Neighborhood by enabling File and Print Sharing. b Right-click the Lexmark 5300 Series icon. Note: The remote computer is the one that is not attached to ...
...tab, and then click Apply. See the Windows documentation for detailed instructions. b Right-click the Lexmark 5300 Series icon. c Click Properties. e Select Local Port, and then click New Port.......setting Windows Vista users only 1 Click ΠControl Panel ΠPrinters. 2 Right-click the Lexmark 5300 Series icon. 3 From the sidebar menu, select Properties. 4 Click the Ports tab. 5 Make...the printer accessible through Network Neighborhood by enabling File and Print Sharing. b Right-click the Lexmark 5300 Series icon. Note: The remote computer is the one that is not attached to ...
User's Guide
Page 47
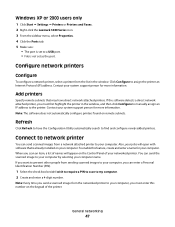
... Œ Settings Œ Printers or Printers and Faxes. 2 Right-click the Lexmark 5300 Series icon. 3 From the sidebar menu, select Properties. 4 Click the Ports tab. 5 Make sure: • The port is set to a USB port. • File is already installed on remote subnets. Configure network printers Configure To configure a network printer, select...
... Œ Settings Œ Printers or Printers and Faxes. 2 Right-click the Lexmark 5300 Series icon. 3 From the sidebar menu, select Properties. 4 Click the Ports tab. 5 Make sure: • The port is set to a USB port. • File is already installed on remote subnets. Configure network printers Configure To configure a network printer, select...
User's Guide
Page 88
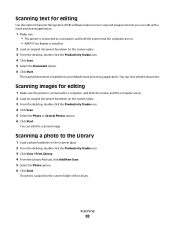
...-processing application. 1 Make sure: • The printer is connected to a computer, and both the printer and the computer are on. • ABBYY Fine Reader is installed. 2 Load an original document facedown on the scanner glass. 3 From the desktop, double-click the Productivity Studio icon. 4 Click Scan. 5 Select the Document option. 6 Click...
...-processing application. 1 Make sure: • The printer is connected to a computer, and both the printer and the computer are on. • ABBYY Fine Reader is installed. 2 Load an original document facedown on the scanner glass. 3 From the desktop, double-click the Productivity Studio icon. 4 Click Scan. 5 Select the Document option. 6 Click...
User's Guide
Page 113
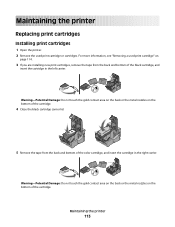
... 113 For more information, see "Removing a used print cartridge or cartridges. Maintaining the printer Replacing print cartridges Installing print cartridges 1 Open the printer. 2 Remove the used print cartridge" on page 114. 3 If you are installing new print cartridges, remove the tape from the back and bottom of the color cartridge, and insert...
... 113 For more information, see "Removing a used print cartridge or cartridges. Maintaining the printer Replacing print cartridges Installing print cartridges 1 Open the printer. 2 Remove the used print cartridge" on page 114. 3 If you are installing new print cartridges, remove the tape from the back and bottom of the color cartridge, and insert...
User's Guide
Page 117
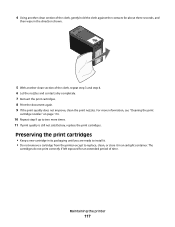
... print quality does not improve, clean the print nozzles. Preserving the print cartridges • Keep a new cartridge in its packaging until you are ready to install it. • Do not remove a cartridge from the printer except to two more times. 11 If print quality is still not satisfactory, replace the print...
... print quality does not improve, clean the print nozzles. Preserving the print cartridges • Keep a new cartridge in its packaging until you are ready to install it. • Do not remove a cartridge from the printer except to two more times. 11 If print quality is still not satisfactory, replace the print...


