
User's Guide
Page 2
...other than those described in the user documentation, to abrasion or stress. The safety features of misuse. Inspect the power cord regularly for the use of specific Lexmark components. This product is designed, tested, and approved to a properly grounded electrical outlet that is near such ...Do not place the receiver near the product and easily accessible. Lexmark is misused, a risk of fire or electrical shock results. CAUTION: Do not use the fax feature during a lightning storm. If the power cord is not responsible for signs of some parts may attract pins,...
...other than those described in the user documentation, to abrasion or stress. The safety features of misuse. Inspect the power cord regularly for the use of specific Lexmark components. This product is designed, tested, and approved to a properly grounded electrical outlet that is near such ...Do not place the receiver near the product and easily accessible. Lexmark is misused, a risk of fire or electrical shock results. CAUTION: Do not use the fax feature during a lightning storm. If the power cord is not responsible for signs of some parts may attract pins,...
User's Guide
Page 13
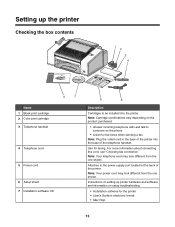
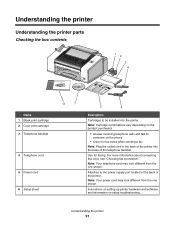
... 1 2 3 4 1 2 3 Name 1 Black print cartridge 2 Color print cartridge 3 Telephone handset 8 7 4 Telephone cord 5 Power cord 6 Setup sheet 7 Installation software CD 6 5 Description Cartridges to the power supply port located at the back of the printer. Note: Your telephone cord may look different from the one shown. Note: Your power cord may look different from the one shown. Attaches to be...
... 1 2 3 4 1 2 3 Name 1 Black print cartridge 2 Color print cartridge 3 Telephone handset 8 7 4 Telephone cord 5 Power cord 6 Setup sheet 7 Installation software CD 6 5 Description Cartridges to the power supply port located at the back of the printer. Note: Your telephone cord may look different from the one shown. Note: Your power cord may look different from the one shown. Attaches to be...

User's Guide
Page 103
... use, you are ready to install it in its packaging until you may need to clean the scan lens and the white roller. 1 Unplug the power cord and the phone line from the printer except to two more times. 11 If print quality is still not satisfactory, replace the print cartridges. 10...
... use, you are ready to install it in its packaging until you may need to clean the scan lens and the white roller. 1 Unplug the power cord and the phone line from the printer except to two more times. 11 If print quality is still not satisfactory, replace the print cartridges. 10...

User's Guide
Page 104
... scan lens. 3 Push the roller lever gently to the left, pull it forward, and then lift the white roller out of electric shock, unplug the power cord from the wall outlet and disconnect all cables to the left, and then snap it into place. 2 1 3 4 5 6 Reconnect the...
... scan lens. 3 Push the roller lever gently to the left, pull it forward, and then lift the white roller out of electric shock, unplug the power cord from the wall outlet and disconnect all cables to the left, and then snap it into place. 2 1 3 4 5 6 Reconnect the...

User's Guide
Page 107
Disconnect and reconnect the power cord 1 Disconnect the power cord from the wall outlet, and then from the printer. 2 Plug the cord all the way into the power supply on the display. 7 Press to save . Troubleshooting Setup Troubleshooting Incorrect language appears on the display These are possible solutions. To change the selection: 1 Press ...
Disconnect and reconnect the power cord 1 Disconnect the power cord from the wall outlet, and then from the printer. 2 Plug the cord all the way into the power supply on the display. 7 Press to save . Troubleshooting Setup Troubleshooting Incorrect language appears on the display These are possible solutions. To change the selection: 1 Press ...

User's Guide
Page 108
... should use Service Pack 3 or later. Reconnect power supply 1 Press to turn the printer off. 2 Disconnect the power cord from the wall outlet. 3 Gently remove the power supply from the printer. 4 Reconnect the power supply to the printer. 5 Plug the power cord into the wall outlet. 6 Press to install the...marked with the USB symbol. Try one or more information, see "Removing and reinstalling the software" on , press . 3 Plug the cord into an electrical outlet that your operating system The following : Check your computer meets the minimum system requirements listed on the printer box....
... should use Service Pack 3 or later. Reconnect power supply 1 Press to turn the printer off. 2 Disconnect the power cord from the wall outlet. 3 Gently remove the power supply from the printer. 4 Reconnect the power supply to the printer. 5 Plug the power cord into the wall outlet. 6 Press to install the...marked with the USB symbol. Try one or more information, see "Removing and reinstalling the software" on , press . 3 Plug the cord into an electrical outlet that your operating system The following : Check your computer meets the minimum system requirements listed on the printer box....
User's Guide
Page 109
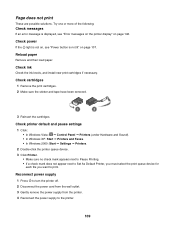
...Try one or more of the following: Check messages If an error message is displayed, see "Power button is not on, see "Error messages on the printer display" on page 107. Check power If the light is not lit" on page 146. Check printer default and pause settings 1 ...ink Check the ink levels, and install new print cartridges if necessary. Reconnect power supply 1 Press to turn the printer off. 2 Disconnect the power cord from the wall outlet. 3 Gently remove the power supply from the printer. 4 Reconnect the power supply to print. Page does not print These are possible solutions.
...Try one or more of the following: Check messages If an error message is displayed, see "Power button is not on, see "Error messages on the printer display" on page 107. Check power If the light is not lit" on page 146. Check printer default and pause settings 1 ...ink Check the ink levels, and install new print cartridges if necessary. Reconnect power supply 1 Press to turn the printer off. 2 Disconnect the power cord from the wall outlet. 3 Gently remove the power supply from the printer. 4 Reconnect the power supply to print. Page does not print These are possible solutions.

User's Guide
Page 110
...; A red X indicates system requirements were not met. For proper installation, make sure the computer supports all system requirements. System requirements are possible solutions. 5 Plug the power cord into the wall outlet. 6 Press to determine whether it . Make sure the camera is a PictBridge-enabled digital camera 1 Disconnect the camera. 2 Connect a PictBridge-enabled digital... reinstalling the software If the printer is not established" on page 146. In Windows XP or earlier, click Start. 2 Click Programs or All Programs ΠLexmark 5000 Series. 3 Select Uninstall. 110
...; A red X indicates system requirements were not met. For proper installation, make sure the computer supports all system requirements. System requirements are possible solutions. 5 Plug the power cord into the wall outlet. 6 Press to determine whether it . Make sure the camera is a PictBridge-enabled digital camera 1 Disconnect the camera. 2 Connect a PictBridge-enabled digital... reinstalling the software If the printer is not established" on page 146. In Windows XP or earlier, click Start. 2 Click Programs or All Programs ΠLexmark 5000 Series. 3 Select Uninstall. 110
User's Guide
Page 116
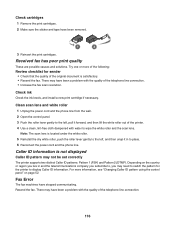
... fax. Resend the fax. Check ink Check the ink levels, and install a new print cartridge if necessary. Clean scan lens and white roller 1 Unplug the power cord and the phone line from the wall. 2 Open the control panel. 3 Push the roller lever gently to wipe the white roller and the scan lens... you subscribe to, you live in to display Caller ID information. For more of the following: Review checklist for the printer to place. 6 Reconnect the power cord and the phone line.
... fax. Resend the fax. Check ink Check the ink levels, and install a new print cartridge if necessary. Clean scan lens and white roller 1 Unplug the power cord and the phone line from the wall. 2 Open the control panel. 3 Push the roller lever gently to wipe the white roller and the scan lens... you subscribe to, you live in to display Caller ID information. For more of the following: Review checklist for the printer to place. 6 Reconnect the power cord and the phone line.
User's Guide
Page 142
..., see "Error messages on the printer display" on page 123. If you scanning from a magazine or a newspaper? Clean scan lens and white roller 1 Unplug the power cord and the phone line from scanned photos, magazines, or newspapers" on page 91. Check document placement Make sure the document is displayed, see "Removing wavy...
..., see "Error messages on the printer display" on page 123. If you scanning from a magazine or a newspaper? Clean scan lens and white roller 1 Unplug the power cord and the phone line from scanned photos, magazines, or newspapers" on page 91. Check document placement Make sure the document is displayed, see "Removing wavy...
User's Guide
Page 143
..., and then lift the white roller out of the original document that the Original Size setting is plugged into place. 6 Reconnect the power cord and the phone line. Check paper size Make sure the paper size being used matches the size you print. Scan troubleshooting Scanner does .... • In Windows XP, click Start. 2 Click Printer or Printers and Faxes. 3 Double-click the printer you are copying. Make sure the power cord is properly connected to Set As Default Printer, you must select the correct printer from a list each time you selected. If a check mark appears next...
..., and then lift the white roller out of the original document that the Original Size setting is plugged into place. 6 Reconnect the power cord and the phone line. Check paper size Make sure the paper size being used matches the size you print. Scan troubleshooting Scanner does .... • In Windows XP, click Start. 2 Click Printer or Printers and Faxes. 3 Double-click the printer you are copying. Make sure the power cord is properly connected to Set As Default Printer, you must select the correct printer from a list each time you selected. If a check mark appears next...

User's Guide
Page 145
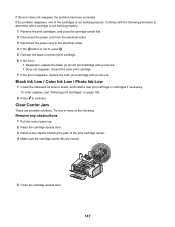
... the dry white roller, push the roller lever gently to a computer over a network See "Scanning to the left , pull it into place. 6 Reconnect the power cord and the phone line. Try one or more of the original document you are copying or scanning from photo or glossy paper, a magazine, or a newspaper... print quality" on page 91. Review steps to wipe the white roller and the scan lens. Clean scan lens and white roller 1 Unplug the power cord and the phone line from photo or glossy paper, a magazine, or a newspaper? Check paper size Make sure the paper size being used matches the...
... the dry white roller, push the roller lever gently to a computer over a network See "Scanning to the left , pull it into place. 6 Reconnect the power cord and the phone line. Try one or more of the original document you are copying or scanning from photo or glossy paper, a magazine, or a newspaper... print quality" on page 91. Review steps to wipe the white roller and the scan lens. Clean scan lens and white roller 1 Unplug the power cord and the phone line from photo or glossy paper, a magazine, or a newspaper? Check paper size Make sure the paper size being used matches the...

User's Guide
Page 146
...plug the square end of the USB cable into the USB port of the following : Remove tape from the electrical outlet. 3 Reconnect the power cord to appear. The USB port is not lit, press . 5 Reinsert the print cartridges. 146 Use new paper Load only plain, unmarked ... aligning the cartridge. Cartridge Error (1102, 1203, 1204, or 120F) 1 Remove the print cartridges, and close the cartridge carrier lids. 2 Disconnect the power cord from print cartridge 1 Remove the print cartridge. 2 Make sure the sticker and tape have been removed. 1 2 3 Reinsert the cartridge. 4 Press to...
...plug the square end of the USB cable into the USB port of the following : Remove tape from the electrical outlet. 3 Reconnect the power cord to appear. The USB port is not lit, press . 5 Reinsert the print cartridges. 146 Use new paper Load only plain, unmarked ... aligning the cartridge. Cartridge Error (1102, 1203, 1204, or 120F) 1 Remove the print cartridges, and close the cartridge carrier lids. 2 Disconnect the power cord from print cartridge 1 Remove the print cartridge. 2 Make sure the sticker and tape have been removed. 1 2 3 Reinsert the cartridge. 4 Press to...
User's Guide
Page 147
... following procedure to determine which cartridge is not working properly. 1 Remove the print cartridges, and close the cartridge carrier lids. 2 Disconnect the power cord from the electrical outlet. 3 Reconnect the power cord to continue. Try one of the print cartridge carrier. 4 Make sure the cartridge carrier lids are possible solutions. If the error does...
... following procedure to determine which cartridge is not working properly. 1 Remove the print cartridges, and close the cartridge carrier lids. 2 Disconnect the power cord from the electrical outlet. 3 Reconnect the power cord to continue. Try one of the print cartridge carrier. 4 Make sure the cartridge carrier lids are possible solutions. If the error does...
User's Guide
Page 149
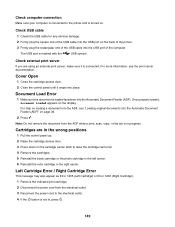
...Error This message may also appear as Error 1205 (Left Cartridge) or Error 1206 (Right Cartridge). 1 Remove the indicated print cartridge. 2 Disconnect the power cord from the ADF while a print, scan, copy, or fax job is turned on the cartridge carrier latch to the electrical outlet. 4 If the button...it snaps into the USB port of the USB cable into place. Note: Do not remove the document from the electrical outlet. 3 Reconnect the power cord to raise the cartridge carrier lid. 4 Remove the cartridges. 5 Reinstall the black cartridge or the photo cartridge in the left carrier. 6 ...
...Error This message may also appear as Error 1205 (Left Cartridge) or Error 1206 (Right Cartridge). 1 Remove the indicated print cartridge. 2 Disconnect the power cord from the ADF while a print, scan, copy, or fax job is turned on the cartridge carrier latch to the electrical outlet. 4 If the button...it snaps into the USB port of the USB cable into place. Note: Do not remove the document from the electrical outlet. 3 Reconnect the power cord to raise the cartridge carrier lid. 4 Remove the cartridges. 5 Reinstall the black cartridge or the photo cartridge in the left carrier. 6 ...

User's Guide
Page 150
... original document facedown into the Automatic Document Feeder (ADF). Left Cartridge Incorrect / Right Cartridge Incorrect 1 Remove the indicated print cartridge. 2 Disconnect the power cord from the electrical outlet. 3 Reconnect the power cord to the electrical outlet. 4 If the button is not lit, press . 5 Reinsert the print cartridge. 6 If the error: • Does not reappear...
... original document facedown into the Automatic Document Feeder (ADF). Left Cartridge Incorrect / Right Cartridge Incorrect 1 Remove the indicated print cartridge. 2 Disconnect the power cord from the electrical outlet. 3 Reconnect the power cord to the electrical outlet. 4 If the button is not lit, press . 5 Reinsert the print cartridge. 6 If the error: • Does not reappear...

User's Guide
Page 152
... to clear the error message: 1 Click Cancel Printing. This message indicates that came with the connections? Is the printer receiving power? The error message closes, and the Canceling Printing dialog box appears. 2 Follow the instructions on the computer screen Clearing error messages... Printing dialog box. Reboot computer Turn off . 2 Disconnect the power cord from the wall outlet. 3 Gently remove the power supply from the printer. 4 Reconnect the power supply to the printer. 5 Plug the power cord into an electrical outlet. Reconnect power supply 1 Press to turn the printer on.
... to clear the error message: 1 Click Cancel Printing. This message indicates that came with the connections? Is the printer receiving power? The error message closes, and the Canceling Printing dialog box appears. 2 Follow the instructions on the computer screen Clearing error messages... Printing dialog box. Reboot computer Turn off . 2 Disconnect the power cord from the wall outlet. 3 Gently remove the power supply from the printer. 4 Reconnect the power supply to the printer. 5 Plug the power cord into an electrical outlet. Reconnect power supply 1 Press to turn the printer on.

User's Guide (Mac)
Page 7
...product or make any electrical or cabling connections, such as furniture and walls. Lexmark is misused, a risk of misuse. Do not pinch the power cord between objects such as the power supply cord or telephone, during a lightning storm. Do not set up this product ...approved to the public switched telephone network. Inspect the power cord regularly for the use the fax feature during a lightning storm. Safety information Use only the power supply and power supply cord provided with the use of specific Lexmark components. Refer service or repairs, other replacement parts....
...product or make any electrical or cabling connections, such as furniture and walls. Lexmark is misused, a risk of misuse. Do not pinch the power cord between objects such as the power supply cord or telephone, during a lightning storm. Do not set up this product ...approved to the public switched telephone network. Inspect the power cord regularly for the use the fax feature during a lightning storm. Safety information Use only the power supply and power supply cord provided with the use of specific Lexmark components. Refer service or repairs, other replacement parts....
User's Guide (Mac)
Page 91
... for fax tones when sending a fax Note: Plug the coiled cord in the back of the printer into the printer. Understanding the printer Understanding the printer parts Checking the box contents 1 2 3 4 1 2 3 Name 1 Black print cartridge 2 Color print cartridge 3 Telephone handset 4 Telephone cord 5 Power cord 6 Setup sheet 8 7 6 5 Description Cartridges to be installed into the base...
... for fax tones when sending a fax Note: Plug the coiled cord in the back of the printer into the printer. Understanding the printer Understanding the printer parts Checking the box contents 1 2 3 4 1 2 3 Name 1 Black print cartridge 2 Color print cartridge 3 Telephone handset 4 Telephone cord 5 Power cord 6 Setup sheet 8 7 6 5 Description Cartridges to be installed into the base...

User's Guide (Mac)
Page 122
... print job. Warning: Do not use household cleaners or detergents, as they may need to clean the scan lens and the white roller. 1 Unplug the power cord and the phone line from the wall. 2 Open the control panel. 3 Push the roller lever gently to the left, pull it forward, and then lift... the white roller out of the printer. 2 3 1 4 Use a clean, lint-free cloth dampened with water. CAUTION: To avoid the risk of electric shock, unplug the power cord from the wall outlet and disconnect all cables to wipe the white roller and the scan lens. Cleaning the exterior of the printer 1 Make sure...
... print job. Warning: Do not use household cleaners or detergents, as they may need to clean the scan lens and the white roller. 1 Unplug the power cord and the phone line from the wall. 2 Open the control panel. 3 Push the roller lever gently to the left, pull it forward, and then lift... the white roller out of the printer. 2 3 1 4 Use a clean, lint-free cloth dampened with water. CAUTION: To avoid the risk of electric shock, unplug the power cord from the wall outlet and disconnect all cables to wipe the white roller and the scan lens. Cleaning the exterior of the printer 1 Make sure...


