User's Guide
Page 4
... Receiving a fax using the control panel 42 Receiving a fax automatically using the control panel 42 Setting a fax manual answer code using the control panel 43 Receiving a fax manually...43 Using Caller ID from the control panel...43 Receiving a fax with an answering machine using the control panel...Sending a fax using the software...53 Receiving a fax using the computer 53 Receiving a fax automatically using the computer 53 Setting a fax manual answer code using the computer 54 Using Caller ID from the software...54 Receiving a fax with an answering machine using the computer 54 ...
... Receiving a fax using the control panel 42 Receiving a fax automatically using the control panel 42 Setting a fax manual answer code using the control panel 43 Receiving a fax manually...43 Using Caller ID from the control panel...43 Receiving a fax with an answering machine using the control panel...Sending a fax using the software...53 Receiving a fax using the computer 53 Receiving a fax automatically using the computer 53 Setting a fax manual answer code using the computer 54 Using Caller ID from the software...54 Receiving a fax with an answering machine using the computer 54 ...
User's Guide
Page 41
... hear the dial tone of the Speed Dial entry (1- 89) or Group Dial entry (90-99). b Repeat entering fax numbers, using the control panel The manual dialing feature lets you want to send a fax to a group of 30. Notes: • For instructions on how to add Speed Dial or Group Dial...
... hear the dial tone of the Speed Dial entry (1- 89) or Group Dial entry (90-99). b Repeat entering fax numbers, using the control panel The manual dialing feature lets you want to send a fax to a group of 30. Notes: • For instructions on how to add Speed Dial or Group Dial...

User's Guide
Page 43
... region setting and only the number of the person who is sending you the fax appears on how to set up a manual answer code, see the related topic, "Setting a fax manual answer code." 4 Hang up to seven characters. Notes: • Caller ID is available only in some countries and regions. ...defined for the selected country or region is shown. 43 j Press to save the setting. i Press or repeatedly until Manual Pickup Keycode appears. 8 Press . 9 Enter the code you set up a manual answer code, enter the code on the telephone after you answer it and hear fax tones. 3 To receive a fax...
... region setting and only the number of the person who is sending you the fax appears on how to set up a manual answer code, see the related topic, "Setting a fax manual answer code." 4 Hang up to seven characters. Notes: • Caller ID is available only in some countries and regions. ...defined for the selected country or region is shown. 43 j Press to save the setting. i Press or repeatedly until Manual Pickup Keycode appears. 8 Press . 9 Enter the code you set up a manual answer code, enter the code on the telephone after you answer it and hear fax tones. 3 To receive a fax...

User's Guide
Page 54
... pattern number you want to the printer: 1 Make sure that identifies the telephone number or the name of the person who is shown. Setting a fax manual answer code using the computer Note: You must set the number of times the telephone rings before receiving a fax automatically." If you may need to...
... pattern number you want to the printer: 1 Make sure that identifies the telephone number or the name of the person who is shown. Setting a fax manual answer code using the computer Note: You must set the number of times the telephone rings before receiving a fax automatically." If you may need to...
User's Guide
Page 87
... minimum file size for the photo to appear in the Photo Library. a Select "Skip Save option and go automatically to", and choose to Automatically Save, Manually Save, or Print your photos from your photo storage device after transferring" to automatically delete photos from the photo storage device connected to your selected...
... minimum file size for the photo to appear in the Photo Library. a Select "Skip Save option and go automatically to", and choose to Automatically Save, Manually Save, or Print your photos from your photo storage device after transferring" to automatically delete photos from the photo storage device connected to your selected...
User's Guide
Page 89
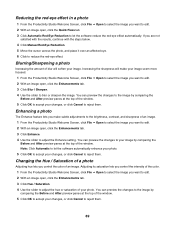
... OK to accept your changes, or click Cancel to reject them . If you are not satisfied with the results, continue with the steps below. 4 Click Manual Red-Eye Reduction. 5 Move the cursor across the photo, and place it over an affected eye. 6 Click to reduce the red-eye effect. Changing the...
... OK to accept your changes, or click Cancel to reject them . If you are not satisfied with the results, continue with the steps below. 4 Click Manual Red-Eye Reduction. 5 Move the cursor across the photo, and place it over an affected eye. 6 Click to reduce the red-eye effect. Changing the...
User's Guide
Page 96
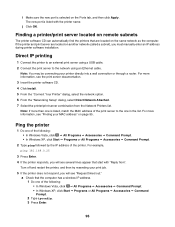
Note: You may be connecting your print job. 5 If the printer does not respond, you must manually enter an IP address during printer software installation. For more information, see "Finding your MAC address" on page 95. Ping the printer 1 Do one in ...
Note: You may be connecting your print job. 5 If the printer does not respond, you must manually enter an IP address during printer software installation. For more information, see "Finding your MAC address" on page 95. Ping the printer 1 Do one in ...
User's Guide
Page 115
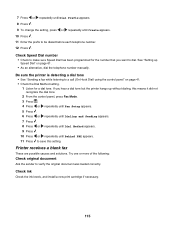
... original document Ask the sender to a call (On Hook Dial) using the control panel" on page 61. • As an alternative, dial the telephone number manually. Be sure the printer is detecting a dial tone • See "Sending a fax while listening to verify the original document was loaded correctly. See "Setting up...
... original document Ask the sender to a call (On Hook Dial) using the control panel" on page 61. • As an alternative, dial the telephone number manually. Be sure the printer is detecting a dial tone • See "Sending a fax while listening to verify the original document was loaded correctly. See "Setting up...
User's Guide
Page 120
... lift the white roller out of the printer to protect the printer gears and rollers. 3 Press to turn the printer back on . Remove the paper manually 1 Press to turn the printer back on .
... lift the white roller out of the printer to protect the printer gears and rollers. 3 Press to turn the printer back on . Remove the paper manually 1 Press to turn the printer back on .
User's Guide
Page 148
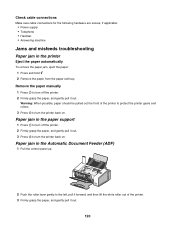
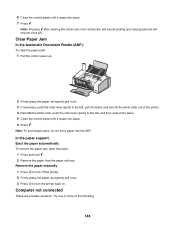
... solutions. Note: Pressing after clearing the carrier jam of an obstruction will cancel printing and copying jobs but will resume a fax job. Remove the paper manually 1 Press to the left , and then snap it into place. 5 Close the control panel until it out. 3 Press to turn off the printer. 2 Firmly grasp...
... solutions. Note: Pressing after clearing the carrier jam of an obstruction will cancel printing and copying jobs but will resume a fax job. Remove the paper manually 1 Press to the left , and then snap it into place. 5 Close the control panel until it out. 3 Press to turn off the printer. 2 Firmly grasp...
User's Guide
Page 159
...Verwendung dieses Produkts in der Schweiz Für dieses Produkt muss ein schweizerischer Billing Tone Filter zur Zählzeichenübertragung (Lexmark Teilenummer 14B5109) für jede Leitung installiert werden, über die in der Schweiz Zeitsteuertakte vorhanden sind. Power consumption Product...Africa telecommunications notice This modem must be used under any single manual call attempt and the beginning of a different make automatic calls to its network. Using this device. The Lexmark filter must be set to operate within the following are dependent...
...Verwendung dieses Produkts in der Schweiz Für dieses Produkt muss ein schweizerischer Billing Tone Filter zur Zählzeichenübertragung (Lexmark Teilenummer 14B5109) für jede Leitung installiert werden, über die in der Schweiz Zeitsteuertakte vorhanden sind. Power consumption Product...Africa telecommunications notice This modem must be used under any single manual call attempt and the beginning of a different make automatic calls to its network. Using this device. The Lexmark filter must be set to operate within the following are dependent...
User's Guide
Page 166
... confirmation reports 62 customizing settings 56 forwarding 55 forwarding using the control panel 44 receiving automatically 42, 53 receiving manually 43 receiving with an answer code 43 setting a manual answer code 54 setting manual answer code using control panel 43 Fax button 31 fax cover page creating using the Fax Setup Utility 56...
... confirmation reports 62 customizing settings 56 forwarding 55 forwarding using the control panel 44 receiving automatically 42, 53 receiving manually 43 receiving with an answer code 43 setting a manual answer code 54 setting manual answer code using control panel 43 Fax button 31 fax cover page creating using the Fax Setup Utility 56...

User's Guide
Page 169
... a fax automatically 42, 53 fax forwarding 55 fax forwarding using the control panel 44 manually 43 using an answering machine and computer 54 using an answering machine and control panel 44 with manual answer code 43 recycling WEEE statement 157 reducing an image 75 red-eye automatic reduction 88..., 89 manual reduction 89 refilling print cartridges 101 remote fax error 118 removing an external device 136...
... a fax automatically 42, 53 fax forwarding 55 fax forwarding using the control panel 44 manually 43 using an answering machine and computer 54 using an answering machine and control panel 44 with manual answer code 43 recycling WEEE statement 157 reducing an image 75 red-eye automatic reduction 88..., 89 manual reduction 89 refilling print cartridges 101 remote fax error 118 removing an external device 136...

User's Guide (Mac)
Page 22
... light is on. 2 To set is useful when you dial a telephone number while listening to the call (On Hook Dial) using the control panel The manual dialing feature lets you must navigate an automated answering system or enter a calling card number before the printer automatically receives faxes: a Press Fax Mode. i Press...
... light is on. 2 To set is useful when you dial a telephone number while listening to the call (On Hook Dial) using the control panel The manual dialing feature lets you must navigate an automated answering system or enter a calling card number before the printer automatically receives faxes: a Press Fax Mode. i Press...

User's Guide (Mac)
Page 23
...Answering appears. 6 Press . Faxing using the control panel Note: You must set up the equipment as shown in the related topic, "Connecting to set up a manual answer code, see the related topic, "Setting Auto Answer to answer calls after you answer it and hear fax tones. 3 To receive a fax if you... have not set up a manual answer code: • Press Start Color or Start Black. The printer receives the fax. For more information, see the related topic, "Setting a fax...
...Answering appears. 6 Press . Faxing using the control panel Note: You must set up the equipment as shown in the related topic, "Connecting to set up a manual answer code, see the related topic, "Setting Auto Answer to answer calls after you answer it and hear fax tones. 3 To receive a fax if you... have not set up a manual answer code: • Press Start Color or Start Black. The printer receives the fax. For more information, see the related topic, "Setting a fax...

User's Guide (Mac)
Page 24
... the number of patterns defined for the selected country or region is a directory of the Speed Dial or Group Dial entry. 7 Press or repeatedly until Manual Pickup Keycode appears. 8 Press . 9 Enter the code you want up to save the setting. Characters can include numbers or the symbols * and #. 10 Press to...
... the number of patterns defined for the selected country or region is a directory of the Speed Dial or Group Dial entry. 7 Press or repeatedly until Manual Pickup Keycode appears. 8 Press . 9 Enter the code you want up to save the setting. Characters can include numbers or the symbols * and #. 10 Press to...

User's Guide (Mac)
Page 36
... automatically" on page 38 • "Setting Auto Answer to On" on page 37 Setting a fax manual answer code 1 From the Finder desktop, double-click the Lexmark 5000 Series folder. 2 Double-click the Lexmark 5000 Series Fax Setup Utility icon. 3 From the Fax Setup Utility dialog, click the Receive tab.... 4 In the Manual Answer Code field, enter the code you set is detected, the printer automatically ...
... automatically" on page 38 • "Setting Auto Answer to On" on page 37 Setting a fax manual answer code 1 From the Finder desktop, double-click the Lexmark 5000 Series folder. 2 Double-click the Lexmark 5000 Series Fax Setup Utility icon. 3 From the Fax Setup Utility dialog, click the Receive tab.... 4 In the Manual Answer Code field, enter the code you set is detected, the printer automatically ...
User's Guide (Mac)
Page 48
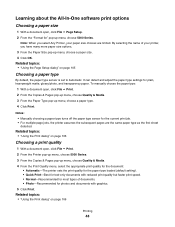
...menu, choose a paper size. 4 Click OK. Related topics: • "Using the Page Setup dialog" on page 106 Printing 48 Notes: • Manually choosing a paper type turns off the paper type sensor for the current print job. • For multiple-page jobs, the printer assumes the subsequent pages...paper size 1 With a document open, click File Œ Page Setup. 2 From the "Format for" pop-up menu, choose a paper type. 4 Click Print. To manually choose the paper type: 1 With a document open, click File Œ Print. 2 From the Copies & Pages pop-up menu, choose Quality & Media. 3 From the...
...menu, choose a paper size. 4 Click OK. Related topics: • "Using the Page Setup dialog" on page 106 Printing 48 Notes: • Manually choosing a paper type turns off the paper type sensor for the current print job. • For multiple-page jobs, the printer assumes the subsequent pages...paper size 1 With a document open, click File Œ Page Setup. 2 From the "Format for" pop-up menu, choose a paper type. 4 Click Print. To manually choose the paper type: 1 With a document open, click File Œ Print. 2 From the Copies & Pages pop-up menu, choose Quality & Media. 3 From the...

User's Guide (Mac)
Page 66
.... • From the File Type pop-up menu. 6 Click OK. Scanning 66 You can manually adjust the color settings for optimum color output. 1 From the Finder desktop, double-click the Lexmark 5000 Series folder. 2 Double-click the Lexmark 5000 Series Center icon. 3 From the All-In-One Center, click Preview/Edit to open...
.... • From the File Type pop-up menu. 6 Click OK. Scanning 66 You can manually adjust the color settings for optimum color output. 1 From the Finder desktop, double-click the Lexmark 5000 Series folder. 2 Double-click the Lexmark 5000 Series Center icon. 3 From the All-In-One Center, click Preview/Edit to open...

User's Guide (Mac)
Page 67
... the scan settings and do creative scanning jobs on the Scan dialog. 1 From the Finder desktop, double-click the Lexmark 5000 Series folder. 2 Double-click the Lexmark 5000 Series Center icon. 3 Click Preview/Edit to open the Scan Settings drawer and change the settings as needed. Note.... Reduce Background Noise Remove smudges and light background shading in color documents. Scanning 67 The effect is similar to customize the scan setting manually instead of a film negative. Select Invert Colors to the color and document type of your scan. From here Settings tab Go to...
... the scan settings and do creative scanning jobs on the Scan dialog. 1 From the Finder desktop, double-click the Lexmark 5000 Series folder. 2 Double-click the Lexmark 5000 Series Center icon. 3 Click Preview/Edit to open the Scan Settings drawer and change the settings as needed. Note.... Reduce Background Noise Remove smudges and light background shading in color documents. Scanning 67 The effect is similar to customize the scan setting manually instead of a film negative. Select Invert Colors to the color and document type of your scan. From here Settings tab Go to...


