User's Guide
Page 2
... menu...24 Using the PictBridge menu ...25 Using the Setup menu ...25 Saving settings...26 Using the printer software...28 Installing printer software ...28 Installing the optional XPS driver (Windows Vista users only 29 Using the Windows printer software...30 Using the Macintosh printer software...31... Switching between the rear USB port and the Quick Connect laptop port (selected models only)...32 Installing the printer on a wireless network (selected models only 34 Wireless network compatibility...34 Information you will need to set up the printer...
... menu...24 Using the PictBridge menu ...25 Using the Setup menu ...25 Saving settings...26 Using the printer software...28 Installing printer software ...28 Installing the optional XPS driver (Windows Vista users only 29 Using the Windows printer software...30 Using the Macintosh printer software...31... Switching between the rear USB port and the Quick Connect laptop port (selected models only)...32 Installing the printer on a wireless network (selected models only 34 Wireless network compatibility...34 Information you will need to set up the printer...
User's Guide
Page 3
... hoc wireless network 43 Frequently asked questions...43 What is a network? ...43 How are home networks configured?...43 Why do I need an installation cable? ...46 How do I attach the installation cable?...46 What is the difference between infrastructure and ad hoc networks 47 Finding the signal strength...48 How can I improve wireless...
... hoc wireless network 43 Frequently asked questions...43 What is a network? ...43 How are home networks configured?...43 Why do I need an installation cable? ...46 How do I attach the installation cable?...46 What is the difference between infrastructure and ad hoc networks 47 Finding the signal strength...48 How can I improve wireless...
User's Guide
Page 5
... computer...91 Receiving a fax...92 Maintaining the printer 94 Maintaining print cartridges...94 Installing print cartridges...94 Removing a used print cartridge ...95 Refilling print cartridges...96 Using genuine Lexmark print cartridges...96 Aligning print cartridges ...97 Cleaning the print cartridge nozzles...97 Checking... 103 Setup troubleshooting...103 Incorrect language appears on the display...103 Power button is not lit ...104 Software did not install...104 Page does not print...105 Solving printer power problems ...108 Removing and reinstalling the software ...108 Enabling the USB...
... computer...91 Receiving a fax...92 Maintaining the printer 94 Maintaining print cartridges...94 Installing print cartridges...94 Removing a used print cartridge ...95 Refilling print cartridges...96 Using genuine Lexmark print cartridges...96 Aligning print cartridges ...97 Cleaning the print cartridge nozzles...97 Checking... 103 Setup troubleshooting...103 Incorrect language appears on the display...103 Power button is not lit ...104 Software did not install...104 Page does not print...105 Solving printer power problems ...108 Removing and reinstalling the software ...108 Enabling the USB...
User's Guide
Page 6
... only 120 Wi-Fi indicator light is still orange ...122 Wireless print server not installed ...124 "Communication not available" message displays when printing wirelessly 124 Communication with printer lost when connected to Virtual Private Network (VPN 124 Resetting the internal ...
... only 120 Wi-Fi indicator light is still orange ...122 Wireless print server not installed ...124 "Communication not available" message displays when printing wirelessly 124 Communication with printer lost when connected to Virtual Private Network (VPN 124 Resetting the internal ...
User's Guide
Page 8
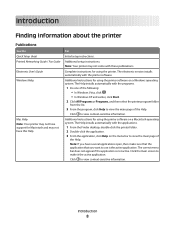
... it the active application. The correct menu bar does not appear if the application is the active application. For Initial setup instructions. The electronic version installs automatically with the programs. 1 Do one of the following: • In Windows Vista, click . • In Windows XP and earlier, click Start. 2 Click All Programs... applications. 1 From the Finder desktop, double-click the printer folder. 2 Double-click the application. 3 From the application, click Help on a Macintosh operating system. The Help installs automatically with these publications. Click ?
... it the active application. The correct menu bar does not appear if the application is the active application. For Initial setup instructions. The electronic version installs automatically with the programs. 1 Do one of the following: • In Windows Vista, click . • In Windows XP and earlier, click Start. 2 Click All Programs... applications. 1 From the Finder desktop, double-click the printer folder. 2 Double-click the application. 3 From the application, click Help on a Macintosh operating system. The Help installs automatically with these publications. Click ?

User's Guide
Page 11
..., use the setup documentation and the printer software CD that came with a USB cable. Note: If you about the printer software being installed. Setting up the printer 11 Purchase a USB cable separately. 4 Networking Guide Note: Your printer model may not come with this publication.... 5 Quick Setup sheet 6 Print cartridges Setting up the printer Bypassing security warnings during software installation Third-party applications, including antivirus, security, and firewall programs may not ship with the printer. 1 Unpack the printer. Setting up ...
..., use the setup documentation and the printer software CD that came with a USB cable. Note: If you about the printer software being installed. Setting up the printer 11 Purchase a USB cable separately. 4 Networking Guide Note: Your printer model may not come with this publication.... 5 Quick Setup sheet 6 Print cartridges Setting up the printer Bypassing security warnings during software installation Third-party applications, including antivirus, security, and firewall programs may not ship with the printer. 1 Unpack the printer. Setting up ...

User's Guide
Page 18
...configured for USB printing • Orange blinking indicates that the printer is configured but is unable to communicate with the rear USB or installation cable. cable. Warning-Potential Damage: Do not touch the USB port except when plugging in or removing a USB cable •...8226; Off indicates that the printer is not turned on or that the printer is connected for wireless printing - indicates that a memory card is installed. • Orange - The light blinks to indicate that the printer is connected to a wireless network. 4 PictBridge port Connect a PictBridge-enabled digital...
...configured for USB printing • Orange blinking indicates that the printer is configured but is unable to communicate with the rear USB or installation cable. cable. Warning-Potential Damage: Do not touch the USB port except when plugging in or removing a USB cable •...8226; Off indicates that the printer is not turned on or that the printer is connected for wireless printing - indicates that a memory card is installed. • Orange - The light blinks to indicate that the printer is connected to a wireless network. 4 PictBridge port Connect a PictBridge-enabled digital...
User's Guide
Page 19
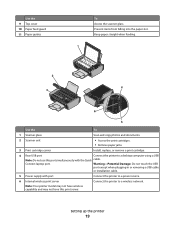
... 6 5 Use the To 1 Scanner glass Scan and copy photos and documents. 2 Scanner unit • Access the print cartridges. • Remove paper jams. 3 Print cartridge carrier Install, replace, or remove a print cartridge. 4 Rear USB port Connect the printer to a wireless network. Connect the printer to a desktop computer using a USB Note: Do not... items from falling into the paper slot. Warning-Potential Damage: Do not touch the USB port except when plugging in or removing a USB cable or installation cable. 5 Power supply with the Quick cable.
... 6 5 Use the To 1 Scanner glass Scan and copy photos and documents. 2 Scanner unit • Access the print cartridges. • Remove paper jams. 3 Print cartridge carrier Install, replace, or remove a print cartridge. 4 Rear USB port Connect the printer to a wireless network. Connect the printer to a desktop computer using a USB Note: Do not... items from falling into the paper slot. Warning-Potential Damage: Do not touch the USB port except when plugging in or removing a USB cable or installation cable. 5 Power supply with the Quick cable.
User's Guide
Page 28
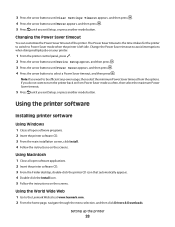
...applications. 2 Insert the printer software CD. 3 From the Finder desktop, double-click the printer CD icon that automatically appears. 4 Double-click the Install icon. 5 Follow the instructions on power usage, then select the minimum Power Saver timeout from Power Saver mode as often, then select the maximum Power...printer back on the screens. If you exit Setup, or press another mode button. Using the World Wide Web 1 Go to the Lexmark Web site at www.lexmark.com. 2 From the home page, navigate through the menu selection, and then click Drivers & Downloads. Setting up the printer 28 ...
...applications. 2 Insert the printer software CD. 3 From the Finder desktop, double-click the printer CD icon that automatically appears. 4 Double-click the Install icon. 5 Follow the instructions on power usage, then select the minimum Power Saver timeout from Power Saver mode as often, then select the maximum Power...printer back on the screens. If you exit Setup, or press another mode button. Using the World Wide Web 1 Go to the Lexmark Web site at www.lexmark.com. 2 From the home page, navigate through the menu selection, and then click Drivers & Downloads. Setting up the printer 28 ...
User's Guide
Page 29
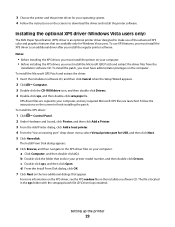
...Computer, and then double-click (C:). To use of the advanced XPS color and graphics features that are launched. To install the patch, you install the regular printer software. The Install From Disk dialog appears. 6 Click Browse, and then navigate to the XPS driver files on the computer. d ... administrator privileges on your printer model number, and then double-click Drivers. XPS driver files are copied to download the driver and install the printer software. Follow the instructions on your operating system. 4 Follow the instructions on the screens to your computer, and any...
...Computer, and then double-click (C:). To use of the advanced XPS color and graphics features that are launched. To install the patch, you install the regular printer software. The Install From Disk dialog appears. 6 Click Browse, and then navigate to the XPS driver files on the computer. d ... administrator privileges on your printer model number, and then double-click Drivers. XPS driver files are copied to download the driver and install the printer software. Follow the instructions on your operating system. 4 Follow the instructions on the screens to your computer, and any...
User's Guide
Page 30
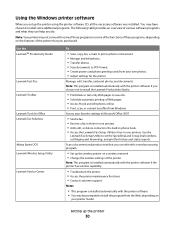
You may have chosen to install some of the functions of these programs, depending on the features of the printer. Use the LexmarkTM Productivity Studio Lexmark Fast Pics Lexmark Toolbar Lexmark Tools for Office Lexmark Fax Solutions Abbyy Sprint OCR Lexmark Wireless Setup Utility Lexmark Service Center To • Scan, copy... Group Dial numbers, set up the printer 30 Use the Lexmark Fax Setup Utility to PDF format. • Create posters and photo greeting cards from your printer model. Note: This program is installed automatically with a word-processing program. • Set up ...
You may have chosen to install some of the functions of these programs, depending on the features of the printer. Use the LexmarkTM Productivity Studio Lexmark Fast Pics Lexmark Toolbar Lexmark Tools for Office Lexmark Fax Solutions Abbyy Sprint OCR Lexmark Wireless Setup Utility Lexmark Service Center To • Scan, copy... Group Dial numbers, set up the printer 30 Use the Lexmark Fax Setup Utility to PDF format. • Create posters and photo greeting cards from your printer model. Note: This program is installed automatically with a word-processing program. • Set up ...
User's Guide
Page 31
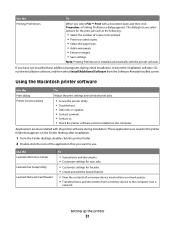
These applications are also installed with the printer software. Use the Lexmark All-In-One Center Lexmark Fax Setup Utility Lexmark Network Card Reader To • Scan photos and documents. • Customize settings for scan jobs. • Customize settings... • Access the printer utility. • Troubleshoot. • Order ink or supplies. • Contact Lexmark. • Contact us. • Check the printer software version installed on the Finder desktop after installation. 1 From the Finder desktop, double-click the printer folder. 2 Double-click the icon of a memory ...
These applications are also installed with the printer software. Use the Lexmark All-In-One Center Lexmark Fax Setup Utility Lexmark Network Card Reader To • Scan photos and documents. • Customize settings for scan jobs. • Customize settings... • Access the printer utility. • Troubleshoot. • Order ink or supplies. • Contact Lexmark. • Contact us. • Check the printer software version installed on the Finder desktop after installation. 1 From the Finder desktop, double-click the printer folder. 2 Double-click the icon of a memory ...
User's Guide
Page 32
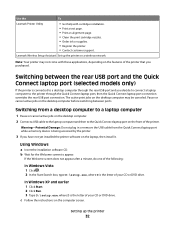
... to connect a laptop computer to a desktop computer through the rear USB port and you have not yet installed the printer software on the computer screen. Using Windows a Insert the installation software CD. Use the To Lexmark Printer Utility • Get help with these applications, depending on the features of the printer that you...
... to connect a laptop computer to a desktop computer through the rear USB port and you have not yet installed the printer software on the computer screen. Using Windows a Insert the installation software CD. Use the To Lexmark Printer Utility • Get help with these applications, depending on the features of the printer that you...

User's Guide
Page 33
Using Macintosh a Insert the installation software CD. c Double-click Install. d Follow the instructions on the desktop. b Wait for the Welcome screen to appear. Note: If the Welcome screen does not appear after a minute, then click the CD icon on the computer screen. Setting up the printer 33
Using Macintosh a Insert the installation software CD. c Double-click Install. d Follow the instructions on the desktop. b Wait for the Welcome screen to appear. Note: If the Welcome screen does not appear after a minute, then click the CD icon on the computer screen. Setting up the printer 33

User's Guide
Page 34
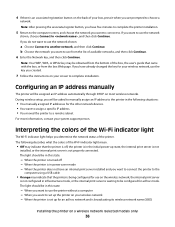
... was used to 63 ASCII characters. If you copy down this setting varies depending on the network if encryption was used to secure your consent. Installing the printer on a wireless network (selected models only) Wireless network compatibility Your printer contains an IEEE 802.11g wireless print server. or • Exactly 5 or...
... was used to 63 ASCII characters. If you copy down this setting varies depending on the network if encryption was used to secure your consent. Installing the printer on a wireless network (selected models only) Wireless network compatibility Your printer contains an IEEE 802.11g wireless print server. or • Exactly 5 or...
User's Guide
Page 35
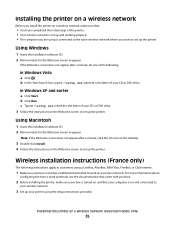
...D:\setup.exe, where D is wireless-enabled and activated to work wirelessly, see the documentation that came with your box. 2 Before installing the printer, make sure that your computer is connected to the same wireless network where you want to customers using the setup instructions ...network, make sure your printer using a LiveBox, AliceBox, N9UF Box, FreeBox, or Club Internet. 1 Make sure your CD or DVD drive. Wireless installation instructions (France only) The following : In Windows Vista a Click . In Windows XP and earlier a Click Start. Note: If the Welcome screen...
...D:\setup.exe, where D is wireless-enabled and activated to work wirelessly, see the documentation that came with your box. 2 Before installing the printer, make sure that your computer is connected to the same wireless network where you want to customers using the setup instructions ...network, make sure your printer using a LiveBox, AliceBox, N9UF Box, FreeBox, or Club Internet. 1 Make sure your CD or DVD drive. Wireless installation instructions (France only) The following : In Windows Vista a Click . In Windows XP and earlier a Click Start. Note: If the Welcome screen...
User's Guide
Page 36
.... The light should be obtained from the box Web page. Note: After pressing the associate/register button, you have an internal print server installed and you created. 7 Follow the instructions on your box, press it when you want to connect the printer to the computer using a USB..., and then click Continue. 6 Enter the Network key, and then click Continue. b Choose the network you do not want to connect to complete installation. When the printer is waiting to set up for use the network shown: a Choose Connect to a remote subnet. The following situations: • ...
.... The light should be obtained from the box Web page. Note: After pressing the associate/register button, you have an internal print server installed and you created. 7 Follow the instructions on your box, press it when you want to connect the printer to the computer using a USB..., and then click Continue. 6 Enter the Network key, and then click Continue. b Choose the network you do not want to connect to complete installation. When the printer is waiting to set up for use the network shown: a Choose Connect to a remote subnet. The following situations: • ...

User's Guide
Page 37
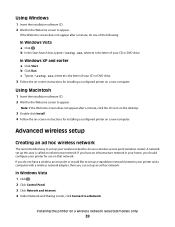
... may be valid. • Green indicates that : - When the printer has been configured, any time you want to start using the installation cable as the configured network, the security key, or other settings: Using Windows 1 Do one of the following: • In Windows Vista...communicate with the wireless access point (wireless router). Using Macintosh 1 From the Finder desktop, double-click the printer folder. 2 Double-click Lexmark Wireless Setup Assistant. 3 Follow the instructions on your wireless network. • Blinking green indicates that you turn the printer off or not...
... may be valid. • Green indicates that : - When the printer has been configured, any time you want to start using the installation cable as the configured network, the security key, or other settings: Using Windows 1 Do one of the following: • In Windows Vista...communicate with the wireless access point (wireless router). Using Macintosh 1 From the Finder desktop, double-click the printer folder. 2 Double-click Lexmark Wireless Setup Assistant. 3 Follow the instructions on your wireless network. • Blinking green indicates that you turn the printer off or not...
User's Guide
Page 38
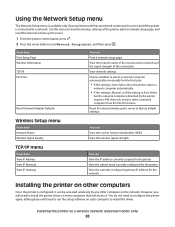
... on each computer to select a network computer from the File Print menu. Choose whether to a network. View the wireless signal strength. Installing the printer on other computers Once the printer is connected to select a network computer automatically or manually for File Print jobs. • If.... From here Print Setup Page Wireless Information TCP/IP File Print Reset Network Adapter Defaults You can View the IP address currently assigned to install the printer driver on the network. View the network name of the current active network and the signal strength of the printer, print a...
... on each computer to select a network computer from the File Print menu. Choose whether to a network. View the wireless signal strength. Installing the printer on other computers Once the printer is connected to select a network computer automatically or manually for File Print jobs. • If.... From here Print Setup Page Wireless Information TCP/IP File Print Reset Network Adapter Defaults You can View the IP address currently assigned to install the printer driver on the network. View the network name of the current active network and the signal strength of the printer, print a...
User's Guide
Page 39
... to appear. If the Welcome screen does not appear after a minute, click the CD icon on the desktop. 3 Double-click Install. 4 Follow the on-screen instructions for installing a configured printer on a new computer. If you should configure your CD or DVD drive. 3 Follow the on-screen instructions for... installing a configured printer on a new computer. b In the Start Search box, type D:\setup.exe, where D is called an infrastructure network. Advanced wireless...
... to appear. If the Welcome screen does not appear after a minute, click the CD icon on the desktop. 3 Double-click Install. 4 Follow the on-screen instructions for installing a configured printer on a new computer. If you should configure your CD or DVD drive. 3 Follow the on-screen instructions for... installing a configured printer on a new computer. b In the Start Search box, type D:\setup.exe, where D is called an infrastructure network. Advanced wireless...


