
Technical Reference
Page 62
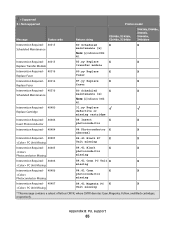
... X X Color PC Units Life Unit Life warning Warning Intervention Required - 40204 PC Kit Life Warning 84 PC kit life warning Intervention Required - 40204 84.yy X X Photoconductor Low photoconductor low Intervention Required - 40204 84 Photoconductor X X Photoconductor Low low Intervention Required - 40204 84.yy [color] X X Photoconductor Nearly Low photoconductor nearly low * This message contains a subset of letters CMYK, where CMYK...
... X X Color PC Units Life Unit Life warning Warning Intervention Required - 40204 PC Kit Life Warning 84 PC kit life warning Intervention Required - 40204 84.yy X X Photoconductor Low photoconductor low Intervention Required - 40204 84 Photoconductor X X Photoconductor Low low Intervention Required - 40204 84.yy [color] X X Photoconductor Nearly Low photoconductor nearly low * This message contains a subset of letters CMYK, where CMYK...

Technical Reference
Page 63
... 88 Replace magenta X X Replace Toner toner Intervention Required - 40303 88 Replace yellow X X Replace Toner toner Intervention Required - 40304 Replace PC Kit 84 Replace PC Kit Intervention Required - 40304 84 Replace X X Replace Photoconductor photoconductor Intervention Required - 40305 84 Replace black X X 84 Replace Black PC Unit PC Unit Intervention Required - 40309 32.yy black X X Cartridge Part...
... 88 Replace magenta X X Replace Toner toner Intervention Required - 40303 88 Replace yellow X X Replace Toner toner Intervention Required - 40304 Replace PC Kit 84 Replace PC Kit Intervention Required - 40304 84 Replace X X Replace Photoconductor photoconductor Intervention Required - 40305 84 Replace black X X 84 Replace Black PC Unit PC Unit Intervention Required - 40309 32.yy black X X Cartridge Part...
Technical Reference
Page 65
... X X Replace Fuser fuser Intervention Required - 40316 80 Scheduled X X Scheduled Maintenance maintenance [x] Note: [x] indicates 100k kit. Intervention Required - 40400 Replace Cartridge 31.yy Replace defective or missing cartridge Intervention Required - 40404 84 Insert X X Insert Photoconductor photoconductor Intervention Required - 40404 84 Photoconductor X X abnormal Intervention Required - 40405 84.41 Black PC X X PC Unit Missing Unit missing Intervention...
... X X Replace Fuser fuser Intervention Required - 40316 80 Scheduled X X Scheduled Maintenance maintenance [x] Note: [x] indicates 100k kit. Intervention Required - 40400 Replace Cartridge 31.yy Replace defective or missing cartridge Intervention Required - 40404 84 Insert X X Insert Photoconductor photoconductor Intervention Required - 40404 84 Photoconductor X X abnormal Intervention Required - 40405 84.41 Black PC X X PC Unit Missing Unit missing Intervention...

Maintenance Guide
Page 2
Contents Maintaining the printer 3 Cleaning the exterior of the printer...3 Cleaning the scanner glass...3 Cleaning the ADF separator rollers...4 Adjusting scanner registration...5 Storing supplies...6 Checking the status of supplies...7 Checking the status of supplies from the printer control panel 7 Checking the status of supplies from a network computer 7 Ordering supplies...8 Ordering toner cartridges...8 Ordering a photoconductor kit...8 Ordering ADF replacement parts...9 Moving the printer to another location...9 Shipping the printer...10 Contents 2
Contents Maintaining the printer 3 Cleaning the exterior of the printer...3 Cleaning the scanner glass...3 Cleaning the ADF separator rollers...4 Adjusting scanner registration...5 Storing supplies...6 Checking the status of supplies...7 Checking the status of supplies from the printer control panel 7 Checking the status of supplies from a network computer 7 Ordering supplies...8 Ordering toner cartridges...8 Ordering a photoconductor kit...8 Ordering ADF replacement parts...9 Moving the printer to another location...9 Shipping the printer...10 Contents 2

Maintenance Guide
Page 8
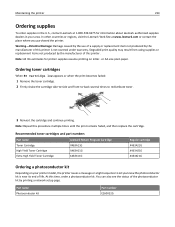
... end of life. Note: All life estimates for information about Lexmark authorized supplies dealers in the U.S., contact Lexmark at www.lexmark.com or contact the place where you know the photoconductor kit is not covered under warranty. You can also see the status... numbers Part name Toner Cartridge High Yield Toner Cartridge Extra High Yield Toner Cartridge Lexmark Return Program Cartridge X463A11G X463H11G X463X11G Regular cartridge X463A21G X463H21G X463X21G Ordering a photoconductor kit Depending on letter- Ordering supplies To order supplies in your printer model, the ...
... end of life. Note: All life estimates for information about Lexmark authorized supplies dealers in the U.S., contact Lexmark at www.lexmark.com or contact the place where you know the photoconductor kit is not covered under warranty. You can also see the status... numbers Part name Toner Cartridge High Yield Toner Cartridge Extra High Yield Toner Cartridge Lexmark Return Program Cartridge X463A11G X463H11G X463X11G Regular cartridge X463A21G X463H21G X463X21G Ordering a photoconductor kit Depending on letter- Ordering supplies To order supplies in your printer model, the ...
User's Guide
Page 9
... of supplies from the printer control panel 233 Checking the status of supplies from a network computer 233 Ordering supplies...234 Ordering toner cartridges ...234 Ordering a photoconductor kit ...234 Ordering ADF replacement parts...235 Moving the printer to another location 235 Shipping the printer...236 Administrative support 237 Finding advanced networking and administrator...
... of supplies from the printer control panel 233 Checking the status of supplies from a network computer 233 Ordering supplies...234 Ordering toner cartridges ...234 Ordering a photoconductor kit ...234 Ordering ADF replacement parts...235 Moving the printer to another location 235 Shipping the printer...236 Administrative support 237 Finding advanced networking and administrator...
User's Guide
Page 234
...network setup page. Maintaining the printer 234 Ordering supplies To order supplies in the U.S., contact Lexmark at www.lexmark.com or contact the place where you know the photoconductor kit is not covered under warranty. Note: Repeat this printer is near its end of this ...for printer supplies assume printing on your area. You can also see the status of this time, order a photoconductor kit. Note: All life estimates for information about Lexmark authorized supplies dealers in your printer model, the printer issues a message or a light sequence to redistribute toner. ...
...network setup page. Maintaining the printer 234 Ordering supplies To order supplies in the U.S., contact Lexmark at www.lexmark.com or contact the place where you know the photoconductor kit is not covered under warranty. Note: Repeat this printer is near its end of this ...for printer supplies assume printing on your area. You can also see the status of this time, order a photoconductor kit. Note: All life estimates for information about Lexmark authorized supplies dealers in your printer model, the printer issues a message or a light sequence to redistribute toner. ...
User's Guide
Page 237
...the IP address in the photoconductor kit, and capacity measurements of your Web browser. For more information, see the Networking Guide on the Software and Documentation CD and the Embedded Web Server Administrator's Guide on the Lexmark Web site at www.lexmark.com/publications. Setting up...address of your Web browser. Using the Embedded Web Server If the printer is installed on the Lexmark Web site at www.lexmark.com. Administrative support 237 Administrative support Finding advanced networking and administrator information This chapter covers basic administrative support tasks...
...the IP address in the photoconductor kit, and capacity measurements of your Web browser. For more information, see the Networking Guide on the Software and Documentation CD and the Embedded Web Server Administrator's Guide on the Lexmark Web site at www.lexmark.com/publications. Setting up...address of your Web browser. Using the Embedded Web Server If the printer is installed on the Lexmark Web site at www.lexmark.com. Administrative support 237 Administrative support Finding advanced networking and administrator information This chapter covers basic administrative support tasks...

User's Guide
Page 239
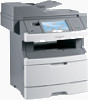
Inside are the toner cartridge and photoconductor kit. 2 Standard exit bin 3 Front door 4 Manual or multipurpose feeder door 5 Standard 250‑sheet tray (Tray 1) 6 Optional 250‑ or 550‑sheet tray (Tray 2) 7 ...
Inside are the toner cartridge and photoconductor kit. 2 Standard exit bin 3 Front door 4 Manual or multipurpose feeder door 5 Standard 250‑sheet tray (Tray 1) 6 Optional 250‑ or 550‑sheet tray (Tray 2) 7 ...

User's Guide
Page 240
..., and then open the rear door. Try one or more of the following : • Remove Tray 1. • Open the front door, and then remove the photoconductor kit. Open the front door, and then open the rear door.
..., and then open the rear door. Try one or more of the following : • Remove Tray 1. • Open the front door, and then remove the photoconductor kit. Open the front door, and then open the rear door.

User's Guide
Page 242
Clearing jams 242 3 If you do not see the jam, open the front door, and then remove the photoconductor kit and toner cartridge. 4 Lift the flap at the front of the printer, and then remove any jammed sheets. 5 If you do not see any jammed sheets, open the rear door.
Clearing jams 242 3 If you do not see the jam, open the front door, and then remove the photoconductor kit and toner cartridge. 4 Lift the flap at the front of the printer, and then remove any jammed sheets. 5 If you do not see any jammed sheets, open the rear door.

User's Guide
Page 243
If the paper is not exiting the printer: 1 Pull down the rear door. 2 Remove the jammed paper. Clearing jams 243 6 Remove the jam. 7 Close the rear door. 8 Insert the photoconductor kit and toner cartridge. 9 Close the front door. 10 Touch Continue. 202 paper jam Touch Status/Supplies to identify the location of the jam. If the paper is exiting the printer, then pull the paper out, and then touch Continue.
If the paper is not exiting the printer: 1 Pull down the rear door. 2 Remove the jammed paper. Clearing jams 243 6 Remove the jam. 7 Close the rear door. 8 Insert the photoconductor kit and toner cartridge. 9 Close the front door. 10 Touch Continue. 202 paper jam Touch Status/Supplies to identify the location of the jam. If the paper is exiting the printer, then pull the paper out, and then touch Continue.

User's Guide
Page 249
Clearing jams 249 If the sheet is not visible, complete the following steps: 1 Open the front door, and then remove the photoconductor kit and toner cartridge. 2 Lift the flap at the front of the printer, and then remove any jams. 3 Reinsert the photoconductor kit and toner cartridge. 4 Close the front door. 5 Touch Continue.
Clearing jams 249 If the sheet is not visible, complete the following steps: 1 Open the front door, and then remove the photoconductor kit and toner cartridge. 2 Lift the flap at the front of the printer, and then remove any jams. 3 Reinsert the photoconductor kit and toner cartridge. 4 Close the front door. 5 Touch Continue.

User's Guide
Page 266
... to clear the message and continue printing. 88 Cartridge low The toner is low. Try one or more of the following : • Replace the photoconductor kit. • Touch Continue to clear the message. If the error message remains, the hard disk may be defective and require replacing. 80 Routine maintenance... of the following : • Touch Continue to replace the pick rollers, the charge roll, the transfer roller, and the fuser. 84 Replace PC Kit The photoconductor kit is exhausted. Install a new photoconductor kit. 84 PC Kit life warning The photoconductor kit is near exhaustion.
... to clear the message and continue printing. 88 Cartridge low The toner is low. Try one or more of the following : • Replace the photoconductor kit. • Touch Continue to clear the message. If the error message remains, the hard disk may be defective and require replacing. 80 Routine maintenance... of the following : • Touch Continue to replace the pick rollers, the charge roll, the transfer roller, and the fuser. 84 Replace PC Kit The photoconductor kit is exhausted. Install a new photoconductor kit. 84 PC Kit life warning The photoconductor kit is near exhaustion.
User's Guide
Page 318
... load 91 Paper Weight menu 159 Parallel menu 174 pausing the current print job to make copies 108 PCL Emul menu 224 PDF menu 223 photoconductor kit ordering 234 photos copying 103 port settings configuring 64 PostScript menu 223 Power Saver adjusting 70 print job canceling from Macintosh 100 canceling from Windows... tray 265 61 Remove defective disk 265 62 Disk full 266 63 Unformatted disk 266 80 Routine maintenance needed 266 84 PC Kit life warning 266 84 Replace PC Kit 266 840.01 Scanner Disabled 268 841‑846 Scanner Service Error 268 88 Cartridge low 266 88.yy Cartridge nearly low...
... load 91 Paper Weight menu 159 Parallel menu 174 pausing the current print job to make copies 108 PCL Emul menu 224 PDF menu 223 photoconductor kit ordering 234 photos copying 103 port settings configuring 64 PostScript menu 223 Power Saver adjusting 70 print job canceling from Macintosh 100 canceling from Windows... tray 265 61 Remove defective disk 265 62 Disk full 266 63 Unformatted disk 266 80 Routine maintenance needed 266 84 PC Kit life warning 266 84 Replace PC Kit 266 840.01 Scanner Disabled 268 841‑846 Scanner Service Error 268 88 Cartridge low 266 88.yy Cartridge nearly low...
User's Guide
Page 320
... 165 Standard USB menu 173 status of 233 storing 232 using recycled paper 68 supplies, ordering 234 ADF pick assembly 235 ADF separator roll 235 photoconductor kit 234 system board accessing 29 System busy, preparing resources for job. 260 System busy, preparing resources for job.
... 165 Standard USB menu 173 status of 233 storing 232 using recycled paper 68 supplies, ordering 234 ADF pick assembly 235 ADF separator roll 235 photoconductor kit 234 system board accessing 29 System busy, preparing resources for job. 260 System busy, preparing resources for job.


