Getting Started
Page 14
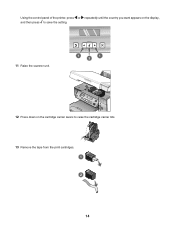
Using the control panel of the printer, press or repeatedly until the country you want appears on the display, and then press to save the setting. 11 Raise the scanner unit. 1 1 2 12 Press down on the cartridge carrier levers to raise the cartridge carrier lids. 13 Remove the tape from the print cartridges. 1 2 14
Using the control panel of the printer, press or repeatedly until the country you want appears on the display, and then press to save the setting. 11 Raise the scanner unit. 1 1 2 12 Press down on the cartridge carrier levers to raise the cartridge carrier lids. 13 Remove the tape from the print cartridges. 1 2 14
Getting Started
Page 15
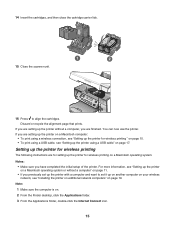
... the printer. Note: 1 Make sure the computer is on page 19. 14 Insert the cartridges, and then close the cartridge carrier lids. 15 Close the scanner unit. 16 Press to set up the printer with a computer and want to align the cartridges.
... the printer. Note: 1 Make sure the computer is on page 19. 14 Insert the cartridges, and then close the cartridge carrier lids. 15 Close the scanner unit. 16 Press to set up the printer with a computer and want to align the cartridges.
Getting Started
Page 25
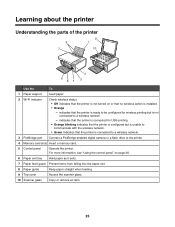
... as it exits. 7 Paper feed guard Prevent items from falling into the paper slot. 8 Paper guide Keep paper straight when feeding. 9 Top cover Access the scanner glass. 10 Scanner glass Copy or remove an item. 25
... as it exits. 7 Paper feed guard Prevent items from falling into the paper slot. 8 Paper guide Keep paper straight when feeding. 9 Top cover Access the scanner glass. 10 Scanner glass Copy or remove an item. 25
Getting Started
Page 26
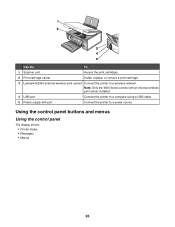
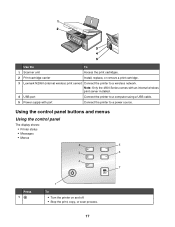
Use the To 1 Scanner unit Access the print cartridges. 2 Print cartridge carrier Install, replace, or remove a print cartridge. 3 Lexmark N2050 (internal wireless print server) Connect the printer to a power source. Using the control panel buttons and menus Using the control panel The display shows: • Printer status • Messages • Menus 26 Note: Only the 4500 Series comes with an internal wireless print server installed. 4 USB port Connect the printer to a computer using a USB cable. 5 Power supply with port Connect the printer to a wireless network.
Use the To 1 Scanner unit Access the print cartridges. 2 Print cartridge carrier Install, replace, or remove a print cartridge. 3 Lexmark N2050 (internal wireless print server) Connect the printer to a power source. Using the control panel buttons and menus Using the control panel The display shows: • Printer status • Messages • Menus 26 Note: Only the 4500 Series comes with an internal wireless print server installed. 4 USB port Connect the printer to a computer using a USB cable. 5 Power supply with port Connect the printer to a wireless network.
Getting Started
Page 43
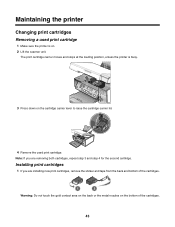
... the back and bottom of the cartridges. 1 2 Warning: Do not touch the gold contact area on the back or the metal nozzles on . 2 Lift the scanner unit. Note: If you are removing both cartridges, repeat step 3 and step 4 for the second cartridge. Maintaining the printer Changing print cartridges Removing a used print...
... the back and bottom of the cartridges. 1 2 Warning: Do not touch the gold contact area on the back or the metal nozzles on . 2 Lift the scanner unit. Note: If you are removing both cartridges, repeat step 3 and step 4 for the second cartridge. Maintaining the printer Changing print cartridges Removing a used print...
Getting Started
Page 44
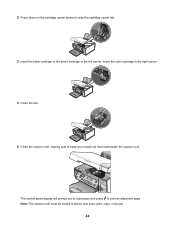
2 Press down on the cartridge carrier levers to raise the cartridge carrier lids. 3 Insert the black cartridge or the photo cartridge in the right carrier. 4 Close the lids. 5 Close the scanner unit, making sure to keep your hands out from underneath the scanner unit. The control panel display will prompt you to load paper and press to start a new scan, print, copy, or fax job. 44 Insert the color cartridge in the left carrier. Note: The scanner unit must be closed to print an alignment page.
2 Press down on the cartridge carrier levers to raise the cartridge carrier lids. 3 Insert the black cartridge or the photo cartridge in the right carrier. 4 Close the lids. 5 Close the scanner unit, making sure to keep your hands out from underneath the scanner unit. The control panel display will prompt you to load paper and press to start a new scan, print, copy, or fax job. 44 Insert the color cartridge in the left carrier. Note: The scanner unit must be closed to print an alignment page.
User's Guide
Page 3
... Using the PictBridge menu ...22 Using the Settings menu ...23 Saving settings ...25 Learning about the software 27 Using the printer software...27 Using the Lexmark Imaging Studio...27 Using the Solution Center...28 Using Printing Preferences...30 Opening Printing Preferences ...30 Using the Printing Preferences tabs ...30 Using the Save... printer software settings to defaults 32 Loading paper and original documents 34 Loading paper...34 Loading various paper types...34 Loading original documents on the scanner glass 37 3
... Using the PictBridge menu ...22 Using the Settings menu ...23 Saving settings ...25 Learning about the software 27 Using the printer software...27 Using the Lexmark Imaging Studio...27 Using the Solution Center...28 Using Printing Preferences...30 Opening Printing Preferences ...30 Using the Printing Preferences tabs ...30 Using the Save... printer software settings to defaults 32 Loading paper and original documents 34 Loading paper...34 Loading various paper types...34 Loading original documents on the scanner glass 37 3
User's Guide
Page 5
... Aligning print cartridges ...72 Cleaning the print cartridge nozzles ...72 Wiping the print cartridge nozzles and contacts 73 Preserving the print cartridges...74 Cleaning the scanner glass...74 Ordering supplies...74 Ordering print cartridges...74 Ordering paper and other supplies ...75 Using genuine...
... Aligning print cartridges ...72 Cleaning the print cartridge nozzles ...72 Wiping the print cartridge nozzles and contacts 73 Preserving the print cartridges...74 Cleaning the scanner glass...74 Ordering supplies...74 Ordering print cartridges...74 Ordering paper and other supplies ...75 Using genuine...
User's Guide
Page 6
Recycling Lexmark products...76 Troubleshooting...77 Setup troubleshooting...77 Incorrect language appears on the display 77 Power button is not lit ...78 Software does not install ...78 ... levels seem to go down too quickly ...86 Copy troubleshooting...86 Copier does not respond ...86 Scanner unit does not close ...86 Poor copy quality ...87 Partial document or photo copies ...88 Scan troubleshooting...88 Scanner does not respond ...88 Scan was not successful ...89 Scanning takes too long or freezes the...
Recycling Lexmark products...76 Troubleshooting...77 Setup troubleshooting...77 Incorrect language appears on the display 77 Power button is not lit ...78 Software does not install ...78 ... levels seem to go down too quickly ...86 Copy troubleshooting...86 Copier does not respond ...86 Scanner unit does not close ...86 Poor copy quality ...87 Partial document or photo copies ...88 Scan troubleshooting...88 Scanner does not respond ...88 Scan was not successful ...89 Scanning takes too long or freezes the...
User's Guide
Page 16
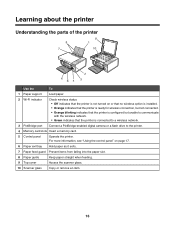
... it exits. 7 Paper feed guard Prevent items from falling into the paper slot. 8 Paper guide Keep paper straight when feeding. 9 Top cover Access the scanner glass. 10 Scanner glass Copy or remove an item. 16 For more information, see "Using the control panel" on or that no wireless option is installed. •...
... it exits. 7 Paper feed guard Prevent items from falling into the paper slot. 8 Paper guide Keep paper straight when feeding. 9 Top cover Access the scanner glass. 10 Scanner glass Copy or remove an item. 16 For more information, see "Using the control panel" on or that no wireless option is installed. •...
User's Guide
Page 17
Use the To 1 Scanner unit Access the print cartridges. 2 Print cartridge carrier Install, replace, or remove a print cartridge. 3 Lexmark N2050 (internal wireless print server) Connect the printer to a power source. Note: Only the 4500 Series comes with an internal wireless print server installed. 4 USB ...
Use the To 1 Scanner unit Access the print cartridges. 2 Print cartridge carrier Install, replace, or remove a print cartridge. 3 Lexmark N2050 (internal wireless print server) Connect the printer to a power source. Note: Only the 4500 Series comes with an internal wireless print server installed. 4 USB ...
User's Guide
Page 37
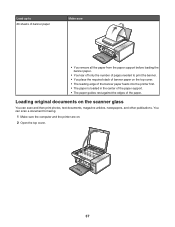
You can scan a document for faxing. 1 Make sure the computer and the printer are on the scanner glass You can scan and then print photos, text documents, magazine articles, newspapers, and other publications. Loading original documents on . 2 Open the top cover. 37 ...
You can scan a document for faxing. 1 Make sure the computer and the printer are on the scanner glass You can scan and then print photos, text documents, magazine articles, newspapers, and other publications. Loading original documents on . 2 Open the top cover. 37 ...

User's Guide
Page 38
3 Place the original document or item facedown on the scanner glass in the upper left corner. 4 Close the top cover to avoid dark edges on the scanned image. 38
3 Place the original document or item facedown on the scanner glass in the upper left corner. 4 Close the top cover to avoid dark edges on the scanned image. 38

User's Guide
Page 49
... until a message appears on the display indicating that contains the images you completely fill in the circles. 11 Load the proof sheet facedown on the scanner glass. You can print a proof sheet: • For all photos on the memory card • For the 20 most recent photos, if...sheet to scan the proof sheet. 49 One or more than one date 8 Press . 9 Press again. For more information, see "Loading original documents on the scanner glass" on page 45. 3 Press or repeatedly until Proof Sheet appears. 4 Press . 5 Press or repeatedly until Scan Proof Sheet appears. 13 Press . ...
... until a message appears on the display indicating that contains the images you completely fill in the circles. 11 Load the proof sheet facedown on the scanner glass. You can print a proof sheet: • For all photos on the memory card • For the 20 most recent photos, if...sheet to scan the proof sheet. 49 One or more than one date 8 Press . 9 Press again. For more information, see "Loading original documents on the scanner glass" on page 45. 3 Press or repeatedly until Proof Sheet appears. 4 Press . 5 Press or repeatedly until Scan Proof Sheet appears. 13 Press . ...
User's Guide
Page 55
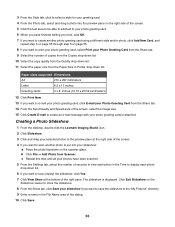
The slideshow is displayed. Creating a Photo Slideshow 1 From the desktop, double-click the Lexmark Imaging Studio icon. 2 Click Slideshow. 3 Click and drag your selected photos to the preview pane at the right side of the screen. 4 If you want ..., click to select a style for your greeting card. 4 From the Photo tab, select and drag a photo into your slideshow: a Place the photo facedown on the scanner glass. Paper sizes supported Dimensions A4 210 x 297 millimeters Letter 8.5 x 11 inches Greeting cards 4 x 8 inches (10.16 x 20.32 centimeters) 12 Click Print Now. 13...
The slideshow is displayed. Creating a Photo Slideshow 1 From the desktop, double-click the Lexmark Imaging Studio icon. 2 Click Slideshow. 3 Click and drag your selected photos to the preview pane at the right side of the screen. 4 If you want ..., click to select a style for your greeting card. 4 From the Photo tab, select and drag a photo into your slideshow: a Place the photo facedown on the scanner glass. Paper sizes supported Dimensions A4 210 x 297 millimeters Letter 8.5 x 11 inches Greeting cards 4 x 8 inches (10.16 x 20.32 centimeters) 12 Click Print Now. 13...

User's Guide
Page 56
Use the drop-down list in the bottom right corner of the screen. 56 b Click File ΠAdd Photo from Scanner. 5 If you are scanning a photo: a Place the photo facedown on the printed pages, click Rotate 90 degrees. 12 Click Print Now in the last column ... poster size. 11 If you want to rotate the poster so that it fits better on the scanner glass. Printing an image as a multiple-page poster 1 Load paper. 2 From the desktop, double-click the Lexmark Imaging Studio icon. 3 From the Printing Creative Tasks area of the Welcome screen, click Poster. 4 If you...
Use the drop-down list in the bottom right corner of the screen. 56 b Click File ΠAdd Photo from Scanner. 5 If you are scanning a photo: a Place the photo facedown on the printed pages, click Rotate 90 degrees. 12 Click Print Now in the last column ... poster size. 11 If you want to rotate the poster so that it fits better on the scanner glass. Printing an image as a multiple-page poster 1 Load paper. 2 From the desktop, double-click the Lexmark Imaging Studio icon. 3 From the Printing Creative Tasks area of the Welcome screen, click Poster. 4 If you...

User's Guide
Page 57
... the copy job. Resolution involves a dots-per-inch (dpi) count; Making a copy 1 Load paper. 2 Load an original document facedown on the scanner glass. 3 From the control panel, press Copy Mode. 4 Press Start Color or Start Black. the higher the dpi count, the higher the resolution... and copy quality. 1 Load paper. 2 Load an original document facedown on the scanner glass. 3 If necessary, press Copy Mode. 4 Press . 5 Press or repeatedly until Quality appears. 6 Press . 7 Press or repeatedly until the quality you want ...
... the copy job. Resolution involves a dots-per-inch (dpi) count; Making a copy 1 Load paper. 2 Load an original document facedown on the scanner glass. 3 From the control panel, press Copy Mode. 4 Press Start Color or Start Black. the higher the dpi count, the higher the resolution... and copy quality. 1 Load paper. 2 Load an original document facedown on the scanner glass. 3 If necessary, press Copy Mode. 4 Press . 5 Press or repeatedly until Quality appears. 6 Press . 7 Press or repeatedly until the quality you want ...
User's Guide
Page 58
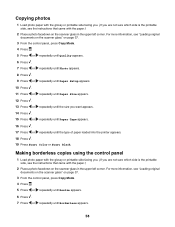
...If you are not sure which side is the printable side, see the instructions that came with the paper.) 2 Place a photo facedown on the scanner glass in the upper left corner. Copying photos 1 Load photo paper with the glossy or printable side facing you. (If you are not sure which...side is the printable side, see the instructions that came with the paper.) 2 Place a photo facedown on the scanner glass in the upper left corner. For more information, see "Loading original documents on the scanner glass" on page 37. 3 From the control panel, press Copy Mode. 4 Press . 5 Press or ...
...If you are not sure which side is the printable side, see the instructions that came with the paper.) 2 Place a photo facedown on the scanner glass in the upper left corner. Copying photos 1 Load photo paper with the glossy or printable side facing you. (If you are not sure which...side is the printable side, see the instructions that came with the paper.) 2 Place a photo facedown on the scanner glass in the upper left corner. For more information, see "Loading original documents on the scanner glass" on page 37. 3 From the control panel, press Copy Mode. 4 Press . 5 Press or ...

User's Guide
Page 59
...are not sure which side is the printable side, see the instructions that came with the paper.) 2 Load an original document facedown on the scanner glass. 59 Making a copy lighter or darker If you want appears. 14 Press . 15 Press or repeatedly until Paper Type appears. 16 Press... document, you can adjust it to make it lighter or darker. 1 Load paper. Collated Not collated 1 Load paper. 2 Load an original document facedown on the scanner glass. 3 From the control panel, press Copy Mode. 4 Press Lighter/Darker. 5 Press or repeatedly to adjust the slider. 6 Press . 7 Press Start Color...
...are not sure which side is the printable side, see the instructions that came with the paper.) 2 Load an original document facedown on the scanner glass. 59 Making a copy lighter or darker If you want appears. 14 Press . 15 Press or repeatedly until Paper Type appears. 16 Press... document, you can adjust it to make it lighter or darker. 1 Load paper. Collated Not collated 1 Load paper. 2 Load an original document facedown on the scanner glass. 3 From the control panel, press Copy Mode. 4 Press Lighter/Darker. 5 Press or repeatedly to adjust the slider. 6 Press . 7 Press Start Color...
User's Guide
Page 60
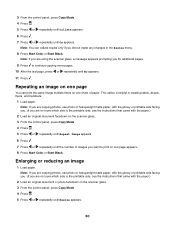
... sure which side is the printable side, see the instructions that came with the glossy or printable side facing you. (If you are using the scanner glass, a message appears prompting you did not make any changes in creating labels, decals, flyers, and handouts. 1 Load paper. 3 From the... or Start Black. Note: If you are copying photos, use photo or heavyweight matte paper, with the paper.) 2 Load an original document facedown on the scanner glass. 3 From the control panel, press Copy Mode. 4 Press . 5 Press or repeatedly until Repeat Image appears. 6 Press . 7 Press or repeatedly ...
... sure which side is the printable side, see the instructions that came with the glossy or printable side facing you. (If you are using the scanner glass, a message appears prompting you did not make any changes in creating labels, decals, flyers, and handouts. 1 Load paper. 3 From the... or Start Black. Note: If you are copying photos, use photo or heavyweight matte paper, with the paper.) 2 Load an original document facedown on the scanner glass. 3 From the control panel, press Copy Mode. 4 Press . 5 Press or repeatedly until Repeat Image appears. 6 Press . 7 Press or repeatedly ...

