
Getting Started
Page 3
...up the printer using a USB cable...17 Installing an optional internal wireless print server 17 Configuring the optional internal wireless print server 19 Installing the printer on additional network computers 19 Wireless networking...20 Networking overview...20 Learning about the printer 25 Understanding the...32 Using the Settings menu ...33 Saving settings ...35 Learning about the software 37 Using the printer software...37 Using the Lexmark Imaging Studio...37 Using the Solution Center...38 Using Printing Preferences...40 Opening Printing Preferences ...40 Using the Save Settings menu ......
...up the printer using a USB cable...17 Installing an optional internal wireless print server 17 Configuring the optional internal wireless print server 19 Installing the printer on additional network computers 19 Wireless networking...20 Networking overview...20 Learning about the printer 25 Understanding the...32 Using the Settings menu ...33 Saving settings ...35 Learning about the software 37 Using the printer software...37 Using the Lexmark Imaging Studio...37 Using the Solution Center...38 Using Printing Preferences...40 Opening Printing Preferences ...40 Using the Save Settings menu ......
Getting Started
Page 4
...Power button is not lit ...47 Software does not install ...48 Page does not print ...49 Cannot print from digital camera using PictBridge 50 Wireless troubleshooting...50 Printing a network setup page ...50 Wi-Fi indicator is not lit ...51 Network printer does not show up in the printer ...selection list during installation 51 Check your security keys...52 Wireless Setup Utility cannot communicate with the printer during installation (Windows users only) ...52 Wi-Fi indicator light is orange ...53 Wi-Fi indicator...
...Power button is not lit ...47 Software does not install ...48 Page does not print ...49 Cannot print from digital camera using PictBridge 50 Wireless troubleshooting...50 Printing a network setup page ...50 Wi-Fi indicator is not lit ...51 Network printer does not show up in the printer ...selection list during installation 51 Check your security keys...52 Wireless Setup Utility cannot communicate with the printer during installation (Windows users only) ...52 Wi-Fi indicator light is orange ...53 Wi-Fi indicator...
Getting Started
Page 9
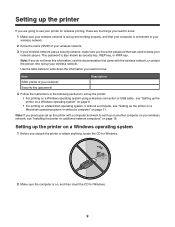
...attach anything, locate the CD for Windows. 2 Make sure the computer is on a Windows operating system 1 Before you need to know: 1 Make sure your wireless network is set up and working properly, and that your computer is also known as security key, WEP key, or WPA key. Setting up the...Note: If you know the password that came with a computer and want to set up the printer: • For printing on a Windows operating system using a wireless connection or USB cable , see "Setting up the printer on a Windows operating system" on page 9. • For printing on page 11. Setting up the ...
...attach anything, locate the CD for Windows. 2 Make sure the computer is on a Windows operating system 1 Before you need to know: 1 Make sure your wireless network is set up and working properly, and that your computer is also known as security key, WEP key, or WPA key. Setting up the...Note: If you know the password that came with a computer and want to set up the printer: • For printing on a Windows operating system using a wireless connection or USB cable , see "Setting up the printer on a Windows operating system" on page 9. • For printing on page 11. Setting up the ...
Getting Started
Page 15
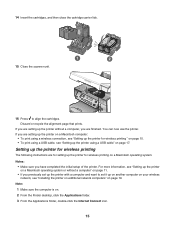
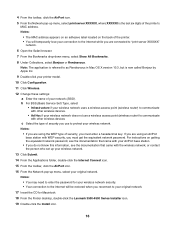
...You can now use the printer. Notes: • Make sure you previously set it up on another computer on your wireless network, see "Setting up the printer for wireless printing on page 17. If you are setting up the printer without a computer" on page 11. • If... the printer on a Macintosh operating system or without a computer, you are setting up the printer on a Macintosh computer: • To print using a wireless connection, see "Installing the printer on additional network computers" on . 2 From the Finder desktop, click the Applications folder. 3 From the Applications folder, ...
...You can now use the printer. Notes: • Make sure you previously set it up on another computer on your wireless network, see "Setting up the printer for wireless printing on page 17. If you are setting up the printer without a computer" on page 11. • If... the printer on a Macintosh operating system or without a computer, you are setting up the printer on a Macintosh computer: • To print using a wireless connection, see "Installing the printer on additional network computers" on . 2 From the Finder desktop, click the Applications folder. 3 From the Applications folder, ...
Getting Started
Page 16
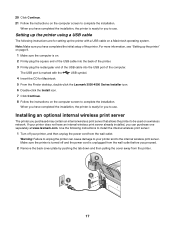
... Infrastructure if your wireless network uses a wireless access point (wireless router) to communicate with other wireless devices. • Ad Hoc if your wireless network does not use to protect your original network. 17 Insert the CD for Macintosh. 18 From the Finder desktop, double-click the Lexmark 3500-4500 Series ...Installer icon. 19 Double-click the Install icon. 16 Notes: • You may need to enter the password for your wireless network security. • Your connection to the Internet will ...
... Infrastructure if your wireless network uses a wireless access point (wireless router) to communicate with other wireless devices. • Ad Hoc if your wireless network does not use to protect your original network. 17 Insert the CD for Macintosh. 18 From the Finder desktop, double-click the Lexmark 3500-4500 Series ...Installer icon. 19 Double-click the Install icon. 16 Notes: • You may need to enter the password for your wireless network security. • Your connection to the Internet will ...
Getting Started
Page 17
.... Warning: Failure to unplug the printer can purchase one separately at www.lexmark.com. Setting up the printer with the USB symbol. 4 Insert the CD for you to the internal wireless print server. When you have completed the installation, the printer is ready ...for Macintosh. 5 From the Finder desktop, double-click the Lexmark 3500-4500 Series Installer icon. 6 Double-click the Install icon. 7 Click Continue. 8 Follow the instructions on a wireless network. Installing an optional internal wireless print server The printer you to complete the installation. Use the...
.... Warning: Failure to unplug the printer can purchase one separately at www.lexmark.com. Setting up the printer with the USB symbol. 4 Insert the CD for you to the internal wireless print server. When you have completed the installation, the printer is ready ...for Macintosh. 5 From the Finder desktop, double-click the Lexmark 3500-4500 Series Installer icon. 6 Double-click the Install icon. 7 Click Continue. 8 Follow the instructions on a wireless network. Installing an optional internal wireless print server The printer you to complete the installation. Use the...

Getting Started
Page 18
...you purchased the optional internal wireless print server separately and have already installed the printer: a Click Start ΠPrograms or All Programs ΠLexmark 3500-4500 Series. Warning: Wireless print servers are easily damaged by static electricity. b Click Wireless Setup. Save the packaging ...materials. c Follow the prompts on the left and right, and then slide the wireless print server into the printer until...
...you purchased the optional internal wireless print server separately and have already installed the printer: a Click Start ΠPrograms or All Programs ΠLexmark 3500-4500 Series. Warning: Wireless print servers are easily damaged by static electricity. b Click Wireless Setup. Save the packaging ...materials. c Follow the prompts on the left and right, and then slide the wireless print server into the printer until...
Getting Started
Page 19
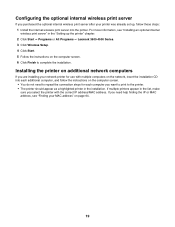
... are installing your printer was already set up the printer" chapter. 2 Click Start Œ Programs or All Programs Œ Lexmark 3500-4500 Series. 3 Click Wireless Setup. 4 Click Start. 5 Follow the instructions on the computer screen. 6 Click Finish to the printer. • The... printer should appear as a highlighted printer in the installation. Configuring the optional internal wireless print server If you purchased the optional internal wireless print server after your network printer for each additional computer, and follow the instructions on the computer screen....
... are installing your printer was already set up the printer" chapter. 2 Click Start Œ Programs or All Programs Œ Lexmark 3500-4500 Series. 3 Click Wireless Setup. 4 Click Start. 5 Follow the instructions on the computer screen. 6 Click Finish to the printer. • The... printer should appear as a highlighted printer in the installation. Configuring the optional internal wireless print server If you purchased the optional internal wireless print server after your network printer for each additional computer, and follow the instructions on the computer screen....
Getting Started
Page 20
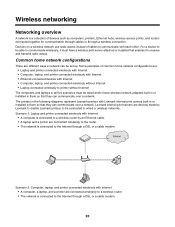
... cable. • A laptop and a printer are different ways a network can be connected to the Internet through a DSL or a cable modem. 20 Lexmark internal print servers are connected wirelessly to a wireless router. • The network is connected to wired or wireless networks. Some examples of common home network configurations are: • Laptop and printer connected...
... cable. • A laptop and a printer are different ways a network can be connected to the Internet through a DSL or a cable modem. 20 Lexmark internal print servers are connected wirelessly to a wireless router. • The network is connected to wired or wireless networks. Some examples of common home network configurations are: • Laptop and printer connected...
Getting Started
Page 21
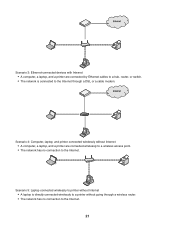
...Internet • A computer, a laptop, and a printer are connected wirelessly to a wireless access point. • The network has no connection to the Internet through a DSL or a cable modem. Scenario 5: Laptop connected wirelessly to printer without Internet • A computer, a laptop, and a ..., or switch. • The network is directly connected wirelessly to a printer without going through a wireless router. • The network has no connection to the Internet. Scenario 4: Computer, laptop, and printer connected wirelessly without Internet • A laptop is connected to the ...
...Internet • A computer, a laptop, and a printer are connected wirelessly to a wireless access point. • The network has no connection to the Internet through a DSL or a cable modem. Scenario 5: Laptop connected wirelessly to printer without Internet • A computer, a laptop, and a ..., or switch. • The network is directly connected wirelessly to a printer without going through a wireless router. • The network has no connection to the Internet. Scenario 4: Computer, laptop, and printer connected wirelessly without Internet • A laptop is connected to the ...
Getting Started
Page 22
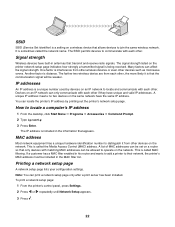
... listed on the network. How to communicate with each other, the more likely it from other wireless devices or even other devices such as microwave ovens. The farther two wireless device are from each other if they have the same IP address. You can print a network... setup page only after a print server has been installed. MAC address Most network equipment has a unique hardware identification number to join the same wireless network. This is called the Media Access Control (MAC) address. This is called MAC filtering. Note: You can locate the printer's IP...
... listed on the network. How to communicate with each other, the more likely it from other wireless devices or even other devices such as microwave ovens. The farther two wireless device are from each other if they have the same IP address. You can print a network... setup page only after a print server has been installed. MAC address Most network equipment has a unique hardware identification number to join the same wireless network. This is called the Media Access Control (MAC) address. This is called MAC filtering. Note: You can locate the printer's IP...
Getting Started
Page 23
Lexmark recommends setting up in this type of network must have a valid IP address and be configured with "Reply from". • If the printer is not on the network or is one of two modes: infrastructure or ad hoc. A wireless network where each device communicates with the ...." appears. d Check that the printer has an IP address. e For additional information, refer to range of communication is listed as the wireless access point (wireless router). This mode of individual devices on the same network, issue a ping command. 1 From the desktop, click Start Menu Œ ...
Lexmark recommends setting up in this type of network must have a valid IP address and be configured with "Reply from". • If the printer is not on the network or is one of two modes: infrastructure or ad hoc. A wireless network where each device communicates with the ...." appears. d Check that the printer has an IP address. e For additional information, refer to range of communication is listed as the wireless access point (wireless router). This mode of individual devices on the same network, issue a ping command. 1 From the desktop, click Start Menu Œ ...
Getting Started
Page 24
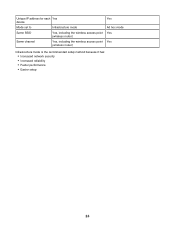
Unique IP address for each Yes device Mode set to Infrastructure mode Same SSID Yes, including the wireless access point (wireless router) Same channel Yes, including the wireless access point (wireless router) Yes Ad hoc mode Yes Yes Infrastructure mode is the recommended setup method because it has: • Increased network security • Increased reliability • Faster performance • Easier setup 24
Unique IP address for each Yes device Mode set to Infrastructure mode Same SSID Yes, including the wireless access point (wireless router) Same channel Yes, including the wireless access point (wireless router) Yes Ad hoc mode Yes Yes Infrastructure mode is the recommended setup method because it has: • Increased network security • Increased reliability • Faster performance • Easier setup 24
Getting Started
Page 25
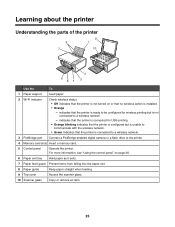
indicates that the printer is connected for wireless printing but is unable to communicate with the wireless network. • Green indicates that the printer is connected to a wireless network. 3 PictBridge port Connect a PictBridge-enabled digital camera or a flash drive to a wireless network - indicates that the printer .... Learning about the printer Understanding the parts of the printer Use the To 1 Paper support Load paper. 2 Wi-Fi indicator Check wireless status: • Off indicates that the printer is not turned on page 26. 6 Paper exit tray Hold paper as it exits....
indicates that the printer is connected for wireless printing but is unable to communicate with the wireless network. • Green indicates that the printer is connected to a wireless network. 3 PictBridge port Connect a PictBridge-enabled digital camera or a flash drive to a wireless network - indicates that the printer .... Learning about the printer Understanding the parts of the printer Use the To 1 Paper support Load paper. 2 Wi-Fi indicator Check wireless status: • Off indicates that the printer is not turned on page 26. 6 Paper exit tray Hold paper as it exits....
Getting Started
Page 26
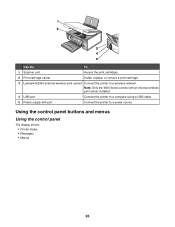
Use the To 1 Scanner unit Access the print cartridges. 2 Print cartridge carrier Install, replace, or remove a print cartridge. 3 Lexmark N2050 (internal wireless print server) Connect the printer to a power source. Using the control panel buttons and menus Using the control panel The display shows: • Printer status • Messages • Menus 26 Note: Only the 4500 Series comes with an internal wireless print server installed. 4 USB port Connect the printer to a computer using a USB cable. 5 Power supply with port Connect the printer to a wireless network.
Use the To 1 Scanner unit Access the print cartridges. 2 Print cartridge carrier Install, replace, or remove a print cartridge. 3 Lexmark N2050 (internal wireless print server) Connect the printer to a power source. Using the control panel buttons and menus Using the control panel The display shows: • Printer status • Messages • Menus 26 Note: Only the 4500 Series comes with an internal wireless print server installed. 4 USB port Connect the printer to a computer using a USB cable. 5 Power supply with port Connect the printer to a wireless network.
Getting Started
Page 34
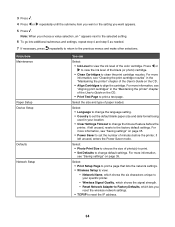
... Country to clean the print cartridge nozzles. Select: • Print Setup Page to print a page that lists the network settings. • Wireless Setup to the previous menus and make other selections. Network Name, which shows the signal strength. - For more information, see "Saving settings..." on the CD. • Print Test Page to change default settings. Wireless Signal Quality, which shows the six characters unique to your location. • Clear Settings Timeout to print a test page. 3 Press . 4 ...
... Country to clean the print cartridge nozzles. Select: • Print Setup Page to print a page that lists the network settings. • Wireless Setup to the previous menus and make other selections. Network Name, which shows the signal strength. - For more information, see "Saving settings..." on the CD. • Print Test Page to change default settings. Wireless Signal Quality, which shows the six characters unique to your location. • Clear Settings Timeout to print a test page. 3 Press . 4 ...
Getting Started
Page 45
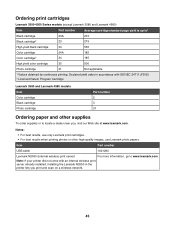
...locate a dealer near you print and scan on a wireless network. 45 Notes: • For best results, use Lexmark photo papers. Note: If your printer did not come with ISO/IEC 24711 (FDIS). 2 Licensed Return Program Cartridge Lexmark 3580 and Lexmark 4580 models Item Color cartridge Black cartridge Photo cartridge Part ... 35 500 Photo cartridge 31 Not applicable 1 Values obtained by continuous printing. Declared yield value in accordance with an internal wireless print server already installed, installing the Lexmark N2050 in the printer lets you , visit our Web site at www...
...locate a dealer near you print and scan on a wireless network. 45 Notes: • For best results, use Lexmark photo papers. Note: If your printer did not come with ISO/IEC 24711 (FDIS). 2 Licensed Return Program Cartridge Lexmark 3580 and Lexmark 4580 models Item Color cartridge Black cartridge Photo cartridge Part ... 35 500 Photo cartridge 31 Not applicable 1 Values obtained by continuous printing. Declared yield value in accordance with an internal wireless print server already installed, installing the Lexmark N2050 in the printer lets you , visit our Web site at www...
Getting Started
Page 48
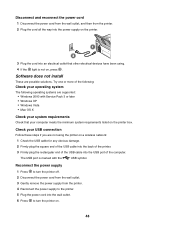
... later • Windows XP • Windows Vista • Mac OS X Check your system requirements Check that other electrical devices have been using the printer on a wireless network: 1 Check the USB cable for any obvious damage. 2 Firmly plug the square end of the USB cable into the back of the printer. 3 Firmly...
... later • Windows XP • Windows Vista • Mac OS X Check your system requirements Check that other electrical devices have been using the printer on a wireless network: 1 Check the USB cable for any obvious damage. 2 Firmly plug the square end of the USB cable into the back of the printer. 3 Firmly...
Getting Started
Page 50
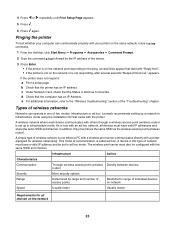
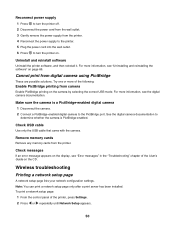
.... Uninstall and reinstall software Uninstall the printer software, and then reinstall it. Check USB cable Use only the USB cable that came with the camera. Wireless troubleshooting Printing a network setup page A network setup page lists your network configuration settings. To print a network setup page: 1 From the control panel of the following...
.... Uninstall and reinstall software Uninstall the printer software, and then reinstall it. Check USB cable Use only the USB cable that came with the camera. Wireless troubleshooting Printing a network setup page A network setup page lists your network configuration settings. To print a network setup page: 1 From the control panel of the following...
Getting Started
Page 51
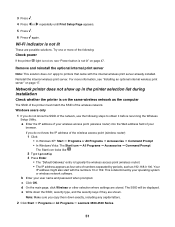
... point (wireless router). • The IP address appears as 192.168.0.100. Try one or more information, see "Power button is not lit These are possible solutions. e Write down exactly, including any capital letters. 2 Click Start Œ Programs or All Programs Œ Lexmark 3500-4500 Series. 51 ...Wi-Fi indicator is not lit" on page 17. b Enter your operating system or wireless network software.
... point (wireless router). • The IP address appears as 192.168.0.100. Try one or more information, see "Power button is not lit These are possible solutions. e Write down exactly, including any capital letters. 2 Click Start Œ Programs or All Programs Œ Lexmark 3500-4500 Series. 51 ...Wi-Fi indicator is not lit" on page 17. b Enter your operating system or wireless network software.


