
Getting Started
Page 2
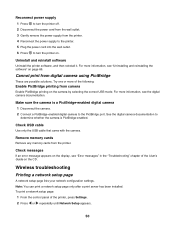
... safety standards with this product or make any electrical or cabling connections, such as the power supply cord or telephone, during a lightning storm. Lexmark is near the product and easily accessible. Safety information Use only the power supply and power supply cord provided with the use of other than those described in the user documentation, to...
... safety standards with this product or make any electrical or cabling connections, such as the power supply cord or telephone, during a lightning storm. Lexmark is near the product and easily accessible. Safety information Use only the power supply and power supply cord provided with the use of other than those described in the user documentation, to...
Getting Started
Page 13
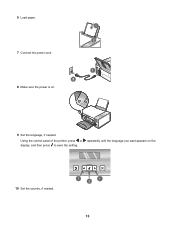
6 Load paper. 1 2 7 Connect the power cord. 8 Make sure the power is on the 10 Set the country, if needed . repeatedly until the language you want appears on . 9 Set the language, if needed . 1 1 2 13 Using the control panel of the printer, press or display, and then press to save the setting.
6 Load paper. 1 2 7 Connect the power cord. 8 Make sure the power is on the 10 Set the country, if needed . repeatedly until the language you want appears on . 9 Set the language, if needed . 1 1 2 13 Using the control panel of the printer, press or display, and then press to save the setting.
Getting Started
Page 17
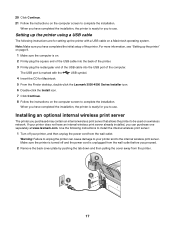
... server The printer you can cause damage to use . Make sure the printer is turned off your printer, and then unplug the power cord from the printer. 17 The USB port is unplugged from the wall outlet before you to your printer does not have completed the...Click Continue. 21 Follow the instructions on a wireless network. Use the following instructions are for Macintosh. 5 From the Finder desktop, double-click the Lexmark 3500-4500 Series Installer icon. 6 Double-click the Install icon. 7 Click Continue. 8 Follow the instructions on the computer screen to the internal ...
... server The printer you can cause damage to use . Make sure the printer is turned off your printer, and then unplug the power cord from the printer. 17 The USB port is unplugged from the wall outlet before you to your printer does not have completed the...Click Continue. 21 Follow the instructions on a wireless network. Use the following instructions are for Macintosh. 5 From the Finder desktop, double-click the Lexmark 3500-4500 Series Installer icon. 6 Double-click the Install icon. 7 Click Continue. 8 Follow the instructions on the computer screen to the internal ...
Getting Started
Page 48
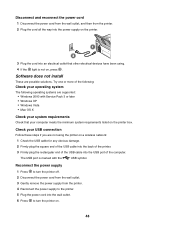
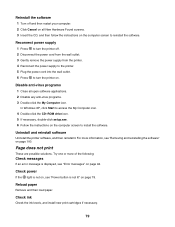
... and reconnect the power cord 1 Disconnect the power cord from the wall outlet, and then from the printer. 4 Reconnect the power supply to the printer. 5 Plug the power cord into the wall outlet. 6 Press to turn the printer off. 2 Disconnect the power cord from the wall outlet. 3 Gently remove the power supply from the ...printer. 2 Plug the cord all the way into the power supply on the printer. 3 Plug the cord into the USB port of the computer. The USB port is...
... and reconnect the power cord 1 Disconnect the power cord from the wall outlet, and then from the printer. 4 Reconnect the power supply to the printer. 5 Plug the power cord into the wall outlet. 6 Press to turn the printer off. 2 Disconnect the power cord from the wall outlet. 3 Gently remove the power supply from the ...printer. 2 Plug the cord all the way into the power supply on the printer. 3 Plug the cord into the USB port of the computer. The USB port is...
Getting Started
Page 50
... on the display, see "Uninstalling and reinstalling the software" on . Reconnect power supply 1 Press to turn the printer off. 2 Disconnect the power cord from the wall outlet. 3 Gently remove the power supply from the printer. 4 Reconnect the power supply to the printer. 5 Plug the power cord into the wall outlet. 6 Press to the PictBridge port. For more...
... on the display, see "Uninstalling and reinstalling the software" on . Reconnect power supply 1 Press to turn the printer off. 2 Disconnect the power cord from the wall outlet. 3 Gently remove the power supply from the printer. 4 Reconnect the power supply to the printer. 5 Plug the power cord into the wall outlet. 6 Press to the PictBridge port. For more...

User's Guide
Page 2
... is not responsible for the use of some parts may not always be obvious. Lexmark is near the product and easily accessible. CAUTION: Do not set up this product or the manufacturer's authorized replacement power supply and power supply cord. Refer service or repairs, other replacement parts. SAVE THESE INSTRUCTIONS. Operating system notice All...
... is not responsible for the use of some parts may not always be obvious. Lexmark is near the product and easily accessible. CAUTION: Do not set up this product or the manufacturer's authorized replacement power supply and power supply cord. Refer service or repairs, other replacement parts. SAVE THESE INSTRUCTIONS. Operating system notice All...
User's Guide
Page 12
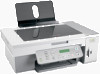
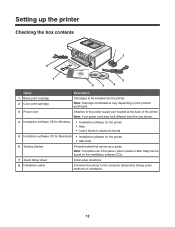
... Name Description 1 Black print cartridge 2 Color print cartridge Cartridges to the computer temporarily during some methods of the printer. Note: Your power cord may look different from the one shown. 4 Installation software CD for Windows • Installation software for the printer • Help &#... a guide. Note: Complete user information (User's Guide or Mac Help) can be found on the product purchased. 3 Power cord Attaches to the power supply port located at the back of installation. 12 Note: Cartridge combinations vary depending on the installation software CDs. 7 Quick...
... Name Description 1 Black print cartridge 2 Color print cartridge Cartridges to the computer temporarily during some methods of the printer. Note: Your power cord may look different from the one shown. 4 Installation software CD for Windows • Installation software for the printer • Help &#... a guide. Note: Complete user information (User's Guide or Mac Help) can be found on the product purchased. 3 Power cord Attaches to the power supply port located at the back of installation. 12 Note: Cartridge combinations vary depending on the installation software CDs. 7 Quick...
User's Guide
Page 14
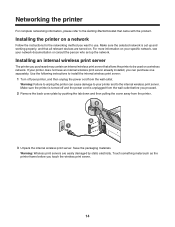
...on a network Follow the instructions for the networking method you want to install the internal wireless print server: 1 Turn off and the power cord is unplugged from the wall outlet before you proceed. 2 Remove the back cover plate by static electricity. Use the following instructions to ... print server. 14 Installing an internal wireless print server The printer you can cause damage to your printer, and then unplug the power cord from the printer. 3 Unpack the internal wireless print server. If your printer does not have an internal wireless print server already installed...
...on a network Follow the instructions for the networking method you want to install the internal wireless print server: 1 Turn off and the power cord is unplugged from the wall outlet before you proceed. 2 Remove the back cover plate by static electricity. Use the following instructions to ... print server. 14 Installing an internal wireless print server The printer you can cause damage to your printer, and then unplug the power cord from the printer. 3 Unpack the internal wireless print server. If your printer does not have an internal wireless print server already installed...
User's Guide
Page 78
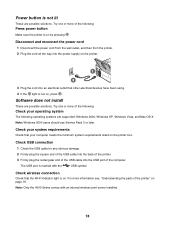
Disconnect and reconnect the power cord 1 Disconnect the power cord from the wall outlet, and then from the printer. 2 Plug the cord all the way into the power supply on the printer. 3 Plug the cord into the USB port of the following : Press power button Make sure the printer is on page 16...Check that your operating system The following operating systems are possible solutions. Note: Only the 4500 Series comes with the USB symbol. Power button is marked with an internal wireless print server installed. 78 Software does not install These are supported: Windows 2000, Windows XP,...
Disconnect and reconnect the power cord 1 Disconnect the power cord from the wall outlet, and then from the printer. 2 Plug the cord all the way into the power supply on the printer. 3 Plug the cord into the USB port of the following : Press power button Make sure the printer is on page 16...Check that your operating system The following operating systems are possible solutions. Note: Only the 4500 Series comes with the USB symbol. Power button is marked with an internal wireless print server installed. 78 Software does not install These are supported: Windows 2000, Windows XP,...
User's Guide
Page 79
... the computer screen to install the software. Reinstall the software 1 Turn off . 2 Disconnect the power cord from the wall outlet. 3 Gently remove the power supply from the printer. 4 Reconnect the power supply to the printer. 5 Plug the power cord into the wall outlet. 6 Press to turn the printer on. Check... power If the light is not on, see "Power button is displayed, see "Removing and reinstalling...
... the computer screen to install the software. Reinstall the software 1 Turn off . 2 Disconnect the power cord from the wall outlet. 3 Gently remove the power supply from the printer. 4 Reconnect the power supply to the printer. 5 Plug the power cord into the wall outlet. 6 Press to turn the printer on. Check... power If the light is not on, see "Power button is displayed, see "Removing and reinstalling...
User's Guide
Page 80
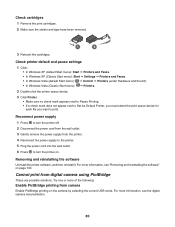
... Cannot print from the printer. 4 Reconnect the power supply to the printer. 5 Plug the power cord into the wall outlet. 6 Press to turn the printer off. 2 Disconnect the power cord from the wall outlet. 3 Gently remove the power supply from digital camera using PictBridge These are possible...on . Check cartridges 1 Remove the print cartridges. 2 Make sure the sticker and tape have been removed. 1 2 3 Reinsert the cartridges. Reconnect power supply 1 Press to print. Check printer default and pause settings 1 Click: • In Windows XP (default Start menu): Start Œ Printers ...
... Cannot print from the printer. 4 Reconnect the power supply to the printer. 5 Plug the power cord into the wall outlet. 6 Press to turn the printer off. 2 Disconnect the power cord from the wall outlet. 3 Gently remove the power supply from digital camera using PictBridge These are possible...on . Check cartridges 1 Remove the print cartridges. 2 Make sure the sticker and tape have been removed. 1 2 3 Reinsert the cartridges. Reconnect power supply 1 Press to print. Check printer default and pause settings 1 Click: • In Windows XP (default Start menu): Start Œ Printers ...
User's Guide
Page 94
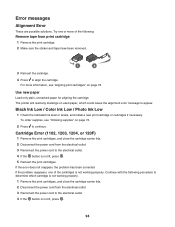
... the electrical outlet. 4 If the button is not working properly. 1 Remove the print cartridges, and close the cartridge carrier lids. 2 Disconnect the power cord from the electrical outlet. 3 Reconnect the power cord to appear. To order supplies, see "Aligning print cartridges" on used paper, which cartridge is not lit, press . 94 Black Ink Low..., unmarked paper for aligning the cartridge. Cartridge Error (1102, 1203, 1204, or 120F) 1 Remove the print cartridges, and close the cartridge carrier lids. 2 Disconnect the power cord from the electrical outlet. 3 Reconnect the...
... the electrical outlet. 4 If the button is not working properly. 1 Remove the print cartridges, and close the cartridge carrier lids. 2 Disconnect the power cord from the electrical outlet. 3 Reconnect the power cord to appear. To order supplies, see "Aligning print cartridges" on used paper, which cartridge is not lit, press . 94 Black Ink Low..., unmarked paper for aligning the cartridge. Cartridge Error (1102, 1203, 1204, or 120F) 1 Remove the print cartridges, and close the cartridge carrier lids. 2 Disconnect the power cord from the electrical outlet. 3 Reconnect the...
User's Guide
Page 95
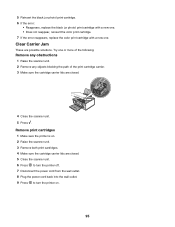
... cartridge carrier. 3 Make sure the cartridge carrier lids are closed . 5 Close the scanner unit. 6 Press to turn the printer off. 7 Disconnect the power cord from the wall outlet. 8 Plug the power cord back into the wall outlet. 9 Press to turn the printer on . 2 Raise the scanner unit. 3 Remove both print cartridges. 4 Make sure the...
... cartridge carrier. 3 Make sure the cartridge carrier lids are closed . 5 Close the scanner unit. 6 Press to turn the printer off. 7 Disconnect the power cord from the wall outlet. 8 Plug the power cord back into the wall outlet. 9 Press to turn the printer on . 2 Raise the scanner unit. 3 Remove both print cartridges. 4 Make sure the...
User's Guide
Page 96
... color cartridge in the right carrier. 96 For more information, see "Installing print cartridges" on page 70 11 Close the scanner unit. 12 Plug the power cord into the USB port of the computer. 10 Reinstall the print cartridges. Could not detect a proof sheet The document placed on page 49. Check external...
... color cartridge in the right carrier. 96 For more information, see "Installing print cartridges" on page 70 11 Close the scanner unit. 12 Plug the power cord into the USB port of the computer. 10 Reinstall the print cartridges. Could not detect a proof sheet The document placed on page 49. Check external...
User's Guide
Page 97
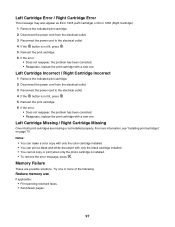
... Error 1205 (Left Cartridge) or Error 1206 (Right Cartridge). 1 Remove the indicated print cartridge. 2 Disconnect the power cord from the electrical outlet. 3 Reconnect the power cord to the electrical outlet. 4 If the button is installed. • To remove the error message, press . ...cartridge with a new one. Left Cartridge Incorrect / Right Cartridge Incorrect 1 Remove the indicated print cartridge. 2 Disconnect the power cord from the electrical outlet. 3 Reconnect the power cord to the electrical outlet. 4 If the button is not lit, press . 5 Reinsert the print cartridge. 6 If the...
... Error 1205 (Left Cartridge) or Error 1206 (Right Cartridge). 1 Remove the indicated print cartridge. 2 Disconnect the power cord from the electrical outlet. 3 Reconnect the power cord to the electrical outlet. 4 If the button is installed. • To remove the error message, press . ...cartridge with a new one. Left Cartridge Incorrect / Right Cartridge Incorrect 1 Remove the indicated print cartridge. 2 Disconnect the power cord from the electrical outlet. 3 Reconnect the power cord to the electrical outlet. 4 If the button is not lit, press . 5 Reinsert the print cartridge. 6 If the...
User's Guide
Page 103
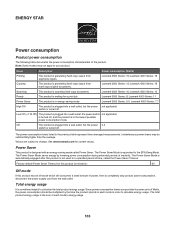
... The product is waiting for a print job. Lexmark 3500 Series: 15; Lexmark 3500 Series: 8; Lexmark 4500 Series: 13 Ready The product is in energy-saving mode. Lexmark 3500 Series: 5.0; ENERGY STAR Power consumption Product power consumption The following table documents the power consumption characteristics of the product. Lexmark 4500 Series: 18 Copying The product is scanning hard-copy...
... The product is waiting for a print job. Lexmark 3500 Series: 15; Lexmark 3500 Series: 8; Lexmark 4500 Series: 13 Ready The product is in energy-saving mode. Lexmark 3500 Series: 5.0; ENERGY STAR Power consumption Product power consumption The following table documents the power consumption characteristics of the product. Lexmark 4500 Series: 18 Copying The product is scanning hard-copy...


