
Troubleshooting Guide
Page 1
...Removing and reinstalling the drivers software If the software is only available on the X342n. Note: After installing the software, be below the max fill line on... paper from the computer. 2 From the desktop, click Start Programs Lexmark Lexmark Software Uninstall. 3 Follow the instructions on the computer screen to remove the software. 4 ...setup.exe. 7 Follow the instructions on the computer screen to install the software. If the MFP is securely connected, and the network options are properly configured. Unable to connect over a network is not functioning...
...Removing and reinstalling the drivers software If the software is only available on the X342n. Note: After installing the software, be below the max fill line on... paper from the computer. 2 From the desktop, click Start Programs Lexmark Lexmark Software Uninstall. 3 Follow the instructions on the computer screen to remove the software. 4 ...setup.exe. 7 Follow the instructions on the computer screen to install the software. If the MFP is securely connected, and the network options are properly configured. Unable to connect over a network is not functioning...
User's Guide
Page 3
... paper tray 11 Getting the MFP ready to print and scan 12 Installing the software for USB attach 12 Installing the software for network attach (X342n only 13 Getting the MFP ready to fax 14 Connecting directly to a telephone wall jack 14 Connecting to a telephone 15 Getting ... 22 Navigating the control panel menus 22 Printing a list of menu items 22 Printing a network setup page (X342n only 22 Changing the default mode 24 Setting the Timeout option 24 Setting the network options (X342n only 25 Using the MFP software 26 Using Print Properties 26 Using Presto! PageManager (USB ...
... paper tray 11 Getting the MFP ready to print and scan 12 Installing the software for USB attach 12 Installing the software for network attach (X342n only 13 Getting the MFP ready to fax 14 Connecting directly to a telephone wall jack 14 Connecting to a telephone 15 Getting ... 22 Navigating the control panel menus 22 Printing a list of menu items 22 Printing a network setup page (X342n only 22 Changing the default mode 24 Setting the Timeout option 24 Setting the network options (X342n only 25 Using the MFP software 26 Using Print Properties 26 Using Presto! PageManager (USB ...

User's Guide
Page 5
...documents directly from an application (USB attach only 56 Scanning text for editing (OCR 57 Customizing scan settings 58 Scanning over a network 58 Understanding Scan options 59 Chapter 9: Maintaining the MFP 61 Removing a toner cartridge 61 Installing a toner cartridge 62 Redistributing toner ... Cleaning the outside of the MFP 67 Cleaning the inside of the MFP 68 Ordering supplies ...70 Recycling Lexmark products 70 Chapter 10: Troubleshooting 71 Setup troubleshooting ...72 Removing and reinstalling the drivers software 74 Jams and misfeeds troubleshooting 75 Clearing a paper jam...
...documents directly from an application (USB attach only 56 Scanning text for editing (OCR 57 Customizing scan settings 58 Scanning over a network 58 Understanding Scan options 59 Chapter 9: Maintaining the MFP 61 Removing a toner cartridge 61 Installing a toner cartridge 62 Redistributing toner ... Cleaning the outside of the MFP 67 Cleaning the inside of the MFP 68 Ordering supplies ...70 Recycling Lexmark products 70 Chapter 10: Troubleshooting 71 Setup troubleshooting ...72 Removing and reinstalling the drivers software 74 Jams and misfeeds troubleshooting 75 Clearing a paper jam...
User's Guide
Page 13
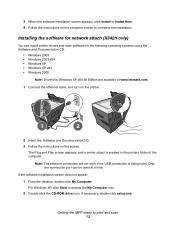
The Plug and Play screen appears, and a printer object is being used at www.lexmark.com. 1 Connect the ethernet cable, and turn on the printer. 1 2 2 Insert the Software and Documentation CD. 3 Follow the instructions on the computer screen to access the My Computer icon. 2 ...8226; Windows XP • Windows XP x64 • Windows 2000 Note: Drivers for network attach (X342n only) You can be used . For Windows XP, click Start to complete the installation. If necessary, double-click setup.exe. Installing the software for Windows XP x64 bit Edition are available at a time...
The Plug and Play screen appears, and a printer object is being used at www.lexmark.com. 1 Connect the ethernet cable, and turn on the printer. 1 2 2 Insert the Software and Documentation CD. 3 Follow the instructions on the computer screen to access the My Computer icon. 2 ...8226; Windows XP • Windows XP x64 • Windows 2000 Note: Drivers for network attach (X342n only) You can be used . For Windows XP, click Start to complete the installation. If necessary, double-click setup.exe. Installing the software for Windows XP x64 bit Edition are available at a time...

User's Guide
Page 14
...such as a DSL filter) is an analog device that works best when directly connected to the public switched telephone network. Getting the MFP ready to pass through the printer, as a telephone, an answering machine, or a computer modem. Follow the instructions on page 72. Getting the...the MFP directly to a telephone wall jack to set up the printer. If problems occur, see Setup troubleshooting on the computer screen to equipment such as described in the setup steps. You can connect the printer to complete the installation. 3 When the software installation screen appears, ...
...such as a DSL filter) is an analog device that works best when directly connected to the public switched telephone network. Getting the MFP ready to pass through the printer, as a telephone, an answering machine, or a computer modem. Follow the instructions on page 72. Getting the...the MFP directly to a telephone wall jack to set up the printer. If problems occur, see Setup troubleshooting on the computer screen to equipment such as described in the setup steps. You can connect the printer to complete the installation. 3 When the software installation screen appears, ...

User's Guide
Page 16
3 Remove the protective plug from the EXT port of the MFP. 4 Connect the other telephone cord to copy 16 Setup steps may vary depending on connecting the MFP to a computer or a network. Getting the MFP ready to a telephone, and then plug it into the EXT port of the MFP. Note: For more information on your country or region. Getting the MFP ready to copy The X340/X340n/X342n can be used as a stand-alone copier and does not require additional setup or connection to telecommunications equipment, see the additional setup instructions that came with the MFP.
3 Remove the protective plug from the EXT port of the MFP. 4 Connect the other telephone cord to copy 16 Setup steps may vary depending on connecting the MFP to a computer or a network. Getting the MFP ready to a telephone, and then plug it into the EXT port of the MFP. Note: For more information on your country or region. Getting the MFP ready to copy The X340/X340n/X342n can be used as a stand-alone copier and does not require additional setup or connection to telecommunications equipment, see the additional setup instructions that came with the MFP.
User's Guide
Page 22
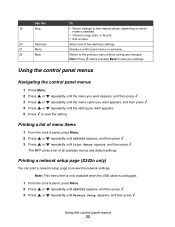
... control panel menus 22 Select one of all available menus and default settings. The MFP prints a list of five darkness settings. Printing a network setup page (X342n only) You can print a network setup page to save your settings. Note: Press before pressing Back to save the setting. Note: This menu item is only available when the... or repeatedly until the menu option you want appears, and then press . 4 Press or repeatedly until the setting you want appears. 5 Press to review the network settings.
... control panel menus 22 Select one of all available menus and default settings. The MFP prints a list of five darkness settings. Printing a network setup page (X342n only) You can print a network setup page to save your settings. Note: Press before pressing Back to save the setting. Note: This menu item is only available when the... or repeatedly until the menu option you want appears, and then press . 4 Press or repeatedly until the setting you want appears. 5 Press to review the network settings.
User's Guide
Page 23
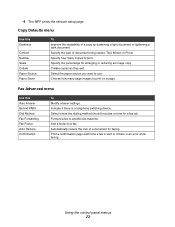
.... Collate copies as they exit. Using the control panel menus 23 Specify the percentage for a fax job. Add a footer to print. 4 The MFP prints the network setup page.
.... Collate copies as they exit. Using the control panel menus 23 Specify the percentage for a fax job. Add a footer to print. 4 The MFP prints the network setup page.

User's Guide
Page 25
... the Ready prompt. Setting the network options (X342n only) Note: These menu items are made, press Back repeatedly to return to the Ready prompt. If no adjustments are only available when the USB cable is unplugged. 1 Press Menu. 2 Press or repeatedly until NETWORK SETUP appears, and then press . ...3 Press or repeatedly until the length of the above items. After making the necessary adjustments, press and the printer will save your settings and return to the Ready prompt. Using the ...
... the Ready prompt. Setting the network options (X342n only) Note: These menu items are made, press Back repeatedly to return to the Ready prompt. If no adjustments are only available when the USB cable is unplugged. 1 Press Menu. 2 Press or repeatedly until NETWORK SETUP appears, and then press . ...3 Press or repeatedly until the length of the above items. After making the necessary adjustments, press and the printer will save your settings and return to the Ready prompt. Using the ...

User's Guide
Page 58
...on your browser, and then press Enter. If the Java applet screen appears, click Yes. For more information, see Printing a network setup page (X342n only) 2 Click Scan Profile. 3 Click Create Scan Profile. 4 Select your original document in the address line of the MFP...X342n connected to the MFP, and place your scan settings, and then click Next. 5 Select a location for saving the scanned output file somewhere on the home screen. Customizing scan settings 1 Open QLINK: • Double-click the QLINK icon on the desktop. • Click Start Æ All Programs Æ Lexmark Æ Lexmark...
...on your browser, and then press Enter. If the Java applet screen appears, click Yes. For more information, see Printing a network setup page (X342n only) 2 Click Scan Profile. 3 Click Create Scan Profile. 4 Select your original document in the address line of the MFP...X342n connected to the MFP, and place your scan settings, and then click Next. 5 Select a location for saving the scanned output file somewhere on the home screen. Customizing scan settings 1 Open QLINK: • Double-click the QLINK icon on the desktop. • Click Start Æ All Programs Æ Lexmark Æ Lexmark...

User's Guide
Page 73
Note: Connecting over a network Solution Make sure you are properly configured. For more information, see Setting the network options (X342n only). Setup troubleshooting 73 Symptom Unable to connect over a network is securely connected, and the network options are using the correct cable, that it is only available on the X342n.
Note: Connecting over a network Solution Make sure you are properly configured. For more information, see Setting the network options (X342n only). Setup troubleshooting 73 Symptom Unable to connect over a network is securely connected, and the network options are using the correct cable, that it is only available on the X342n.
User's Guide
Page 103
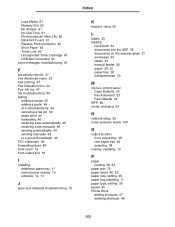
... paper 28, 32 paper tray 28 transparencies 33 M menus, control panel Copy Defaults 23 Fax Advanced 23 Fax Defaults 24 MFP 84 mode, changing 24 N network setup 25 noise emission levels 100 O output location front output tray 38 rear paper exit 38 selecting 38 overlay, installing 10 P paper loading 28, 32 paper...
... paper 28, 32 paper tray 28 transparencies 33 M menus, control panel Copy Defaults 23 Fax Advanced 23 Fax Defaults 24 MFP 84 mode, changing 24 N network setup 25 noise emission levels 100 O output location front output tray 38 rear paper exit 38 selecting 38 overlay, installing 10 P paper loading 28, 32 paper...

Service Manual
Page 28
7003-XXX Using the MFP menus Reports Print Menus Demo Page Network Setup Fax Call Log FaxJob Log Phonebook Copy Defaults Darkness Content Number Scale Collate Paper Source Paper Saver Network Setup Enable DHCP IP Address Netmask Gateway Fax Defaults Content Original Size Darkness Rings Distinct Ring... Redials Redial Wait Paper Source Speaker Volume Prefix ECM Station ID Machine Setup Language Country Date Format Clock Format Set ...
7003-XXX Using the MFP menus Reports Print Menus Demo Page Network Setup Fax Call Log FaxJob Log Phonebook Copy Defaults Darkness Content Number Scale Collate Paper Source Paper Saver Network Setup Enable DHCP IP Address Netmask Gateway Fax Defaults Content Original Size Darkness Rings Distinct Ring... Redials Redial Wait Paper Source Speaker Volume Prefix ECM Station ID Machine Setup Language Country Date Format Clock Format Set ...
Service Manual
Page 66
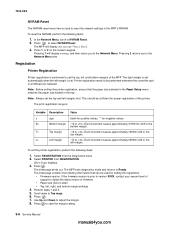
... Scroll down to adjust the margin. 8. Use Up and Down to Top mrgn. 6. Press 1, or 2 on the numeric keypad. Registration Printer Registration Printer registration is performed to reset the network settings in the top margin. Press to +10-Each increment causes approximately 0.559 mm shift in the tray. Perform steps 1 and 2. 5. ... the registration: • Firmware version. To reset the NVRAM, perform the following information that the paper size selected in the Paper Setup menu matches the paper size loaded in the bottom margin. The skew page contains the following tasks: 1.
... Scroll down to adjust the margin. 8. Use Up and Down to Top mrgn. 6. Press 1, or 2 on the numeric keypad. Registration Printer Registration Printer registration is performed to reset the network settings in the top margin. Press to +10-Each increment causes approximately 0.559 mm shift in the tray. Perform steps 1 and 2. 5. ... the registration: • Firmware version. To reset the NVRAM, perform the following information that the paper size selected in the Paper Setup menu matches the paper size loaded in the bottom margin. The skew page contains the following tasks: 1.


