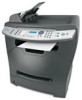
Sending a fax using the computer
Page 2
...print jobs. Sending a fax using the computer 2 Using the World Wide Web 1 Go to the Lexmark Web site at www.lexmark.com. 2 From the Drivers & Downloads menu, click Driver Finder. 3 Select your printer, select ...driver Once the printer software and any options are installed, it may be necessary to manually add the options in the Print Emulation column. 8 Click Add Printer. 9 Click Finish, and ...then follow the instructions on the screen. For Windows users 1 Close all open software programs. 2 Insert the Software and Documentation CD. Note: If you ...
...print jobs. Sending a fax using the computer 2 Using the World Wide Web 1 Go to the Lexmark Web site at www.lexmark.com. 2 From the Drivers & Downloads menu, click Driver Finder. 3 Select your printer, select ...driver Once the printer software and any options are installed, it may be necessary to manually add the options in the Print Emulation column. 8 Click Add Printer. 9 Click Finish, and ...then follow the instructions on the screen. For Windows users 1 Close all open software programs. 2 Insert the Software and Documentation CD. Note: If you ...
Troubleshooting Guide
Page 1
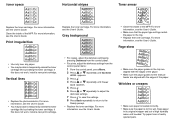
...wall of the paper tray. • Do not remove the paper from the computer. 2 From the desktop, click Start Programs Lexmark Lexmark Software Uninstall. 3 Follow the instructions on the computer screen to remove the software. 4 Restart the computer. 5 If any other electrical devices have ... the recommended print side has the correct orientation when loading paper in the paper tray and the manual feeder. • Do not overload the paper tray. For more information, see the User's Guide. If the problems persist, follow these tips to the MFP and the computer. The ...
...wall of the paper tray. • Do not remove the paper from the computer. 2 From the desktop, click Start Programs Lexmark Lexmark Software Uninstall. 3 Follow the instructions on the computer screen to remove the software. 4 Restart the computer. 5 If any other electrical devices have ... the recommended print side has the correct orientation when loading paper in the paper tray and the manual feeder. • Do not overload the paper tray. For more information, see the User's Guide. If the problems persist, follow these tips to the MFP and the computer. The ...

Troubleshooting Guide
Page 2
... or fanning it . For more information, see the User's Guide. • Disconnect the USB cable, and then reconnect it back and forth. or Click Start Control Panel Printers and Other Hardware Printers and Faxes. 2 Double-click the Lexmark X340/X340n/ X342n icon. 3 Click Printer, and make sure... Paper stacks poorly in the front output slot • Extend the paper stop. • Do not let too much paper stack up in the manual feeder, and make sure no check mark appears next to Pause Printing. 4 Make sure a check mark appears next to the Ready prompt. Print ...
... or fanning it . For more information, see the User's Guide. • Disconnect the USB cable, and then reconnect it back and forth. or Click Start Control Panel Printers and Other Hardware Printers and Faxes. 2 Double-click the Lexmark X340/X340n/ X342n icon. 3 Click Printer, and make sure... Paper stacks poorly in the front output slot • Extend the paper stop. • Do not let too much paper stack up in the manual feeder, and make sure no check mark appears next to Pause Printing. 4 Make sure a check mark appears next to the Ready prompt. Print ...
Troubleshooting Guide
Page 3
... Wrinkles or creases • Make sure paper is loaded correctly. • Make sure the paper is not too wet. For more information, see the User's Guide. • Make sure that the paper type settings match the paper in the tray. • Replace the toner cartridge. For more information, ...repeatedly until needed. Keep paper in the tray are aligned with the edges of the paper. • Make sure the paper guides for the manual feeder are aligned with the edges of the MFP. Toner specs AaBbCc AaBbCc AaBbCc AaBbCc AaBbCc Replace the toner cartridge. For more information, see...
... Wrinkles or creases • Make sure paper is loaded correctly. • Make sure the paper is not too wet. For more information, see the User's Guide. • Make sure that the paper type settings match the paper in the tray. • Replace the toner cartridge. For more information, ...repeatedly until needed. Keep paper in the tray are aligned with the edges of the paper. • Make sure the paper guides for the manual feeder are aligned with the edges of the MFP. Toner specs AaBbCc AaBbCc AaBbCc AaBbCc AaBbCc Replace the toner cartridge. For more information, see...

User's Guide
Page 98
Mercury statement This product contains mercury in the lamp ( Notices Korean MIC statement If this symbol appears on your product, the accompanying statement is applicable.
Mercury statement This product contains mercury in the lamp ( Notices Korean MIC statement If this symbol appears on your product, the accompanying statement is applicable.


