Service Manual
Page 13
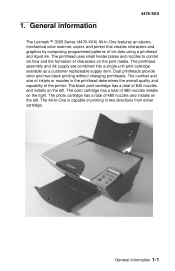
... installs on the left . The printhead assembly and ink supply are combined into a single-unit print cartridge available as a customer replaceable supply item. The black print cartridge has a total of characters on the right. The All-In-One is capable of the printer. ...printhead determines the overall quality and capability of printing in two directions from either cartridge. The photo cartridge has a total of ink dots using a printhead and liquid ink. 1. General information 4479-XXX The Lexmark™ 3300 Series (4479-XXX) All-In-One features an electromechanical color ...
... installs on the left . The printhead assembly and ink supply are combined into a single-unit print cartridge available as a customer replaceable supply item. The black print cartridge has a total of characters on the right. The All-In-One is capable of the printer. ...printhead determines the overall quality and capability of printing in two directions from either cartridge. The photo cartridge has a total of ink dots using a printhead and liquid ink. 1. General information 4479-XXX The Lexmark™ 3300 Series (4479-XXX) All-In-One features an electromechanical color ...
Service Manual
Page 20
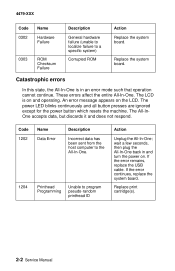
... all button presses are ignored except for the power button which resets the machine. The LCD is in and turn the power on. Replace print cartridge(s). 2-2 Service Manual If the error continues, replace the system board. If the error remains, replace the USB cable. Replace the system board. Code 1202 Name...
... all button presses are ignored except for the power button which resets the machine. The LCD is in and turn the power on. Replace print cartridge(s). 2-2 Service Manual If the error continues, replace the system board. If the error remains, replace the USB cable. Replace the system board. Code 1202 Name...
Service Manual
Page 22
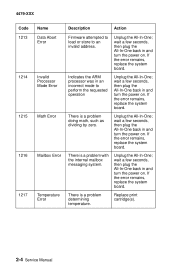
wait a few seconds, then plug the All-In-One back in and turn the power on . Unplug the All-In-One; Replace print cartridge(s). 2-4 Service Manual Indicates the ARM processor was in and turn the power on . Unplug the All-In-One; If the error remains, replace the system ...
wait a few seconds, then plug the All-In-One back in and turn the power on . Unplug the All-In-One; Replace print cartridge(s). 2-4 Service Manual Indicates the ARM processor was in and turn the power on . Unplug the All-In-One; If the error remains, replace the system ...
Service Manual
Page 26
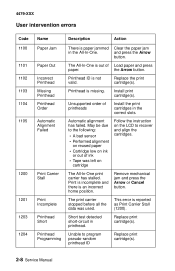
...order of ink • Tape was used. Automatic alignment has failed. May be due to program pseudo-random printhead ID Replace print cartridge(s). 2-8 Service Manual Remove mechanical jam and press the Arrow or Cancel button. Short test detected short-circuit in the correct slots.... following: • A bad sensor • Performed alignment on reused paper • Cartridge low on the LCD to recover and align the cartridges. and press the Arrow button. Install the print cartridges in printhead. Print is incomplete and there is reported as Print Carrier Stall (1200). ...
...order of ink • Tape was used. Automatic alignment has failed. May be due to program pseudo-random printhead ID Replace print cartridge(s). 2-8 Service Manual Remove mechanical jam and press the Arrow or Cancel button. Short test detected short-circuit in the correct slots.... following: • A bad sensor • Performed alignment on reused paper • Cartridge low on the LCD to recover and align the cartridges. and press the Arrow button. Install the print cartridges in printhead. Print is incomplete and there is reported as Print Carrier Stall (1200). ...
Service Manual
Page 27
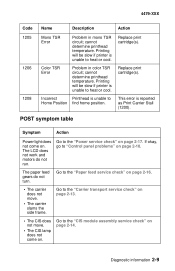
... TSR circuit; This error is unable to heat or cool. The LCD does not work and motors do not turn. Replace print cartridge(s). Go to heat or cool. Replace print cartridge(s). POST symptom table Symptom Action Power light does not come on . Printing will be slow if printer is unable to the...
... TSR circuit; This error is unable to heat or cool. The LCD does not work and motors do not turn. Replace print cartridge(s). Go to heat or cool. Replace print cartridge(s). POST symptom table Symptom Action Power light does not come on . Printing will be slow if printer is unable to the...

Service Manual
Page 32
... on the inside (rear) of these parts are damaged, replace the carrier assembly. If any of the printhead carrier for wear or damage: • Printhead cartridge latch • Latch spring • Carrier • Printhead cables Ensure that the belt is installed and is not binding. Check the gold-plated contacts located...
... on the inside (rear) of these parts are damaged, replace the carrier assembly. If any of the printhead carrier for wear or damage: • Printhead cartridge latch • Latch spring • Carrier • Printhead cables Ensure that the belt is installed and is not binding. Check the gold-plated contacts located...
Service Manual
Page 36
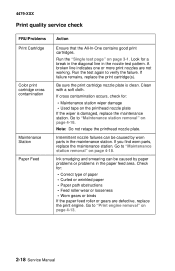
...in the maintenance station. 4479-XXX Print quality service check FRU/Problems Print Cartridge Color print cartridge cross contamination Maintenance Station Paper Feed Action Ensure that the All-In-One contains good print cartridges. Look for a break in the diagonal line in the paper feed area... engine removal" on page 4-13. 2-18 Service Manual Go to "Maintenance station removal" on page 4-18. If failure remains, replace the print cartridge(s). Run the test again to "Maintenance station removal" on page 4-18. If cross contamination occurs, check for : • Correct type of paper...
...in the maintenance station. 4479-XXX Print quality service check FRU/Problems Print Cartridge Color print cartridge cross contamination Maintenance Station Paper Feed Action Ensure that the All-In-One contains good print cartridges. Look for a break in the diagonal line in the paper feed area... engine removal" on page 4-13. 2-18 Service Manual Go to "Maintenance station removal" on page 4-18. If failure remains, replace the print cartridge(s). Run the test again to "Maintenance station removal" on page 4-18. If cross contamination occurs, check for : • Correct type of paper...
Service Manual
Page 37
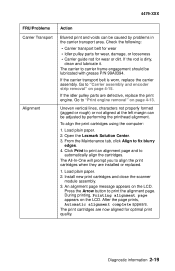
... the printhead alignment. Press the Arrow button to automatically align the cartridges. If the carrier transport belt is dirty, clean and lubricate it. To align the print cartridges using the computer: 1. Open the Lexmark Solution Center. 3. Click Print to print an alignment page and ...3. If the rod is worn, replace the carrier assembly. Diagnostic information 2-19 From the Maintenance tab, click Align to align the print cartridges when they are defective, replace the print engine. Load plain paper. 2. Load plain paper. 2. During printing, Printing alignment page appears on...
... the printhead alignment. Press the Arrow button to automatically align the cartridges. If the carrier transport belt is dirty, clean and lubricate it. To align the print cartridges using the computer: 1. Open the Lexmark Solution Center. 3. Click Print to print an alignment page and ...3. If the rod is worn, replace the carrier assembly. Diagnostic information 2-19 From the Maintenance tab, click Align to align the print cartridges when they are defective, replace the print engine. Load plain paper. 2. Load plain paper. 2. During printing, Printing alignment page appears on...
Service Manual
Page 38
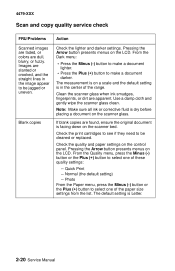
... colors are apparent. Pressing the Arrow button presents menus on the LCD. Use a damp cloth and gently wipe the scanner glass clean. Check the print cartridges to see if they need to make a document lighter. • Press the Plus (+) button to be jagged or uneven. From the Quality menu, press the...
... colors are apparent. Pressing the Arrow button presents menus on the LCD. Use a damp cloth and gently wipe the scanner glass clean. Check the print cartridges to see if they need to make a document lighter. • Press the Plus (+) button to be jagged or uneven. From the Quality menu, press the...

Service Manual
Page 39
... the left side of the carrier and a good color cartridge in the paper support. 6. Load paper in the right. 4. Diagnostic aids 4479-XXX Single test page This test prints a test page. Turn on the LCD. 8. ...Close the scanner unit. 5. The single test page consists of black and color patterns, be sure the print cartridges are in good condition. 3. Turn off the All-In-One. 7. Release both buttons. 9. Press the Arrow button until Mfg Menu Enabled appears on the All...
... the left side of the carrier and a good color cartridge in the paper support. 6. Load paper in the right. 4. Diagnostic aids 4479-XXX Single test page This test prints a test page. Turn on the LCD. 8. ...Close the scanner unit. 5. The single test page consists of black and color patterns, be sure the print cartridges are in good condition. 3. Turn off the All-In-One. 7. Release both buttons. 9. Press the Arrow button until Mfg Menu Enabled appears on the All...

Service Manual
Page 44
... the LCD. During printing, Printing alignment page appears on the LCD. Removal procedures The following procedures are arranged according to align the print cartridges when they are held in place with plastic latches. Load plain paper. 2. After the page prints, Automatic alignment complete appears. CAUTION: ... The All-In-One will prompt you to the name of the All-In-One part discussed. release them carefully. Install new print cartridges and close the scanner module assembly. 3. Press the Arrow button to which it is latched. 4-2 Service Manual Releasing plastic latches Many ...
... the LCD. During printing, Printing alignment page appears on the LCD. Removal procedures The following procedures are arranged according to align the print cartridges when they are held in place with plastic latches. Load plain paper. 2. After the page prints, Automatic alignment complete appears. CAUTION: ... The All-In-One will prompt you to the name of the All-In-One part discussed. release them carefully. Install new print cartridges and close the scanner module assembly. 3. Press the Arrow button to which it is latched. 4-2 Service Manual Releasing plastic latches Many ...
Service Manual
Page 45
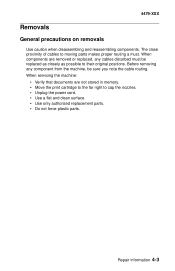
... the cable routing. The close proximity of cables to their original positions. Repair information 4-3 When components are not stored in memory. • Move the print cartridge to the far right to cap the nozzles. • Unplug the power cord. • Use a flat and clean surface. • Use only authorized replacement parts...
... the cable routing. The close proximity of cables to their original positions. Repair information 4-3 When components are not stored in memory. • Move the print cartridge to the far right to cap the nozzles. • Unplug the power cord. • Use a flat and clean surface. • Use only authorized replacement parts...
Service Manual
Page 63
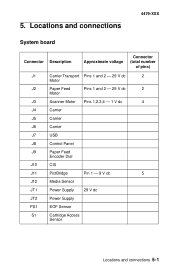
Locations and connections 4479-XXX System board Connector Description Approximate voltage Connector (total number of pins) J1 Carrier Transport Pins 1 and 2 - 29 V dc 2 Motor J2 Paper Feed Pins 1 and 2 - 29 V dc 2 Motor J3 Scanner Motor Pins 1,2,3,4 - 1 V dc 4 J4 Carrier J5 Carrier J6 Carrier J7 USB J8 Control Panel J9 Paper Feed Encoder Dial J10 CIS J11 PictBridge Pin 1 - 9 V dc 5 J12 Media Sensor JT1 Power Supply 29 V dc JT2 Power Supply PS1 EOF Sensor S1 Cartridge Access Sensor Locations and connections 5-1 5.
Locations and connections 4479-XXX System board Connector Description Approximate voltage Connector (total number of pins) J1 Carrier Transport Pins 1 and 2 - 29 V dc 2 Motor J2 Paper Feed Pins 1 and 2 - 29 V dc 2 Motor J3 Scanner Motor Pins 1,2,3,4 - 1 V dc 4 J4 Carrier J5 Carrier J6 Carrier J7 USB J8 Control Panel J9 Paper Feed Encoder Dial J10 CIS J11 PictBridge Pin 1 - 9 V dc 5 J12 Media Sensor JT1 Power Supply 29 V dc JT2 Power Supply PS1 EOF Sensor S1 Cartridge Access Sensor Locations and connections 5-1 5.
Service Manual
Page 73
... 7-1 print engine, carrier, and electronics 7-5 PictBridge problems 2-11 plastic latches 4-2 POST (Power-On Self Test) sequence 2-1 POST symptom table 2-9 power problems 2-12 preventive maintenance 6-1 print cartridge 1-1 print quality 2-18 print quality problems 2-12 printer communication problems 2-11 R removals ASF guide with spring 4-4 base assembly 4-19 bezel 4-5 carrier assembly and encoder strip...
... 7-1 print engine, carrier, and electronics 7-5 PictBridge problems 2-11 plastic latches 4-2 POST (Power-On Self Test) sequence 2-1 POST symptom table 2-9 power problems 2-12 preventive maintenance 6-1 print cartridge 1-1 print quality 2-18 print quality problems 2-12 printer communication problems 2-11 R removals ASF guide with spring 4-4 base assembly 4-19 bezel 4-5 carrier assembly and encoder strip...


