User's Guide
Page 5
... Redistributing toner 65 Ordering toner cartridges 65 Replacing the toner cartridge 66 Cleaning the photoconductor drum 68 Chapter 10: Troubleshooting 69 Preventing document and paper jams 69 Clearing document jams 70 ADF misfeed 70 Output misfeed 72 Roller misfeed 72 Clearing paper jams 73 Paper feed area (PAPER JAM 0 73 Paper exit area (PAPER JAM 1 75 Fuser and toner cartridge areas...
... Redistributing toner 65 Ordering toner cartridges 65 Replacing the toner cartridge 66 Cleaning the photoconductor drum 68 Chapter 10: Troubleshooting 69 Preventing document and paper jams 69 Clearing document jams 70 ADF misfeed 70 Output misfeed 72 Roller misfeed 72 Clearing paper jams 73 Paper feed area (PAPER JAM 0 73 Paper exit area (PAPER JAM 1 75 Fuser and toner cartridge areas...

User's Guide
Page 6
Manual bypass area (BYPASS JAM 78 Clearing display messages 79 Solving problems 79 Paper feeding problems 80 Printing and copying problems 81 Scanning problems 84 Faxing problems 84 Print quality problems 86 Calling for service 89 Notices 90 Safety information 90 Conventions 90 Laser notices 91 Electronic emission notices 91 Telecommunications notices 94 Contents 6
Manual bypass area (BYPASS JAM 78 Clearing display messages 79 Solving problems 79 Paper feeding problems 80 Printing and copying problems 81 Scanning problems 84 Faxing problems 84 Print quality problems 86 Calling for service 89 Notices 90 Safety information 90 Conventions 90 Laser notices 91 Electronic emission notices 91 Telecommunications notices 94 Contents 6

User's Guide
Page 21
... Selecting print materials Select print materials that are an appropriate size for your input source (paper tray or manual bypass). Size, input sources and capacities Input source/capacity1 Size (mm/in.) Paper tray Manual bypass Plain paper Letter (215.9 x 279/8.5 x 11) A4 (210 x 297/8.27 x 11.69) Folio (215.9 x 330....69) Transparency films2 Letter (215.9 x 279/8.5 x 11) A4 (210 x 297/8.27 x 11.69) No/0 No/0 Yes/1 Yes/1 No/0 No/0 Yes/1 Yes/1 Loading paper and changing paper size 21 Using print materials that are not recommended may cause paper jams or poor print quality.
... Selecting print materials Select print materials that are an appropriate size for your input source (paper tray or manual bypass). Size, input sources and capacities Input source/capacity1 Size (mm/in.) Paper tray Manual bypass Plain paper Letter (215.9 x 279/8.5 x 11) A4 (210 x 297/8.27 x 11.69) Folio (215.9 x 330....69) Transparency films2 Letter (215.9 x 279/8.5 x 11) A4 (210 x 297/8.27 x 11.69) No/0 No/0 Yes/1 Yes/1 No/0 No/0 Yes/1 Yes/1 Loading paper and changing paper size 21 Using print materials that are not recommended may cause paper jams or poor print quality.

User's Guide
Page 22
... tray as a plastic container or bag, to print on damp, curled, wrinkled, or torn paper can cause paper jams and poor print quality. • Use only high quality, copier grade paper. Keep it is printed. • Place transparencies on a flat surface after removing them from ...the machine. • Do not leave transparencies in .) Paper tray Card stock2 No/0 A6 card (105 x 148/4.13 x 5.88) Postcard ...
... tray as a plastic container or bag, to print on damp, curled, wrinkled, or torn paper can cause paper jams and poor print quality. • Use only high quality, copier grade paper. Keep it is printed. • Place transparencies on a flat surface after removing them from ...the machine. • Do not leave transparencies in .) Paper tray Card stock2 No/0 A6 card (105 x 148/4.13 x 5.88) Postcard ...

User's Guide
Page 23
... withstand these temperatures without discoloring, bleeding, or releasing hazardous emissions. Exposed areas can cause labels to peel off during printing, which can cause paper jams. Exposed adhesive can tolerate a fusing temperature of 180o C (356o F) for only one pass through the machine. • Do not use labels that your label adhesive ...
... withstand these temperatures without discoloring, bleeding, or releasing hazardous emissions. Exposed areas can cause labels to peel off during printing, which can cause paper jams. Exposed adhesive can tolerate a fusing temperature of 180o C (356o F) for only one pass through the machine. • Do not use labels that your label adhesive ...

User's Guide
Page 26
3 Load the paper with the print side facing down . The top, short edge of the sheet with the design side facing down and the short edges of the paper placed at the front of the tray. Note: Paper overloading may cause paper jams. triangle Loading the paper tray 26 Note: Load letterhead paper with the logo should be placed at the front and rear of the tray. LETTERHEAD 4 Make sure the paper is below the triangle on the left inside wall of the tray.
3 Load the paper with the print side facing down . The top, short edge of the sheet with the design side facing down and the short edges of the paper placed at the front of the tray. Note: Paper overloading may cause paper jams. triangle Loading the paper tray 26 Note: Load letterhead paper with the logo should be placed at the front and rear of the tray. LETTERHEAD 4 Make sure the paper is below the triangle on the left inside wall of the tray.

User's Guide
Page 27
... the side of the stack of paper currently in the manual bypass. Loading the paper tray 27 Note: The paper level indicator, on page 29. Note: If you experience problems with the paper feed, place the paper in the tray. When the indicator... lowers, the tray is empty. For help, see "Setting the paper type and size" on the front of the paper tray, shows the amount of paper. Incorrect adjustments may cause paper jams. 6 Close the paper...
... the side of the stack of paper currently in the manual bypass. Loading the paper tray 27 Note: The paper level indicator, on page 29. Note: If you experience problems with the paper feed, place the paper in the tray. When the indicator... lowers, the tray is empty. For help, see "Setting the paper type and size" on the front of the paper tray, shows the amount of paper. Incorrect adjustments may cause paper jams. 6 Close the paper...

User's Guide
Page 28
... "Selecting print materials" on the top left side. • If you experience problems with paper feed, turn the paper around. For information on acceptable print media to make quick runs of paper types or sizes that are deposited on the transparency can effect print quality. • Insert envelopes...• Hold transparencies by the edges and avoid touching the print side. Oils from your machine. Using only the specified print media helps prevent paper jams and print quality problems. To load the manual bypass: 1 Place a sheet of the selected print media, print side facing up, into the...
... "Selecting print materials" on the top left side. • If you experience problems with paper feed, turn the paper around. For information on acceptable print media to make quick runs of paper types or sizes that are deposited on the transparency can effect print quality. • Insert envelopes...• Hold transparencies by the edges and avoid touching the print side. Oils from your machine. Using only the specified print media helps prevent paper jams and print quality problems. To load the manual bypass: 1 Place a sheet of the selected print media, print side facing up, into the...
User's Guide
Page 30
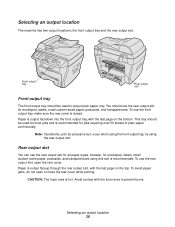
... use the front output tray, make sure the rear cover is recommended. CAUTION: The fuser area is recommended for envelopes, labels, small custom-sized paper, postcards, and transparencies. Front output tray Rear output slot Front output tray The front output tray should be used for most jobs and is hot... be used to prevent burns. Selecting an output location 30 To use the rear output slot for jobs requiring over 50 sheets of plain paper continuously. To avoid paper jams, do not open the rear cover. Selecting an output location The machine has two output locations;
... use the front output tray, make sure the rear cover is recommended. CAUTION: The fuser area is recommended for envelopes, labels, small custom-sized paper, postcards, and transparencies. Front output tray Rear output slot Front output tray The front output tray should be used for most jobs and is hot... be used to prevent burns. Selecting an output location 30 To use the rear output slot for jobs requiring over 50 sheets of plain paper continuously. To avoid paper jams, do not open the rear cover. Selecting an output location The machine has two output locations;
User's Guide
Page 69
... on page 73. If a document or paper jam occurs, see "Clearing document jams" on page 70 or "Clearing paper jams" on the inside wall of the paper tray. • Do not remove the paper from the tray while printing. 10 Troubleshooting Preventing document and paper jams Follow these tips to help prevent document and paper jams. • Use only recommended print...
... on page 73. If a document or paper jam occurs, see "Clearing document jams" on page 70 or "Clearing paper jams" on the inside wall of the paper tray. • Do not remove the paper from the tray while printing. 10 Troubleshooting Preventing document and paper jams Follow these tips to help prevent document and paper jams. • Use only recommended print...

User's Guide
Page 73
Message PAPER JAM 0 PAPER JAM 1 PAPER JAM 2 BYPASS JAM Location of jam Paper feed area Paper exit area Fuser and toner cartridge areas Manual bypass area Go to locate and clear the paper jam. page 73 page 75 page 77 page 78 Note: To avoid tearing the paper, pull the paper out gently and slowly. Clearing paper jams The message PAPER JAM appears on the display if paper loaded in...
Message PAPER JAM 0 PAPER JAM 1 PAPER JAM 2 BYPASS JAM Location of jam Paper feed area Paper exit area Fuser and toner cartridge areas Manual bypass area Go to locate and clear the paper jam. page 73 page 75 page 77 page 78 Note: To avoid tearing the paper, pull the paper out gently and slowly. Clearing paper jams The message PAPER JAM appears on the display if paper loaded in...

User's Guide
Page 74
If there is any resistance when you pull the paper, or the paper is not seen in this area, continue with the instructions for clearing a jam in the fuser and toner cartridge areas on page 77. 4 Insert the paper tray until it straight out. 3 Remove the jammed paper by gently pulling it snaps into place. Clearing paper jams 74
If there is any resistance when you pull the paper, or the paper is not seen in this area, continue with the instructions for clearing a jam in the fuser and toner cartridge areas on page 77. 4 Insert the paper tray until it straight out. 3 Remove the jammed paper by gently pulling it snaps into place. Clearing paper jams 74

User's Guide
Page 75
Paper exit area (PAPER JAM 1) 1 Open and close the front cover to resume printing. If the paper does not exit, continue with step 2. 2 Gently pull the paper out of the front output tray. The jammed paper automatically exits. 5 Open and close the front cover. Clearing paper jams 75
Paper exit area (PAPER JAM 1) 1 Open and close the front cover to resume printing. If the paper does not exit, continue with step 2. 2 Gently pull the paper out of the front output tray. The jammed paper automatically exits. 5 Open and close the front cover. Clearing paper jams 75

User's Guide
Page 76
Clearing paper jams 76 3 If there is any resistance when you pull the paper, or the paper is not seen in the front output tray, open the rear cover. 4 Remove the jammed paper by gently pulling it straight out. 5 Close the rear cover. 6 Open and close the front cover to resume printing.
Clearing paper jams 76 3 If there is any resistance when you pull the paper, or the paper is not seen in the front output tray, open the rear cover. 4 Remove the jammed paper by gently pulling it straight out. 5 Close the rear cover. 6 Open and close the front cover to resume printing.

User's Guide
Page 77
Avoid contact with the fuser area to prevent burns. 1 Open the front cover and remove the toner cartridge. 2 Remove the jammed paper by gently pulling it straight out. 3 Reinstall the toner cartridge and close the front cover. Printing automatically resumes. Fuser and toner cartridge areas (PAPER JAM 2) CAUTION: The fuser area is hot. Clearing paper jams 77
Avoid contact with the fuser area to prevent burns. 1 Open the front cover and remove the toner cartridge. 2 Remove the jammed paper by gently pulling it straight out. 3 Reinstall the toner cartridge and close the front cover. Printing automatically resumes. Fuser and toner cartridge areas (PAPER JAM 2) CAUTION: The fuser area is hot. Clearing paper jams 77
User's Guide
Page 78
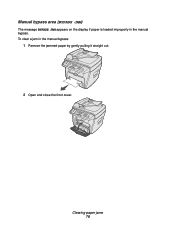
Clearing paper jams 78 Manual bypass area (BYPASS JAM) The message BYPASS JAM appears on the display if paper is loaded improperly in the manual bypass: 1 Remove the jammed paper by gently pulling it straight out. 2 Open and close the front cover. To clear a jam in the manual bypass.
Clearing paper jams 78 Manual bypass area (BYPASS JAM) The message BYPASS JAM appears on the display if paper is loaded improperly in the manual bypass: 1 Remove the jammed paper by gently pulling it straight out. 2 Open and close the front cover. To clear a jam in the manual bypass.

User's Guide
Page 79
... See "Setting the date and time" on . Clearing display messages Display BYPASS JAM DOCUMENT JAM DOOR OPEN FUSER ERROR LOAD BYPASS LSU ERROR Memory Full NO CARTRIDGE NO PAPER PAPER JAM 0 PAPER JAM 1 PAPER JAM 2 POWER FAILURE TIME/DATE prompt TONER EMPTY TONER LOW Meaning Solution No feeding ... 89. Collated copy is not installed. Install the toner cartridge. Paper jam in the paper exit area. Clear the jam. See page 73. Paper jam in the feeding area of pages in the paper tray. Clear the jam. cartridge areas. page 16. Toner cartridge has run out. This...
... See "Setting the date and time" on . Clearing display messages Display BYPASS JAM DOCUMENT JAM DOOR OPEN FUSER ERROR LOAD BYPASS LSU ERROR Memory Full NO CARTRIDGE NO PAPER PAPER JAM 0 PAPER JAM 1 PAPER JAM 2 POWER FAILURE TIME/DATE prompt TONER EMPTY TONER LOW Meaning Solution No feeding ... 89. Collated copy is not installed. Install the toner cartridge. Paper jam in the paper exit area. Clear the jam. See page 73. Paper jam in the feeding area of pages in the paper tray. Clear the jam. cartridge areas. page 16. Toner cartridge has run out. This...

User's Guide
Page 80
... are using the correct type of paper. Use only paper that meets specifications. • Remove any obstructions. Clear the paper jam. Multiple sheets do not force the paper down into the machine. • If multiple sheets have caused a paper jam, clear the paper jam. See page 73. Remove excess paper from the tray. • The paper is not loaded correctly. each...
... are using the correct type of paper. Use only paper that meets specifications. • Remove any obstructions. Clear the paper jam. Multiple sheets do not force the paper down into the machine. • If multiple sheets have caused a paper jam, clear the paper jam. See page 73. Remove excess paper from the tray. • The paper is not loaded correctly. each...

User's Guide
Page 81
... Printers. 2 Right-click the Lexmark X215 printer icon. 3 Click Properties. 4 From the Details tab, click Spool Settings. 5 Select the spool setting you want. Front or rear covers are correct. Machine is blank. Print job is not installed. settings matches the paper in the printer driver settings do not match. Paper jam. Toner cartridge is extremely...
... Printers. 2 Right-click the Lexmark X215 printer icon. 3 Click Properties. 4 From the Details tab, click Spool Settings. 5 Select the spool setting you want. Front or rear covers are correct. Machine is blank. Print job is not installed. settings matches the paper in the printer driver settings do not match. Paper jam. Toner cartridge is extremely...

User's Guide
Page 83
... cause Solution Original document not positioned correctly. • Ensure the original is closed when making copies. Solving problems 83 Frequent jams. Fewer copies from the toner cartridge than expected. Ensure that paper is being left open while copies are forms, newsletters, books, and so on. • The machine is being turned on...
... cause Solution Original document not positioned correctly. • Ensure the original is closed when making copies. Solving problems 83 Frequent jams. Fewer copies from the toner cartridge than expected. Ensure that paper is being left open while copies are forms, newsletters, books, and so on. • The machine is being turned on...


