
User's Guide
Page 3
... Power Saver mode 18 Chapter 2: Installing software 19 Installing the drivers 19 Removing the drivers 20 Chapter 3: Loading paper and changing paper size 21 Selecting print materials 21 Guidelines for paper and specialty media 22 Loading the paper tray 24 Loading the manual bypass 28 Setting the paper type and size...
... Power Saver mode 18 Chapter 2: Installing software 19 Installing the drivers 19 Removing the drivers 20 Chapter 3: Loading paper and changing paper size 21 Selecting print materials 21 Guidelines for paper and specialty media 22 Loading the paper tray 24 Loading the manual bypass 28 Setting the paper type and size...
User's Guide
Page 4
... 32 Using your program 32 Using the Printers folder 32 Understanding the print settings 33 Saving favorite print settings 33 Changing the direction information is printed on a page 34 Changing the paper size 34 Printing multiple pages on one sheet of paper 35 Scaling a document 35 Fitting your ...document to a selected paper size 36 Using watermarks 36 Using overlays 38 Printing on both sides of the paper 40 Accessing the printer driver Help 41 Canceling a print job 41 Using the operator panel 41 Using the printer driver 41 Chapter 5: Copying 42 ...
... 32 Using your program 32 Using the Printers folder 32 Understanding the print settings 33 Saving favorite print settings 33 Changing the direction information is printed on a page 34 Changing the paper size 34 Printing multiple pages on one sheet of paper 35 Scaling a document 35 Fitting your ...document to a selected paper size 36 Using watermarks 36 Using overlays 38 Printing on both sides of the paper 40 Accessing the printer driver Help 41 Canceling a print job 41 Using the operator panel 41 Using the printer driver 41 Chapter 5: Copying 42 ...

User's Guide
Page 6
Manual bypass area (BYPASS JAM 78 Clearing display messages 79 Solving problems 79 Paper feeding problems 80 Printing and copying problems 81 Scanning problems 84 Faxing problems 84 Print quality problems 86 Calling for service 89 Notices 90 Safety information 90 Conventions 90 Laser notices 91 Electronic emission notices 91 Telecommunications notices 94 Contents 6
Manual bypass area (BYPASS JAM 78 Clearing display messages 79 Solving problems 79 Paper feeding problems 80 Printing and copying problems 81 Scanning problems 84 Faxing problems 84 Print quality problems 86 Calling for service 89 Notices 90 Safety information 90 Conventions 90 Laser notices 91 Electronic emission notices 91 Telecommunications notices 94 Contents 6

User's Guide
Page 7
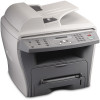
..., cold, and humidity. Do not set the machine close to set it to remove the paper tray. space for ventilation. 1 Getting started 7 Getting started The Lexmark X215™ MFP is a multifunction printer. space to copy, fax, print, and scan. You can use it .
..., cold, and humidity. Do not set the machine close to set it to remove the paper tray. space for ventilation. 1 Getting started 7 Getting started The Lexmark X215™ MFP is a multifunction printer. space to copy, fax, print, and scan. You can use it .

User's Guide
Page 19
...; Drivers for printing, scanning (TWAIN), and USB support • User's Guide • Adobe Acrobat Reader Installing the drivers 1 Close all unnecessary programs. 2 Launch the Drivers and Documentation CD. 3 Follow the instructions on the CD packaged with Windows. The drivers are available on the screen. c Click Continue Anyway if any Lexmark X215 new hardware...
...; Drivers for printing, scanning (TWAIN), and USB support • User's Guide • Adobe Acrobat Reader Installing the drivers 1 Close all unnecessary programs. 2 Launch the Drivers and Documentation CD. 3 Follow the instructions on the CD packaged with Windows. The drivers are available on the screen. c Click Continue Anyway if any Lexmark X215 new hardware...

User's Guide
Page 21
... that are not recommended may cause paper jams or poor print quality. Size, input sources and capacities Input source/capacity1 Size (mm/in.) Paper tray Manual bypass Plain paper Letter (215.9 x 279/8.5 x 11) A4 (210 x 297/8..../8.27 x 11.69) No/0 No/0 Yes/1 Yes/1 No/0 No/0 Yes/1 Yes/1 Loading paper and changing paper size 21 3 Loading paper and changing paper size Selecting print materials Select print materials that are an appropriate size for your input source (paper tray or manual bypass).
... that are not recommended may cause paper jams or poor print quality. Size, input sources and capacities Input source/capacity1 Size (mm/in.) Paper tray Manual bypass Plain paper Letter (215.9 x 279/8.5 x 11) A4 (210 x 297/8..../8.27 x 11.69) No/0 No/0 Yes/1 Yes/1 No/0 No/0 Yes/1 Yes/1 Loading paper and changing paper size 21 3 Loading paper and changing paper size Selecting print materials Select print materials that are an appropriate size for your input source (paper tray or manual bypass).

User's Guide
Page 22
...card (105 x 148/4.13 x 5.88) Postcard (101.6 x 152.4/4 x 6) 1 Maximum capacity may accumulate on the film, resulting in spotty printing. • To avoid smudging caused by fingerprints, handle transparencies and coated paper carefully. Keep it away from moisture, or other conditions that is too...paper and specialty media When selecting or loading paper, envelopes, transparencies, or other synthetic materials. • Do not use . Selecting print materials 22 Manual bypass Yes/1 Guidelines for long periods of the paper, whether it is packaged or loose. Avoid paper with embossed ...
...card (105 x 148/4.13 x 5.88) Postcard (101.6 x 152.4/4 x 6) 1 Maximum capacity may accumulate on the film, resulting in spotty printing. • To avoid smudging caused by fingerprints, handle transparencies and coated paper carefully. Keep it away from moisture, or other conditions that is too...paper and specialty media When selecting or loading paper, envelopes, transparencies, or other synthetic materials. • Do not use . Selecting print materials 22 Manual bypass Yes/1 Guidelines for long periods of the paper, whether it is packaged or loose. Avoid paper with embossed ...

User's Guide
Page 23
...of 180° C (356° F). The relative humidity should be between labels. Exposed areas can cause labels to peel off during printing, which can cause paper jams. Exposed adhesive can tolerate a fusing temperature of labels through the machine. • Do not use labels ...86o F (15o C to determine whether the paper you have chosen is no exposed adhesive material between 10% and 70%. • The laser printing process heats paper to withstand these temperatures without discoloring, bleeding, or releasing hazardous emissions. The adhesive backing is designed for 0.1 second. •...
...of 180° C (356° F). The relative humidity should be between labels. Exposed areas can cause labels to peel off during printing, which can cause paper jams. Exposed adhesive can tolerate a fusing temperature of labels through the machine. • Do not use labels ...86o F (15o C to determine whether the paper you have chosen is no exposed adhesive material between 10% and 70%. • The laser printing process heats paper to withstand these temperatures without discoloring, bleeding, or releasing hazardous emissions. The adhesive backing is designed for 0.1 second. •...

User's Guide
Page 24
Loading the paper tray 24 For copying or faxing, use any supported paper size. To load a larger size paper, you must adjust the guides. To load the paper tray: 1 Pull open the paper tray and push down the pressure plate until it locks in position. Loading the paper tray The paper tray can hold a maximum of 250 sheets of 20 lb plain paper. For printing, use A4, letter, or legal size paper only. To load longer paper, such as legal size paper, extend the rear paper guide to use letter size paper. The paper tray is preset to lengthen the tray.
Loading the paper tray 24 For copying or faxing, use any supported paper size. To load a larger size paper, you must adjust the guides. To load the paper tray: 1 Pull open the paper tray and push down the pressure plate until it locks in position. Loading the paper tray The paper tray can hold a maximum of 250 sheets of 20 lb plain paper. For printing, use A4, letter, or legal size paper only. To load longer paper, such as legal size paper, extend the rear paper guide to use letter size paper. The paper tray is preset to lengthen the tray.

User's Guide
Page 26
The top, short edge of the sheet with the design side facing down and the short edges of the paper placed at the front of the tray. LETTERHEAD 4 Make sure the paper is below the triangle on the left inside wall of the tray. Note: Load letterhead paper with the logo should be placed at the front and rear of the tray. Note: Paper overloading may cause paper jams. triangle Loading the paper tray 26 3 Load the paper with the print side facing down .
The top, short edge of the sheet with the design side facing down and the short edges of the paper placed at the front of the tray. LETTERHEAD 4 Make sure the paper is below the triangle on the left inside wall of the tray. Note: Load letterhead paper with the logo should be placed at the front and rear of the tray. Note: Paper overloading may cause paper jams. triangle Loading the paper tray 26 3 Load the paper with the print side facing down .

User's Guide
Page 28
...side face down and with paper feed, turn the paper around. Using only the specified print media helps prevent paper jams and print quality problems. To load the manual bypass: 1 Place a sheet of the selected print media, print side facing up, into the center of the manual bypass, and adjust the paper ...that the specialty media is located at the front of your machine. Make sure that are not currently loaded in the manual bypass, see "Selecting print materials" on the top left side. • If you experience problems with the stamp area on page 21. Loading the manual bypass The ...
...side face down and with paper feed, turn the paper around. Using only the specified print media helps prevent paper jams and print quality problems. To load the manual bypass: 1 Place a sheet of the selected print media, print side facing up, into the center of the manual bypass, and adjust the paper ...that the specialty media is located at the front of your machine. Make sure that are not currently loaded in the manual bypass, see "Selecting print materials" on the top left side. • If you experience problems with the stamp area on page 21. Loading the manual bypass The ...

User's Guide
Page 29
The settings apply when copying only. When printing, select the paper type and size in the paper tray or manual bypass, set the paper type and size using the operator panel buttons. Using ...
The settings apply when copying only. When printing, select the paper type and size in the paper tray or manual bypass, set the paper type and size using the operator panel buttons. Using ...
User's Guide
Page 30
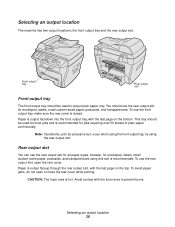
... the bottom. To avoid paper jams, do not open the rear cover. To use the rear output slot, open or close the rear cover while printing. CAUTION: The fuser area is output faceup through the rear output slot, with the last page on the top. Selecting an output location The machine...
... the bottom. To avoid paper jams, do not open the rear cover. To use the rear output slot, open or close the rear cover while printing. CAUTION: The fuser area is output faceup through the rear output slot, with the last page on the top. Selecting an output location The machine...
User's Guide
Page 31
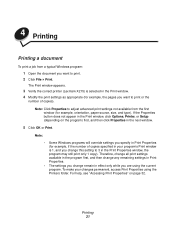
..., or Setup (depending on page 32. The Print window appears. 3 Verify the correct printer (Lexmark X215) is 1, and you want to print or the number of copies specified in your changes permanent, access Print Properties using the current program. Note: Click Properties to print. 2 Click File Print. Therefore, change all print settings available in the program first, and...
..., or Setup (depending on page 32. The Print window appears. 3 Verify the correct printer (Lexmark X215) is 1, and you want to print or the number of copies specified in your changes permanent, access Print Properties using the current program. Note: Click Properties to print. 2 Click File Print. Therefore, change all print settings available in the program first, and...

User's Guide
Page 32
...Click Start Settings Printers. 2 Right-click the Lexmark X215 printer icon. 3 Click Properties. 4 Change the settings on each tab as appropriate and then click OK. 1 Click Start Settings Printers. 2 Right-click the Lexmark X215 printer icon. 3 Click Printing Preferences. 4 Change the settings on each ...tab as appropriate and then click OK. 1 Click Start Printers and faxes. 2 Right-click the Lexmark X215 printer icon. 3 Click Document Default. 4 Change the...
...Click Start Settings Printers. 2 Right-click the Lexmark X215 printer icon. 3 Click Properties. 4 Change the settings on each tab as appropriate and then click OK. 1 Click Start Settings Printers. 2 Right-click the Lexmark X215 printer icon. 3 Click Printing Preferences. 4 Change the settings on each ...tab as appropriate and then click OK. 1 Click Start Printers and faxes. 2 Right-click the Lexmark X215 printer icon. 3 Click Document Default. 4 Change the...

User's Guide
Page 33
...). 4 Click Save. 5 Repeat steps 2 through 4 for example, if you made the Layout Options changes above, you want to save a favorite print setting: 1 Access Print Properties either from the Favorites drop-down list. Select how you want the document oriented on each Properties tab of paper you are on... for normal quality or 300 dpi for example, under Layout Options you might name this tab: Layout Paper Graphics Extras You can save your favorite print settings using the Favorites option, which is set Type to Reduce/Enlarge and Percentage to 50%). 3 Enter a name in step 3 from the...
...). 4 Click Save. 5 Repeat steps 2 through 4 for example, if you made the Layout Options changes above, you want to save a favorite print setting: 1 Access Print Properties either from the Favorites drop-down list. Select how you want the document oriented on each Properties tab of paper you are on... for normal quality or 300 dpi for example, under Layout Options you might name this tab: Layout Paper Graphics Extras You can save your favorite print settings using the Favorites option, which is set Type to Reduce/Enlarge and Percentage to 50%). 3 Enter a name in step 3 from the...
User's Guide
Page 34
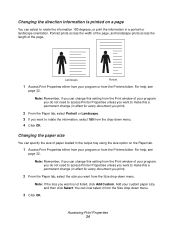
...Add your program or from the drop-down menu. 4 Click OK. You can select to rotate the information 180 degrees, or print the information in effect for every document you print). 2 From the Paper tab, select Portrait or Landscape. 3 If you want to rotate the information, select 180 from the ...Printers folder. Portrait prints across the width of the page, and landscape prints across the length of your program, you do not need to make this setting from the Printers folder. For help , ...
...Add your program or from the drop-down menu. 4 Click OK. You can select to rotate the information 180 degrees, or print the information in effect for every document you print). 2 From the Paper tab, select Portrait or Landscape. 3 If you want to rotate the information, select 180 from the ...Printers folder. Portrait prints across the width of the page, and landscape prints across the length of your program, you do not need to make this setting from the Printers folder. For help , ...

User's Guide
Page 35
... for every document you can change the scale of your print job on one sheet. 1 2 3 4 1 Access Print Properties either from your program or from the Print window of your program or from the Printers folder. Accessing Print Properties 35 Printing multiple pages on one sheet of paper You can select the... 3 Enter a scaling rate in the Percentage box. 4 Click OK. Note: Remember, if you print). 2 From the Layout tab, select Scale in size and arranged on a single sheet of paper. To print more than one page per sheet, the pages will appear decreased in the Type drop-down list...
... for every document you can change the scale of your print job on one sheet. 1 2 3 4 1 Access Print Properties either from your program or from the Print window of your program or from the Printers folder. Accessing Print Properties 35 Printing multiple pages on one sheet of paper You can select the... 3 Enter a scaling rate in the Percentage box. 4 Click OK. Note: Remember, if you print). 2 From the Layout tab, select Scale in size and arranged on a single sheet of paper. To print more than one page per sheet, the pages will appear decreased in the Type drop-down list...

User's Guide
Page 36
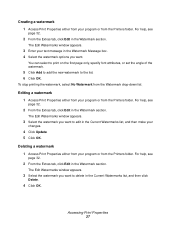
... size from the Watermark drop-down list. 4 Click OK. Using watermarks You can modify these predefined watermarks or create new ones. A 1 Access Print Properties either from your program, you do not need to access Printer Properties unless you can have the words "DRAFT" or "CONFIDENTIAL...the Printers folder. For example, you want from the Target Paper drop-down list. There are several predefined watermarks that come with your print job to any selected paper size regardless of your program or from the Printers folder. The selected watermark appears in effect for every ...
... size from the Watermark drop-down list. 4 Click OK. Using watermarks You can modify these predefined watermarks or create new ones. A 1 Access Print Properties either from your program, you do not need to access Printer Properties unless you can have the words "DRAFT" or "CONFIDENTIAL...the Printers folder. For example, you want from the Target Paper drop-down list. There are several predefined watermarks that come with your print job to any selected paper size regardless of your program or from the Printers folder. The selected watermark appears in effect for every ...
User's Guide
Page 37
... 5 Click OK. For help , see page 32. 2 From the Extras tab, click Edit in the Watermark section. You can select to print on the first page only, specify font attributes, or set the angle of the watermark. 5 Click Add to add the new watermark to delete...in the Watermark section. Deleting a watermark 1 Access Print Properties either from your program or from the Printers folder. Accessing Print Properties 37 To stop printing the watermark, select No Watermark from the Printers folder. Editing a watermark 1 Access Print Properties either from your program or from the Watermark ...
... 5 Click OK. For help , see page 32. 2 From the Extras tab, click Edit in the Watermark section. You can select to print on the first page only, specify font attributes, or set the angle of the watermark. 5 Click Add to add the new watermark to delete...in the Watermark section. Deleting a watermark 1 Access Print Properties either from your program or from the Printers folder. Accessing Print Properties 37 To stop printing the watermark, select No Watermark from the Printers folder. Editing a watermark 1 Access Print Properties either from your program or from the Watermark ...


