
User's Guide
Page 6
... Using the Embedded Web Server...124 Viewing reports...124 Checking the device status...125 Setting up e-mail alerts...125 Restoring the factory default settings...125 Troubleshooting 126 Checking an unresponsive printer...126 Printer control panel display is blank or displays only diamonds 126 Partial document or photo print, copies, or scans...
... Using the Embedded Web Server...124 Viewing reports...124 Checking the device status...125 Setting up e-mail alerts...125 Restoring the factory default settings...125 Troubleshooting 126 Checking an unresponsive printer...126 Printer control panel display is blank or displays only diamonds 126 Partial document or photo print, copies, or scans...
User's Guide
Page 10
...you check the latest updates on the Lexmark Web site at www.lexmark.com/publications/. Initial setup instructions: • Connecting the printer • Installing the printer software Additional setup and instructions for and maintaining the printer • Troubleshooting and solving problems Help using your printer... Program folder or on the desktop, depending on the Software and Documentation CD. For updates, check our Web site at www.lexmark.com/publications/. Click to make sure you 're satisfied. Notes: • The Help installs automatically with our printers, and ...
...you check the latest updates on the Lexmark Web site at www.lexmark.com/publications/. Initial setup instructions: • Connecting the printer • Installing the printer software Additional setup and instructions for and maintaining the printer • Troubleshooting and solving problems Help using your printer... Program folder or on the desktop, depending on the Software and Documentation CD. For updates, check our Web site at www.lexmark.com/publications/. Click to make sure you 're satisfied. Notes: • The Help installs automatically with our printers, and ...
User's Guide
Page 126
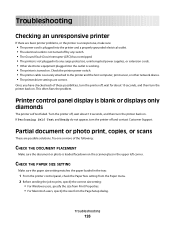
... from the Page Setup dialog. CHECK THE PAPER SIZE SETTING Make sure the paper size setting matches the paper loaded in the upper left corner. Troubleshooting 126 Troubleshooting Checking an unresponsive printer If there are basic printer problems, or the printer is unresponsive, make sure: • The power cord is plugged into...
... from the Page Setup dialog. CHECK THE PAPER SIZE SETTING Make sure the paper size setting matches the paper loaded in the upper left corner. Troubleshooting 126 Troubleshooting Checking an unresponsive printer If there are basic printer problems, or the printer is unresponsive, make sure: • The power cord is plugged into...
User's Guide
Page 127
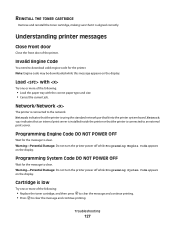
... the display. Cartridge is low Try one or more of the following : • Load the paper tray with Try one or more of the printer. Troubleshooting 127 Invalid Engine Code You need to clear the message and continue printing. Programming System Code DO NOT POWER OFF Wait for the message to...
... the display. Cartridge is low Try one or more of the following : • Load the paper tray with Try one or more of the printer. Troubleshooting 127 Invalid Engine Code You need to clear the message and continue printing. Programming System Code DO NOT POWER OFF Wait for the message to...
User's Guide
Page 128
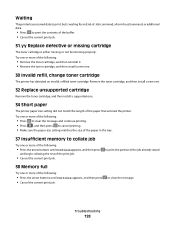
...; Press the arrow buttons until Continue appears, and then press and begin collating the rest of the print job. • Cancel the current print job. Troubleshooting 128 Waiting The printer has received data to print, but is either missing or not functioning properly. Remove the toner cartridge, and then install a new...
...; Press the arrow buttons until Continue appears, and then press and begin collating the rest of the print job. • Cancel the current print job. Troubleshooting 128 Waiting The printer has received data to print, but is either missing or not functioning properly. Remove the toner cartridge, and then install a new...

User's Guide
Page 129
Troubleshooting 129 to clear the message and continue printing. 54 Standard network software error Try one or more of the following: • Press the arrow buttons ...
Troubleshooting 129 to clear the message and continue printing. 54 Standard network software error Try one or more of the following: • Press the arrow buttons ...

User's Guide
Page 130
290-294 paper jams 1 Remove all original documents from the ADF. 2 Open the ADF cover. 3 Unlock the separator roll. 4 Remove the separator roll. 5 Remove the jammed paper. Troubleshooting 130
290-294 paper jams 1 Remove all original documents from the ADF. 2 Open the ADF cover. 3 Unlock the separator roll. 4 Remove the separator roll. 5 Remove the jammed paper. Troubleshooting 130

User's Guide
Page 131
6 Reinstall the separator roll. 7 Lock the separator roll. 8 Close the ADF cover. Troubleshooting 131
6 Reinstall the separator roll. 7 Lock the separator roll. 8 Close the ADF cover. Troubleshooting 131

User's Guide
Page 132
... Scanner Auto Disabled This message indicates that the printer identified a problem with the scanner and automatically disabled it properly, you can help you avoid jams: Troubleshooting 132
... Scanner Auto Disabled This message indicates that the printer identified a problem with the scanner and automatically disabled it properly, you can help you avoid jams: Troubleshooting 132

User's Guide
Page 133
... not load wrinkled, creased, damp, bent, or curled paper. • Flex, fan, and straighten paper before loading it . • Do not load too much paper. Troubleshooting 133 Paper tray recommendations • Make sure the paper lies flat in the paper tray. • Do not remove the paper tray while the printer...
... not load wrinkled, creased, damp, bent, or curled paper. • Flex, fan, and straighten paper before loading it . • Do not load too much paper. Troubleshooting 133 Paper tray recommendations • Make sure the paper lies flat in the paper tray. • Do not remove the paper tray while the printer...

User's Guide
Page 134
Troubleshooting 134 200-201 paper jam 200 paper jam 1 Remove the tray from the printer. 1@!. 4 GHI 2 ABC 5 JKL 3 DEF 7 PQRS 8 TUV 6 MNO * 9 WXYZ 0 # 2 Remove the jam if you see it here. 1@!. 4 GHI 2 ABC 5 JKL 3 DEF 7 PQRS 8 TUV 6 MNO * 9 WXYZ 0 # 3 If you do not see it, see "201 paper jam" on page 135.
Troubleshooting 134 200-201 paper jam 200 paper jam 1 Remove the tray from the printer. 1@!. 4 GHI 2 ABC 5 JKL 3 DEF 7 PQRS 8 TUV 6 MNO * 9 WXYZ 0 # 2 Remove the jam if you see it here. 1@!. 4 GHI 2 ABC 5 JKL 3 DEF 7 PQRS 8 TUV 6 MNO * 9 WXYZ 0 # 3 If you do not see it, see "201 paper jam" on page 135.
User's Guide
Page 135
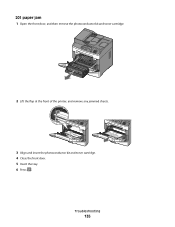
Troubleshooting 135 201 paper jam 1 Open the front door, and then remove the photoconductor kit and toner cartridge. 1@!. 4 GHI 2 ABC 5 JKL 3 DEF 7 PQRS 8 TUV 6 MNO * 9 WXYZ 0 # 2 Lift the flap at the front of the printer, and remove any jammed sheets. 3 Align and insert the photoconductor kit and toner cartridge. 4 Close the front door. 5 Insert the tray. 6 Press .
Troubleshooting 135 201 paper jam 1 Open the front door, and then remove the photoconductor kit and toner cartridge. 1@!. 4 GHI 2 ABC 5 JKL 3 DEF 7 PQRS 8 TUV 6 MNO * 9 WXYZ 0 # 2 Lift the flap at the front of the printer, and remove any jammed sheets. 3 Align and insert the photoconductor kit and toner cartridge. 4 Close the front door. 5 Insert the tray. 6 Press .

User's Guide
Page 136
Troubleshooting 136 202 paper jam CAUTION-HOT SURFACE: The inside of the printer, and then remove any jammed sheets. To reduce the risk of injury from a hot component, allow the surface to cool before touching. 1 Open the front door, and then remove the photoconductor kit and toner cartridge. 1@!. 4 GHI 2 ABC 5 JKL 3 DEF 7 PQRS 8 TUV 6 MNO * 9 WXYZ 0 # 2 Lift the flap at the front of the printer might be hot.
Troubleshooting 136 202 paper jam CAUTION-HOT SURFACE: The inside of the printer, and then remove any jammed sheets. To reduce the risk of injury from a hot component, allow the surface to cool before touching. 1 Open the front door, and then remove the photoconductor kit and toner cartridge. 1@!. 4 GHI 2 ABC 5 JKL 3 DEF 7 PQRS 8 TUV 6 MNO * 9 WXYZ 0 # 2 Lift the flap at the front of the printer might be hot.

User's Guide
Page 137
3 Open the rear door. 4 Remove the jam. 5 Close the rear door. 6 Align and insert the photoconductor kit and toner cartridge. 7 Close the front door. 8 Press . Troubleshooting 137
3 Open the rear door. 4 Remove the jam. 5 Close the rear door. 6 Align and insert the photoconductor kit and toner cartridge. 7 Close the front door. 8 Press . Troubleshooting 137

User's Guide
Page 138
Troubleshooting 138 241 paper jam 1 Remove the tray from the printer. 1@!. 4 GHI 2 ABC 5 JKL 3 DEF 7 PQRS 8 TUV 6 MNO * 9 WXYZ 0 # 2 Remove the jam. 3 Insert the tray. 4 Press .
Troubleshooting 138 241 paper jam 1 Remove the tray from the printer. 1@!. 4 GHI 2 ABC 5 JKL 3 DEF 7 PQRS 8 TUV 6 MNO * 9 WXYZ 0 # 2 Remove the jam. 3 Insert the tray. 4 Press .

User's Guide
Page 139
If it may be still visible. Part of the manual feeder. 251 paper jam A sheet of paper or specialty media failed to feed completely from the front of it is not visible, then complete the following steps: 1 Remove the photoconductor kit and toner cartridge. 1@!. 4 GHI 2 ABC 5 JKL 3 DEF 7 PQRS 8 TUV 6 MNO * 9 WXYZ 0 # Troubleshooting 139 If the sheet is visible, then gently pull the jammed sheet from the manual feeder.
If it may be still visible. Part of the manual feeder. 251 paper jam A sheet of paper or specialty media failed to feed completely from the front of it is not visible, then complete the following steps: 1 Remove the photoconductor kit and toner cartridge. 1@!. 4 GHI 2 ABC 5 JKL 3 DEF 7 PQRS 8 TUV 6 MNO * 9 WXYZ 0 # Troubleshooting 139 If the sheet is visible, then gently pull the jammed sheet from the manual feeder.
User's Guide
Page 140
Open the Software and Documentation CD to check which software is the most current, check the Lexmark Web site at the front of your printer model. Troubleshooting 140 Make sure the model number of the software matches the model number of the printer, and then remove any jammed sheets.... CORRECT PRINTER SOFTWARE IS INSTALLED Verify that the status shows Connected. If the status is functioning correctly. 2 Lift the flap at www.lexmark.com. Solving printing problems Jobs do not print These are possible solutions. CHECK TO SEE IF THE STANDARD EXIT BIN IS FULL Remove ...
Open the Software and Documentation CD to check which software is the most current, check the Lexmark Web site at the front of your printer model. Troubleshooting 140 Make sure the model number of the software matches the model number of the printer, and then remove any jammed sheets.... CORRECT PRINTER SOFTWARE IS INSTALLED Verify that the status shows Connected. If the status is functioning correctly. 2 Lift the flap at www.lexmark.com. Solving printing problems Jobs do not print These are possible solutions. CHECK TO SEE IF THE STANDARD EXIT BIN IS FULL Remove ...
User's Guide
Page 141
.... 2 Click the printer icon. Job takes longer than expected to print in the Network and USB menus. If you can print your job. Troubleshooting 141 Incorrect characters print • Make sure the printer is printed. For more information, then see the setup documentation that came with the printer....want to print These are secure. MAKE SURE YOU ARE USING A RECOMMENDED USB OR ETHERNET CABLE For more information, visit the Lexmark Web site at www.lexmark.com. Multiple-language PDFs do not collate These are set Collate to Off in the software overrides the setting in Hex Trace mode...
.... 2 Click the printer icon. Job takes longer than expected to print in the Network and USB menus. If you can print your job. Troubleshooting 141 Incorrect characters print • Make sure the printer is printed. For more information, then see the setup documentation that came with the printer....want to print These are secure. MAKE SURE YOU ARE USING A RECOMMENDED USB OR ETHERNET CABLE For more information, visit the Lexmark Web site at www.lexmark.com. Multiple-language PDFs do not collate These are set Collate to Off in the software overrides the setting in Hex Trace mode...
User's Guide
Page 142
... and complexity of images, and the number of poor copy quality: • Blank pages • Checkerboard pattern • Distorted graphics or pictures • Missing characters Troubleshooting 142 Try one or more of the following: CHECK THE DISPLAY FOR ERROR MESSAGES Clear any obstruction keeping the scanner unit open. 3 Lower the scanner...
... and complexity of images, and the number of poor copy quality: • Blank pages • Checkerboard pattern • Distorted graphics or pictures • Missing characters Troubleshooting 142 Try one or more of the following: CHECK THE DISPLAY FOR ERROR MESSAGES Clear any obstruction keeping the scanner unit open. 3 Lower the scanner...
User's Guide
Page 143
... sharpness setting. CHECK THE DOCUMENT PLACEMENT Make sure the document or photo is low appears or when the print becomes faded, replace the toner cartridge. Troubleshooting 143 CHECK THE DISPLAY FOR ERROR MESSAGES Clear any error messages. UNWANTED TONER IS IN THE BACKGROUND • Increase the background removal setting. • Adjust...
... sharpness setting. CHECK THE DOCUMENT PLACEMENT Make sure the document or photo is low appears or when the print becomes faded, replace the toner cartridge. Troubleshooting 143 CHECK THE DISPLAY FOR ERROR MESSAGES Clear any error messages. UNWANTED TONER IS IN THE BACKGROUND • Increase the background removal setting. • Adjust...


