Quick Reference
Page 8
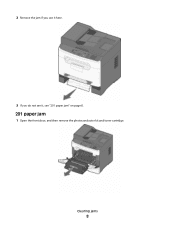
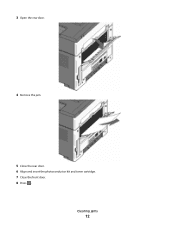
2 Remove the jam if you see it here. 3 If you do not see it, see "201 paper jam" on page 8. 201 paper jam 1 Open the front door, and then remove the photoconductor kit and toner cartridge. Clearing jams 8
2 Remove the jam if you see it here. 3 If you do not see it, see "201 paper jam" on page 8. 201 paper jam 1 Open the front door, and then remove the photoconductor kit and toner cartridge. Clearing jams 8
Quick Reference
Page 9
Clearing jams 9 2 Lift the flap at the front of the printer, and remove any jammed sheets. 3 Align and insert the photoconductor kit and toner cartridge. 4 Close the front door. 5 Insert the tray. 6 Press .
Clearing jams 9 2 Lift the flap at the front of the printer, and remove any jammed sheets. 3 Align and insert the photoconductor kit and toner cartridge. 4 Close the front door. 5 Insert the tray. 6 Press .
Quick Reference
Page 10
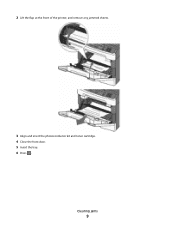
To reduce the risk of the printer might be hot. 202 paper jam CAUTION-HOT SURFACE: The inside of injury from a hot component, allow the surface to cool before touching. 1 Open the front door, and then remove the photoconductor kit and toner cartridge. Clearing jams 10
To reduce the risk of the printer might be hot. 202 paper jam CAUTION-HOT SURFACE: The inside of injury from a hot component, allow the surface to cool before touching. 1 Open the front door, and then remove the photoconductor kit and toner cartridge. Clearing jams 10
Quick Reference
Page 12
Clearing jams 12 3 Open the rear door. 4 Remove the jam. 5 Close the rear door. 6 Align and insert the photoconductor kit and toner cartridge. 7 Close the front door. 8 Press .
Clearing jams 12 3 Open the rear door. 4 Remove the jam. 5 Close the rear door. 6 Align and insert the photoconductor kit and toner cartridge. 7 Close the front door. 8 Press .

Quick Reference
Page 14
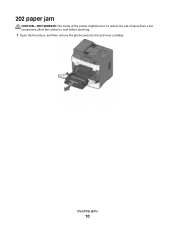
Part of the manual feeder. If it may be still visible. 251 paper jam A sheet of paper or specialty media failed to feed completely from the front of it is not visible, then complete the following steps: 1 Remove the photoconductor kit and toner cartridge. If the sheet is visible, then gently pull the jammed sheet from the manual feeder. Clearing jams 14
Part of the manual feeder. If it may be still visible. 251 paper jam A sheet of paper or specialty media failed to feed completely from the front of it is not visible, then complete the following steps: 1 Remove the photoconductor kit and toner cartridge. If the sheet is visible, then gently pull the jammed sheet from the manual feeder. Clearing jams 14

Quick Reference
Page 15
2 Lift the flap at the front of the printer, and then remove any jammed sheets. 3 Align and insert the photoconductor kit and toner cartridge. 4 Press . Clearing jams 15
2 Lift the flap at the front of the printer, and then remove any jammed sheets. 3 Align and insert the photoconductor kit and toner cartridge. 4 Press . Clearing jams 15

User's Guide
Page 2
......24 Using recycled paper...24 Conserving supplies...24 Saving energy...25 Using Eco-Mode ...25 Adjusting Power Saver...26 Recycling...26 Recycling Lexmark products...26 Recycling Lexmark packaging...26 Returning Lexmark cartridges for reuse or recycling...27 Reducing printer noise...27 Loading paper and specialty media 29 Setting the Paper Size and Paper Type...
......24 Using recycled paper...24 Conserving supplies...24 Saving energy...25 Using Eco-Mode ...25 Adjusting Power Saver...26 Recycling...26 Recycling Lexmark products...26 Recycling Lexmark packaging...26 Returning Lexmark cartridges for reuse or recycling...27 Reducing printer noise...27 Loading paper and specialty media 29 Setting the Paper Size and Paper Type...

User's Guide
Page 6
...114 Storing supplies...116 Checking the status of supplies from a network computer 116 Ordering supplies...117 Ordering toner cartridges...117 Ordering a photoconductor kit ...117 Replacing supplies...118 Replacing the toner cartridge ...118 Replacing the photoconductor kit ...119 Moving the printer to another location...122 Shipping the printer...123 ... or photo print, copies, or scans 126 Check the document placement...126 Check the paper size setting...126 Reinstall the toner cartridge ...127 Understanding printer messages...127 Close front door...127 Invalid Engine Code...127 Contents 6
...114 Storing supplies...116 Checking the status of supplies from a network computer 116 Ordering supplies...117 Ordering toner cartridges...117 Ordering a photoconductor kit ...117 Replacing supplies...118 Replacing the toner cartridge ...118 Replacing the photoconductor kit ...119 Moving the printer to another location...122 Shipping the printer...123 ... or photo print, copies, or scans 126 Check the document placement...126 Check the paper size setting...126 Reinstall the toner cartridge ...127 Understanding printer messages...127 Close front door...127 Invalid Engine Code...127 Contents 6

User's Guide
Page 7
...Code DO NOT POWER OFF...127 Programming System Code DO NOT POWER OFF ...127 Cartridge is low...127 Waiting ...128 31.yy Replace defective or missing cartridge ...128 30 Invalid refill, change toner cartridge...128 32 Replace unsupported cartridge...128 34 Short paper ...128 37 Insufficient memory to collate job ...128 38 Memory...129 54 Network software error...129 56 Standard USB port disabled...129 84 PC Kit life warning...129 84 Replace PC Kit...129 88.yy Cartridge is low ...129 200-250 paper jam ...129 290-294 paper jams ...130 840.01 Scanner Disabled...132 840.02 Scanner Auto Disabled...132...
...Code DO NOT POWER OFF...127 Programming System Code DO NOT POWER OFF ...127 Cartridge is low...127 Waiting ...128 31.yy Replace defective or missing cartridge ...128 30 Invalid refill, change toner cartridge...128 32 Replace unsupported cartridge...128 34 Short paper ...128 37 Insufficient memory to collate job ...128 38 Memory...129 54 Network software error...129 56 Standard USB port disabled...129 84 PC Kit life warning...129 84 Replace PC Kit...129 88.yy Cartridge is low ...129 200-250 paper jam ...129 290-294 paper jams ...130 840.01 Scanner Disabled...132 840.02 Scanner Auto Disabled...132...
User's Guide
Page 27
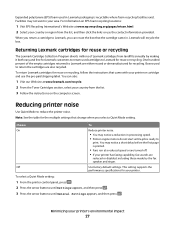
.... • Printer engine motors do not start until General Settings appears, and then press . One hundred percent of Lexmark cartridges from landfills annually by the fax speaker and ringer. Boxes used in your country from the list, and then click ...printer noise Use Quiet Mode to reduce the printer noise. Returning Lexmark cartridges for reuse or recycling The Lexmark Cartridge Collection Program diverts millions of the empty cartridges returned to Lexmark are also recycled. To return Lexmark cartridges for reuse or recycling. Facilities may notice a short delay before...
.... • Printer engine motors do not start until General Settings appears, and then press . One hundred percent of Lexmark cartridges from landfills annually by the fax speaker and ringer. Boxes used in your country from the list, and then click ...printer noise Use Quiet Mode to reduce the printer noise. Returning Lexmark cartridges for reuse or recycling The Lexmark Cartridge Collection Program diverts millions of the empty cartridges returned to Lexmark are also recycled. To return Lexmark cartridges for reuse or recycling. Facilities may notice a short delay before...
User's Guide
Page 45
... strip on the leading and driver edge, and use labels in the paper tray or manual feeder. Partial sheets also contaminate the printer and the cartridge with adhesive, and could void the warranty. • If zone coating of the adhesive at the highest fusing temperature if Label Weight is Card... sure the Paper Type is set to verify that may cause labels to the sheet edge. Print samples on the card stock being considered for laser printers. The labels can withstand up to 25 psi (172 kPa) pressure without delaminating, oozing around the edges, or releasing hazardous fumes. •...
... strip on the leading and driver edge, and use labels in the paper tray or manual feeder. Partial sheets also contaminate the printer and the cartridge with adhesive, and could void the warranty. • If zone coating of the adhesive at the highest fusing temperature if Label Weight is Card... sure the Paper Type is set to verify that may cause labels to the sheet edge. Print samples on the card stock being considered for laser printers. The labels can withstand up to 25 psi (172 kPa) pressure without delaminating, oozing around the edges, or releasing hazardous fumes. •...

User's Guide
Page 94
... to PC Port Range Date Format MM-DD-YYYY DD-MM-YYYY YYYY-MM-DD Time Format 12 hour A.M./P.M. 24 hour clock Alarms Alarm Control Cartridge Alarm Timeouts Power Saver Disabled 1-240 Timeouts Screen Timeout 15-300 Description Reduces the amount of inactivity before returning the printer display to a Ready state...
... to PC Port Range Date Format MM-DD-YYYY DD-MM-YYYY YYYY-MM-DD Time Format 12 hour A.M./P.M. 24 hour clock Alarms Alarm Control Cartridge Alarm Timeouts Power Saver Disabled 1-240 Timeouts Screen Timeout 15-300 Description Reduces the amount of inactivity before returning the printer display to a Ready state...

User's Guide
Page 117
... in your Web browser. Note: All life estimates for information about Lexmark authorized supplies dealers in the TCP/IP section. 2 Click Device Status. Ordering toner cartridges When 88 Cartridge is near its end of your area. Note: Repeat this printer ... of this procedure multiple times until the print remains faded, and then replace the cartridge. Recommended toner cartridge part numbers Part name Toner cartridge Regular cartridge X203A21G Lexmark Return Program Cartridge X203A11G Ordering a photoconductor kit When 84 PC Kit Life Warning appears on letter- ...
... in your Web browser. Note: All life estimates for information about Lexmark authorized supplies dealers in the TCP/IP section. 2 Click Device Status. Ordering toner cartridges When 88 Cartridge is near its end of your area. Note: Repeat this printer ... of this procedure multiple times until the print remains faded, and then replace the cartridge. Recommended toner cartridge part numbers Part name Toner cartridge Regular cartridge X203A21G Lexmark Return Program Cartridge X203A11G Ordering a photoconductor kit When 84 PC Kit Life Warning appears on letter- ...

User's Guide
Page 118
...several times to see approximately how much toner is low appears, or when you experience faded print, remove the toner cartridge. Note: You can check to redistribute the toner, and then reinsert it and continue printing. Maintaining the printer 118 When shaking the... cartridge no longer improves the print quality, replace the toner cartridge. To replace the toner cartridge: 1 Open the front door by printing a menu settings page. Replacing supplies Replacing the toner cartridge When 88 Cartridge is left in your cartridge by pressing the button on the ...
...several times to see approximately how much toner is low appears, or when you experience faded print, remove the toner cartridge. Note: You can check to redistribute the toner, and then reinsert it and continue printing. Maintaining the printer 118 When shaking the... cartridge no longer improves the print quality, replace the toner cartridge. To replace the toner cartridge: 1 Open the front door by printing a menu settings page. Replacing supplies Replacing the toner cartridge When 88 Cartridge is left in your cartridge by pressing the button on the ...
User's Guide
Page 119
...as far as it will go. While the printer may continue to distribute the toner. 5 Install the new toner cartridge by aligning the rollers on the toner cartridge with the arrows on the display. Maintaining the printer 119 When 84 PC Kit life warning or 84 Replace PC Kit... first appears, you before the photoconductor kit reaches a page maximum by printing a menu settings page. Push the toner cartridge in all directions to function properly after the photoconductor kit has reached its official end-of the photoconductor kit. Replacing the photoconductor kit The ...
...as far as it will go. While the printer may continue to distribute the toner. 5 Install the new toner cartridge by aligning the rollers on the toner cartridge with the arrows on the display. Maintaining the printer 119 When 84 PC Kit life warning or 84 Replace PC Kit... first appears, you before the photoconductor kit reaches a page maximum by printing a menu settings page. Push the toner cartridge in all directions to function properly after the photoconductor kit has reached its official end-of the photoconductor kit. Replacing the photoconductor kit The ...

User's Guide
Page 120
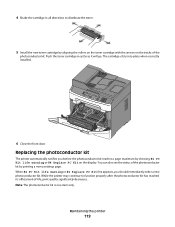
Note: The photoconductor kit and toner cartridge form a unit. 1@!. 4 GHI 2 ABC 5 JKL 3 DEF 7 PQRS 8 TUV 6 MNO * 9 WXYZ 0 # Maintaining the printer 120 1 Open the front door by pressing the button on the left side of the printer and lowering the front door. 1@!. 4 GHI 2 ABC 5 JKL 3 DEF 7 PQRS 8 TUV 6 MNO * 9 WXYZ 0 # 2 Pull the photoconductor kit and toner cartridge out of the printer as a unit by pulling on the toner cartridge handle.
Note: The photoconductor kit and toner cartridge form a unit. 1@!. 4 GHI 2 ABC 5 JKL 3 DEF 7 PQRS 8 TUV 6 MNO * 9 WXYZ 0 # Maintaining the printer 120 1 Open the front door by pressing the button on the left side of the printer and lowering the front door. 1@!. 4 GHI 2 ABC 5 JKL 3 DEF 7 PQRS 8 TUV 6 MNO * 9 WXYZ 0 # 2 Pull the photoconductor kit and toner cartridge out of the printer as a unit by pulling on the toner cartridge handle.

User's Guide
Page 121
Place the unit on a flat, clean surface. 3 Press the button on the base of time. Extended light exposure can cause significant print quality problems. Maintaining the printer 121 Pull the toner cartridge up and out using the handle. 1 2 4 Unpack the new photoconductor kit. Be careful not to direct light for an extended period of the photoconductor kit. Warning-Potential Damage: When replacing the photoconductor kit, do not leave the kit exposed to touch the photoconductor drum.
Place the unit on a flat, clean surface. 3 Press the button on the base of time. Extended light exposure can cause significant print quality problems. Maintaining the printer 121 Pull the toner cartridge up and out using the handle. 1 2 4 Unpack the new photoconductor kit. Be careful not to direct light for an extended period of the photoconductor kit. Warning-Potential Damage: When replacing the photoconductor kit, do not leave the kit exposed to touch the photoconductor drum.

User's Guide
Page 122
...arrows in as far as it . Maintaining the printer 122 Push the unit in the printer. 5 Insert the toner cartridge into the printer by aligning the arrows on the toner cartridge with the new photoconductor kit. To reset the counter, see the instruction sheet that came with the tracks. CAUTION-... will go. 1@!. 4 GHI 2 ABC 5 JKL 3 DEF 7 PQRS 8 TUV 6 MNO * 9 WXYZ 0 # 7 After you replace the photoconductor kit, reset the photoconductor counter. Push the toner cartridge until it clicks into place. 6 Install the unit into the photoconductor kit by the printer warranty.
...arrows in as far as it . Maintaining the printer 122 Push the unit in the printer. 5 Insert the toner cartridge into the printer by aligning the arrows on the toner cartridge with the new photoconductor kit. To reset the counter, see the instruction sheet that came with the tracks. CAUTION-... will go. 1@!. 4 GHI 2 ABC 5 JKL 3 DEF 7 PQRS 8 TUV 6 MNO * 9 WXYZ 0 # 7 After you replace the photoconductor kit, reset the photoconductor counter. Push the toner cartridge until it clicks into place. 6 Install the unit into the photoconductor kit by the printer warranty.

User's Guide
Page 125
... address field of your system support person to set up e-mail alerts You can view paper tray settings, the level of toner in the print cartridge, the percentage of life remaining in the e-mail addresses that you want to retain a list of certain printer parts. Checking the device status Using the...
... address field of your system support person to set up e-mail alerts You can view paper tray settings, the level of toner in the print cartridge, the percentage of life remaining in the e-mail addresses that you want to retain a list of certain printer parts. Checking the device status Using the...
User's Guide
Page 127
... Code appears on the display. Programming System Code DO NOT POWER OFF Wait for the printer. Troubleshooting 127 REINSTALL THE TONER CARTRIDGE Remove and reinstall the toner cartridge, making sure that the printer is using the standard network port built into the printer system board. Load with the correct... the printer or that the printer is connected to clear. Programming Engine Code DO NOT POWER OFF Wait for the message to the network. Cartridge is low Try one or more of the following : • Load the paper tray with Try one or more of the printer. Warning...
... Code appears on the display. Programming System Code DO NOT POWER OFF Wait for the printer. Troubleshooting 127 REINSTALL THE TONER CARTRIDGE Remove and reinstall the toner cartridge, making sure that the printer is using the standard network port built into the printer system board. Load with the correct... the printer or that the printer is connected to clear. Programming Engine Code DO NOT POWER OFF Wait for the message to the network. Cartridge is low Try one or more of the following : • Load the paper tray with Try one or more of the printer. Warning...


