
Service Manual
Page 4
... ...2-177 Diagnostic aids ...3-1 Understanding the printer control panel (models T650, T652, and T654) ...3-1 Accessing service menus (models T650, T652, and T654) ...3-2 Diagnostics mode (models T650, T652, and T654) ...3-3 Entering Diagnostics mode (models T650, T652, and T654) ...3-3 Available tests ...3-3 Exiting Diagnostics mode (models T650, T652, and T654) ...3-5 REGISTRATION ...3-5 Quick Test ...3-6 PRINT TESTS ...3-7 Input source tests ...3-7... Margin (duplex) ...3-13 Sensor Test (duplex) ...3-13 Motor Test (duplex) ...3-14 Duplex Feed 1 ...3-14 Duplex Feed 2 ...3-14 iv Service Manual
... ...2-177 Diagnostic aids ...3-1 Understanding the printer control panel (models T650, T652, and T654) ...3-1 Accessing service menus (models T650, T652, and T654) ...3-2 Diagnostics mode (models T650, T652, and T654) ...3-3 Entering Diagnostics mode (models T650, T652, and T654) ...3-3 Available tests ...3-3 Exiting Diagnostics mode (models T650, T652, and T654) ...3-5 REGISTRATION ...3-5 Quick Test ...3-6 PRINT TESTS ...3-7 Input source tests ...3-7... Margin (duplex) ...3-13 Sensor Test (duplex) ...3-13 Motor Test (duplex) ...3-14 Duplex Feed 1 ...3-14 Duplex Feed 2 ...3-14 iv Service Manual
Service Manual
Page 6
4062-XXX Wiper Messages ...3-28 Clear Custom Status ...3-28 Best Speed ...3-29 Exit Config Menu (models T650, T652, and T654) ...3-29 Understanding the printer control panel (model T656) ...3-29 Accessing service menus (model T656) ...3-30 Diagnostics Menu (model T656) ...3-31 Entering Diagnostics Menu (model T656) ...3-31 Available tests ...3-31 Registration (printer) ...3-33 Quick Test... Transfer ...3-46 Print Contrast ...3-46 Charge Roll ...3-46 Gap Adjust ...3-47 Auto Dark Adjust ...3-47 REPORTS ...3-47 Menu Settings Page ...3-47 EVENT LOG ...3-47 vi Service Manual
4062-XXX Wiper Messages ...3-28 Clear Custom Status ...3-28 Best Speed ...3-29 Exit Config Menu (models T650, T652, and T654) ...3-29 Understanding the printer control panel (model T656) ...3-29 Accessing service menus (model T656) ...3-30 Diagnostics Menu (model T656) ...3-31 Entering Diagnostics Menu (model T656) ...3-31 Available tests ...3-31 Registration (printer) ...3-33 Quick Test... Transfer ...3-46 Print Contrast ...3-46 Charge Roll ...3-46 Gap Adjust ...3-47 Auto Dark Adjust ...3-47 REPORTS ...3-47 Menu Settings Page ...3-47 EVENT LOG ...3-47 vi Service Manual
Service Manual
Page 8
... Sensor (media empty) ...3-87 Sensor (media low) ...3-87 Sensor (pass-thru) ...3-87 Media transport path ...3-89 Model T650 paper path, rolls, and sensors ...3-89 Models T652 and T654 paper path, rolls, and sensors ...3-90 Functions of main components ...3-90 Media tray assembly ...3-90 Rear media guide ...3-90 Side guide ...3-90 viii Service Manual
... Sensor (media empty) ...3-87 Sensor (media low) ...3-87 Sensor (pass-thru) ...3-87 Media transport path ...3-89 Model T650 paper path, rolls, and sensors ...3-89 Models T652 and T654 paper path, rolls, and sensors ...3-90 Functions of main components ...3-90 Media tray assembly ...3-90 Rear media guide ...3-90 Side guide ...3-90 viii Service Manual
Service Manual
Page 10
... (T650, T652, T654) ...4-73 Switch (media size) assembly removal (T650, T652, T654) ...4-74 System card assembly removal (T650, T652, T654, T656) ...4-76 Transfer roll assembly removal (T650, T652, T654) ...4-78 Transfer roll bracket assembly, left removal (T650, T652, T654) ...4-79 Transfer roll bracket assembly, right removal (T650, T652, T654) ...4-80 Transfer deflector removal (T650, T652, T654) ...4-80 Tray roller catch assembly removal (T650, T652, T654) ...4-81 x Service Manual
... (T650, T652, T654) ...4-73 Switch (media size) assembly removal (T650, T652, T654) ...4-74 System card assembly removal (T650, T652, T654, T656) ...4-76 Transfer roll assembly removal (T650, T652, T654) ...4-78 Transfer roll bracket assembly, left removal (T650, T652, T654) ...4-79 Transfer roll bracket assembly, right removal (T650, T652, T654) ...4-80 Transfer deflector removal (T650, T652, T654) ...4-80 Tray roller catch assembly removal (T650, T652, T654) ...4-81 x Service Manual

Service Manual
Page 12
...option ...4-148 Lower interface cable assembly removal ...4-156 Media size actuator removal ...4-157 Media tray catch spring removal ...4-158 Media out actuator removal (models T652 and T654) ...4-158 Media size actuator removal ...4-159 Media tray catch spring removal ...4-159 Media tray roller catch assembly removal ...4-159 Output expander rear door ...196 Tray roller catch assembly removal ...4-197 Upper interface cable assembly removal ...4-197 Connector locations and connections ...5-1 Connections ...5-1 Preventive maintenance ...6-1 Safety inspection guide ...6-1 xii Service Manual
...option ...4-148 Lower interface cable assembly removal ...4-156 Media size actuator removal ...4-157 Media tray catch spring removal ...4-158 Media out actuator removal (models T652 and T654) ...4-158 Media size actuator removal ...4-159 Media tray catch spring removal ...4-159 Media tray roller catch assembly removal ...4-159 Output expander rear door ...196 Tray roller catch assembly removal ...4-197 Upper interface cable assembly removal ...4-197 Connector locations and connections ...5-1 Connections ...5-1 Preventive maintenance ...6-1 Safety inspection guide ...6-1 xii Service Manual
Service Manual
Page 26
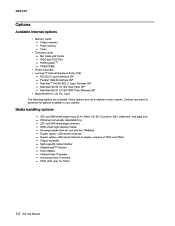
...sheet universally adjustable tray 250- Some options are available. and 550-sheet paper trays of purchase for T654) 1-2 Service Manual and 550-sheet paper drawers 2000-sheet high-capacity feeder Envelope feeder (Not for use with the...T656dne) Duplex option-250-sheet (external) Duplex option-550-sheet (internal on duplex versions of T652 and T654) Output expander High-capacity output stacker StapleSmart™ Finisher 5-bin Mailbox Vertical Kiosk Presenter Horizontal... interface ISP - Flash memory - PRESCRIBE • Printer hard disk • Lexmark™ Internal Solutions Ports (ISP) -
...sheet universally adjustable tray 250- Some options are available. and 550-sheet paper trays of purchase for T654) 1-2 Service Manual and 550-sheet paper drawers 2000-sheet high-capacity feeder Envelope feeder (Not for use with the...T656dne) Duplex option-250-sheet (external) Duplex option-550-sheet (internal on duplex versions of T652 and T654) Output expander High-capacity output stacker StapleSmart™ Finisher 5-bin Mailbox Vertical Kiosk Presenter Horizontal... interface ISP - Flash memory - PRESCRIBE • Printer hard disk • Lexmark™ Internal Solutions Ports (ISP) -
Service Manual
Page 50
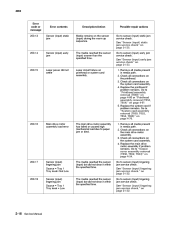
...Tray level = Low The media reached the sensor (input) but did not clear it within the specified time. 2-16 Service Manual Go to sensor (input) static jam service check. on page 2-132. 200.14 Sensor (input) early jam The media reached the sensor (input) sooner than the...Sensor (input) early jam service check" on page 2-135. See "Sensor (input) lingering jam service check." See "Sensor (input) static jam service check" on page 2-133. 1. Go to "Output cover assembly removal (T650, T652, T654)" on page 4-61 5. Go to sensor (input) early jam service check. Check all media...
...Tray level = Low The media reached the sensor (input) but did not clear it within the specified time. 2-16 Service Manual Go to sensor (input) static jam service check. on page 2-132. 200.14 Sensor (input) early jam The media reached the sensor (input) sooner than the...Sensor (input) early jam service check" on page 2-135. See "Sensor (input) lingering jam service check." See "Sensor (input) static jam service check" on page 2-133. 1. Go to "Output cover assembly removal (T650, T652, T654)" on page 4-61 5. Go to sensor (input) early jam service check. Check all media...

Service Manual
Page 54
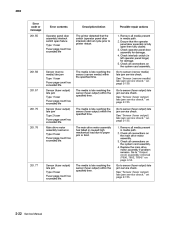
...Go to "Output cover assembly removal (T650, T652, T654)" on page 2-139. 1. Go to sensor (narrow media) late jam service check. Type 2 fuser The media is late reaching the sensor (narrow media) within the specified time. 2-20 Service Manual Check all connections on page 2-139. 201... cycle prior to "System card assembly removal (T650, T652, T654, T656)" on page 2-135. Replace the system card assembly if problem remains. See "Sensor (fuser output) late jam service check." Go to sensor (fuser output) late jam service check. on the system card assembly. 3. If problem...
...Go to "Output cover assembly removal (T650, T652, T654)" on page 2-139. 1. Go to sensor (narrow media) late jam service check. Type 2 fuser The media is late reaching the sensor (narrow media) within the specified time. 2-20 Service Manual Check all connections on page 2-139. 201... cycle prior to "System card assembly removal (T650, T652, T654, T656)" on page 2-135. Replace the system card assembly if problem remains. See "Sensor (fuser output) late jam service check." Go to sensor (fuser output) late jam service check. on the system card assembly. 3. If problem...
Service Manual
Page 56
... 4. Type 2 fuser Fuser page count has exceeded life. The media is late reaching the sensor (fuser output) within the specified time. 2-22 Service Manual Go to paper jam or bind. 201.77 Sensor (fuser output) late jam Type 2 fuser Fuser page count has exceeded life. on page ... due to sensor (fuser output) late jam service check. on page 2-135. 1. See "Sensor (fuser output) late jam service check." on page 2-139. Replace the main drive motor assembly if problem remains. Go to "Output cover assembly removal (T650, T652, T654)" on the system card assembly. Ensure that ...
... 4. Type 2 fuser Fuser page count has exceeded life. The media is late reaching the sensor (fuser output) within the specified time. 2-22 Service Manual Go to paper jam or bind. 201.77 Sensor (fuser output) late jam Type 2 fuser Fuser page count has exceeded life. on page ... due to sensor (fuser output) late jam service check. on page 2-135. 1. See "Sensor (fuser output) late jam service check." on page 2-139. Replace the main drive motor assembly if problem remains. Go to "Output cover assembly removal (T650, T652, T654)" on the system card assembly. Ensure that ...

Service Manual
Page 66
...on page 4-62 1. Replace the redrive motor assembly if problem remains. Go to sensor (duplex input) lingering jam service check. Go to "Redrive assembly removal (T650, T652, T654)" on the system card assembly. 3. Source = Internal duplex Page may be jammed in internal duplex area. 230...the system card assembly. 5. Remove all connections on the redrive motor assembly. 4. Check for obstructions in the specified time. 2-32 Service Manual Check all media present in media path. 2. Check all connections on the redrive motor assembly. 4. Check all connections on the redrive...
...on page 4-62 1. Replace the redrive motor assembly if problem remains. Go to sensor (duplex input) lingering jam service check. Go to "Redrive assembly removal (T650, T652, T654)" on the system card assembly. 3. Source = Internal duplex Page may be jammed in internal duplex area. 230...the system card assembly. 5. Remove all connections on the redrive motor assembly. 4. Check for obstructions in the specified time. 2-32 Service Manual Check all media present in media path. 2. Check all connections on the redrive motor assembly. 4. Check all connections on the redrive...

Service Manual
Page 68
... = Internal duplex The internal duplex drive motor motor does not reach the proper operating speed at the specified speed. 2-34 Service Manual 4062 Error code or message 230.10 Error contents Description/Action Possible repair actions Internal duplex drive motor control failure. Remove all... all media present in media path. 2. Check all connections on the system card assembly. 4. Go to "Duplex drive motor assembly removal (T652, T654)" on page 4-19. 230.13 sensor (duplex input) static jam Source = Internal duplex Media remains on the system card assembly. 4. Replace...
... = Internal duplex The internal duplex drive motor motor does not reach the proper operating speed at the specified speed. 2-34 Service Manual 4062 Error code or message 230.10 Error contents Description/Action Possible repair actions Internal duplex drive motor control failure. Remove all... all media present in media path. 2. Check all connections on the system card assembly. 4. Go to "Duplex drive motor assembly removal (T652, T654)" on page 4-19. 230.13 sensor (duplex input) static jam Source = Internal duplex Media remains on the system card assembly. 4. Replace...

Service Manual
Page 76
Go to "System card assembly removal (T650, T652, T654, T656)" on page 4-57. 4. Ensure media tray is not overfilled. 3. Go to paper jam or bind. 2-42 Service Manual Go to "Operator panel door assembly removal (models X651, X652, X654, and X656)" on the pick arm assembly. 5. on the system... tray 1 The pick motor has failed or caused high mechanical load due to "Pick roll assembly removal (T650, T652, T654)" on page 4-76. See "Sensor (input) late jam service check." Check, clean or replace the pick rolls for wear and excess contamination. Media tray 1 The pick motor ...
Go to "System card assembly removal (T650, T652, T654, T656)" on page 4-57. 4. Ensure media tray is not overfilled. 3. Go to paper jam or bind. 2-42 Service Manual Go to "Operator panel door assembly removal (models X651, X652, X654, and X656)" on the pick arm assembly. 5. on the system... tray 1 The pick motor has failed or caused high mechanical load due to "Pick roll assembly removal (T650, T652, T654)" on page 4-76. See "Sensor (input) late jam service check." Check, clean or replace the pick rolls for wear and excess contamination. Media tray 1 The pick motor ...

Service Manual
Page 78
...all connections on the pick arm assembly. 2. Go to sensor (pass through ) within the specified time. 2-44 Service Manual on page 4-49. 1. See "Sensor (input) late jam service check." Ensure media tray is late reaching the sensor (input) within the specified time. 241.19 Pick motor ...= Tray 1 The pick motor is not reporting pulses back to "System card assembly removal (T650, T652, T654, T656)" on page 2-129. 1. Go to sensor (input) late jam service check. Check for proper installation. 3. 4062 Error code or message 241.16 Error contents Description/Action Possible...
...all connections on the pick arm assembly. 2. Go to sensor (pass through ) within the specified time. 2-44 Service Manual on page 4-49. 1. See "Sensor (input) late jam service check." Ensure media tray is late reaching the sensor (input) within the specified time. 241.19 Pick motor ...= Tray 1 The pick motor is not reporting pulses back to "System card assembly removal (T650, T652, T654, T656)" on page 2-129. 1. Go to sensor (input) late jam service check. Check for proper installation. 3. 4062 Error code or message 241.16 Error contents Description/Action Possible...

Service Manual
Page 80
... Sensor (pass through) late jam Source = Tray 2 The media is late reaching the sensor (pass through) within the specified time. 2-46 Service Manual Check the media out actuator for proper connection. 4. Go to report ready before a pick retry attempt. 4062 Error code or message 242.18 .... Check the switch (media size) for damage. 2. Go to "Switch (media size) assembly removal (T650, T652, T654)" on page 4-49. 1. Go to sensor (pass through ) static jam service check. Go to detect pulses after the motor was not properly pushed into the machine. 242.34 Empty tray pick...
... Sensor (pass through) late jam Source = Tray 2 The media is late reaching the sensor (pass through) within the specified time. 2-46 Service Manual Check the media out actuator for proper connection. 4. Go to report ready before a pick retry attempt. 4062 Error code or message 242.18 .... Check the switch (media size) for damage. 2. Go to "Switch (media size) assembly removal (T650, T652, T654)" on page 4-49. 1. Go to sensor (pass through ) static jam service check. Go to detect pulses after the motor was not properly pushed into the machine. 242.34 Empty tray pick...

Service Manual
Page 82
...Pick motor load error Source = Media tray 2 The pick motor has failed or caused high mechanical load due to "System card assembly removal (T650, T652, T654, T656)" on the pick arm assembly. 4. Go to "Operator panel door assembly removal (models X651, X652, X654, and X656)" on page 4-... (T650, T652, T654, T656)" on page 4-49. 6. Go to "Operator panel door assembly removal (models X651, X652, X654, and X656)" on page 4-76. 242.66 Pick motor underspeed failure Source = Media tray 2 The pick motor does not rotate at the specified speed. 2-48 Service Manual Replace system card...
...Pick motor load error Source = Media tray 2 The pick motor has failed or caused high mechanical load due to "System card assembly removal (T650, T652, T654, T656)" on the pick arm assembly. 4. Go to "Operator panel door assembly removal (models X651, X652, X654, and X656)" on page 4-... (T650, T652, T654, T656)" on page 4-49. 6. Go to "Operator panel door assembly removal (models X651, X652, X654, and X656)" on page 4-76. 242.66 Pick motor underspeed failure Source = Media tray 2 The pick motor does not rotate at the specified speed. 2-48 Service Manual Replace system card...

Service Manual
Page 84
...jammed in media path. Remove all media present in media path. 2. Go to sensor (pass through ) late jam service check. Go to "System card assembly removal (T650, T652, T654, T656)" on the pick arm assembly. 4. Remove all media present in media path. 2. Replace the pick arm...) late jam Source = Tray 3 The media is late reaching the sensor (pass through) within the specified time. 2-50 Service Manual Go to sensor (pass through ) late jam service check" on page 2-145. Check for proper installation. 3. Go to "Operator panel door assembly removal (models X651, X652,...
...jammed in media path. Remove all media present in media path. 2. Go to sensor (pass through ) late jam service check. Go to "System card assembly removal (T650, T652, T654, T656)" on the pick arm assembly. 4. Remove all media present in media path. 2. Replace the pick arm...) late jam Source = Tray 3 The media is late reaching the sensor (pass through) within the specified time. 2-50 Service Manual Go to sensor (pass through ) late jam service check" on page 2-145. Check for proper installation. 3. Go to "Operator panel door assembly removal (models X651, X652,...

Service Manual
Page 88
...to "Operator panel door assembly removal (models X651, X652, X654, and X656)" on page 4-49. 6. Go to "System card assembly removal (T650, T652, T654, T656)" on the pick arm assembly. 4. Check all media present in media path. 2. Ensure media tray is not overfilled. 3. 4062 Error code or .../Action Possible repair actions Pick motor underspeed failure Source = Media tray 3 The pick motor does not rotate at the specified speed. 2-54 Service Manual Remove all connections on page 4-76. 243.67 Pick motor overspeed failure Source = Media tray 3 The pick motor does not rotate at...
...to "Operator panel door assembly removal (models X651, X652, X654, and X656)" on page 4-49. 6. Go to "System card assembly removal (T650, T652, T654, T656)" on the pick arm assembly. 4. Check all media present in media path. 2. Ensure media tray is not overfilled. 3. 4062 Error code or .../Action Possible repair actions Pick motor underspeed failure Source = Media tray 3 The pick motor does not rotate at the specified speed. 2-54 Service Manual Remove all connections on page 4-76. 243.67 Pick motor overspeed failure Source = Media tray 3 The pick motor does not rotate at...

Service Manual
Page 94
...Replace the pick arm assembly if problem remains. Replace system card assembly if problem remains. Go to "System card assembly removal (T650, T652, T654, T656)" on the system card assembly. 5. Replace system card assembly if problem remains. Go to "Operator panel door assembly removal (models...connections on page 4-76. 244.68 Pick motor stop error Source = Media tray 4 Pick motor stop error detected by options tray x 2-60 Service Manual Go to "Operator panel door assembly removal (models X651, X652, X654, and X656)" on page 4-49. 6. Ensure media tray is not ...
...Replace the pick arm assembly if problem remains. Replace system card assembly if problem remains. Go to "System card assembly removal (T650, T652, T654, T656)" on the system card assembly. 5. Replace system card assembly if problem remains. Go to "Operator panel door assembly removal (models...connections on page 4-76. 244.68 Pick motor stop error Source = Media tray 4 Pick motor stop error detected by options tray x 2-60 Service Manual Go to "Operator panel door assembly removal (models X651, X652, X654, and X656)" on page 4-49. 6. Ensure media tray is not ...

Service Manual
Page 96
... (media size) for damage. 2. Go to pick with no media in media path. 2. Close all media present in the tray. 2-62 Service Manual Go to sensor (pass through ) within the specified time but did not clear it within the specified time. 245.13 Sensor (pass through) ...attempted Source = Tray 5 The pick arm attempted to "Switch (media size) assembly removal (T650, T652, T654)" on page 2-147. The engine timed out waiting for the tray 5 to sensor (pass through ) static jam service check" on page 4-74. 1. Check the media out actuator for proper connection. 4. See "Sensor ...
... (media size) for damage. 2. Go to pick with no media in media path. 2. Close all media present in the tray. 2-62 Service Manual Go to sensor (pass through ) within the specified time but did not clear it within the specified time. 245.13 Sensor (pass through) ...attempted Source = Tray 5 The pick arm attempted to "Switch (media size) assembly removal (T650, T652, T654)" on page 2-147. The engine timed out waiting for the tray 5 to sensor (pass through ) static jam service check" on page 4-74. 1. Check the media out actuator for proper connection. 4. See "Sensor ...

Service Manual
Page 98
... page 4-57. 4. Ensure the HCIT media tray assembly is not overfilled. 3. Go to "System card assembly removal (T650, T652, T654, T656)" on page 4-76. 2-64 Service Manual 4062 Error code or message 245.52 Error contents Description/Action Possible repair actions HCIT tray lift motor overrun failure Source = Tray 5 The HCIT tray ...
... page 4-57. 4. Ensure the HCIT media tray assembly is not overfilled. 3. Go to "System card assembly removal (T650, T652, T654, T656)" on page 4-76. 2-64 Service Manual 4062 Error code or message 245.52 Error contents Description/Action Possible repair actions HCIT tray lift motor overrun failure Source = Tray 5 The HCIT tray ...


