User's Guide (2 MB)
Page 11
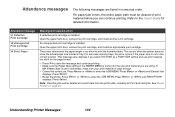
... and possible intervention conditions. The Toner Low message warns you must resolve. • Service messages indicate printer failures that the print cartridge is an example of the operator panel. Printer messages Status messages Busy Toner Low PCL The operator panel displays three types of messages: NOTE: Refer to the Administrator's Guide for the...
... and possible intervention conditions. The Toner Low message warns you must resolve. • Service messages indicate printer failures that the print cartridge is an example of the operator panel. Printer messages Status messages Busy Toner Low PCL The operator panel displays three types of messages: NOTE: Refer to the Administrator's Guide for the...

User's Guide (2 MB)
Page 12
Service messages 917 Service Transfer Roll A service message indicates a printer failure that may require a service call. Using the Operator Panel and Menus 12 Attendance messages 201 Paper Jam Remove Cartridge Attendance messages help you solve printer problems. For example, if print material is jammed in the printer, the message 201 Paper Jam displays.
Service messages 917 Service Transfer Roll A service message indicates a printer failure that may require a service call. Using the Operator Panel and Menus 12 Attendance messages 201 Paper Jam Remove Cartridge Attendance messages help you solve printer problems. For example, if print material is jammed in the printer, the message 201 Paper Jam displays.

User's Guide (2 MB)
Page 35
... information about these settings). • Do not load labels together with laser printers. combining print materials can cause feeding problems. • Do not load partial sheets with adhesive, and could void your cartridge with areas exposed by missing labels; Label guidelines The printer can print on many labels designed for use with paper or...
... information about these settings). • Do not load labels together with laser printers. combining print materials can cause feeding problems. • Do not load partial sheets with adhesive, and could void your cartridge with areas exposed by missing labels; Label guidelines The printer can print on many labels designed for use with paper or...
User's Guide (2 MB)
Page 36
Choosing Print Materials 36 For detailed information on label printing, characteristics, and design, refer to maintain printer feeding reliability: 1 Print 5 sheets of paper. 2 Wait approximately 5 seconds. 3 Print 5 more sheets of labels (or each time you replace the print cartridge), complete the following steps to the Card Stock & Label Guide, available on the Drivers, MarkVision and Utilities CD or the Lexmark Web site, at www.lexmark.com. After continuously printing approximately 10,000 page sides of paper.
Choosing Print Materials 36 For detailed information on label printing, characteristics, and design, refer to maintain printer feeding reliability: 1 Print 5 sheets of paper. 2 Wait approximately 5 seconds. 3 Print 5 more sheets of labels (or each time you replace the print cartridge), complete the following steps to the Card Stock & Label Guide, available on the Drivers, MarkVision and Utilities CD or the Lexmark Web site, at www.lexmark.com. After continuously printing approximately 10,000 page sides of paper.

User's Guide (2 MB)
Page 38
For more sheets of paper. 2 Wait approximately 5 seconds. 3 Print 5 more information, refer to maintain printer feeding reliability: 1 Print 5 sheets of paper. After printing approximately 10,000 page sides of card stock (or each time you replace the print cartridge), complete the following steps to the Card Stock & Label Guide, available on the Drivers, MarkVision and Utilities CD or the Lexmark Web site, at www.lexmark.com. Choosing Print Materials 38
For more sheets of paper. 2 Wait approximately 5 seconds. 3 Print 5 more information, refer to maintain printer feeding reliability: 1 Print 5 sheets of paper. After printing approximately 10,000 page sides of card stock (or each time you replace the print cartridge), complete the following steps to the Card Stock & Label Guide, available on the Drivers, MarkVision and Utilities CD or the Lexmark Web site, at www.lexmark.com. Choosing Print Materials 38
User's Guide (2 MB)
Page 72
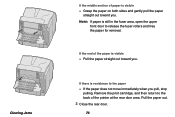
... the paper path. 1 Open the upper and lower front doors of the printer is farther back in the printer, so you . Lay it straight out toward you need to reach in the area under the print cartridge. With a 201 attendance message, the jam is hot. Clearing Jams 72 NOTE: Do not leave ...the print cartridge exposed to grasp the paper. CAUTION: The rear portion of the inside of the printer. 2 While grasping the print cartridge by the hand grip, pull the print cartridge up toward the upper front door, and then pull it aside. NOTE...
... the paper path. 1 Open the upper and lower front doors of the printer is farther back in the printer, so you . Lay it straight out toward you need to reach in the area under the print cartridge. With a 201 attendance message, the jam is hot. Clearing Jams 72 NOTE: Do not leave ...the print cartridge exposed to grasp the paper. CAUTION: The rear portion of the inside of the printer. 2 While grasping the print cartridge by the hand grip, pull the print cartridge up toward the upper front door, and then pull it aside. NOTE...
User's Guide (2 MB)
Page 76
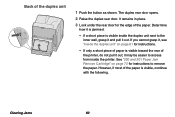
... straight out toward you. Pull the paper out. 3 Close the rear door. 76 If there is visible - Clearing Jams If the middle section of the printer at the rear door area. If the end of the paper is still in the fuser area, open the upper front door to the back... of paper is resistance to the paper - Remove the print cartridge, and then return to release the fuser rollers and free the paper for removal. If the paper does not move immediately when you . NOTE: If...
... straight out toward you. Pull the paper out. 3 Close the rear door. 76 If there is visible - Clearing Jams If the middle section of the printer at the rear door area. If the end of the paper is still in the fuser area, open the upper front door to the back... of paper is resistance to the paper - Remove the print cartridge, and then return to release the fuser rollers and free the paper for removal. If the paper does not move immediately when you . NOTE: If...
User's Guide (2 MB)
Page 82
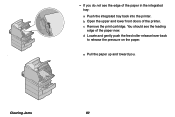
... piece is visible, continue with the following. If only a short piece of paper is visible toward the rear of the paper is visible inside the printer. it may be easier to access from inside the duplex unit next to remove the paper. Clearing Jams 82 It remains in place. 3 Look under... the rear door for instructions. - See "200 and 201 Paper Jam Remove Cartridge" on page 81 for the edge of the duplex unit 1 Push the button as shown. Back of the paper. However, if most of the...
... piece is visible, continue with the following. If only a short piece of paper is visible toward the rear of the paper is visible inside the printer. it may be easier to access from inside the duplex unit next to remove the paper. Clearing Jams 82 It remains in place. 3 Look under... the rear door for instructions. - See "200 and 201 Paper Jam Remove Cartridge" on page 81 for the edge of the duplex unit 1 Push the button as shown. Back of the paper. However, if most of the...
User's Guide (2 MB)
Page 92
- b Open the upper and lower front doors of the paper now. If you . You should see the edge of the paper in the integrated tray: a Push the integrated tray back into the printer. e Pull the paper up and toward you do not see the leading edge of the printer. d Locate and gently push the feed roller release lever back to release the pressure on the paper. . c Remove the print cartridge. Clearing Jams 92
- b Open the upper and lower front doors of the paper now. If you . You should see the edge of the paper in the integrated tray: a Push the integrated tray back into the printer. e Pull the paper up and toward you do not see the leading edge of the printer. d Locate and gently push the feed roller release lever back to release the pressure on the paper. . c Remove the print cartridge. Clearing Jams 92

User's Guide (2 MB)
Page 93
f Reinstall the print cartridge: Align the slides on the print cartridge with the slots on the print cartridge cradle and use the colored arrows inside the printer for placement. Guide the print car- Clearing Jams 93 tridge down as it drops and snaps into the printer. g Close the upper and lower front doors of the printer. h Slide the paper tray all the way into place. .
f Reinstall the print cartridge: Align the slides on the print cartridge with the slots on the print cartridge cradle and use the colored arrows inside the printer for placement. Guide the print car- Clearing Jams 93 tridge down as it drops and snaps into the printer. g Close the upper and lower front doors of the printer. h Slide the paper tray all the way into place. .

User's Guide (2 MB)
Page 99
... and lower it to get the envelope out. See page page 93 for instructions on reinstalling the print cartridge. 8 Align the tabs on the envelope feeder with the slots on both sides of the printer and gently push the envelope feeder into the opening until it aside. 7 Pull the envelope straight out... toward you. NOTE: You may have to remove the print cartridge to the stack. 99 . Set it snaps into place. 9 Close the...
... and lower it to get the envelope out. See page page 93 for instructions on reinstalling the print cartridge. 8 Align the tabs on the envelope feeder with the slots on both sides of the printer and gently push the envelope feeder into the opening until it aside. 7 Pull the envelope straight out... toward you. NOTE: You may have to remove the print cartridge to the stack. 99 . Set it snaps into place. 9 Close the...
Administrator's Guide (1.4 MB)
Page 103
...only displays when Configure Bins is empty. To utilize the remaining toner, remove the print cartridge, shake it gently, and reinstall it in the print cartridge is low, the printer displays the message for the multipurpose feeder or the envelope feeder. You can repeat this ...process until you replace the print cartridge. Paper tray x, where x represents tray number 1 through 5, has a low supply of toner in the printer. Paper tray x, where x represents tray number 1 through 5, is set to Link Optional. The printer is locked onto parallel interface port x, where ...
...only displays when Configure Bins is empty. To utilize the remaining toner, remove the print cartridge, shake it gently, and reinstall it in the print cartridge is low, the printer displays the message for the multipurpose feeder or the envelope feeder. You can repeat this ...process until you replace the print cartridge. Paper tray x, where x represents tray number 1 through 5, has a low supply of toner in the printer. Paper tray x, where x represents tray number 1 through 5, is set to Link Optional. The printer is locked onto parallel interface port x, where ...
Administrator's Guide (1.4 MB)
Page 104
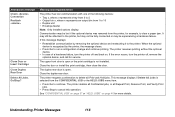
...before you are listed in the PAPER MENU is too short to Universal, make sure your print material is installed. An unsupported print cartridge is large enough. • Cancel the current job. Refer to clear the message and continue printing. • Make sure the ...printing. This occurs when the printer does not know the actual paper size loaded in the correct position. Attendance message 31 Defective Print Cartridge 32 Unsupported Print Cartridge 34 Short Paper Meaning and required action A defective print cartridge is not in tray. The printer determines the paper length is...
...before you are listed in the PAPER MENU is too short to Universal, make sure your print material is installed. An unsupported print cartridge is large enough. • Cancel the current job. Refer to clear the message and continue printing. • Make sure the ...printing. This occurs when the printer does not know the actual paper size loaded in the correct position. Attendance message 31 Defective Print Cartridge 32 Unsupported Print Cartridge 34 Short Paper Meaning and required action A defective print cartridge is not in tray. The printer determines the paper length is...
Administrator's Guide (1.4 MB)
Page 113
... the duplex front access cover. A new copy of the page prints if Jam Recovery is set to On or Auto. Reinstall the print cartridge and close the printer rear door. A new copy of the page prints if Jam Recovery is set to On or Auto. However, the Auto setting does not... Paper Jam Open Rear Door 230 Paper Jam Check Duplex 24x Paper Jam Check Tray x Meaning and required action The printer detects a paper jam under the print cartridge and further back in tray x, where x represents a tray from 1 to 5. Press Go to clear the message and continue printing. However, the Auto ...
... the duplex front access cover. A new copy of the page prints if Jam Recovery is set to On or Auto. Reinstall the print cartridge and close the printer rear door. A new copy of the page prints if Jam Recovery is set to On or Auto. However, the Auto setting does not... Paper Jam Open Rear Door 230 Paper Jam Check Duplex 24x Paper Jam Check Tray x Meaning and required action The printer detects a paper jam under the print cartridge and further back in tray x, where x represents a tray from 1 to 5. Press Go to clear the message and continue printing. However, the Auto ...
Administrator's Guide (1.4 MB)
Page 114
...option 1 to clear the message and continue printing. Reinstall the cartridge, if it out gently. Refer to the User's Guide for more details. The printer detects a paper jam in output option x, where x is visible from the front of the printer and set to On or Auto. Refer to the User's... to remove, you may require service. A new copy of the problem. These service messages indicate printer failures that may have to remove the print cartridge to On or Auto. Turn the printer off, wait for service and report the message number and description of the page prints if Jam Recovery...
...option 1 to clear the message and continue printing. Reinstall the cartridge, if it out gently. Refer to the User's Guide for more details. The printer detects a paper jam in output option x, where x is visible from the front of the printer and set to On or Auto. Refer to the User's... to remove, you may require service. A new copy of the problem. These service messages indicate printer failures that may have to remove the print cartridge to On or Auto. Turn the printer off, wait for service and report the message number and description of the page prints if Jam Recovery...
Administrator's Guide (1.4 MB)
Page 116
...Confidential jobs, or all Print and Hold jobs. Attendance message Check Connection Reattach Close Door or Insert Cartridge Close Duplex Rear Door Delete All Jobs. If the error recurs, turn the printer off , remove the optional device, and call for service. Close the duplex rear door. When... the optional device is open or the print cartridge is selected from the printer, for more details. Meaning and required action The printer has lost if the optional device was removed from the CONFIDENTIAL JOB or the HELD JOBS menu item...
...Confidential jobs, or all Print and Hold jobs. Attendance message Check Connection Reattach Close Door or Insert Cartridge Close Duplex Rear Door Delete All Jobs. If the error recurs, turn the printer off , remove the optional device, and call for service. Close the duplex rear door. When... the optional device is open or the print cartridge is selected from the printer, for more details. Meaning and required action The printer has lost if the optional device was removed from the CONFIDENTIAL JOB or the HELD JOBS menu item...
Administrator's Guide (1.4 MB)
Page 122
.... For your country. Maintaining Your Printer 122 Even though your printer is time to replace printer maintenance items. NOTE: If you need to replace routine printer maintenance items such as the print cartridge, fuser assembly, charge roll, and transfer roll. All users sharing the printer should be done at : http://www.lexmark.com/support/index.html. "Replacing...
.... For your country. Maintaining Your Printer 122 Even though your printer is time to replace printer maintenance items. NOTE: If you need to replace routine printer maintenance items such as the print cartridge, fuser assembly, charge roll, and transfer roll. All users sharing the printer should be done at : http://www.lexmark.com/support/index.html. "Replacing...
Administrator's Guide (1.4 MB)
Page 123
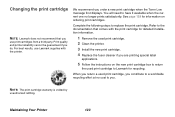
... is voided by unauthorized refilling. Maintaining Your Printer 123 Changing the print cartridge NOTE: Lexmark does not recommend that comes with the printer. See page 128 for information on the new print cartridge box to return the used print cartridge to Lexmark for detailed installation information. 1 Remove the used print cartridge, you . Refer to a worldwide recycling effort at...
... is voided by unauthorized refilling. Maintaining Your Printer 123 Changing the print cartridge NOTE: Lexmark does not recommend that comes with the printer. See page 128 for information on the new print cartridge box to return the used print cartridge to Lexmark for detailed installation information. 1 Remove the used print cartridge, you . Refer to a worldwide recycling effort at...
Administrator's Guide (1.4 MB)
Page 124
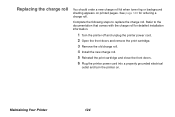
...toner fog or background shading appears on . See page 129 for detailed installation information. 1 Turn the printer off and unplug the printer power cord. 2 Open the front doors and remove the print cartridge. 3 Remove the old charge roll. 4 Install the new charge roll. 5 Reinstall the print... cartridge and close the front doors. 6 Plug the printer power cord into a properly grounded electrical outlet and turn the printer on printed pages. Maintaining Your Printer 124 Complete the following steps to the documentation that comes with ...
...toner fog or background shading appears on . See page 129 for detailed installation information. 1 Turn the printer off and unplug the printer power cord. 2 Open the front doors and remove the print cartridge. 3 Remove the old charge roll. 4 Install the new charge roll. 5 Reinstall the print... cartridge and close the front doors. 6 Plug the printer power cord into a properly grounded electrical outlet and turn the printer on printed pages. Maintaining Your Printer 124 Complete the following steps to the documentation that comes with ...
Administrator's Guide (1.4 MB)
Page 125
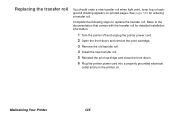
... transfer roll for ordering a transfer roll. See page 129 for detailed installation information. 1 Turn the printer off and unplug the printer power cord. 2 Open the front doors and remove the print cartridge. 3 Remove the old transfer roll. 4 Install the new transfer roll. 5 Reinstall the print... cartridge and close the front doors. 6 Plug the printer power cord into a properly grounded electrical outlet and turn the printer on printed pages. Refer to replace the transfer roll. Replacing the transfer roll You...
... transfer roll for ordering a transfer roll. See page 129 for detailed installation information. 1 Turn the printer off and unplug the printer power cord. 2 Open the front doors and remove the print cartridge. 3 Remove the old transfer roll. 4 Install the new transfer roll. 5 Reinstall the print... cartridge and close the front doors. 6 Plug the printer power cord into a properly grounded electrical outlet and turn the printer on printed pages. Refer to replace the transfer roll. Replacing the transfer roll You...


