User's Guide (2 MB)
Page 5
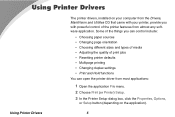
... print jobs • Resetting printer defaults • Multipage printing • Changing duplex settings • Print and Hold functions You can open the printer driver from most applications: 1 Open the application File menu. 2 Choose Print (or Printer) Setup. 3 In the Printer Setup dialog box, click the Properties, Options, or Setup button (depending on your computer from the Drivers, MarkVision and Utilities CD that came with your printer, provide you with powerful control of the printer features from almost any software application. Using Printer Drivers Using Printer Drivers...
... print jobs • Resetting printer defaults • Multipage printing • Changing duplex settings • Print and Hold functions You can open the printer driver from most applications: 1 Open the application File menu. 2 Choose Print (or Printer) Setup. 3 In the Printer Setup dialog box, click the Properties, Options, or Setup button (depending on your computer from the Drivers, MarkVision and Utilities CD that came with your printer, provide you with powerful control of the printer features from almost any software application. Using Printer Drivers Using Printer Drivers...
User's Guide (2 MB)
Page 19
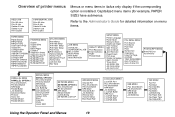
...Bins Overflow Bin ASSIGN TYPE/BIN Substitute Size Configure MP Envelope Enhance PAPER TEXTURE PAPER WEIGHT PAPER LOADING FINISHING MENU Duplex Duplex Bind Copies Blank Pages Collation Separator Sheets Separator Source Multipage Print Multipage Order Multipage View Multipage Border UTILITIES MENU Print Menus Print Net Setup Print Net1 Setup Print Net2 Setup Print Fonts Print Directory Factory Defaults Format Flash Defragment Flash Format Disk Job Acct Stat Hex Trace JOB MENU Cancel Job CONFIDENTIAL JOB HELD JOBS Reset Printer Print Buffer Reset Active Bin QUALITY MENU Print Resolution Toner...
...Bins Overflow Bin ASSIGN TYPE/BIN Substitute Size Configure MP Envelope Enhance PAPER TEXTURE PAPER WEIGHT PAPER LOADING FINISHING MENU Duplex Duplex Bind Copies Blank Pages Collation Separator Sheets Separator Source Multipage Print Multipage Order Multipage View Multipage Border UTILITIES MENU Print Menus Print Net Setup Print Net1 Setup Print Net2 Setup Print Fonts Print Directory Factory Defaults Format Flash Defragment Flash Format Disk Job Acct Stat Hex Trace JOB MENU Cancel Job CONFIDENTIAL JOB HELD JOBS Reset Printer Print Buffer Reset Active Bin QUALITY MENU Print Resolution Toner...

User's Guide (2 MB)
Page 35
...-size sheets. this can cause labels to the Administrator's Guide for laser printers. A special fuser cleaner should be used for label applications to the Administrator's Guide for information on labels: • Be sure to select Labels in the PAPER TYPE menu in the PAPER MENU (refer to peel off during printing, resulting in a paper jam and contamination of the most difficult print materials for detailed information about these settings). • Do not load labels...
...-size sheets. this can cause labels to the Administrator's Guide for laser printers. A special fuser cleaner should be used for label applications to the Administrator's Guide for information on labels: • Be sure to select Labels in the PAPER TYPE menu in the PAPER MENU (refer to peel off during printing, resulting in a paper jam and contamination of the most difficult print materials for detailed information about these settings). • Do not load labels...

User's Guide (2 MB)
Page 99
... remove the print cartridge to the stack. 99 See page page 93 for instructions on reinstalling the print cartridge. 8 Align the tabs on the envelope feeder with the slots on both sides of the printer and gently push the envelope feeder into the opening until it snaps into place. 9 Close the upper front door of the printer. 10 Replace the stack of the printer. . Set it to get the envelope out. Clearing Jams 5 Open...
... remove the print cartridge to the stack. 99 See page page 93 for instructions on reinstalling the print cartridge. 8 Align the tabs on the envelope feeder with the slots on both sides of the printer and gently push the envelope feeder into the opening until it snaps into place. 9 Close the upper front door of the printer. 10 Replace the stack of the printer. . Set it to get the envelope out. Clearing Jams 5 Open...
Administrator's Guide (1.4 MB)
Page 13
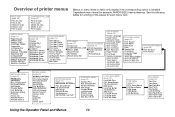
... Size Configure MP Envelope Enhance PAPER TEXTURE PAPER WEIGHT PAPER LOADING FINISHING MENU (page 26) Duplex Duplex Bind Copies Blank Pages Collation Separator Sheets Separator Source Multipage Print Multipage Order Multipage View Multipage Border UTILITIES MENU (page 33) Print Menus Print Net Setup Print Net1 Setup Print Net2 Setup Print Fonts Print Directory Factory Defaults Format Flash Defragment Flash Format Disk Job Acct Stat Hex Trace JOB MENU (page 37) Cancel Job CONFIDENTIAL JOB HELD JOBS Reset Printer Print Buffer Reset Active Bin QUALITY MENU (page 44) Print Resolution Toner...
... Size Configure MP Envelope Enhance PAPER TEXTURE PAPER WEIGHT PAPER LOADING FINISHING MENU (page 26) Duplex Duplex Bind Copies Blank Pages Collation Separator Sheets Separator Source Multipage Print Multipage Order Multipage View Multipage Border UTILITIES MENU (page 33) Print Menus Print Net Setup Print Net1 Setup Print Net2 Setup Print Fonts Print Directory Factory Defaults Format Flash Defragment Flash Format Disk Job Acct Stat Hex Trace JOB MENU (page 37) Cancel Job CONFIDENTIAL JOB HELD JOBS Reset Printer Print Buffer Reset Active Bin QUALITY MENU (page 44) Print Resolution Toner...
Administrator's Guide (1.4 MB)
Page 18
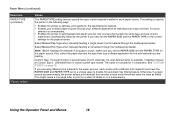
.... Use MarkVision to print on a sheet of print material through the multipurpose feeder. If a user-defined name is truncated to 14 characters. Custom Type 1 through the multipurpose feeder. Paper Menu (continued) Menu item PAPER TYPE (continued) *Factory default Values The PAPER TYPE setting lets you specify the type of print material installed in the following ways: • Enables the printer to optimize print quality for the specified print material. • Enables you to select paper sources through your software application...
.... Use MarkVision to print on a sheet of print material through the multipurpose feeder. If a user-defined name is truncated to 14 characters. Custom Type 1 through the multipurpose feeder. Paper Menu (continued) Menu item PAPER TYPE (continued) *Factory default Values The PAPER TYPE setting lets you specify the type of print material installed in the following ways: • Enables the printer to optimize print quality for the specified print material. • Enables you to select paper sources through your software application...
Administrator's Guide (1.4 MB)
Page 21
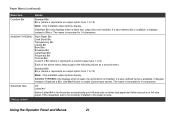
... the paper source. Using the Operator Panel and Menus 21 If a user-defined bin is truncated to 14 characters. Paper Menu (continued) Menu item Overflow Bin ASSIGN TYPE/BIN Substitute Size *Factory default Values Standard Bin Bin x (where x represents an output option from 1 to 10) Note: Only installed output options display. Off Letter/A4* Select Letter/A4 to let the printer automatically print A4-size jobs on letter-size paper and letter-size jobs on A4-size paper, if the requested size is truncated to 10) Note: Only installed output options display...
... the paper source. Using the Operator Panel and Menus 21 If a user-defined bin is truncated to 14 characters. Paper Menu (continued) Menu item Overflow Bin ASSIGN TYPE/BIN Substitute Size *Factory default Values Standard Bin Bin x (where x represents an output option from 1 to 10) Note: Only installed output options display. Off Letter/A4* Select Letter/A4 to let the printer automatically print A4-size jobs on letter-size paper and letter-size jobs on A4-size paper, if the requested size is truncated to 10) Note: Only installed output options display...
Administrator's Guide (1.4 MB)
Page 50
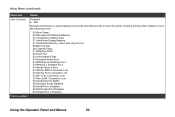
... Page 51 Defective Flash 52 Flash Full 53 Unformatted Flash 54 Standard Serial Error 54 Std Network Software Error 54 Network x Software Error 54 Serial Option x Error 54 Std Par ENA Connection Lost 54 Std Ser Fax Connection Lost 54 Ser x Fax Connection Lost 54 Par x ENA Connection Lost 55 Insufficient Fax Buffer 56 Standard Serial Disabled 56 Serial Port x Disabled 56 Std Parallel Port Disabled 56 Parallel Port x Disabled *Factory default Using the Operator Panel and Menus 50 Setup Menu (continued) Menu item Values Auto Continue Disabled* 5...255 Set Auto...
... Page 51 Defective Flash 52 Flash Full 53 Unformatted Flash 54 Standard Serial Error 54 Std Network Software Error 54 Network x Software Error 54 Serial Option x Error 54 Std Par ENA Connection Lost 54 Std Ser Fax Connection Lost 54 Ser x Fax Connection Lost 54 Par x ENA Connection Lost 55 Insufficient Fax Buffer 56 Standard Serial Disabled 56 Serial Port x Disabled 56 Std Parallel Port Disabled 56 Parallel Port x Disabled *Factory default Using the Operator Panel and Menus 50 Setup Menu (continued) Menu item Values Auto Continue Disabled* 5...255 Set Auto...

Administrator's Guide (1.4 MB)
Page 60
Font Priority Resident* Flash / Disk The Font Priority menu item only displays if a flash memory or disk is installed, formatted and is not defective, Read/Write or Write protected and Job Buffer Size is discarded but no error message prints. If Print PS Error is set to Off and an error occurs, the job is not set to 100%. *Factory default Using the Operator Panel and Menus 60 If an error occurs, the job stops processing, the error message prints, and the...
Font Priority Resident* Flash / Disk The Font Priority menu item only displays if a flash memory or disk is installed, formatted and is not defective, Read/Write or Write protected and Job Buffer Size is discarded but no error message prints. If Print PS Error is set to Off and an error occurs, the job is not set to 100%. *Factory default Using the Operator Panel and Menus 60 If an error occurs, the job stops processing, the error message prints, and the...
Administrator's Guide (1.4 MB)
Page 104
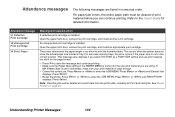
... auto-size sensing trays, this error occurs if the paper stop is installed. Open the upper front door, remove the print cartridge, and install another print cartridge. An unsupported print cartridge is not in the PAPER MENU is large enough. • Cancel the current job. This message also displays if you select Universal as a Paper Size setting and use print material too short for the page format. • Press Go to print the formatted data. If MP Feeder Size is set to the User's Guide for the size print...
... auto-size sensing trays, this error occurs if the paper stop is installed. Open the upper front door, remove the print cartridge, and install another print cartridge. An unsupported print cartridge is not in the PAPER MENU is large enough. • Cancel the current job. This message also displays if you select Universal as a Paper Size setting and use print material too short for the page format. • Press Go to print the formatted data. If MP Feeder Size is set to the User's Guide for the size print...

Administrator's Guide (1.4 MB)
Page 132
Problem Menus Disabled status message displays on the operator panel. Action The operator panel menus are password protected, see "Disabling operator panel menus" on page 12. • Turn the printer off, wait about 10 seconds, and turn on the printer. • Release the buttons when Performing Self Test displays. • CONFIG MENU displays on the second line of the operator panel. • Disable the settings in the printer driver, the printer utilities, or the software application so you can change settings from...
Problem Menus Disabled status message displays on the operator panel. Action The operator panel menus are password protected, see "Disabling operator panel menus" on page 12. • Turn the printer off, wait about 10 seconds, and turn on the printer. • Release the buttons when Performing Self Test displays. • CONFIG MENU displays on the second line of the operator panel. • Disable the settings in the printer driver, the printer utilities, or the software application so you can change settings from...
Administrator's Guide (1.4 MB)
Page 133
..., serial, or USB cable is being used , verify that the current interface settings are set to print. The settings on the printer and on page 9. Make sure Ready displays on page 142. Press Go to return to Ready. Verify that the printer is using the correct printer language. • Verify that the correct printer driver is firmly plugged in the printer. Problem Action Job did not print or incorrect characters printed. Check the printer interface from the SETUP MENU. If...
..., serial, or USB cable is being used , verify that the current interface settings are set to print. The settings on the printer and on page 9. Make sure Ready displays on page 142. Press Go to return to Ready. Verify that the printer is using the correct printer language. • Verify that the correct printer driver is firmly plugged in the printer. Problem Action Job did not print or incorrect characters printed. Check the printer interface from the SETUP MENU. If...

Administrator's Guide (1.4 MB)
Page 135
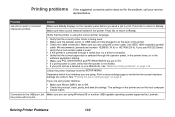
... not load print material that is too light. Toner appears on the back of the printed page. the job to be low. Problem Print is smaller than the page size of Toner is on page 17. • Verify that the correct print material is within the printer specifications. Reinstall the same print cartridge. • Change the Toner Darkness setting in the PAPER MENU. Print quality problems If the suggested corrective action does not fix the problem, call the Lexmark Customer Support Center...
... not load print material that is too light. Toner appears on the back of the printed page. the job to be low. Problem Print is smaller than the page size of Toner is on page 17. • Verify that the correct print material is within the printer specifications. Reinstall the same print cartridge. • Change the Toner Darkness setting in the PAPER MENU. Print quality problems If the suggested corrective action does not fix the problem, call the Lexmark Customer Support Center...

Administrator's Guide (1.4 MB)
Page 139
... PAPER MENU and in the software application. • Make sure the envelopes are using. Envelope feeder: • Make sure the connection between the option and printer. • Print the menu settings page and check to see if the option is listed in the Installed Options list. If the option is not listed, reinstall it enters or exits the duplex unit, the printer and duplex unit may not be properly aligned. • Make sure the duplex front access cover is securely installed. Refer to the User's Guide...
... PAPER MENU and in the software application. • Make sure the envelopes are using. Envelope feeder: • Make sure the connection between the option and printer. • Print the menu settings page and check to see if the option is listed in the Installed Options list. If the option is not listed, reinstall it enters or exits the duplex unit, the printer and duplex unit may not be properly aligned. • Make sure the duplex front access cover is securely installed. Refer to the User's Guide...

Administrator's Guide (1.4 MB)
Page 142
... statement. For Macintosh users: • The printer may need an optional internal print server to the Drivers, MarkVision, and Utilities CD for more details. Action If you are using either a Lexmark internal print server or external print server, verify that the printer is included in CHOOSER. Problem Job did not print or incorrect characters printed. Network printing problems If the suggested corrective action does not fix the problem, call your service representative. Note...
... statement. For Macintosh users: • The printer may need an optional internal print server to the Drivers, MarkVision, and Utilities CD for more details. Action If you are using either a Lexmark internal print server or external print server, verify that the printer is included in CHOOSER. Problem Job did not print or incorrect characters printed. Network printing problems If the suggested corrective action does not fix the problem, call your service representative. Note...

Administrator's Guide (1.4 MB)
Page 143
... a serial port, or you have installed an optional interface card, refer to the Setup to the Technical Reference available on the Drivers, MarkVision and Utilities CD or at the Lexmark Web codes listed? site, http://www.lexmark.com. Solving Printer Problems 143 Where are the printer escape Refer to the printer? Other problems and questions If the suggested corrective action does not fix the problem, call your printer is configured with your printer...
... a serial port, or you have installed an optional interface card, refer to the Setup to the Technical Reference available on the Drivers, MarkVision and Utilities CD or at the Lexmark Web codes listed? site, http://www.lexmark.com. Solving Printer Problems 143 Where are the printer escape Refer to the printer? Other problems and questions If the suggested corrective action does not fix the problem, call your printer is configured with your printer...

Technical Reference
Page 38
... modes and indicates the font group for each font. 2-27 PCL Type 1 Fonts Thirty of the Type 1 fonts have different font selection parameters in the forward and backward compatibility modes and 9 of the fonts work only in the Hewlett-Packard Company's LaserJet 4050. 3 For the symbol sets supported by both the Hewlett-Packard Company's LaserJet 4050 and the Lexmark Optra S family of printers. All Type 1 fonts are supported by a particular font, find the font...
... modes and indicates the font group for each font. 2-27 PCL Type 1 Fonts Thirty of the Type 1 fonts have different font selection parameters in the forward and backward compatibility modes and 9 of the fonts work only in the Hewlett-Packard Company's LaserJet 4050. 3 For the symbol sets supported by both the Hewlett-Packard Company's LaserJet 4050 and the Lexmark Optra S family of printers. All Type 1 fonts are supported by a particular font, find the font...
Technical Reference
Page 98
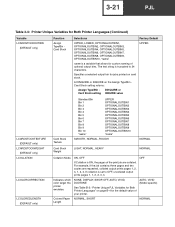
... Card Stock Weight LIGHT, NORMAL, HEAVY NORMAL Collation Mode ON, OFF OFF If Collation is a variable that allows for custom naming of your printer. Specifies a selected output bin for the default value of optional output bins. Indicates which color target the printer emulates NONE, DISPLAY, SWOP, OFF, AUTO, VIVID, DUOTONE See Table B-2: "Printer Unique PJL Variables for Both Printer Languages" on page B-4 for jobs printed on the Assign Type/Bin Card Stock setting returns: Assign Type/Bin...
... Card Stock Weight LIGHT, NORMAL, HEAVY NORMAL Collation Mode ON, OFF OFF If Collation is a variable that allows for custom naming of your printer. Specifies a selected output bin for the default value of optional output bins. Indicates which color target the printer emulates NONE, DISPLAY, SWOP, OFF, AUTO, VIVID, DUOTONE See Table B-2: "Printer Unique PJL Variables for Both Printer Languages" on page B-4 for jobs printed on the Assign Type/Bin Card Stock setting returns: Assign Type/Bin...

Technical Reference
Page 238
... printer user documentation. For example, assume there is 1. Determines if Nup is either null or a number. This is set to print. Nup is a manual source. For some printers, the value of the Feed Timeout menu item value. Indicates the type of copies to True. If the default paper source is not a manual paper source, ManualFeed is initialized at the start of each PostScript emulation job to print multiple page images...
... printer user documentation. For example, assume there is 1. Determines if Nup is either null or a number. This is set to print. Nup is a manual source. For some printers, the value of the Feed Timeout menu item value. Indicates the type of copies to True. If the default paper source is not a manual paper source, ManualFeed is initialized at the start of each PostScript emulation job to print multiple page images...
Technical Reference
Page 384
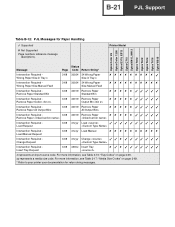
...10008; Not Supported Page numbers reference message descriptions. yy represents a media size code. For more information, see Table 3-17: "Media Size Codes" on page 3-69. Printer Model Message Status Page Code Return String* Intervention Required Wrong Paper Size in Tray x 3-68 30034 34 Wrong Paper Size in Tray x Intervention Required Wrong Paper Size Manual Feed 3-68 30034 34 Wrong Paper Size Manual Feed Intervention Required Remove Paper Standard Bin 3-68 40019 Remove Paper Standard Bin Intervention Required Remove Paper Outbin 3-68 40019 Remove Paper Output Bin...
...10008; Not Supported Page numbers reference message descriptions. yy represents a media size code. For more information, see Table 3-17: "Media Size Codes" on page 3-69. Printer Model Message Status Page Code Return String* Intervention Required Wrong Paper Size in Tray x 3-68 30034 34 Wrong Paper Size in Tray x Intervention Required Wrong Paper Size Manual Feed 3-68 30034 34 Wrong Paper Size Manual Feed Intervention Required Remove Paper Standard Bin 3-68 40019 Remove Paper Standard Bin Intervention Required Remove Paper Outbin 3-68 40019 Remove Paper Output Bin...

