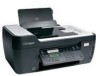
Quick Reference
Page 4
...version 10.6 1 From the Applications folder in a minimum-power standby mode after the printer is left idle for using the "Clean Printhead" and "Deep Clean Printhead" features. The Power Saver feature puts the printer in the Finder, double-click the printer folder. 2 Double-click User's... Comprehensive User's Guide installed automatically with fewer cartridges. • Clean the printhead. These features clean the printhead nozzles to print more than normal and are ideal for reuse or recycling through the Lexmark Cartridge Collection Program. To return an ink cartridge, go to ...
...version 10.6 1 From the Applications folder in a minimum-power standby mode after the printer is left idle for using the "Clean Printhead" and "Deep Clean Printhead" features. The Power Saver feature puts the printer in the Finder, double-click the printer folder. 2 Double-click User's... Comprehensive User's Guide installed automatically with fewer cartridges. • Clean the printhead. These features clean the printhead nozzles to print more than normal and are ideal for reuse or recycling through the Lexmark Cartridge Collection Program. To return an ink cartridge, go to ...

Quick Reference
Page 11
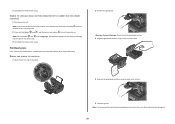
... after removing the protective cap to avoid exposing the ink to install the black cartridge. Aligning the printhead If the characters or lines on the computer screen. If print quality has not improved, then clean the printhead nozzles. 11 4 Remove the ink cartridge from the pack, and then remove the protective cap from...
... after removing the protective cap to avoid exposing the ink to install the black cartridge. Aligning the printhead If the characters or lines on the computer screen. If print quality has not improved, then clean the printhead nozzles. 11 4 Remove the ink cartridge from the pack, and then remove the protective cap from...
Quick Reference
Page 12
... Windows 2000 (SP4 or later) • Macintosh PowerPC OS X version 10.3.9 to 10.6 • Macintosh Intel OS X version 10.4.4 to Clean Printhead or Deep Clean Printhead, and then press . 3 Press . Using the printer control panel 1 From the printer control panel, navigate to: > Maintenance > 2 Press...* The printer driver for this computer before you installed the printer software on this operating system is available only at http://support.lexmark.com. For Macintosh users 1 Close all open software applications. 2 Insert the installation software CD. Using the printer software For ...
... Windows 2000 (SP4 or later) • Macintosh PowerPC OS X version 10.3.9 to 10.6 • Macintosh Intel OS X version 10.4.4 to Clean Printhead or Deep Clean Printhead, and then press . 3 Press . Using the printer control panel 1 From the printer control panel, navigate to: > Maintenance > 2 Press...* The printer driver for this computer before you installed the printer software on this operating system is available only at http://support.lexmark.com. For Macintosh users 1 Close all open software applications. 2 Insert the installation software CD. Using the printer software For ...
Quick Reference
Page 14
...and PDF documents from a memory device to the computer over a network. Network Card Reader (in Mac OS X version 10.6) or Lexmark Network Card Reader (in Mac OS X version 10.5 or earlier) (referred to as Wireless Setup Assistant) Uninstaller Remove the printer software...a test page. • Print an alignment page. • Clean the printhead nozzles. • Order ink or supplies. • Register the printer. • Contact technical support. Use Customer Support Lexmark Software Updates Lexmark Online Order Supplies Online Printer Registration To Contact technical support. Register your...
...and PDF documents from a memory device to the computer over a network. Network Card Reader (in Mac OS X version 10.6) or Lexmark Network Card Reader (in Mac OS X version 10.5 or earlier) (referred to as Wireless Setup Assistant) Uninstaller Remove the printer software...a test page. • Print an alignment page. • Clean the printhead nozzles. • Order ink or supplies. • Register the printer. • Contact technical support. Use Customer Support Lexmark Software Updates Lexmark Online Order Supplies Online Printer Registration To Contact technical support. Register your...
Quick Reference
Page 20
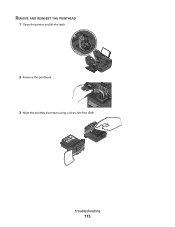
... initial printer setup. 5 Complete the initial printer setup. Warning-Potential Damage: Do not touch the printhead nozzles. 3 Wipe the printhead contacts using a clean, lint-free cloth. 4 Reinsert the printhead, and then close the latch until Language Selection appears on . CHANGE THE LANGUAGE USING A BUTTON..." checklist does not solve the problem, then try the following: REMOVE AND REINSERT THE PRINTHEAD 1 Open the printer and lift the latch. 2 Remove the printhead. Note: If removing and reinserting the printhead does not resolve the error, then contact technical support. 20
... initial printer setup. 5 Complete the initial printer setup. Warning-Potential Damage: Do not touch the printhead nozzles. 3 Wipe the printhead contacts using a clean, lint-free cloth. 4 Reinsert the printhead, and then close the latch until Language Selection appears on . CHANGE THE LANGUAGE USING A BUTTON..." checklist does not solve the problem, then try the following: REMOVE AND REINSERT THE PRINTHEAD 1 Open the printer and lift the latch. 2 Remove the printhead. Note: If removing and reinserting the printhead does not resolve the error, then contact technical support. 20
Quick Reference
Page 22
... SUPPLY 1 Turn off slowly, then the printer is in the print queue and cannot delete them to get other jobs to have connected to Deep Clean Printhead, and then press . The Device Manager opens. 4 Click the plus sign (+) beside Universal Serial Bus controllers. If the cartridges do not seem ...Printer is busy or does not respond If the "Before you have jobs stuck in Power Saver mode. REINSTALL THE INK CARTRIDGES AND DEEP CLEAN AND ALIGN THE PRINTHEAD 1 Reinstall the ink cartridges, see the computer documentation. Note: Do not remove the alignment page until printing is marked with a USB...
... SUPPLY 1 Turn off slowly, then the printer is in the print queue and cannot delete them to get other jobs to have connected to Deep Clean Printhead, and then press . The Device Manager opens. 4 Click the plus sign (+) beside Universal Serial Bus controllers. If the cartridges do not seem ...Printer is busy or does not respond If the "Before you have jobs stuck in Power Saver mode. REINSTALL THE INK CARTRIDGES AND DEEP CLEAN AND ALIGN THE PRINTHEAD 1 Reinstall the ink cartridges, see the computer documentation. Note: Do not remove the alignment page until printing is marked with a USB...

User Guide
Page 7
... and photos • Setting up and using the "Clean Printhead" and "Deep Clean Printhead" features. Recycling • Return ink cartridges for ? To read the Lexmark Environmental Sustainability Report, see www.lexmark.com/environment. For updates, check our Web site at www.lexmark.com/publications/. Follow the instructions to request a postage-paid...software Find it away. • Recycle paper from discarded print jobs. • Use recycled paper. About your prints. • Clean the printhead. These features clean the printhead nozzles to www.lexmark.com/recycle.
... and photos • Setting up and using the "Clean Printhead" and "Deep Clean Printhead" features. Recycling • Return ink cartridges for ? To read the Lexmark Environmental Sustainability Report, see www.lexmark.com/environment. For updates, check our Web site at www.lexmark.com/publications/. Follow the instructions to request a postage-paid...software Find it away. • Recycle paper from discarded print jobs. • Use recycled paper. About your prints. • Clean the printhead. These features clean the printhead nozzles to www.lexmark.com/recycle.
User Guide
Page 22
... may not come with cartridge installation. • Print a test page. • Print an alignment page. • Clean the printhead nozzles. • Order ink or supplies. • Register the printer. • Contact technical support. Use the To Lexmark Network Card Reader (referred to as Network Card Reader) • View the contents of the printer...
... may not come with cartridge installation. • Print a test page. • Print an alignment page. • Clean the printhead nozzles. • Order ink or supplies. • Register the printer. • Contact technical support. Use the To Lexmark Network Card Reader (referred to as Network Card Reader) • View the contents of the printer...
User Guide
Page 111
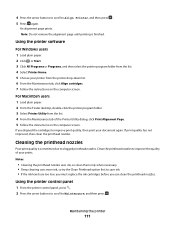
...not remove the alignment page until printing is sometimes due to clogged printhead nozzles. Notes: • Cleaning the printhead nozzles uses ink, so clean them only when necessary. • Deep cleaning uses more ink, so try the Clean Printhead option first to save ink. • If the ink levels ...select the printer program folder from the list. 4 Select Printer Home. 5 Choose your prints. If print quality has not improved, then clean the printhead nozzles. An alignment page prints. For Macintosh users 1 Load plain paper. 2 From the Finder desktop, double-click the printer program folder...
...not remove the alignment page until printing is sometimes due to clogged printhead nozzles. Notes: • Cleaning the printhead nozzles uses ink, so clean them only when necessary. • Deep cleaning uses more ink, so try the Clean Printhead option first to save ink. • If the ink levels ...select the printer program folder from the list. 4 Select Printer Home. 5 Choose your prints. If print quality has not improved, then clean the printhead nozzles. An alignment page prints. For Macintosh users 1 Load plain paper. 2 From the Finder desktop, double-click the printer program folder...
User Guide
Page 112
...of the printer. 4 Wipe only the outside of the printer 1 Make sure that has accumulated on the scanner glass. Cleaning the exterior of the printer, making sure to clean the printhead nozzles. Note: Make sure all cables to your printer. 5 Make sure the paper support and paper exit tray are...to the printer before proceeding. 2 Remove paper from the wall outlet. Maintaining the printer 112 3 Press the arrow buttons to scroll to Clean Printhead or Deep Clean Printhead, and then press . 4 Press to remove any ink residue that the printer is dry before beginning a new print job.
...of the printer. 4 Wipe only the outside of the printer 1 Make sure that has accumulated on the scanner glass. Cleaning the exterior of the printer, making sure to clean the printhead nozzles. Note: Make sure all cables to your printer. 5 Make sure the paper support and paper exit tray are...to the printer before proceeding. 2 Remove paper from the wall outlet. Maintaining the printer 112 3 Press the arrow buttons to scroll to Clean Printhead or Deep Clean Printhead, and then press . 4 Press to remove any ink residue that the printer is dry before beginning a new print job.
User Guide
Page 115
Troubleshooting 115 REMOVE AND REINSERT THE PRINTHEAD 1 Open the printer and lift the latch. 2 WI F I PRINTING 2 Remove the printhead. 3 Wipe the printhead contacts using a clean, lint-free cloth.
Troubleshooting 115 REMOVE AND REINSERT THE PRINTHEAD 1 Open the printer and lift the latch. 2 WI F I PRINTING 2 Remove the printhead. 3 Wipe the printhead contacts using a clean, lint-free cloth.

User Guide
Page 117
...the cartridges again. 2 Load plain paper. 3 From the printer control panel, press . 4 Press the arrow buttons to scroll to fit, make sure the printhead is damaged, then use a new one. 2 Firmly plug the square end of the USB cable into the back of the printer. 3 Firmly plug the ...USB CABLE CONNECTED TO YOUR PRINTER CHECK THE USB CONNECTION 1 Check the USB cable for more information. REINSTALL THE INK CARTRIDGES AND DEEP CLEAN AND ALIGN THE PRINTHEAD 1 Reinstall the ink cartridges, see "Replacing ink cartridges" on the printer. The USB port is printing blank pages Blank pages may be...
...the cartridges again. 2 Load plain paper. 3 From the printer control panel, press . 4 Press the arrow buttons to scroll to fit, make sure the printhead is damaged, then use a new one. 2 Firmly plug the square end of the USB cable into the back of the printer. 3 Firmly plug the ...USB CABLE CONNECTED TO YOUR PRINTER CHECK THE USB CONNECTION 1 Check the USB cable for more information. REINSTALL THE INK CARTRIDGES AND DEEP CLEAN AND ALIGN THE PRINTHEAD 1 Reinstall the ink cartridges, see "Replacing ink cartridges" on the printer. The USB port is printing blank pages Blank pages may be...
User Guide
Page 118
...: MAKE SURE THE PRINTER IS NOT IN POWER SAVER MODE If the power light is blinking on and off slowly, then the printer is finished. A cleaning page prints. 6 Press the arrow buttons to scroll to wake up the printer. Press to Align Printer, and the press . Printer is busy or does... printer. Note: Do not remove the alignment page until printing is in the print queue and cannot delete them to get other jobs to Deep Clean Printhead, and then press . If this problem persists, then check our Web site for updates for any obvious damage. RESTART THE COMPUTER AND TRY AGAIN ...
...: MAKE SURE THE PRINTER IS NOT IN POWER SAVER MODE If the power light is blinking on and off slowly, then the printer is finished. A cleaning page prints. 6 Press the arrow buttons to scroll to wake up the printer. Press to Align Printer, and the press . Printer is busy or does... printer. Note: Do not remove the alignment page until printing is in the print queue and cannot delete them to get other jobs to Deep Clean Printhead, and then press . If this problem persists, then check our Web site for updates for any obvious damage. RESTART THE COMPUTER AND TRY AGAIN ...

User Guide
Page 122
... when printing These are possible solutions. SELECT A HIGHER PRINT QUALITY FROM THE PRINTER SOFTWARE MAKE SURE THE INK CARTRIDGES ARE PROPERLY INSTALLED ALIGN THE PRINTHEAD CLEAN OR DEEP CLEAN THE PRINTHEAD NOZZLES Note: If these solutions do not remove the streaks or lines on printed image If the "Before you troubleshoot" checklist does not...
... when printing These are possible solutions. SELECT A HIGHER PRINT QUALITY FROM THE PRINTER SOFTWARE MAKE SURE THE INK CARTRIDGES ARE PROPERLY INSTALLED ALIGN THE PRINTHEAD CLEAN OR DEEP CLEAN THE PRINTHEAD NOZZLES Note: If these solutions do not remove the streaks or lines on printed image If the "Before you troubleshoot" checklist does not...
User Guide
Page 168
..., sending immediately 77 buttons, printer control panel Address Book 15 Back 15 Cancel 16 Color/Black 16 Copy 14 Dialtone 15 Display 15 Fax 14 Keypad 16 Photo 14 Power ...computer over a network 124 cannot send faxes 126 cartridges, ink ordering 11 using genuine Lexmark 11 changing Power Saver timeout 17 changing printing mode 47 changing temporary settings into default ...fax troubleshooting 125 memory card troubleshooting 132 choosing a splitter, faxing 80 cleaning exterior of the printer 112 cleaning printhead nozzles 111 Club Internet 90 collating copies 52 Communication not available message ...
..., sending immediately 77 buttons, printer control panel Address Book 15 Back 15 Cancel 16 Color/Black 16 Copy 14 Dialtone 15 Display 15 Fax 14 Keypad 16 Photo 14 Power ...computer over a network 124 cannot send faxes 126 cartridges, ink ordering 11 using genuine Lexmark 11 changing Power Saver timeout 17 changing printing mode 47 changing temporary settings into default ...fax troubleshooting 125 memory card troubleshooting 132 choosing a splitter, faxing 80 cleaning exterior of the printer 112 cleaning printhead nozzles 111 Club Internet 90 collating copies 52 Communication not available message ...
User Guide
Page 172
printhead nozzles cleaning 111 printing collate 31 custom-size paper 35 documents 30 documents from memory card or...R received history report 84 receiving faxes Auto Answer setting 78, 79 automatically 78 manually 79 tips 78, 79 recycling 6 Lexmark products 13 WEEE statement 155 redial attempts, fax setting 74 redial time, fax setting 74 reducing an image 51 registering fax... and white 60 improving quality 60 PIN 60 scan job canceling 61 scan was not successful 124 scanner glass 10 cleaning 112 scanner lid 9 scanner unit 10 scanner unit does not close 123 scanning creating a PDF from scan 59 ...
printhead nozzles cleaning 111 printing collate 31 custom-size paper 35 documents 30 documents from memory card or...R received history report 84 receiving faxes Auto Answer setting 78, 79 automatically 78 manually 79 tips 78, 79 recycling 6 Lexmark products 13 WEEE statement 155 redial attempts, fax setting 74 redial time, fax setting 74 reducing an image 51 registering fax... and white 60 improving quality 60 PIN 60 scan job canceling 61 scan was not successful 124 scanner glass 10 cleaning 112 scanner lid 9 scanner unit 10 scanner unit does not close 123 scanning creating a PDF from scan 59 ...


