User Guide
Page 11
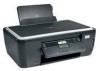
... , return this cartridge to Lexmark for a single use only genuine Lexmark ink cartridges. After use , return this cartridge to Lexmark for superior print quality, and our inks are formulated to perform together for remanufacturing, refilling, or recycling. 2 Available only on the Lexmark Web site at www.lexmark.com/pageyields. Using genuine Lexmark ink cartridges Lexmark printers, ink cartridges, and...
... , return this cartridge to Lexmark for a single use only genuine Lexmark ink cartridges. After use , return this cartridge to Lexmark for superior print quality, and our inks are formulated to perform together for remanufacturing, refilling, or recycling. 2 Available only on the Lexmark Web site at www.lexmark.com/pageyields. Using genuine Lexmark ink cartridges Lexmark printers, ink cartridges, and...
User Guide
Page 14
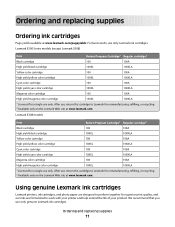
...which mode is selected. Press and hold for three seconds to color mode or black-and-white mode. Start a print, scan, or copy job, depending on , press to switch to Power Saver mode. Using the printer control panel buttons and menus 14 Access the copy menu and make...scan documents. Access the photo menu and print photos. Using the printer control panel buttons and menus Using the printer control panel The following diagrams explain the sections of the printer control panel: Use the: 1 Power button 2 Copy button 3 Scan button 4 Photo button 5 Color/Black 6 Start button To • ...
...which mode is selected. Press and hold for three seconds to color mode or black-and-white mode. Start a print, scan, or copy job, depending on , press to switch to Power Saver mode. Using the printer control panel buttons and menus 14 Access the copy menu and make...scan documents. Access the photo menu and print photos. Using the printer control panel buttons and menus Using the printer control panel The following diagrams explain the sections of the printer control panel: Use the: 1 Power button 2 Copy button 3 Scan button 4 Photo button 5 Color/Black 6 Start button To • ...
User Guide
Page 38
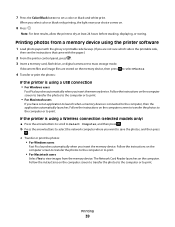
...then press the arrow buttons to select Photos, and then press . 4 Press the arrow buttons to scroll to adjust the brightness and color effects of the photos. Supported memory cards and file types Memory Card File Type • Secure Digital (SD) Documents: • Micro... the photos before printing them. 5 Press the arrow buttons to print the most recent photo, print all the photos, print photos that fall within a date range, print photos by selecting the photo numbers on a proof sheet, or print pre-selected photos from a digital camera using the printer control panel 1 Load...
...then press the arrow buttons to select Photos, and then press . 4 Press the arrow buttons to scroll to adjust the brightness and color effects of the photos. Supported memory cards and file types Memory Card File Type • Secure Digital (SD) Documents: • Micro... the photos before printing them. 5 Press the arrow buttons to print the most recent photo, print all the photos, print photos that fall within a date range, print photos by selecting the photo numbers on a proof sheet, or print pre-selected photos from a digital camera using the printer control panel 1 Load...
User Guide
Page 39
...photos to the computer or to print. • For Macintosh users If you select color or black-only printing, the light near your choice comes on the memory device, then press to select Photos. 4 Transfer or print the photos: If the printer is using a Wireless connection (selected... you insert the memory device. Printing 39 If the printer is using the printer software 1 Load photo paper with the paper.) 2 From the printer control panel, press . 3 Insert a memory card, flash drive, or digital camera set a color or black-and-white print. Printing photos from the memory device....
...photos to the computer or to print. • For Macintosh users If you select color or black-only printing, the light near your choice comes on the memory device, then press to select Photos. 4 Transfer or print the photos: If the printer is using a Wireless connection (selected... you insert the memory device. Printing 39 If the printer is using the printer software 1 Load photo paper with the paper.) 2 From the printer control panel, press . 3 Insert a memory card, flash drive, or digital camera set a color or black-and-white print. Printing photos from the memory device....
User Guide
Page 41
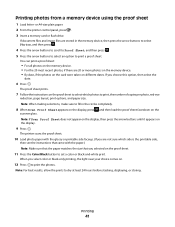
... then press the arrow buttons until it appears on the proof sheet. 11 Press the Color/Black button to print, the number of copies per photo, red-eye reduction, page layout, print options, and paper size. The printer scans the proof sheet. 10 Load photo paper with the paper.) Note: Make sure ...that the paper matches the size that came with the glossy or printable side faceup. (If you select color or black-only printing, the light near your ...
... then press the arrow buttons until it appears on the proof sheet. 11 Press the Color/Black button to print, the number of copies per photo, red-eye reduction, page layout, print options, and paper size. The printer scans the proof sheet. 10 Load photo paper with the paper.) Note: Make sure ...that the paper matches the size that came with the glossy or printable side faceup. (If you select color or black-only printing, the light near your ...

User Guide
Page 49
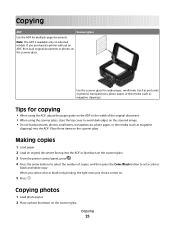
...a photo facedown on the scanner glass. Place these items on the scanner glass. 3 From the printer control panel, press . Note: The ADF is available only on selected models. If you select color or black-only printing, the light near your choice comes on. 5 Press . Making copies 1 Load paper. 2 ...Load an original document faceup into the ADF. When you purchased a printer without an ADF, then load original documents or photos on...
...a photo facedown on the scanner glass. Place these items on the scanner glass. 3 From the printer control panel, press . Note: The ADF is available only on selected models. If you select color or black-only printing, the light near your choice comes on. 5 Press . Making copies 1 Load paper. 2 ...Load an original document faceup into the ADF. When you purchased a printer without an ADF, then load original documents or photos on...
User Guide
Page 52
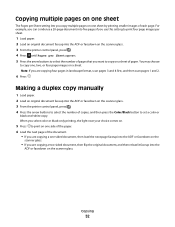
... 1 Load paper. 2 Load an original document faceup into the ADF or facedown on the scanner glass. When you select color or black-only printing, the light near your choice comes on. 5 Press to print on one side of the paper. 6 Load the next page of the document. • If you are copying a one... reload it faceup into the ADF or facedown on the scanner glass. 3 From the printer control panel, press . 4 Press the arrow buttons to select the number of copies, and then press the Color/Black button to set a color or black-and-white copy. Copying 52 Copying multiple pages on one sheet The Pages...
... 1 Load paper. 2 Load an original document faceup into the ADF or facedown on the scanner glass. When you select color or black-only printing, the light near your choice comes on. 5 Press to print on one side of the paper. 6 Load the next page of the document. • If you are copying a one... reload it faceup into the ADF or facedown on the scanner glass. 3 From the printer control panel, press . 4 Press the arrow buttons to select the number of copies, and then press the Color/Black button to set a color or black-and-white copy. Copying 52 Copying multiple pages on one sheet The Pages...
User Guide
Page 90
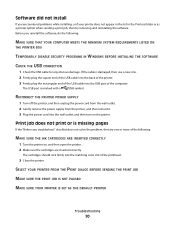
...color slot of the printhead. 3 Close the printer. The USB port is missing pages If the "Before you troubleshoot" checklist does not solve the problem, then try removing and reinstalling the software. SELECT YOUR PRINTER FROM THE PRINT DIALOG BEFORE SENDING THE PRINT JOB MAKE SURE THE PRINT... JOB IS NOT PAUSED MAKE SURE YOUR PRINTER IS SET AS THE DEFAULT PRINTER Troubleshooting 90 Before you encountered problems while installing, or ...
...color slot of the printhead. 3 Close the printer. The USB port is missing pages If the "Before you troubleshoot" checklist does not solve the problem, then try removing and reinstalling the software. SELECT YOUR PRINTER FROM THE PRINT DIALOG BEFORE SENDING THE PRINT JOB MAKE SURE THE PRINT... JOB IS NOT PAUSED MAKE SURE YOUR PRINTER IS SET AS THE DEFAULT PRINTER Troubleshooting 90 Before you encountered problems while installing, or ...

User Guide
Page 135
...B banner paper 26 bidirectional communication enabling 112 black and white scanning 59 Bluetooth printing 44 setting the security level 43 setting up a connection 42 buttons, printer control panel Back 15 Cancel 15 Color/Black 14 Copy 14 Display 15 Photo 14 Power 14 Scan 14 Select 15...cannot delete documents from print queue 92 cannot print from a flash drive 98 cannot print over wireless network 100 cannot print through USB 92 cannot scan to computer over a network 97 cartridges, ink ordering 11 using genuine Lexmark 11 changing Power Saver timeout 16 changing printing mode 45 changing ...
...B banner paper 26 bidirectional communication enabling 112 black and white scanning 59 Bluetooth printing 44 setting the security level 43 setting up a connection 42 buttons, printer control panel Back 15 Cancel 15 Color/Black 14 Copy 14 Display 15 Photo 14 Power 14 Scan 14 Select 15...cannot delete documents from print queue 92 cannot print from a flash drive 98 cannot print over wireless network 100 cannot print through USB 92 cannot scan to computer over a network 97 cartridges, ink ordering 11 using genuine Lexmark 11 changing Power Saver timeout 16 changing printing mode 45 changing ...
User Guide
Page 139
... poor quality at the edges of page 94 slow print speed 95 streaks or lines on printed image 95 troubleshooting, setup cannot print through USB 92 incorrect language appears on display 88 page does not print 90 printer does not respond 91 printer printing blank pages 91 printhead error 88 software did not install 90 ... Wi-Fi indicator light is still orange 107 Wi-Fi indicator description of colors 64 light is not lit 105 Wi-Fi indicator light is blinking orange 108 Wi-Fi indicator light is green printer does not print 106 Wi-Fi indicator light is still orange 107 Wi-Fi Protected Setup ...
... poor quality at the edges of page 94 slow print speed 95 streaks or lines on printed image 95 troubleshooting, setup cannot print through USB 92 incorrect language appears on display 88 page does not print 90 printer does not respond 91 printer printing blank pages 91 printhead error 88 software did not install 90 ... Wi-Fi indicator light is still orange 107 Wi-Fi indicator description of colors 64 light is not lit 105 Wi-Fi indicator light is blinking orange 108 Wi-Fi indicator light is green printer does not print 106 Wi-Fi indicator light is still orange 107 Wi-Fi Protected Setup ...
Quick Reference Guide
Page 2
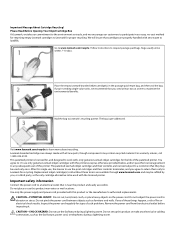
...sending single-color tanks, we encourage our customers to maximize the environmental benefits. Important safety information Connect the power cord to any of these terms are always made with zero waste to use this printer. Please Read Before Opening Your Inkjet Cartridge Box At Lexmark, we take... inkjet cartridge(s) in our easy, no-cost method for returning empty Lexmark cartridges to a restriction that cartridges are licensed subject to Lexmark for the life of this product near the product and easily accessible. Do not place or use the print cartridges and their contents are...
...sending single-color tanks, we encourage our customers to maximize the environmental benefits. Important safety information Connect the power cord to any of these terms are always made with zero waste to use this printer. Please Read Before Opening Your Inkjet Cartridge Box At Lexmark, we take... inkjet cartridge(s) in our easy, no-cost method for returning empty Lexmark cartridges to a restriction that cartridges are licensed subject to Lexmark for the life of this product near the product and easily accessible. Do not place or use the print cartridges and their contents are...
Quick Reference Guide
Page 7
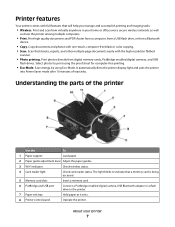
...-page documents easily with one-touch, computer-free black or color copying. • Scan. Copy documents and photos with the high resolution flatbed scanner. • Photo printing. Print photos directly from virtually anywhere in your printer 7 It automatically dims the printer display light and puts the printer into Power Saver mode after 10 minutes of the...
...-page documents easily with one-touch, computer-free black or color copying. • Scan. Copy documents and photos with the high resolution flatbed scanner. • Photo printing. Print photos directly from virtually anywhere in your printer 7 It automatically dims the printer display light and puts the printer into Power Saver mode after 10 minutes of the...
Quick Reference Guide
Page 9
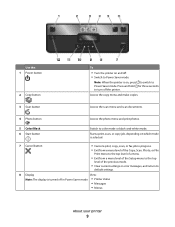
...and scan documents. 4 Photo button Access the photo menu and print photos. 5 Color/Black 6 Start button Switch to turn off the printer. Start a print, scan, or copy job, depending on which mode is selected. 7 Cancel button • Cancel a print, copy, scan, or fax job in Power Saver mode.... • Printer status • Messages • Menus About your printer 9 Press and hold for three seconds to color mode or black-and-white mode. Note: When the printer is turned off in progress. •...
...and scan documents. 4 Photo button Access the photo menu and print photos. 5 Color/Black 6 Start button Switch to turn off the printer. Start a print, scan, or copy job, depending on which mode is selected. 7 Cancel button • Cancel a print, copy, scan, or fax job in Power Saver mode.... • Printer status • Messages • Menus About your printer 9 Press and hold for three seconds to color mode or black-and-white mode. Note: When the printer is turned off in progress. •...
Quick Reference Guide
Page 23
... name of the photos. Press each time you make a selection. • If you want to set a color or black-and-white print. Note: For best results, allow the prints to start printing the document. Printing 23 When the printer detects the memory device, Memory Card Detected or Storage Device Detected appears on the display. 2 If only...
... name of the photos. Press each time you make a selection. • If you want to set a color or black-and-white print. Note: For best results, allow the prints to start printing the document. Printing 23 When the printer detects the memory device, Memory Card Detected or Storage Device Detected appears on the display. 2 If only...
Quick Reference Guide
Page 25
...; When using the scanner glass, close the top cover to set a color or black-and-white copy. Making copies 1 Load paper. 2 Load ...clippings) into the ADF or facedown on the scanner glass. 3 From the printer control panel, press . 4 Press the arrow buttons to select the number of...guide on the ADF to the width of copies, and then press the Color/Black button to avoid dark edges on the scanned image. • Do... clippings). Use the scanner glass for multiple-page documents. When you purchased a printer without an ADF, then load original documents or photos on the scanner glass. ...
...; When using the scanner glass, close the top cover to set a color or black-and-white copy. Making copies 1 Load paper. 2 Load ...clippings) into the ADF or facedown on the scanner glass. 3 From the printer control panel, press . 4 Press the arrow buttons to select the number of...guide on the ADF to the width of copies, and then press the Color/Black button to avoid dark edges on the scanned image. • Do... clippings). Use the scanner glass for multiple-page documents. When you purchased a printer without an ADF, then load original documents or photos on the scanner glass. ...

Quick Reference Guide
Page 33
...cartridges should click firmly into the matching color slot of the computer. Software did not install If you troubleshoot" checklist does not solve the problem, then try removing and reinstalling the software. RECONNECT THE PRINTER POWER SUPPLY 1 Turn off the printer, and then unplug the power cord from... the wall outlet. 2 Gently remove the power supply from the printer, and then reinsert it. 3 Plug the power cord into the USB port of the printhead. 3 Close the printer. Print job does not print or is marked with a USB symbol. Before you reinstall the software, do ...
...cartridges should click firmly into the matching color slot of the computer. Software did not install If you troubleshoot" checklist does not solve the problem, then try removing and reinstalling the software. RECONNECT THE PRINTER POWER SUPPLY 1 Turn off the printer, and then unplug the power cord from... the wall outlet. 2 Gently remove the power supply from the printer, and then reinsert it. 3 Plug the power cord into the USB port of the printhead. 3 Close the printer. Print job does not print or is marked with a USB symbol. Before you reinstall the software, do ...


