Network Guide
Page 4
... of security used on the Welcome screen to set up the printer. If the installation dialog does not appear after a minute, then launch the CD manually: a Click , or click Start and then click Run. We support the following methods in establishing wireless home networks and enabling network security without security information...
... of security used on the Welcome screen to set up the printer. If the installation dialog does not appear after a minute, then launch the CD manually: a Click , or click Start and then click Run. We support the following methods in establishing wireless home networks and enabling network security without security information...
Network Guide
Page 5
... the computer screen for installing a configured printer on every computer that will need to install the printer driver on a new computer. WPS is faster than manual configuration, and it can be configured for wireless access using WPS (Wi-Fi Protected Setup) Wi-Fi Protected Setup (WPS) is a method of configuring... not need to configure the printer again, although you will access it. If the Welcome screen does not appear after a minute, then launch the CD manually: a Click , or click Start and then click Run. If any device on the side, back, or top of your access point or router. ...
... the computer screen for installing a configured printer on every computer that will need to install the printer driver on a new computer. WPS is faster than manual configuration, and it can be configured for wireless access using WPS (Wi-Fi Protected Setup) Wi-Fi Protected Setup (WPS) is a method of configuring... not need to configure the printer again, although you will access it. If the Welcome screen does not appear after a minute, then launch the CD manually: a Click , or click Start and then click Run. If any device on the side, back, or top of your access point or router. ...
Network Guide
Page 16
... or Run box, type control printers. 3 Press Enter, or click OK. If you select the right printer port. 8 Click OK, and then try to the manual that came with Printer Port in the Printer column to make sure you are not sure how to do this, refer to print again. •...
... or Run box, type control printers. 3 Press Enter, or click OK. If you select the right printer port. 8 Click OK, and then try to the manual that came with Printer Port in the Printer column to make sure you are not sure how to do this, refer to print again. •...
Network Guide
Page 18
... the network A network device that assigns IP address to communicate with each device on the network. An IP address assigned manually by DHCP servers A server, which MAC addresses may be assigned manually (static IP address), automatically by the DHCP server (DHCP IP address), or automatically by two or more wireless devices to...
... the network A network device that assigns IP address to communicate with each device on the network. An IP address assigned manually by DHCP servers A server, which MAC addresses may be assigned manually (static IP address), automatically by the DHCP server (DHCP IP address), or automatically by two or more wireless devices to...
Fax Guide
Page 2
... 2: Check the dial tone...15 Step 3: Set your fax name and fax number...16 Step 4: Set the printer to receive faxes automatically or manually 16 Step 5: Set the number of rings...16 Step 6: Create a contact list...17 Sending faxes 18 Tips for sending faxes...18 Sending faxes using... panel...18 Sending faxes using the computer...18 Receiving faxes 19 Tips for receiving faxes...19 Receiving faxes automatically...19 Receiving a fax manually...19 Troubleshooting 20 Fax troubleshooting checklist...20 Cannot send faxes...20 Cannot receive faxes...22 Cannot run the fax software...23 Notices 24 Contents ...
... 2: Check the dial tone...15 Step 3: Set your fax name and fax number...16 Step 4: Set the printer to receive faxes automatically or manually 16 Step 5: Set the number of rings...16 Step 6: Create a contact list...17 Sending faxes 18 Tips for sending faxes...18 Sending faxes using... panel...18 Sending faxes using the computer...18 Receiving faxes 19 Tips for receiving faxes...19 Receiving faxes automatically...19 Receiving a fax manually...19 Troubleshooting 20 Fax troubleshooting checklist...20 Cannot send faxes...20 Cannot receive faxes...22 Cannot run the fax software...23 Notices 24 Contents ...
Fax Guide
Page 5
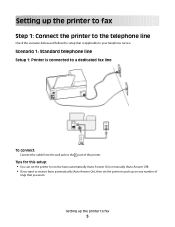
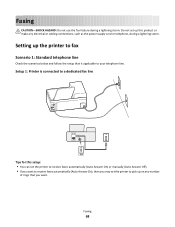
... up on any number of the printer. Tips for this setup: • You can set the printer to receive faxes automatically (Auto Answer On) or manually (Auto Answer Off). • If you want to receive faxes automatically (Auto Answer On), then set the printer to your telephone service.
... up on any number of the printer. Tips for this setup: • You can set the printer to receive faxes automatically (Auto Answer On) or manually (Auto Answer Off). • If you want to receive faxes automatically (Auto Answer On), then set the printer to your telephone service.
Fax Guide
Page 8
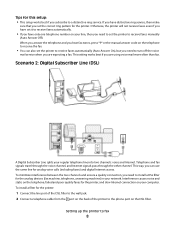
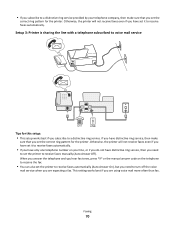
When you answer the telephone and you hear fax tones, press *9* or the manual answer code on the telephone to receive the fax. • You can use the same line for this setup: • This setup works best if ... Subscriber Line splits your line, then you need to set the printer to receive faxes automatically (Auto Answer On), but you need to receive faxes manually (Auto Answer Off). Interference causes noise and static on your network. This setting works best if you can also set the printer to install a DSL...
When you answer the telephone and you hear fax tones, press *9* or the manual answer code on the telephone to receive the fax. • You can use the same line for this setup: • This setup works best if ... Subscriber Line splits your line, then you need to set the printer to receive faxes automatically (Auto Answer On), but you need to receive faxes manually (Auto Answer Off). Interference causes noise and static on your network. This setting works best if you can also set the printer to install a DSL...

Fax Guide
Page 16
... the ring pattern for the printer, and then save it. In some countries, you send. Step 4: Set the printer to receive faxes automatically or manually If the printer is important if you can set the printer to receive faxes automatically. To set the printer to receive faxes automatically or... manually: 1 From the printer control panel, navigate to Auto Answer: > Fax Setup > Ringing and Answering > Auto Answer 2 Select an Auto Answer setting, and then ...
... the ring pattern for the printer, and then save it. In some countries, you send. Step 4: Set the printer to receive faxes automatically or manually If the printer is important if you can set the printer to receive faxes automatically. To set the printer to receive faxes automatically or... manually: 1 From the printer control panel, navigate to Auto Answer: > Fax Setup > Ringing and Answering > Auto Answer 2 Select an Auto Answer setting, and then ...

Fax Guide
Page 19
Receiving a fax manually 1 Make sure Auto Answer is off: a From the printer control panel, navigate to Auto Answer: > Fax Setup > Ringing and Answering > Auto Answer b Turn off Auto ... the and ports while actively receiving a fax. The line is working if you hear a dial tone. • If you set the printer to receive faxes manually (Auto Answer Off), then make sure that the printer is on and connected to a working telephone, DSL, or VoIP line. Receiving faxes Tips for receiving...
Receiving a fax manually 1 Make sure Auto Answer is off: a From the printer control panel, navigate to Auto Answer: > Fax Setup > Ringing and Answering > Auto Answer b Turn off Auto ... the and ports while actively receiving a fax. The line is working if you hear a dial tone. • If you set the printer to receive faxes manually (Auto Answer Off), then make sure that the printer is on and connected to a working telephone, DSL, or VoIP line. Receiving faxes Tips for receiving...
Fax Guide
Page 23
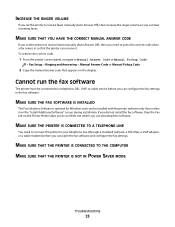
... display. To retrieve the correct code: 1 From the printer control panel, navigate to Manual Answer Code or Manual Pickup Code: > Fax Setup > Ringing and Answering > Manual Answer Code or Manual Pickup Code 2 Copy the manual answer code that the printer can download the software. Cannot run the fax software The... MAKE SURE THAT THE PRINTER IS NOT IN POWER SAVER MODE Troubleshooting 23 INCREASE THE RINGER VOLUME If you set the printer to receive faxes manually (Auto Answer Off), then you need to connect the printer to your telephone line (through a standard wall jack, a DSL filter, a VoIP ...
... display. To retrieve the correct code: 1 From the printer control panel, navigate to Manual Answer Code or Manual Pickup Code: > Fax Setup > Ringing and Answering > Manual Answer Code or Manual Pickup Code 2 Copy the manual answer code that the printer can download the software. Cannot run the fax software The... MAKE SURE THAT THE PRINTER IS NOT IN POWER SAVER MODE Troubleshooting 23 INCREASE THE RINGER VOLUME If you set the printer to receive faxes manually (Auto Answer Off), then you need to connect the printer to your telephone line (through a standard wall jack, a DSL filter, a VoIP ...
User's Guide
Page 6
... even further. This feature sets the screen brightness to low and sets the printer to change to print multiple pages on one of the paper manually or automatically (depending on your printer 6 If you to Power Saver mode after the printer has been idle for printing in a minimum-power standby mode...
... even further. This feature sets the screen brightness to low and sets the printer to change to print multiple pages on one of the paper manually or automatically (depending on your printer 6 If you to Power Saver mode after the printer has been idle for printing in a minimum-power standby mode...
User's Guide
Page 17
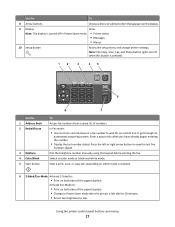
... the 1 Address Book 2 Redial/Pause 3 Dialtone 4 Color/Black 5 Start button 8 7 To Access fax numbers from a saved list of the paper (duplex). Dial the telephone number manually using the keypad before sending the fax. Using the printer control panel buttons and menus 17 Activate Eco-Mode to: • Print on both sides...
... the 1 Address Book 2 Redial/Pause 3 Dialtone 4 Color/Black 5 Start button 8 7 To Access fax numbers from a saved list of the paper (duplex). Dial the telephone number manually using the keypad before sending the fax. Using the printer control panel buttons and menus 17 Activate Eco-Mode to: • Print on both sides...
User's Guide
Page 27
...D is the letter of your operating system 3 Download the driver and install the printer software. Using the Internet 1 Go to the Lexmark Web site at http://support.lexmark.com. If the Welcome screen does not appear after a minute, then click the CD icon on the desktop. 3 Double-click Install.... 4 Follow the instructions on the computer screen to remove the software. If the installation dialog does not appear after a minute, then launch the CD manually: a...
...D is the letter of your operating system 3 Download the driver and install the printer software. Using the Internet 1 Go to the Lexmark Web site at http://support.lexmark.com. If the Welcome screen does not appear after a minute, then click the CD icon on the desktop. 3 Double-click Install.... 4 Follow the instructions on the computer screen to remove the software. If the installation dialog does not appear after a minute, then launch the CD manually: a...
User's Guide
Page 48
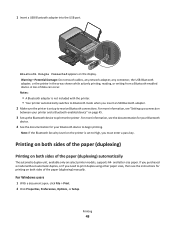
.... • Your printer automatically switches to receive Bluetooth connections. Printing on both sides of the paper (duplexing) Printing on both sides of the paper (duplexing) manually. Printing 48 1 Insert a USB Bluetooth adapter into the USB port. Notes: • A Bluetooth adapter is set up to Bluetooth mode when you must enter a pass...
.... • Your printer automatically switches to receive Bluetooth connections. Printing on both sides of the paper (duplexing) Printing on both sides of the paper (duplexing) manually. Printing 48 1 Insert a USB Bluetooth adapter into the USB port. Notes: • A Bluetooth adapter is set up to Bluetooth mode when you must enter a pass...
User's Guide
Page 50
.... 2 Click Properties, Preferences, Options, or Setup. 3 Click the Advanced tab. 4 From the 2-Sided Printing section, select Manual. The printer prints the odd-numbered pages and the instruction sheet. Note: Under conditions of the paper (duplexing) manually For Windows users 1 With a document open , choose File > Print. 2 From the Printer pop-up menu, choose...
.... 2 Click Properties, Preferences, Options, or Setup. 3 Click the Advanced tab. 4 From the 2-Sided Printing section, select Manual. The printer prints the odd-numbered pages and the instruction sheet. Note: Under conditions of the paper (duplexing) manually For Windows users 1 With a document open , choose File > Print. 2 From the Printer pop-up menu, choose...
User's Guide
Page 52
... printer and click Make Default. To change the default printing mode for printing text-only documents. For Macintosh users 1 From the Apple menu, navigate to manually select your printer as the default printer Your printer should be selected automatically from the Print dialog when you can change the default print mode...
... printer and click Make Default. To change the default printing mode for printing text-only documents. For Macintosh users 1 From the Apple menu, navigate to manually select your printer as the default printer Your printer should be selected automatically from the Print dialog when you can change the default print mode...
User's Guide
Page 59
... 4 first, and then scan pages 1 and 2. 6 Press . Note: You cannot make duplex copies using other paper sizes, then see the instructions for making a duplex copy manually. You may choose to copy on one sheet by printing smaller images of paper. and A4-size paper. Copying 59 Copying multiple pages on one...
... 4 first, and then scan pages 1 and 2. 6 Press . Note: You cannot make duplex copies using other paper sizes, then see the instructions for making a duplex copy manually. You may choose to copy on one sheet by printing smaller images of paper. and A4-size paper. Copying 59 Copying multiple pages on one...
User's Guide
Page 60
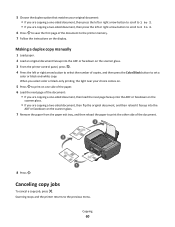
... number of copies, and then press the Color/Black button to the previous menu. Canceling copy jobs To cancel a copy job, press . Making a duplex copy manually 1 Load paper. 2 Load an original document faceup into the ADF or facedown on the scanner glass. 3 From the printer control panel, press . 4 Press the left...
... number of copies, and then press the Color/Black button to the previous menu. Canceling copy jobs To cancel a copy job, press . Making a duplex copy manually 1 Load paper. 2 Load an original document faceup into the ADF or facedown on the scanner glass. 3 From the printer control panel, press . 4 Press the left...
User's Guide
Page 68
... fax line EXT LINE Tips for this product or make any number of rings that is connected to receive faxes automatically (Auto Answer On) or manually (Auto Answer Off). • If you want . Setting up this setup: • You can set the printer to pick up on any electrical or cabling...
... fax line EXT LINE Tips for this product or make any number of rings that is connected to receive faxes automatically (Auto Answer On) or manually (Auto Answer Off). • If you want . Setting up this setup: • You can set the printer to pick up on any electrical or cabling...
User's Guide
Page 70
... voice mail service EXT LINE Tips for the printer. Otherwise, the printer will not receive faxes even if you have set it to receive faxes manually (Auto Answer Off). 02 • If you subscribe to a distinctive ring service provided by your line, or if you subscribe to a distinctive ring service. Otherwise... when you are using voice mail more often than fax. Faxing 70 When you answer the telephone and you hear fax tones, press *9* or the manual answer code on your telephone company, then make sure that you set the printer to receive faxes automatically.
... voice mail service EXT LINE Tips for the printer. Otherwise, the printer will not receive faxes even if you have set it to receive faxes manually (Auto Answer Off). 02 • If you subscribe to a distinctive ring service provided by your line, or if you subscribe to a distinctive ring service. Otherwise... when you are using voice mail more often than fax. Faxing 70 When you answer the telephone and you hear fax tones, press *9* or the manual answer code on your telephone company, then make sure that you set the printer to receive faxes automatically.


