Card Stock & Label Guide
Page 10
Lexmark printers are removed before you are ready to the edge may develop uneven moisture content that heat the ink to 80%. Inks (preprinted stock) Preprinted ... prevent tearing at the perforation line, the perfs may cause jams, feeding problems, reduced print quality, and predispensing (peeling) labels. Back splits and pop-out windows are more likely to compensate for inadequate release strength of the perforation affects initial pick strength. Lighter materials, such as micro-perfs or data-perfs...
Lexmark printers are removed before you are ready to the edge may develop uneven moisture content that heat the ink to 80%. Inks (preprinted stock) Preprinted ... prevent tearing at the perforation line, the perfs may cause jams, feeding problems, reduced print quality, and predispensing (peeling) labels. Back splits and pop-out windows are more likely to compensate for inadequate release strength of the perforation affects initial pick strength. Lighter materials, such as micro-perfs or data-perfs...
Network Scan Drivers
Page 3
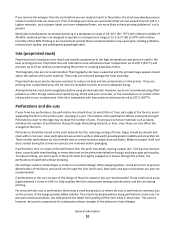
... using a network printer...6 Removing the network scan driver...6 Scanning...7 Scanning using applications...7 Scanning using XSane...7 Scanning using OpenOffice.org...7 Scanning using GIMP ...8 Scanning using a terminal window ...8 Scanning multiple pages...8 Scanning both sides of a page...10 Canceling a scan...11 Adjusting scan settings...12 Adjusting scan settings using XSane or OpenOffice.org 12...
... using a network printer...6 Removing the network scan driver...6 Scanning...7 Scanning using applications...7 Scanning using XSane...7 Scanning using OpenOffice.org...7 Scanning using GIMP ...8 Scanning using a terminal window ...8 Scanning multiple pages...8 Scanning both sides of a page...10 Canceling a scan...11 Adjusting scan settings...12 Adjusting scan settings using XSane or OpenOffice.org 12...
Network Scan Drivers
Page 6
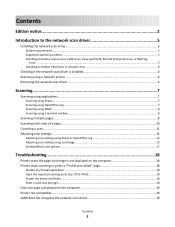
...Removing the network scan driver 1 Do the following, depending on your computer. In Debian GNU/Linux or Linspire Linux Open a terminal window, and then type dpkg -r lexmark-network-scan. Once the device is found, a message indicating that your device is found is present. c Select the Linux distribution running...: In Fedora, Linpus Linux, SUSE Linux, Linux openSUSE, Red Hat Enterprise Linux, or Red Flag Linux Open a terminal window, and then type rpm -e lexmark-network-scan. Checking if the network scan driver is installed Make sure the network scan driver is installed and added to your...
...Removing the network scan driver 1 Do the following, depending on your computer. In Debian GNU/Linux or Linspire Linux Open a terminal window, and then type dpkg -r lexmark-network-scan. Once the device is found, a message indicating that your device is found is present. c Select the Linux distribution running...: In Fedora, Linpus Linux, SUSE Linux, Linux openSUSE, Red Hat Enterprise Linux, or Red Flag Linux Open a terminal window, and then type rpm -e lexmark-network-scan. Checking if the network scan driver is installed Make sure the network scan driver is installed and added to your...
Network Scan Drivers
Page 7
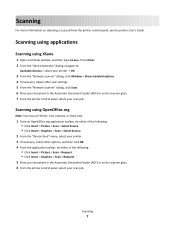
...Press Enter. 2 From the "device detection" dialog, navigate to: Available devices > select your printer > OK 3 From the "Network:scanner" dialog, click Window > Show standard options. 4 If necessary, adjust other options, and then click OK. 4 From the application toolbar, do either of the following : •...Feeder (ADF) or on the scanner glass. 6 From the printer control panel, select your scan job. Scanning using XSane 1 Open a terminal window, and then type xsane. Scanning For more information on the scanner glass. 7 From the printer control panel, select your scan job. Scanning ...
...Press Enter. 2 From the "device detection" dialog, navigate to: Available devices > select your printer > OK 3 From the "Network:scanner" dialog, click Window > Show standard options. 4 If necessary, adjust other options, and then click OK. 4 From the application toolbar, do either of the following : •...Feeder (ADF) or on the scanner glass. 6 From the printer control panel, select your scan job. Scanning using XSane 1 Open a terminal window, and then type xsane. Scanning For more information on the scanner glass. 7 From the printer control panel, select your scan job. Scanning ...
Network Scan Drivers
Page 8
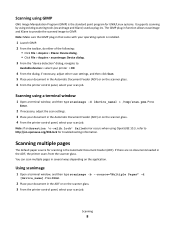
... XSane to provide the scanned image to http://en.opensuse.org/Xlib.lock for UNIX/Linux systems. It supports scanning by using a terminal window 1 Open a terminal window, and then type scanimage -d [device_name] > /tmp/scan.pnm. Scanning 8 Press Enter. 2 If necessary, adjust the scan settings.... glass. 4 From the printer control panel, select your scan job. Press Enter. 2 Place your scan job. Using scanimage 1 Open a terminal window, and then type scanimage -b --source="Multiple Pages" -d [device_name]. The GIMP plug-in the ADF, the printer scans from the scanner glass. ...
... XSane to provide the scanned image to http://en.opensuse.org/Xlib.lock for UNIX/Linux systems. It supports scanning by using a terminal window 1 Open a terminal window, and then type scanimage -d [device_name] > /tmp/scan.pnm. Scanning 8 Press Enter. 2 If necessary, adjust the scan settings.... glass. 4 From the printer control panel, select your scan job. Press Enter. 2 Place your scan job. Using scanimage 1 Open a terminal window, and then type scanimage -b --source="Multiple Pages" -d [device_name]. The GIMP plug-in the ADF, the printer scans from the scanner glass. ...
Network Scan Drivers
Page 9
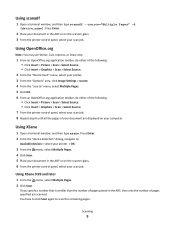
... of your scan job. Using XSane 0.99 and later 1 From the menu, select Multiple Pages. 2 Click Scan. Using XSane 1 Open a terminal window, and then type xsane. Using scanadf 1 Open a terminal window, and then type scanadf --source="Multiple Pages" -d [device_name]. You have to click Scan again to : Available devices > select your printer > OK...
... of your scan job. Using XSane 0.99 and later 1 From the menu, select Multiple Pages. 2 Click Scan. Using XSane 1 Open a terminal window, and then type xsane. Using scanadf 1 Open a terminal window, and then type scanadf --source="Multiple Pages" -d [device_name]. You have to click Scan again to : Available devices > select your printer > OK...
Network Scan Drivers
Page 10
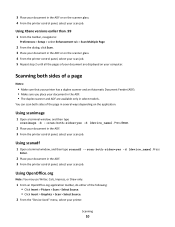
... document in the ADF. 3 From the printer control panel, select your document are available only in select models. Using scanimage 1 Open a terminal window, and then type scanimage -b --scan-both -sides=yes -d [device_name]. Using OpenOffice.org Note: You may use Writer, Calc, Impress, or ...Scanning 10 Press Enter. 2 Place your document in the ADF. 3 From the printer control panel, select your printer. Using scanadf 1 Open a terminal window, and then type scanadf --scan-both -sides=yes -d [device_name]. You can scan both sides of the following: • Click Insert > Picture >...
... document in the ADF. 3 From the printer control panel, select your document are available only in select models. Using scanimage 1 Open a terminal window, and then type scanimage -b --scan-both -sides=yes -d [device_name]. Using OpenOffice.org Note: You may use Writer, Calc, Impress, or ...Scanning 10 Press Enter. 2 Place your document in the ADF. 3 From the printer control panel, select your printer. Using scanadf 1 Open a terminal window, and then type scanadf --scan-both -sides=yes -d [device_name]. You can scan both sides of the following: • Click Insert > Picture >...
Network Scan Drivers
Page 11
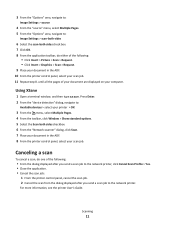
... the dialog displayed after you send a scan job to : Available devices > select your printer > OK 3 From the menu, select Multiple Pages. 4 From the toolbar, click Window > Show standard options. 5 Select the Scan both -sides check box. 7 Click OK. 8 From the application toolbar, do either of your document are displayed on your.... • Click Insert > Graphics > Scan > Request. 9 Place your document in the ADF. 8 From the printer control panel, select your scan job. Using XSane 1 Open a terminal window, and then type xsane.
... the dialog displayed after you send a scan job to : Available devices > select your printer > OK 3 From the menu, select Multiple Pages. 4 From the toolbar, click Window > Show standard options. 5 Select the Scan both -sides check box. 7 Click OK. 8 From the application toolbar, do either of your document are displayed on your.... • Click Insert > Graphics > Scan > Request. 9 Place your document in the ADF. 8 From the printer control panel, select your scan job. Using XSane 1 Open a terminal window, and then type xsane.

Network Scan Drivers
Page 12
Adjusting scan settings Adjusting scan settings using XSane or OpenOffice.org Depending on the application, do either of the following: - Click Window > Show advanced options. • Using OpenOffice.org Note: You may use Writer, Calc, Impress, or Draw only. 1 From an OpenOffice.org...; Make sure that the printer has a duplex scanner and an Automatic Document Feeder (ADF). • Make sure to place your document in select models. Click Window > Show standard options. - Click Insert > Graphics > Scan > Select Source. 2 From the "Device Used" menu, select your printer. 3 From the "Options" ...
Adjusting scan settings Adjusting scan settings using XSane or OpenOffice.org Depending on the application, do either of the following: - Click Window > Show advanced options. • Using OpenOffice.org Note: You may use Writer, Calc, Impress, or Draw only. 1 From an OpenOffice.org...; Make sure that the printer has a duplex scanner and an Automatic Document Feeder (ADF). • Make sure to place your document in select models. Click Window > Show standard options. - Click Insert > Graphics > Scan > Select Source. 2 From the "Device Used" menu, select your printer. 3 From the "Options" ...
Network Scan Drivers
Page 17
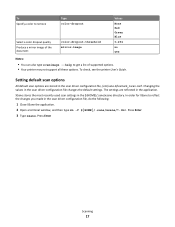
... also type scanimage --help to reflect the changes you made in the scan driver configuration file, do the following: 1 Close XSane the application. 2 Open a terminal window, and then type rm -f ${HOME}/.sane/xsane/*.drc.
... also type scanimage --help to reflect the changes you made in the scan driver configuration file, do the following: 1 Close XSane the application. 2 Open a terminal window, and then type rm -f ${HOME}/.sane/xsane/*.drc.
Network Scan Drivers
Page 18
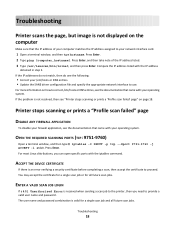
... the IP address listed. 3 Type /usr/lexscan/bin/lsinet, and then press Enter. OPEN THE REQUIRED SCANNING PORTS (TCP: 9751-9760) Open a terminal window, and then type # iptables -I INPUT -p tcp --dport 9751:9760 -j ACCEPT -i eth0. ENTER A VALID SCAN JOB LOGIN If a 401 Unauthorized Error ...is received when sending a scan job to the printer, then you can open specific ports with your network interface card. 1 Open a terminal window, and then type hostname. Press Enter, and then take note of your operating system. Press Enter. 2 Type ping [computer_hostname]. Printer stops scanning ...
... the IP address listed. 3 Type /usr/lexscan/bin/lsinet, and then press Enter. OPEN THE REQUIRED SCANNING PORTS (TCP: 9751-9760) Open a terminal window, and then type # iptables -I INPUT -p tcp --dport 9751:9760 -j ACCEPT -i eth0. ENTER A VALID SCAN JOB LOGIN If a 401 Unauthorized Error ...is received when sending a scan job to the printer, then you can open specific ports with your network interface card. 1 Open a terminal window, and then type hostname. Press Enter, and then take note of your operating system. Press Enter. 2 Type ping [computer_hostname]. Printer stops scanning ...

Network Scan Drivers
Page 20
Note: If you may need to version 0.90 or higher so it will work correctly with non-English languages. Troubleshooting 20 XSane displays garbage characters Run XSane version 0.90 or higher, which supports more languages than its earlier versions. • For some SANE installations, you are running Linpus Linux, upgrade XSane to set the LD_LIBRARY_PATH: 1 Open a terminal window, and then type export LD_LIBRARY_PATH=/usr/lib. 2 Press Enter.
Note: If you may need to version 0.90 or higher so it will work correctly with non-English languages. Troubleshooting 20 XSane displays garbage characters Run XSane version 0.90 or higher, which supports more languages than its earlier versions. • For some SANE installations, you are running Linpus Linux, upgrade XSane to set the LD_LIBRARY_PATH: 1 Open a terminal window, and then type export LD_LIBRARY_PATH=/usr/lib. 2 Press Enter.
Print Drivers for UNIX and LINUX Systems
Page 15
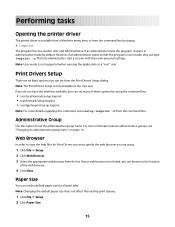
...User and Administrative. Print Drivers Setup There are six basic options you are using the command line. • /usr/local/lexmark/setup.lexprint • /opt/lexmark/setup.lexprint • /usr/lpp/lexprint/setup.lexprint Note: For more information about administrative groups, see "Changing an administrative ...Print Drivers Setup dialog. Web Browser In order to the root user. Performing tasks Opening the printer driver The printer driver is available from a Windows menu item, or from the command line by using . 1 Click File Œ Setup. 2 Click Web Browser. 3 Select the appropriate...
...User and Administrative. Print Drivers Setup There are six basic options you are using the command line. • /usr/local/lexmark/setup.lexprint • /opt/lexmark/setup.lexprint • /usr/lpp/lexprint/setup.lexprint Note: For more information about administrative groups, see "Changing an administrative ...Print Drivers Setup dialog. Web Browser In order to the root user. Performing tasks Opening the printer driver The printer driver is available from a Windows menu item, or from the command line by using . 1 Click File Œ Setup. 2 Click Web Browser. 3 Select the appropriate...
Print Drivers for UNIX and LINUX Systems
Page 23
... from which you want to remove the queue. Adding a print queue to My Printers or another printer group either by dragging a printer from the main window onto a printer group or by right-clicking All Printers and selecting New Group. 1 Enter the group name in groups. Note: A class exists as long as...
... from which you want to remove the queue. Adding a print queue to My Printers or another printer group either by dragging a printer from the main window onto a printer group or by right-clicking All Printers and selecting New Group. 1 Enter the group name in groups. Note: A class exists as long as...

Print Drivers for UNIX and LINUX Systems
Page 34
... 17. I make My Printers my default group? No. 34 To enable a print queue: 1 Open the printer driver as an administrator. 2 From the main window, right-click the print queue icon. 3 Clear the Enabled check box. To disable a print queue: 1 Open the printer driver as an administrator. 2 From ...the main window, right-click the print queue icon. 3 Select the Enabled check box. Normal user or administrator Why are different from the administrative group" on the same...
... 17. I make My Printers my default group? No. 34 To enable a print queue: 1 Open the printer driver as an administrator. 2 From the main window, right-click the print queue icon. 3 Clear the Enabled check box. To disable a print queue: 1 Open the printer driver as an administrator. 2 From ...the main window, right-click the print queue icon. 3 Select the Enabled check box. Normal user or administrator Why are different from the administrative group" on the same...
Print Drivers for UNIX and LINUX Systems
Page 47
...A type of serial transmission signaling used in the /dev directory, and other applications cannot send information to a printer using the X Window System. This breaks many tools used to connect computers and hosts. A local area network is commonly used in the print server. ...community name subnet System Management Interface Tool (SMIT) tar TCP/IP (Transmission Control Protocol/Internet Protocol) virtual device X client X server X Window System XON/XOFF A plain-text password mechanism used to authenticate queries to agents of managed network devices on the AIX operating system. A...
...A type of serial transmission signaling used in the /dev directory, and other applications cannot send information to a printer using the X Window System. This breaks many tools used to connect computers and hosts. A local area network is commonly used in the print server. ...community name subnet System Management Interface Tool (SMIT) tar TCP/IP (Transmission Control Protocol/Internet Protocol) virtual device X client X server X Window System XON/XOFF A plain-text password mechanism used to authenticate queries to agents of managed network devices on the AIX operating system. A...
Tech Notes
Page 1
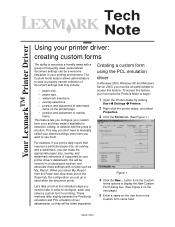
... select Properties. 3 Click the Forms tab. (See Figure 1.) Figure 1 4 Click the New... March 2004 Creating a custom form using the PCL emulation driver In Windows 2000, Windows XP, and Windows Server 2003, you want to use them. For example, if you print a daily report that may include: • paper size. • paper type. •...
... select Properties. 3 Click the Forms tab. (See Figure 1.) Figure 1 4 Click the New... March 2004 Creating a custom form using the PCL emulation driver In Windows 2000, Windows XP, and Windows Server 2003, you want to use them. For example, if you print a daily report that may include: • paper size. • paper type. •...

