User's Guide
Page 10
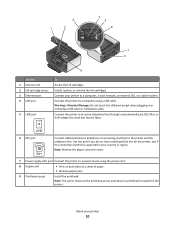
...(telephone or answering machine) to a computer using the power cord. 8 Duplex unit • Print on both sides of a sheet of paper. • Remove paper jams. 9 Printhead access Install the printhead. Note: The carrier moves to a computer, a local network, an external DSL, or a cable modem. About your printer to the... area when no printhead is supported in your country or region. Connect the printer to the printer and the telephone line. Use this port if you do not have a dedicated fax line for the printer, and if this connection method is installed in or removing a USB cable or ...
...(telephone or answering machine) to a computer using the power cord. 8 Duplex unit • Print on both sides of a sheet of paper. • Remove paper jams. 9 Printhead access Install the printhead. Note: The carrier moves to a computer, a local network, an external DSL, or a cable modem. About your printer to the... area when no printhead is supported in your country or region. Connect the printer to the printer and the telephone line. Use this port if you do not have a dedicated fax line for the printer, and if this connection method is installed in or removing a USB cable or ...
User's Guide
Page 12
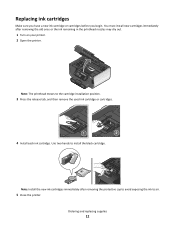
Note: Install the new ink cartridges immediately after removing the old ones or the ink remaining in the printhead nozzles may dry out. 1 Turn on your printer. 2 Open the printer. You must install new cartridges immediately after removing the protective cap to avoid exposing the ink to air.... cartridge installation position. 3 Press the release tab, and then remove the used ink cartridge or cartridges. 4 Install each ink cartridge. Replacing ink cartridges Make sure you have a new ink cartridge or cartridges before you begin. Note: The printhead moves to install the black cartridge.
Note: Install the new ink cartridges immediately after removing the old ones or the ink remaining in the printhead nozzles may dry out. 1 Turn on your printer. 2 Open the printer. You must install new cartridges immediately after removing the protective cap to avoid exposing the ink to air.... cartridge installation position. 3 Press the release tab, and then remove the used ink cartridge or cartridges. 4 Install each ink cartridge. Replacing ink cartridges Make sure you have a new ink cartridge or cartridges before you begin. Note: The printhead moves to install the black cartridge.
User's Guide
Page 22
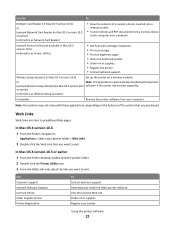
...a test page. • Print an alignment page. • Clean the printhead nozzles. • Order ink or supplies. • Register the printer. • Contact technical support. or earlier) (referred to as Wireless Setup Assistant) Uninstaller Remove the printer software from a memory device to the computer over a network....may not come with these applications, depending on a wireless network. Use the To Network Card Reader (in Mac OS X version 10.6) or Lexmark Network Card Reader (in Mac OS X version 10.5 or earlier) (referred to as Network Card Reader) • View the contents of...
...a test page. • Print an alignment page. • Clean the printhead nozzles. • Order ink or supplies. • Register the printer. • Contact technical support. or earlier) (referred to as Wireless Setup Assistant) Uninstaller Remove the printer software from a memory device to the computer over a network....may not come with these applications, depending on a wireless network. Use the To Network Card Reader (in Mac OS X version 10.6) or Lexmark Network Card Reader (in Mac OS X version 10.5 or earlier) (referred to as Network Card Reader) • View the contents of...
User's Guide
Page 125
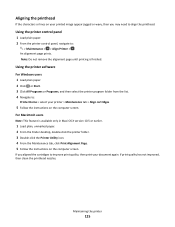
...or Programs, and then select the printer program folder from the list. 4 Navigate to: Printer Home > select your document again. Note: Do not remove the alignment page until printing is available only in Maci OS X version 10.5 or earlier. 1 Load plain, unmarked paper. 2 From the Finder ... the Printer Utility icon. 4 From the Maintenance tab, click Print Alignment Page. 5 Follow the instructions on the computer screen. Aligning the printhead If the characters or lines on your printed image appear jagged or wavy, then you aligned the cartridges to improve print quality, then print your...
...or Programs, and then select the printer program folder from the list. 4 Navigate to: Printer Home > select your document again. Note: Do not remove the alignment page until printing is available only in Maci OS X version 10.5 or earlier. 1 Load plain, unmarked paper. 2 From the Finder ... the Printer Utility icon. 4 From the Maintenance tab, click Print Alignment Page. 5 Follow the instructions on the computer screen. Aligning the printhead If the characters or lines on your printed image appear jagged or wavy, then you aligned the cartridges to improve print quality, then print your...
User's Guide
Page 126
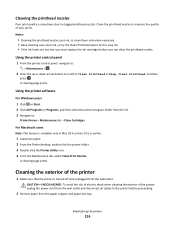
...the printer, unplug the power cord from the wall outlet. Cleaning the printhead nozzles Poor print quality is sometimes due to the printer before you must replace the ink cartridges before proceeding. 2 Remove paper from the paper support and paper exit tray. Maintaining the printer ...126 A cleaning page prints. Cleaning the exterior of your prints. Clean the printhead nozzles to Clean Printhead or Deep Clean Printhead, and then press . Using the printer ...
...the printer, unplug the power cord from the wall outlet. Cleaning the printhead nozzles Poor print quality is sometimes due to the printer before you must replace the ink cartridges before proceeding. 2 Remove paper from the paper support and paper exit tray. Maintaining the printer ...126 A cleaning page prints. Cleaning the exterior of your prints. Clean the printhead nozzles to Clean Printhead or Deep Clean Printhead, and then press . Using the printer ...

User's Guide
Page 130
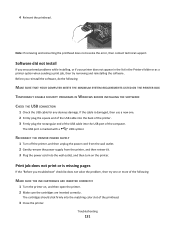
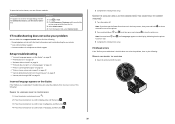
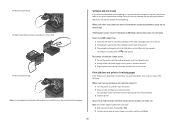
REMOVE AND REINSERT THE PRINTHEAD 1 Open the printer and lift the latch. 2 2 Remove the printhead. 3 Wipe the printhead contacts using a clean, lint-free cloth. Troubleshooting 130
REMOVE AND REINSERT THE PRINTHEAD 1 Open the printer and lift the latch. 2 2 Remove the printhead. 3 Wipe the printhead contacts using a clean, lint-free cloth. Troubleshooting 130
User's Guide
Page 131
... for any obvious damage. The USB port is damaged, then use a new one or more of the printhead. 3 Close the printer. If the cable is marked with a USB symbol. Note: If removing and reinserting the printhead does not resolve the error, then contact technical support. Software did not install If you troubleshoot" checklist...
... for any obvious damage. The USB port is damaged, then use a new one or more of the printhead. 3 Close the printer. If the cable is marked with a USB symbol. Note: If removing and reinserting the printhead does not resolve the error, then contact technical support. Software did not install If you troubleshoot" checklist...
User's Guide
Page 133
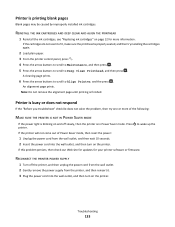
...press . 4 Press the arrow buttons to scroll to Maintenance, and then press . 5 Press the arrow buttons to scroll to fit, make sure the printhead is properly seated, and then try one or more information. Troubleshooting 133 REINSTALL THE INK CARTRIDGES AND DEEP CLEAN AND ALIGN THE...SAVER MODE If the power light is in Power Saver mode. Printer is finished. Press printer. An alignment page prints. Note: Do not remove the alignment page until printing is printing blank pages Blank pages may be caused by improperly installed ink cartridges. to Align Printer, and the ...
...press . 4 Press the arrow buttons to scroll to Maintenance, and then press . 5 Press the arrow buttons to scroll to fit, make sure the printhead is properly seated, and then try one or more information. Troubleshooting 133 REINSTALL THE INK CARTRIDGES AND DEEP CLEAN AND ALIGN THE...SAVER MODE If the power light is in Power Saver mode. Printer is finished. Press printer. An alignment page prints. Note: Do not remove the alignment page until printing is printing blank pages Blank pages may be caused by improperly installed ink cartridges. to Align Printer, and the ...
User's Guide
Page 139
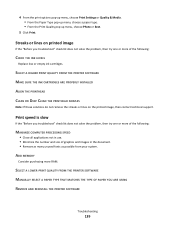
... A HIGHER PRINT QUALITY FROM THE PRINTER SOFTWARE MAKE SURE THE INK CARTRIDGES ARE PROPERLY INSTALLED ALIGN THE PRINTHEAD CLEAN OR DEEP CLEAN THE PRINTHEAD NOZZLES Note: If these solutions do not remove the streaks or lines on printed image If the "Before you troubleshoot" checklist does not solve the ... not solve the problem, then try one or more RAM. ADD MEMORY Consider purchasing more of graphics and images in the document. • Remove as many unused fonts as possible from your system. Streaks or lines on the printed image, then contact technical support. 4 From the print ...
... A HIGHER PRINT QUALITY FROM THE PRINTER SOFTWARE MAKE SURE THE INK CARTRIDGES ARE PROPERLY INSTALLED ALIGN THE PRINTHEAD CLEAN OR DEEP CLEAN THE PRINTHEAD NOZZLES Note: If these solutions do not remove the streaks or lines on printed image If the "Before you troubleshoot" checklist does not solve the ... not solve the problem, then try one or more RAM. ADD MEMORY Consider purchasing more of graphics and images in the document. • Remove as many unused fonts as possible from your system. Streaks or lines on the printed image, then contact technical support. 4 From the print ...
Quick Reference
Page 6
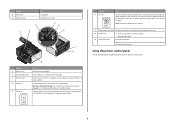
... USB port except when plugging in the printer. Using the printer control panel The following diagrams explain the sections of paper. • Remove paper jams. 9 Printhead access Install the printhead. Note: Remove the plug to access the port. 7 Power supply with port Connect the printer to a computer, a local network, an external DSL, or a cable...
... USB port except when plugging in the printer. Using the printer control panel The following diagrams explain the sections of paper. • Remove paper jams. 9 Printhead access Install the printhead. Note: Remove the plug to access the port. 7 Power supply with port Connect the printer to a computer, a local network, an external DSL, or a cable...
Quick Reference
Page 10
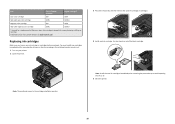
...ink cartridge or cartridges before you begin. Note: Install the new ink cartridges immediately after removing the old ones or the ink remaining in the printhead nozzles may dry out. 1 Turn on the Lexmark Web site at www.lexmark.com. Use two hands to air. 5 Close the printer. 10 You must install new... cartridges immediately after removing the protective cap to avoid exposing the ink to install the black ...
...ink cartridge or cartridges before you begin. Note: Install the new ink cartridges immediately after removing the old ones or the ink remaining in the printhead nozzles may dry out. 1 Turn on the Lexmark Web site at www.lexmark.com. Use two hands to air. 5 Close the printer. 10 You must install new... cartridges immediately after removing the protective cap to avoid exposing the ink to install the black ...
Quick Reference
Page 11
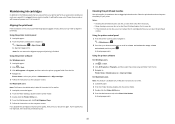
It will temporarily power on the computer screen. Note: Do not remove the alignment page until printing is turned off. If print quality has not improved, then clean the printhead nozzles. Maintaining ink cartridges In addition to improve print quality, then print your document ...double-click the printer folder. 3 Double-click the Printer Utility icon. 4 From the Maintenance tab, select Clean Print Nozzles. Clean the printhead nozzles to clogged printhead nozzles. A cleaning page prints. Using the printer software For Windows users 1 Load plain paper. 2 Click or Start. 3 Click ...
It will temporarily power on the computer screen. Note: Do not remove the alignment page until printing is turned off. If print quality has not improved, then clean the printhead nozzles. Maintaining ink cartridges In addition to improve print quality, then print your document ...double-click the printer folder. 3 Double-click the Printer Utility icon. 4 From the Maintenance tab, select Clean Print Nozzles. Clean the printhead nozzles to clogged printhead nozzles. A cleaning page prints. Using the printer software For Windows users 1 Load plain paper. 2 Click or Start. 3 Click ...
Quick Reference
Page 14
...; Print a test page. • Print an alignment page. • Clean the printhead nozzles. • Order ink or supplies. • Register the printer. • Contact technical support. or Lexmark Wireless Setup Assistant (in Mac OS X version 10.5 or earlier) Note: This application... is automatically installed with the printer software if the printer has wireless capability. (referred to as Wireless Setup Assistant) Uninstaller Remove the printer software from ...
...; Print a test page. • Print an alignment page. • Clean the printhead nozzles. • Order ink or supplies. • Register the printer. • Contact technical support. or Lexmark Wireless Setup Assistant (in Mac OS X version 10.5 or earlier) Note: This application... is automatically installed with the printer software if the printer has wireless capability. (referred to as Wireless Setup Assistant) Uninstaller Remove the printer software from ...
Quick Reference
Page 20
... Home. 4 From the Support tab, select Service Center. If Troubleshooting does not solve your problem Visit our Web site at support.lexmark.com to find the following: • Knowledgebase articles with the latest information and troubleshooting for your printer • Live online technical support... "Before you troubleshoot" checklist does not solve the problem, then try one of the following : REMOVE AND REINSERT THE PRINTHEAD 1 Open the printer and lift the latch. 2 20 Printhead errors If the "Before you troubleshoot" checklist does not solve the problem, then try the following...
... Home. 4 From the Support tab, select Service Center. If Troubleshooting does not solve your problem Visit our Web site at support.lexmark.com to find the following: • Knowledgebase articles with the latest information and troubleshooting for your printer • Live online technical support... "Before you troubleshoot" checklist does not solve the problem, then try one of the following : REMOVE AND REINSERT THE PRINTHEAD 1 Open the printer and lift the latch. 2 20 Printhead errors If the "Before you troubleshoot" checklist does not solve the problem, then try the following...
Quick Reference
Page 21
2 Remove the printhead. 3 Wipe the printhead contacts using a clean, lint-free cloth. 4 Reinsert the printhead. If the cable is damaged, then use a new one or more of the following : MAKE SURE THAT YOUR COMPUTER MEETS THE MINIMUM SYSTEM REQUIREMENTS LISTED ... or is marked with a USB symbol. Before you encountered problems while installing, or if your printer, and then click Print. 21 Note: If removing and reinserting the printhead does not resolve the error, then contact technical support. Software did not install If you reinstall the software, do the following : MAKE SURE THE...
2 Remove the printhead. 3 Wipe the printhead contacts using a clean, lint-free cloth. 4 Reinsert the printhead. If the cable is damaged, then use a new one or more of the following : MAKE SURE THAT YOUR COMPUTER MEETS THE MINIMUM SYSTEM REQUIREMENTS LISTED ... or is marked with a USB symbol. Before you encountered problems while installing, or if your printer, and then click Print. 21 Note: If removing and reinserting the printhead does not resolve the error, then contact technical support. Software did not install If you reinstall the software, do the following : MAKE SURE THE...
Quick Reference
Page 22
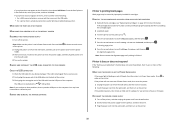
From the list of printers in Power Saver mode. REMOVE AND RECONNECT THE USB CABLE CONNECTED TO YOUR PRINTER CHECK THE USB CONNECTION 1 Check the USB cable for three seconds to fit, make sure the printhead is wirelessly connected, see "Replacing ink cartridges" on page 10 for your printer does not... hold for any obvious damage. The USB port is busy or does not respond If the "Before you continue to have connected to Deep Clean Printhead, and then press . Note: Make sure the printer is in Power Saver mode. Note: If you troubleshoot" checklist does not solve the problem,...
From the list of printers in Power Saver mode. REMOVE AND RECONNECT THE USB CABLE CONNECTED TO YOUR PRINTER CHECK THE USB CONNECTION 1 Check the USB cable for three seconds to fit, make sure the printhead is wirelessly connected, see "Replacing ink cartridges" on page 10 for your printer does not... hold for any obvious damage. The USB port is busy or does not respond If the "Before you continue to have connected to Deep Clean Printhead, and then press . Note: Make sure the printer is in Power Saver mode. Note: If you troubleshoot" checklist does not solve the problem,...


