Setup Sheet
Page 1
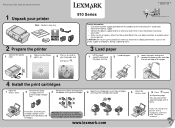
... up this product or make any electrical or cabling connections, such as the power supply or telephone, during a lightning storm. 2 Prepare the printer Connect the power 1 cord. 2 Make sure the Power light is near the product and easily accessible. • Refer service or ...storage unit to a professional service person. Please save this product or the manufacturer's authorized replacement power supply. • Connect the power supply cord to an electrical outlet that is on the bottom. 1 2 3 www.lexmark.com If you are using your language, and then press . 2 1 2 1 4 ...
... up this product or make any electrical or cabling connections, such as the power supply or telephone, during a lightning storm. 2 Prepare the printer Connect the power 1 cord. 2 Make sure the Power light is near the product and easily accessible. • Refer service or ...storage unit to a professional service person. Please save this product or the manufacturer's authorized replacement power supply. • Connect the power supply cord to an electrical outlet that is on the bottom. 1 2 3 www.lexmark.com If you are using your language, and then press . 2 1 2 1 4 ...
Setup Sheet
Page 2
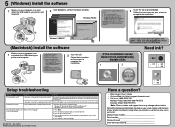
...D:\setup.exe, where D is the letter of your User's Guide. • Visit our Web site: http://support.lexmark.com/. • Call us so that language. Reconnect the power cord by pushing it ready when you contact us at 1-800-332-4120. Important: After installation is complete, remember to a... Diagnosis Is the power cord pushed all the way into the wall outlet. Connect the printer to an electrical outlet that other electrical devices have it all the way into the connector on the screen to complete the installation. P/N 11X1111 E.C. 1X1111 © 2004 Lexmark International, Inc....
...D:\setup.exe, where D is the letter of your User's Guide. • Visit our Web site: http://support.lexmark.com/. • Call us so that language. Reconnect the power cord by pushing it ready when you contact us at 1-800-332-4120. Important: After installation is complete, remember to a... Diagnosis Is the power cord pushed all the way into the wall outlet. Connect the printer to an electrical outlet that other electrical devices have it all the way into the connector on the screen to complete the installation. P/N 11X1111 E.C. 1X1111 © 2004 Lexmark International, Inc....
Setup Solutions Booklet
Page 5
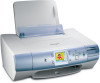
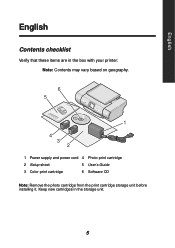
Keep new cartridges in the box with your printer: Note: Contents may vary based on geography. 6 5 1 4 3 2 1 Power supply and power cord 4 Photo print cartridge 2 Setup sheet 5 User's Guide 3 Color print cartridge 6 Software CD Note: Remove the photo cartridge from the print cartridge storage unit before installing it. English English Contents checklist Verify that these items are in the storage unit. 5
Keep new cartridges in the box with your printer: Note: Contents may vary based on geography. 6 5 1 4 3 2 1 Power supply and power cord 4 Photo print cartridge 2 Setup sheet 5 User's Guide 3 Color print cartridge 6 Software CD Note: Remove the photo cartridge from the print cartridge storage unit before installing it. English English Contents checklist Verify that these items are in the storage unit. 5
Setup Solutions Booklet
Page 6
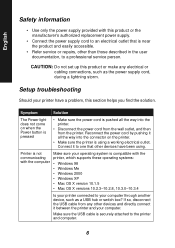
... provided with this product or the manufacturer's authorized replacement power supply. • Connect the power supply cord to an electrical outlet that other devices have a problem, this product or make any other than those described in the user documentation, to your ... securely attached to the printer and computer. 6 Reconnect the power cord by pushing it all the way into the connector on when the Power button is pressed • Make sure the power cord is pushed all the way into the printer. • Disconnect the power cord from the wall outlet, and then from any electrical or...
... provided with this product or the manufacturer's authorized replacement power supply. • Connect the power supply cord to an electrical outlet that other devices have a problem, this product or make any other than those described in the user documentation, to your ... securely attached to the printer and computer. 6 Reconnect the power cord by pushing it all the way into the connector on when the Power button is pressed • Make sure the power cord is pushed all the way into the printer. • Disconnect the power cord from the wall outlet, and then from any electrical or...


