OptraImage 443/433 Setup Guide (1.8 MB)
Page 3
OptraImage Setup Guide OptraImage Setup Guide English For OptraImage model 443/433 Safety information 2 Set up your printer 3 Install the MarkNet print server 4 Unlock the scan unit 5 Install output tray and raise paper feed tray - - 6 Attach cables and power cords 7 Turn on scan unit and printer 10 Assign a network address 12 Set default copy settings 14 Set up to send and receive faxes 16 Set up network scanning 20 Verify the setup 23 Distribute OptraImage user instructions - - - 24 Solve setup problems 25 Maintain your scanner 26 Notices 30 1
OptraImage Setup Guide OptraImage Setup Guide English For OptraImage model 443/433 Safety information 2 Set up your printer 3 Install the MarkNet print server 4 Unlock the scan unit 5 Install output tray and raise paper feed tray - - 6 Attach cables and power cords 7 Turn on scan unit and printer 10 Assign a network address 12 Set default copy settings 14 Set up to send and receive faxes 16 Set up network scanning 20 Verify the setup 23 Distribute OptraImage user instructions - - - 24 Solve setup problems 25 Maintain your scanner 26 Notices 30 1

OptraImage 443/433 Setup Guide (1.8 MB)
Page 11
...MarkNet print server installed in your printer. The adapter is designed only for use in your country, attach the telephone adapter to your OptraImage printer, plug the Ethernet cable into the Ethernet network port on the MarkNet N2501e print server installed in your printer. This must ... a billing tone filter. Do not plug the fax telephone cable into the fax modem port of the back on the back of scanner Power adapter cable SCSI cable OptraImage Setup Guide 9 Germany: Use only the German TAE type F adapter (P/N 14B5123) shipped with this product because it contains a billing...
...MarkNet print server installed in your printer. The adapter is designed only for use in your country, attach the telephone adapter to your OptraImage printer, plug the Ethernet cable into the Ethernet network port on the MarkNet N2501e print server installed in your printer. This must ... a billing tone filter. Do not plug the fax telephone cable into the fax modem port of the back on the back of scanner Power adapter cable SCSI cable OptraImage Setup Guide 9 Germany: Use only the German TAE type F adapter (P/N 14B5123) shipped with this product because it contains a billing...

OptraImage 443/433 Setup Guide (1.8 MB)
Page 13
... Power saver mode. Error. If green and red light is off and yellow light is on . OptraImage Setup Guide 11 When lit, power is on , scanner is stopped. When the scanner is reactivated, there is ready, but not in Power Saver mode. Each represents lights a different mode. ...See user documentation on top of the scanner. Scanner is a short warm-up period. Check for possible paper jams or other paper feed errors. Indicator lights Yellow Green Red Power indicator. Scanner indicator There are three lights on the CD. When lit, an error...
... Power saver mode. Error. If green and red light is off and yellow light is on . OptraImage Setup Guide 11 When lit, power is on , scanner is stopped. When the scanner is reactivated, there is ready, but not in Power Saver mode. Each represents lights a different mode. ...See user documentation on top of the scanner. Scanner is a short warm-up period. Check for possible paper jams or other paper feed errors. Indicator lights Yellow Green Red Power indicator. Scanner indicator There are three lights on the CD. When lit, an error...
OptraImage 443/433 Setup Guide (1.8 MB)
Page 16
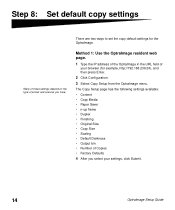
... Guide Step 8: Set default copy settings Many of these settings depend on the type of printer and scanner you select your browser (for the OptraImage. The Copy Setup page has the following settings available: • Content • Copy Media • Paper Saver • n-up frame • Duplex • Finishing • ... ways to set the copy default settings for example, http://192.168.236.24), and then press Enter. 2 Click Configuration. 3 Select Copy Setup from the OptraImage menu.
... Guide Step 8: Set default copy settings Many of these settings depend on the type of printer and scanner you select your browser (for the OptraImage. The Copy Setup page has the following settings available: • Content • Copy Media • Paper Saver • n-up frame • Duplex • Finishing • ... ways to set the copy default settings for example, http://192.168.236.24), and then press Enter. 2 Click Configuration. 3 Select Copy Setup from the OptraImage menu.

OptraImage 443/433 Setup Guide (1.8 MB)
Page 27
... unit and printer" on page 10. 1 Verify each other, or the printer or scanner may be configured in the correct order. Network scanning modes (SCAN → PROFILE,... panel Solution The control panel and the printer are connected, and then power up in the OptraImage control panel. Make sure all cables and cords are not talking to each electrical outlet has power...1 Make sure the telephone fax line cable is unlocked. For more help Launch the OptraImage CD, and then click Contact Lexmark for a complete list of the SCSI cables for detailed instructions. If the problem continues...
... unit and printer" on page 10. 1 Verify each other, or the printer or scanner may be configured in the correct order. Network scanning modes (SCAN → PROFILE,... panel Solution The control panel and the printer are connected, and then power up in the OptraImage control panel. Make sure all cables and cords are not talking to each electrical outlet has power...1 Make sure the telephone fax line cable is unlocked. For more help Launch the OptraImage CD, and then click Contact Lexmark for a complete list of the SCSI cables for detailed instructions. If the problem continues...

OptraImage 443/433 Setup Guide (1.8 MB)
Page 28
Maintain your scanner Clearing a paper jam in the ADF 1 Turn off and disconnect the power to the scan unit. 2 Open the Automatic Document Feeder (ADF). 3 Carefully pull out the jammed paper. 4 Close the ADF. 5 Reconnect the power and turn the scan unit back on. 26 OptraImage Setup Guide
Maintain your scanner Clearing a paper jam in the ADF 1 Turn off and disconnect the power to the scan unit. 2 Open the Automatic Document Feeder (ADF). 3 Carefully pull out the jammed paper. 4 Close the ADF. 5 Reconnect the power and turn the scan unit back on. 26 OptraImage Setup Guide

OptraImage 443/433 Setup Guide (1.8 MB)
Page 30
Warning! Moving the scan unit If you need to transport the scanner, follow these instructions to relock the scanner: 1 Open the scanner lid and power the unit on. 2 When the scanning mechanism reaches the far right side of the scanner glass, power the unit off. 3 Raise the scanner high enough to move the switch down to lock the scan mechanism before moving the unit can cause internal damage. 28 OptraImage Setup Guide Failure to the locked position.
Warning! Moving the scan unit If you need to transport the scanner, follow these instructions to relock the scanner: 1 Open the scanner lid and power the unit on. 2 When the scanning mechanism reaches the far right side of the scanner glass, power the unit off. 3 Raise the scanner high enough to move the switch down to lock the scan mechanism before moving the unit can cause internal damage. 28 OptraImage Setup Guide Failure to the locked position.


