User's Guide (7.1 MB)
Page 5
Table of Contents Using Print Materials 123 Print Materials 124 Print Material Characteristics 126 Paper Guidelines 128 Envelope Guidelines 130 Label Guidelines 131 Card Stock Guidelines 138 Transparency Guidelines 139 Paper Sources 140 Standard Trays 140 Multipurpose Feeder 141 Optional Drawers 141 Optional Envelope Feeder 142 Paper Source Specifications ...
Table of Contents Using Print Materials 123 Print Materials 124 Print Material Characteristics 126 Paper Guidelines 128 Envelope Guidelines 130 Label Guidelines 131 Card Stock Guidelines 138 Transparency Guidelines 139 Paper Sources 140 Standard Trays 140 Multipurpose Feeder 141 Optional Drawers 141 Optional Envelope Feeder 142 Paper Source Specifications ...
User's Guide (7.1 MB)
Page 7
... 281 Installing an Optional Output Expander 282 Removing an Output Expander Tray 289 Changing Output Bin Settings 291 Output Bin Linking 291 Memory and Option Cards 293 Accessing the Printer System Board 293 Closing the Printer System Board 297 Printer Memory Option 299 Installing a Printer Memory Option 300 Removing a Memory Option...
... 281 Installing an Optional Output Expander 282 Removing an Output Expander Tray 289 Changing Output Bin Settings 291 Output Bin Linking 291 Memory and Option Cards 293 Accessing the Printer System Board 293 Closing the Printer System Board 297 Printer Memory Option 299 Installing a Printer Memory Option 300 Removing a Memory Option...

User's Guide (7.1 MB)
Page 8
Table of Contents Removing a Flash Memory Option 307 Option Cards 308 Internal Network Adapter (INA) Option Card 309 Tri-Port Interface Option Card 310 Parallel 1284-C Adapter Option Card 311 Hard Disk with Adapter Option Card 312 Installing an Option Card 315 Removing an Option Card 319 Infrared Adapter 321 Connecting the Cable and Using the Infrared Adapter...
Table of Contents Removing a Flash Memory Option 307 Option Cards 308 Internal Network Adapter (INA) Option Card 309 Tri-Port Interface Option Card 310 Parallel 1284-C Adapter Option Card 311 Hard Disk with Adapter Option Card 312 Installing an Option Card 315 Removing an Option Card 319 Infrared Adapter 321 Connecting the Cable and Using the Infrared Adapter...
User's Guide (7.1 MB)
Page 12
... and commands, interface specification, or managing printer memory, a Technical Reference is only available in English. Simply complete the order form included with the printer registration card to install options available for your printer. Appendixes This section provides information on fonts, print quality, printer specifications, features, and options. The Technical Reference is...
... and commands, interface specification, or managing printer memory, a Technical Reference is only available in English. Simply complete the order form included with the printer registration card to install options available for your printer. Appendixes This section provides information on fonts, print quality, printer specifications, features, and options. The Technical Reference is...
User's Guide (7.1 MB)
Page 80
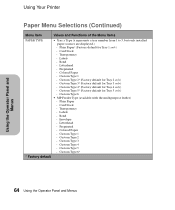
Card Stock - Custom Type 3* (Factory default for Tray 2 only) - Bond - Envelope - Custom Type 2* (Factory default for Tray 3 only) - Plain Paper - Transparency - Custom Type 1 -... Items PAPER TYPE • Tray x Type (x represents a tray number from 1 to 5, but only installed paper sources are displayed.) - Custom Type 4* (Factory default for Tray 5 only) - Card Stock - Custom Type 4 - Custom Type 5 - Bond - Preprinted - Colored Paper - Letterhead - Custom Type 2 - Letterhead - Custom Type 1 - Colored Paper - Custom Type 3 - Custom Type 6* * ...
Card Stock - Custom Type 3* (Factory default for Tray 2 only) - Bond - Envelope - Custom Type 2* (Factory default for Tray 3 only) - Plain Paper - Transparency - Custom Type 1 -... Items PAPER TYPE • Tray x Type (x represents a tray number from 1 to 5, but only installed paper sources are displayed.) - Custom Type 4* (Factory default for Tray 5 only) - Card Stock - Custom Type 4 - Custom Type 5 - Bond - Preprinted - Colored Paper - Letterhead - Custom Type 2 - Letterhead - Custom Type 1 - Colored Paper - Custom Type 3 - Custom Type 6* * ...
User's Guide (7.1 MB)
Page 82
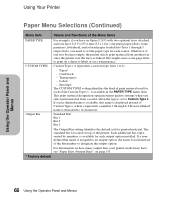
Using the Operator Panel and Menus Using Your Printer Paper Menu Selections (Continued) Menu Item Values and Functions of labels or on a transparency. Card Stock - Each additional bin, represented by numbers, is available for each source. Otherwise, if one -page letter to print on a sheet of the ...Menu Items PAPER TYPE CUSTOM TYPES For example, if you have an Optra S 2455 with two optional trays attached, and you have , see "Paper Exits (Output Bins)" on top of the Custom Types 1 - 6 available in .) size ...
Using the Operator Panel and Menus Using Your Printer Paper Menu Selections (Continued) Menu Item Values and Functions of labels or on a transparency. Card Stock - Each additional bin, represented by numbers, is available for each source. Otherwise, if one -page letter to print on a sheet of the ...Menu Items PAPER TYPE CUSTOM TYPES For example, if you have an Optra S 2455 with two optional trays attached, and you have , see "Paper Exits (Output Bins)" on top of the Custom Types 1 - 6 available in .) size ...
User's Guide (7.1 MB)
Page 85
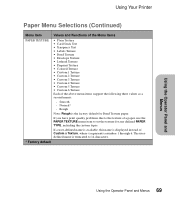
... the custom types. Using Your Printer Paper Menu Selections (Continued) Menu Item Values and Functions of the Menu Items PAPER TEXTURE • Plain Texture • Card Stock Text • Trnsprncy Text • Labels Texture • Bond Texture • Envelope Texture • Ltrhead Texture • Preprint Texture • Colored Texture • Custom...
... the custom types. Using Your Printer Paper Menu Selections (Continued) Menu Item Values and Functions of the Menu Items PAPER TEXTURE • Plain Texture • Card Stock Text • Trnsprncy Text • Labels Texture • Bond Texture • Envelope Texture • Ltrhead Texture • Preprint Texture • Colored Texture • Custom...
User's Guide (7.1 MB)
Page 95
... Option or Hard Disk with Adapter Option are unaffected.) • All menu settings are deleted. (Resources residing in flash memory and prepares the flash memory card to the factory default values except: - Warning: If you restore the factory default settings: • All downloaded resources (fonts, macros, and so on . Do not...
... Option or Hard Disk with Adapter Option are unaffected.) • All menu settings are deleted. (Resources residing in flash memory and prepares the flash memory card to the factory default values except: - Warning: If you restore the factory default settings: • All downloaded resources (fonts, macros, and so on . Do not...
User's Guide (7.1 MB)
Page 117
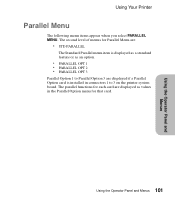
... Panel and Menus Using Your Printer Parallel Menu The following menu items appear when you select PARALLEL MENU. The parallel functions for each card are displayed if a Parallel Option card is installed in the Parallel Option menu for Parallel Menu are: • STD PARALLEL The Standard Parallel menu item is displayed as...
... Panel and Menus Using Your Printer Parallel Menu The following menu items appear when you select PARALLEL MENU. The parallel functions for each card are displayed if a Parallel Option card is installed in the Parallel Option menu for Parallel Menu are: • STD PARALLEL The Standard Parallel menu item is displayed as...
User's Guide (7.1 MB)
Page 121
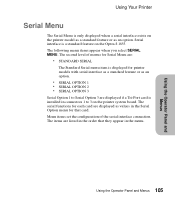
... the Operator Panel and Menus Using Your Printer Serial Menu The Serial Menu is installed in connectors 1 to Serial Option 3 are displayed if a Tri-Port card is only displayed when a serial interface exists on the printer model as a standard feature or as values in the Serial Option menu for that they... appear in the menu. 105 Using the Operator Panel and Menus The serial functions for each card are listed in the order that card. Serial interface is a standard feature on the Optra S 1855.
... the Operator Panel and Menus Using Your Printer Serial Menu The Serial Menu is installed in connectors 1 to Serial Option 3 are displayed if a Tri-Port card is only displayed when a serial interface exists on the printer model as a standard feature or as values in the Serial Option menu for that they... appear in the menu. 105 Using the Operator Panel and Menus The serial functions for each card are listed in the order that card. Serial interface is a standard feature on the Optra S 1855.

User's Guide (7.1 MB)
Page 126
... Honor DSR On to set On, only data received while the DSR signal is in the Optra S 1625 and Optra S 1255. If the card is installed in connector 1 on the printer system board, the functions for that card are displayed as a value in connector 2 on pin 3 is sent by the host computer or... and Menus Serial Menu Selections (Continued) Menu Item Values and Functions of the Menu Items Honor DSR Off* On DSR is one option card can be installed in the Optra S 1855, and one of the handshaking signals for the three networks operate independently of serial interface is seen as valid data.
... Honor DSR On to set On, only data received while the DSR signal is in the Optra S 1625 and Optra S 1255. If the card is installed in connector 1 on the printer system board, the functions for that card are displayed as a value in connector 2 on pin 3 is sent by the host computer or... and Menus Serial Menu Selections (Continued) Menu Item Values and Functions of the Menu Items Honor DSR Off* On DSR is one option card can be installed in the Optra S 1855, and one of the handshaking signals for the three networks operate independently of serial interface is seen as valid data.
User's Guide (7.1 MB)
Page 128
... Operator Panel and Menus If Job Buffering is set Off, the print jobs are supplied by the network card. Refer to see Job Buffer Size on the amount of memory in which the card is On or Off. The Auto setting indicates the printer selects the buffer size based on page 189...
... Operator Panel and Menus If Job Buffering is set Off, the print jobs are supplied by the network card. Refer to see Job Buffer Size on the amount of memory in which the card is On or Off. The Auto setting indicates the printer selects the buffer size based on page 189...
User's Guide (7.1 MB)
Page 129
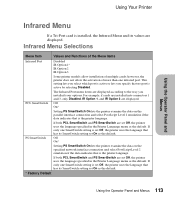
If only one infrared port. This setting lets you select which port is active or lets you installed your options. For example, if cards are installed into connectors 1 and 3, only Disabled, IR Option 1, and IR Option 3 are displayed according to the way you specify that no port is... Port Disabled IR Option 1* IR Option 2 IR Option 3 Some printer models allow the activation of multiple cards; Using Your Printer Using the Operator Panel and Menus Infrared Menu If a Tri-Port card is set Off, the printer uses the language that has its SmartSwitch setting set On as the default.
If only one infrared port. This setting lets you select which port is active or lets you installed your options. For example, if cards are installed into connectors 1 and 3, only Disabled, IR Option 1, and IR Option 3 are displayed according to the way you specify that no port is... Port Disabled IR Option 1* IR Option 2 IR Option 3 Some printer models allow the activation of multiple cards; Using Your Printer Using the Operator Panel and Menus Infrared Menu If a Tri-Port card is set Off, the printer uses the language that has its SmartSwitch setting set On as the default.
User's Guide (7.1 MB)
Page 132
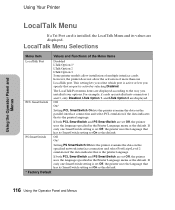
... if the data indicates that is the printer language. Using Your Printer Using the Operator Panel and Menus LocalTalk Menu If a Tri-Port card is installed, the LocalTalk Menu and its SmartSwitch setting set Off, the printer uses the language that is the printer language. If only ...Functions of the Menu Items LocalTalk Port Disabled LTalk Option 1* LTalk Option 2 LTalk Option 3 Some printer models allow the activation of multiple interface cards; however, the printer does not allow installation of more than one SmartSwitch setting is set On as the default. Off On* Setting PS ...
... if the data indicates that is the printer language. Using Your Printer Using the Operator Panel and Menus LocalTalk Menu If a Tri-Port card is installed, the LocalTalk Menu and its SmartSwitch setting set Off, the printer uses the language that is the printer language. If only ...Functions of the Menu Items LocalTalk Port Disabled LTalk Option 1* LTalk Option 2 LTalk Option 3 Some printer models allow the activation of multiple interface cards; however, the printer does not allow installation of more than one SmartSwitch setting is set On as the default. Off On* Setting PS ...
User's Guide (7.1 MB)
Page 135
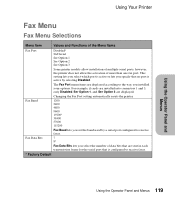
... Fax Port setting automatically resets the printer. 1200 2400 4800 9600 19200* 38400 57600 115200 Fax Baud lets you installed your options. For example, if cards are installed into connectors 1 and 3, only Disabled, Ser Option 1, and Ser Option 3 are displayed according to receive faxes. * Factory Default 119 Using the Operator Panel...
... Fax Port setting automatically resets the printer. 1200 2400 4800 9600 19200* 38400 57600 115200 Fax Baud lets you installed your options. For example, if cards are installed into connectors 1 and 3, only Disabled, Ser Option 1, and Ser Option 3 are displayed according to receive faxes. * Factory Default 119 Using the Operator Panel...
User's Guide (7.1 MB)
Page 139
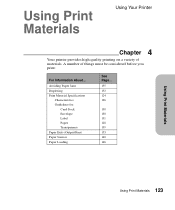
A number of materials. Using Print Materials Using Your Printer Chapter 4 Your printer provides high quality printing on a variety of things must be considered before you print: For Information About... Avoiding Paper Jams Duplexing Print Material Specifications Characteristics Guidelines for: Card Stock Envelope Label Paper Transparency Paper Exits (Output Bins) Paper Sources Paper Loading See Page... 155 152 124 126 138 130 131 128 139 153 140 146 Using Print Materials Using Print Materials 123
A number of materials. Using Print Materials Using Your Printer Chapter 4 Your printer provides high quality printing on a variety of things must be considered before you print: For Information About... Avoiding Paper Jams Duplexing Print Material Specifications Characteristics Guidelines for: Card Stock Envelope Label Paper Transparency Paper Exits (Output Bins) Paper Sources Paper Loading See Page... 155 152 124 126 138 130 131 128 139 153 140 146 Using Print Materials Using Print Materials 123
User's Guide (7.1 MB)
Page 141
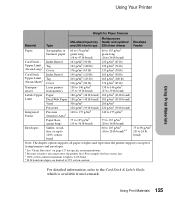
...for Paper Sources Material Type Multipurpose 250-sheet input tray feeder and optional and 500-sheet trays 250-sheet drawer Envelope Feeder Paper Card Stock Upper Limit (Grain Long)1 Card Stock Upper Limit (Grain Short)1 Transparencies Labels Upper Limit Integrated Forms Envelopes Xerographic or business paper Index Bristol Tag Cover Index ...75 to 135 g/m2 (20 to 36 lb bond) 60 to 105 g/m2 (16 to 28 lb bond)3,4 75 to 90 g/m2 (20 to the Card Stock & Labels Guide, which is 24 lb bond. 4 28 lb bond envelopes are limited to 25% cotton content. Using Print Materials 125 For example, the...
...for Paper Sources Material Type Multipurpose 250-sheet input tray feeder and optional and 500-sheet trays 250-sheet drawer Envelope Feeder Paper Card Stock Upper Limit (Grain Long)1 Card Stock Upper Limit (Grain Short)1 Transparencies Labels Upper Limit Integrated Forms Envelopes Xerographic or business paper Index Bristol Tag Cover Index ...75 to 135 g/m2 (20 to 36 lb bond) 60 to 105 g/m2 (16 to 28 lb bond)3,4 75 to 90 g/m2 (20 to the Card Stock & Labels Guide, which is 24 lb bond. 4 28 lb bond envelopes are limited to 25% cotton content. Using Print Materials 125 For example, the...
User's Guide (7.1 MB)
Page 148
... is attached to. Adhesive must be kept out of paper. For detailed information on label printing, characteristics, and design, refer to the Card Stock & Labels Guide, which leads to skew and paper jams. Excessive paper dust or chaff may affect print quality. Rough liners can ... feed and increase toner buildup in the fuser during a paper jam. The adhesive can increase paper path friction, which is available from Lexmark. Using Your Printer Using Print Materials After continuously printing approximately 10,000 page sides of labels (or each time you replace the print ...
... is attached to. Adhesive must be kept out of paper. For detailed information on label printing, characteristics, and design, refer to the Card Stock & Labels Guide, which leads to skew and paper jams. Excessive paper dust or chaff may affect print quality. Rough liners can ... feed and increase toner buildup in the fuser during a paper jam. The adhesive can increase paper path friction, which is available from Lexmark. Using Your Printer Using Print Materials After continuously printing approximately 10,000 page sides of labels (or each time you replace the print ...
User's Guide (7.1 MB)
Page 154
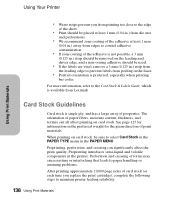
...significantly affect the print quality. When printing on card stock. Card Stock Guidelines Card stock is preferred, especially when printing bar ...a non-oozing adhesive should be sure to select Card Stock in the PAPER TYPE menu in the printer...Materials Preprinting, perforation, and creasing can all affect printing on card stock, be used. • If the labels are vinyl... The orientation of the adhesive is available from edges to the Card Stock & Labels Guide, which is not possible, a 3 .... After printing approximately 10,000 page sides of card stock (or each time you from printing too ...
...significantly affect the print quality. When printing on card stock. Card Stock Guidelines Card stock is preferred, especially when printing bar ...a non-oozing adhesive should be sure to select Card Stock in the PAPER TYPE menu in the printer...Materials Preprinting, perforation, and creasing can all affect printing on card stock, be used. • If the labels are vinyl... The orientation of the adhesive is available from edges to the Card Stock & Labels Guide, which is not possible, a 3 .... After printing approximately 10,000 page sides of card stock (or each time you from printing too ...
User's Guide (7.1 MB)
Page 155
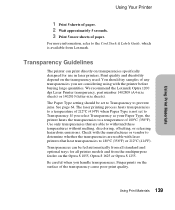
...careful when you are able to withstand these temperatures without melting, discoloring, offsetting, or releasing hazardous emissions. Fingerprints on the Optra S 1855, Optra S 1625 or Optra S 1255. We recommend the Lexmark Optra 1200 dpi Laser Printer transparency, part number 1402809 (A4-size sheets) or 1402810 (letter-size sheets). If you select ... used. Using Print Materials Using Your Printer 1 Print 5 sheets of paper. 2 Wait approximately 5 seconds. 3 Print 5 more information, refer to the Card Stock & Labels Guide, which is not set to Transparency to prevent jams. See page 64.
...careful when you are able to withstand these temperatures without melting, discoloring, offsetting, or releasing hazardous emissions. Fingerprints on the Optra S 1855, Optra S 1625 or Optra S 1255. We recommend the Lexmark Optra 1200 dpi Laser Printer transparency, part number 1402809 (A4-size sheets) or 1402810 (letter-size sheets). If you select ... used. Using Print Materials Using Your Printer 1 Print 5 sheets of paper. 2 Wait approximately 5 seconds. 3 Print 5 more information, refer to the Card Stock & Labels Guide, which is not set to Transparency to prevent jams. See page 64.


