
User's Guide (7.1 MB)
Page 3
... Getting Started Setting Up Your Printer 1 Identifying Your Printer, Features, and Options 1 Optra S 1255 and Optra S 1625 2 Optra S 1855 3 Optra S 2455 4 Unpacking the Printer 5 Determining What to Install Next 7 Installing the Dual 500-Sheet Drawer 7 Attaching the Decals 11 Removing the Print Cartridge Packaging 12 Removing the 250-Sheet Input Tray 16 Adding Names to...
... Getting Started Setting Up Your Printer 1 Identifying Your Printer, Features, and Options 1 Optra S 1255 and Optra S 1625 2 Optra S 1855 3 Optra S 2455 4 Unpacking the Printer 5 Determining What to Install Next 7 Installing the Dual 500-Sheet Drawer 7 Attaching the Decals 11 Removing the Print Cartridge Packaging 12 Removing the 250-Sheet Input Tray 16 Adding Names to...
User's Guide (7.1 MB)
Page 6
... Jam - Check Tray x 224 250 Paper Jam - Check Bin x 238 Maintaining Your Printer 247 Ordering a Print Cartridge 248 Ordering a Label Fuser Cleaner 248 Storing the Print Cartridge 249 Replacing the Print Cartridge 249 Ordering a Charge Roll Kit 250 vi Table of Contents Caring for Your Printer Understanding Printer Messages 177 Status...Problems and Questions 208 Clearing Jams 209 Possible Paper Jam Areas 209 Accessing Paper Jam Areas 211 200 and 201 Paper Jam - Remove Cartridge 212 202 Paper Jam - Check Env Feeder 234 27x Paper Jam - Check MP Feeder 234 260 Paper Jam -
... Jam - Check Tray x 224 250 Paper Jam - Check Bin x 238 Maintaining Your Printer 247 Ordering a Print Cartridge 248 Ordering a Label Fuser Cleaner 248 Storing the Print Cartridge 249 Replacing the Print Cartridge 249 Ordering a Charge Roll Kit 250 vi Table of Contents Caring for Your Printer Understanding Printer Messages 177 Status...Problems and Questions 208 Clearing Jams 209 Possible Paper Jam Areas 209 Accessing Paper Jam Areas 211 200 and 201 Paper Jam - Remove Cartridge 212 202 Paper Jam - Check Env Feeder 234 27x Paper Jam - Check MP Feeder 234 260 Paper Jam -
User's Guide (7.1 MB)
Page 28
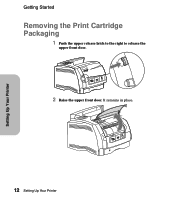
It remains in place. 12 Setting Up Your Printer Setting Up Your Printer Getting Started Removing the Print Cartridge Packaging 1 Push the upper release latch to the right to release the upper front door. 2 Raise the upper front door.
It remains in place. 12 Setting Up Your Printer Setting Up Your Printer Getting Started Removing the Print Cartridge Packaging 1 Push the upper release latch to the right to release the upper front door. 2 Raise the upper front door.
User's Guide (7.1 MB)
Page 29
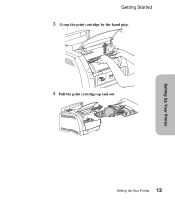
Setting Up Your Printer Getting Started 3 Grasp the print cartridge by the hand grip. 4 Pull the print cartridge up and out. 13 Setting Up Your Printer
Setting Up Your Printer Getting Started 3 Grasp the print cartridge by the hand grip. 4 Pull the print cartridge up and out. 13 Setting Up Your Printer
User's Guide (7.1 MB)
Page 31
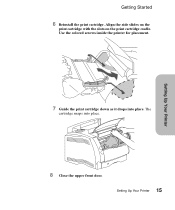
Getting Started 6 Reinstall the print cartridge. Setting Up Your Printer 7 Guide the print cartridge down as it drops into place. 8 Close the upper front door. 15 Setting Up Your Printer Align the side slides on the print cartridge with the slots on the print cartridge cradle. Use the colored arrows inside the printer for placement. The cartridge snaps into place.
Getting Started 6 Reinstall the print cartridge. Setting Up Your Printer 7 Guide the print cartridge down as it drops into place. 8 Close the upper front door. 15 Setting Up Your Printer Align the side slides on the print cartridge with the slots on the print cartridge cradle. Use the colored arrows inside the printer for placement. The cartridge snaps into place.

User's Guide (7.1 MB)
Page 45
... see "Understanding Printer Messages" on page 177 for the TESTS MENU. Setting Up Your Printer Getting Started Printing a Test Page WARNING: Complete "Removing the Print Cartridge Packaging" on page 12 before you print a page. 1 Make sure the printer power is shown on the display and remains on the display until the...
... see "Understanding Printer Messages" on page 177 for the TESTS MENU. Setting Up Your Printer Getting Started Printing a Test Page WARNING: Complete "Removing the Print Cartridge Packaging" on page 12 before you print a page. 1 Make sure the printer power is shown on the display and remains on the display until the...
User's Guide (7.1 MB)
Page 61
... function lets you remove MarkVision from your company define valuable information about the printer, such as, a unique name, the name of toner in the print cartridge. This information is specified in the Property Tag field and the information is stored in Windows 95, Windows NT 4.0, and OS/2. 45 Using the Printer...
... function lets you remove MarkVision from your company define valuable information about the printer, such as, a unique name, the name of toner in the print cartridge. This information is specified in the Property Tag field and the information is stored in Windows 95, Windows NT 4.0, and OS/2. 45 Using the Printer...
User's Guide (7.1 MB)
Page 71
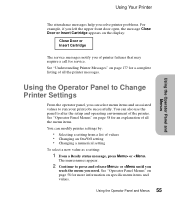
... The attendance messages help you solve printer problems. For example, if you left the upper front door open, the message Close Door or Insert Cartridge appears on page 58 for an explanation of all the printer messages. You can also use the panel to run your print jobs successfully. See... "Operator Panel Menus" on the display: Close Door or Insert Cartridge The service messages notify you of printer failures that may require a call for a complete listing of all the menu items. You can modify printer ...
... The attendance messages help you solve printer problems. For example, if you left the upper front door open, the message Close Door or Insert Cartridge appears on page 58 for an explanation of all the printer messages. You can also use the panel to run your print jobs successfully. See... "Operator Panel Menus" on the display: Close Door or Insert Cartridge The service messages notify you of printer failures that may require a call for a complete listing of all the menu items. You can modify printer ...
User's Guide (7.1 MB)
Page 147
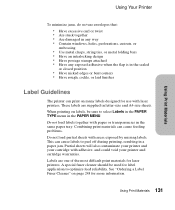
... labels to select Labels in the PAPER TYPE menu in a paper jam. Partial sheets will also contaminate your printer and your cartridge with adhesive, and could void your printer and cartridge warranties. Using Print Materials 131 These labels are one of the most difficult print materials for label application to optimize feed...
... labels to select Labels in the PAPER TYPE menu in a paper jam. Partial sheets will also contaminate your printer and your cartridge with adhesive, and could void your printer and cartridge warranties. Using Print Materials 131 These labels are one of the most difficult print materials for label application to optimize feed...
User's Guide (7.1 MB)
Page 148
... successfully with these liners. Acrylic based adhesives are harder to . The adhesive can increase paper path friction, which is available from Lexmark. The major adhesive problem is reduced and feed performance improves with your forms supplier for cut-sheet label printers. This is attached to...design and the use of full label sheets (sheets that do not have areas exposed by missing labels). Toner contamination is printer and cartridge contamination. Tissue or plain bond, porous, lay-flat liners are two major types of label adhesives: removable and permanent. For detailed ...
... successfully with these liners. Acrylic based adhesives are harder to . The adhesive can increase paper path friction, which is available from Lexmark. The major adhesive problem is reduced and feed performance improves with your forms supplier for cut-sheet label printers. This is attached to...design and the use of full label sheets (sheets that do not have areas exposed by missing labels). Toner contamination is printer and cartridge contamination. Tissue or plain bond, porous, lay-flat liners are two major types of label adhesives: removable and permanent. For detailed ...
User's Guide (7.1 MB)
Page 152
... each label. Butt-cut labels may or may not have adhesive to the edge of the sheet will contaminate your printer and cartridge, and could void your printer and cartridge warranties. If matrix must be smooth and clean with a non-print area between die-cuts of 1 mm. Butt-cut labels are preferred...
... each label. Butt-cut labels may or may not have adhesive to the edge of the sheet will contaminate your printer and cartridge, and could void your printer and cartridge warranties. If matrix must be smooth and clean with a non-print area between die-cuts of 1 mm. Butt-cut labels are preferred...
User's Guide (7.1 MB)
Page 154
...a non-oozing adhesive should be sure to select Card Stock in the PAPER TYPE menu in .) strip from the leading edge to prevent labels from Lexmark. Preprinting introduces semi-liquid and volatile components in the fuser. • Portrait orientation is preferred, especially when printing bar codes. For more information, ... from peeling in the printer. The orientation of properties. Using Print Materials Using Your Printer • Waste strips prevent you replace the print cartridge), complete the following steps to maintain printer feeding reliability: 138 Using Print Materials
...a non-oozing adhesive should be sure to select Card Stock in the PAPER TYPE menu in .) strip from the leading edge to prevent labels from Lexmark. Preprinting introduces semi-liquid and volatile components in the fuser. • Portrait orientation is preferred, especially when printing bar codes. For more information, ... from peeling in the printer. The orientation of properties. Using Print Materials Using Your Printer • Waste strips prevent you replace the print cartridge), complete the following steps to maintain printer feeding reliability: 138 Using Print Materials
User's Guide (7.1 MB)
Page 199
...x Empty Tray x Low Tray x Missing Caring for the greater numbered tray first. To utilize the remaining toner, remove the print cartridge and shake it gently. Before the toner supply is opened. Understanding Printer Messages 183 Understanding Printer Messages This message does not display for ...the envelope feeder or the multipurpose feeder. Reinstall the same print cartridge. x represents the number of print material. The message is cleared when the upper front door is depleted, the printer might display...
...x Empty Tray x Low Tray x Missing Caring for the greater numbered tray first. To utilize the remaining toner, remove the print cartridge and shake it gently. Before the toner supply is opened. Understanding Printer Messages 183 Understanding Printer Messages This message does not display for ...the envelope feeder or the multipurpose feeder. Reinstall the same print cartridge. x represents the number of print material. The message is cleared when the upper front door is depleted, the printer might display...
User's Guide (7.1 MB)
Page 200
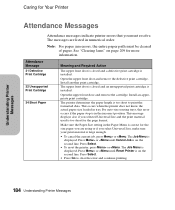
... Caring for Your Printer Attendance Messages Attendance messages indicate printer errors that you must be cleared of paper. Install another print cartridge. Install an appropriate print cartridge. The printer determines the paper length is in the Paper Menu is correct for the size paper you are listed in...you select Universal Size, make sure your print material is too short for more information. Open the upper front door and remove the cartridge. Make sure the Paper Size setting in the incorrect position. The messages are using or if you selected Universal Size and the ...
... Caring for Your Printer Attendance Messages Attendance messages indicate printer errors that you must be cleared of paper. Install another print cartridge. Install an appropriate print cartridge. The printer determines the paper length is in the Paper Menu is correct for the size paper you are listed in...you select Universal Size, make sure your print material is too short for more information. Open the upper front door and remove the cartridge. Make sure the Paper Size setting in the incorrect position. The messages are using or if you selected Universal Size and the ...
User's Guide (7.1 MB)
Page 206
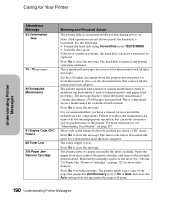
... must be replaced. It is discarded and must be re-transmitted from Lexmark. For more information. The printer detects a paper jam under the print cartridge. Open the upper front door, remove the print cartridge, and remove the jammed print material. however, the Auto setting does ... panel for internal network adapter messages. Press Go to resume printing. The toner supply is ignored and normal operation continues. Remove Cartridge" on page 212 for Your Printer Understanding Printer Messages Attendance Message 63 Unformatted Disk 70 - 79 messages 80 Scheduled Maintenance 81...
... must be replaced. It is discarded and must be re-transmitted from Lexmark. For more information. The printer detects a paper jam under the print cartridge. Open the upper front door, remove the print cartridge, and remove the jammed print material. however, the Auto setting does ... panel for internal network adapter messages. Press Go to resume printing. The toner supply is ignored and normal operation continues. Remove Cartridge" on page 212 for Your Printer Understanding Printer Messages Attendance Message 63 Unformatted Disk 70 - 79 messages 80 Scheduled Maintenance 81...
User's Guide (7.1 MB)
Page 207
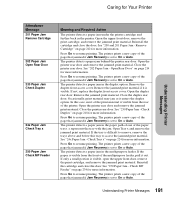
... remove the trays above and below this case, most of the print material is set to resume printing. Caring for more information. Reinstall the cartridge and close the door. The printer prints a new copy of the page that jammed if Jam Recovery is visible from the front of the ...or Auto. Close the printer rear door. Check Duplex" on page 234 for Your Printer Understanding Printer Messages Attendance Message 201 Paper Jam Remove Cartridge 202 Paper Jam Open Rear Door 230 Paper Jam Check Duplex 24x Paper Jam Check Tray x 250 Paper Jam Check MP Feeder Meaning and ...
... remove the trays above and below this case, most of the print material is set to resume printing. Caring for more information. Reinstall the cartridge and close the door. The printer prints a new copy of the page that jammed if Jam Recovery is visible from the front of the ...or Auto. Close the printer rear door. Check Duplex" on page 234 for Your Printer Understanding Printer Messages Attendance Message 201 Paper Jam Remove Cartridge 202 Paper Jam Open Rear Door 230 Paper Jam Check Duplex 24x Paper Jam Check Tray x 250 Paper Jam Check MP Feeder Meaning and ...

User's Guide (7.1 MB)
Page 208
If the envelope is jammed between two output expanders. Reinstall the print cartridge, if it is still difficult to remove, you may require service. Close the upper front door. See "260 Paper Jam Check Env Feeder" on page .... Open the printer upper front door. Reinstall the envelope feeder. The printer prints a new copy of the page that may have to remove the print cartridge to On or Auto. The printer prints a new copy of the page that jammed if Jam Recovery is visible from the output expander, open the...
If the envelope is jammed between two output expanders. Reinstall the print cartridge, if it is still difficult to remove, you may require service. Close the upper front door. See "260 Paper Jam Check Env Feeder" on page .... Open the printer upper front door. Reinstall the envelope feeder. The printer prints a new copy of the page that may have to remove the print cartridge to On or Auto. The printer prints a new copy of the page that jammed if Jam Recovery is visible from the output expander, open the...
User's Guide (7.1 MB)
Page 210
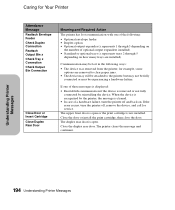
... failure. The printer clears the message and continues. Understanding Printer Messages 194 Understanding Printer Messages Close the door or install the print cartridge, then close the door. If one of the following ways: • The device was removed from the printer, for example,...Attendance Message Reattach Envelope Feeder Check Duplex Connection Reattach Output Bin x Check Tray x Connection Check Output Bin Connection Close Door or Insert Cartridge Close Duplex Rear Door Meaning and Required Action The printer has lost in the following : • Optional envelope feeder • ...
... failure. The printer clears the message and continues. Understanding Printer Messages 194 Understanding Printer Messages Close the door or install the print cartridge, then close the door. If one of the following ways: • The device was removed from the printer, for example,...Attendance Message Reattach Envelope Feeder Check Duplex Connection Reattach Output Bin x Check Tray x Connection Check Output Bin Connection Close Door or Insert Cartridge Close Duplex Rear Door Meaning and Required Action The printer has lost in the following : • Optional envelope feeder • ...
User's Guide (7.1 MB)
Page 217
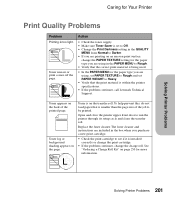
...to Darker. • If you are using in the box when you purchase a new print cartridge. • Check the print cartridge to see if it is installed correctly or change the print cartridge. • If the problem continues, change the PAPER TEXTURE setting for the paper type you are...instructions are included in the PAPER MENU to Rough. • Verify that is within the printer specifications. • If the problem continues, call Lexmark Technical Support. See "Ordering a Charge Roll Kit" on the page. Toner fog or background shading appears on page 250 for more information. Toner...
...to Darker. • If you are using in the box when you purchase a new print cartridge. • Check the print cartridge to see if it is installed correctly or change the print cartridge. • If the problem continues, change the PAPER TEXTURE setting for the paper type you are...instructions are included in the PAPER MENU to Rough. • Verify that is within the printer specifications. • If the problem continues, call Lexmark Technical Support. See "Ordering a Charge Roll Kit" on the page. Toner fog or background shading appears on page 250 for more information. Toner...
User's Guide (7.1 MB)
Page 218
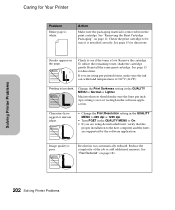
...is low. Reduce the complexity of 212oC (414oF). Solving Printer Problems 202 Solving Printer Problems See page 15 for directions. Remove the cartridge. See page 15 for directions. Change the Print Darkness setting in the software application. Caring for Your Printer Problem Entire page is ... ink can withstand temperatures of the job or add additional memory. See "Removing the Print Cartridge Packaging" on the page. Streaks appear on page 12. Reinstall the same print cartridge. If you are supported by the software application. Characters have jagged or uneven edges. •...
...is low. Reduce the complexity of 212oC (414oF). Solving Printer Problems 202 Solving Printer Problems See page 15 for directions. Remove the cartridge. See page 15 for directions. Change the Print Darkness setting in the software application. Caring for Your Printer Problem Entire page is ... ink can withstand temperatures of the job or add additional memory. See "Removing the Print Cartridge Packaging" on the page. Streaks appear on page 12. Reinstall the same print cartridge. If you are supported by the software application. Characters have jagged or uneven edges. •...

