
Supplies Guide
Page 2
...Lexmark Return Program Regular Imaging unit 520Z 520ZA Ordering a maintenance kit To identify the supported fuser type, view the label on the front of toner. Do either of 3 Item Regular cartridge Worldwide High Yield Toner Cartridge 520HA1 Extra High Yield Toner Cartridge 520XA2 1 This cartridge is supported only in MS810n and MS810dn printer... with the supply. Extended exposure to light may cause imaging unit parts to fail prior to direct light for MS810, MS811, and MS812 Fuser maintenance kit type Part number Type 00 40X8420 Type 01 40X8421 Type 02 40X8422 Type...
...Lexmark Return Program Regular Imaging unit 520Z 520ZA Ordering a maintenance kit To identify the supported fuser type, view the label on the front of toner. Do either of 3 Item Regular cartridge Worldwide High Yield Toner Cartridge 520HA1 Extra High Yield Toner Cartridge 520XA2 1 This cartridge is supported only in MS810n and MS810dn printer... with the supply. Extended exposure to light may cause imaging unit parts to fail prior to direct light for MS810, MS811, and MS812 Fuser maintenance kit type Part number Type 00 40X8420 Type 01 40X8421 Type 02 40X8422 Type...
User's Guide
Page 2
... Web Server 40 Changing port settings after installing a new network Internal Solutions Port 41 Setting up serial printing...42 Verifying printer setup...43 Using MS810n, MS810dn, MS811n, MS811dn, MS812dn 45 Learning about the printer...45 Printer configurations ...45 Using the printer control panel...47 Understanding the colors of the indicator and Sleep button lights 48
... Web Server 40 Changing port settings after installing a new network Internal Solutions Port 41 Setting up serial printing...42 Verifying printer setup...43 Using MS810n, MS810dn, MS811n, MS811dn, MS812dn 45 Learning about the printer...45 Printer configurations ...45 Using the printer control panel...47 Understanding the colors of the indicator and Sleep button lights 48
User's Guide
Page 45
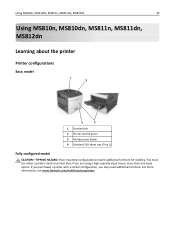
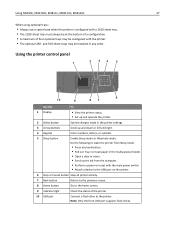
You must use either a printer stand or printer base if you may need additional furniture. Using MS810n, MS810dn, MS811n, MS811dn, MS812dn 45 Using MS810n, MS810dn, MS811n, MS811dn, MS812dn Learning about the printer Printer configurations Basic model 1 2 4 3 1 Standard bin 2 Printer control panel 3 Multipurpose feeder 4 Standard 550‑sheet tray (Tray 1) Fully configured model CAUTION-TIPPING HAZARD: Floor-mounted configurations...
You must use either a printer stand or printer base if you may need additional furniture. Using MS810n, MS810dn, MS811n, MS811dn, MS812dn 45 Using MS810n, MS810dn, MS811n, MS811dn, MS812dn Learning about the printer Printer configurations Basic model 1 2 4 3 1 Standard bin 2 Printer control panel 3 Multipurpose feeder 4 Standard 550‑sheet tray (Tray 1) Fully configured model CAUTION-TIPPING HAZARD: Floor-mounted configurations...
User's Guide
Page 46
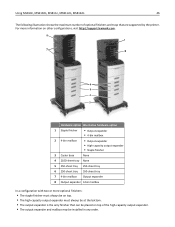
Using MS810n, MS810dn, MS811n, MS811dn, MS812dn 46 The following illustration shows the maximum number of the high‑capacity output expander. • The output expander and mailbox may be placed on top of optional finishers and trays that are supported by the printer. For more information on other configurations, visit http://support.lexmark.com...
Using MS810n, MS810dn, MS811n, MS811dn, MS812dn 46 The following illustration shows the maximum number of the high‑capacity output expander. • The output expander and mailbox may be placed on top of optional finishers and trays that are supported by the printer. For more information on other configurations, visit http://support.lexmark.com...
User's Guide
Page 47
... the front USB port supports flash drives. Do the following to wake the printer from Sleep mode: • Press any order. Using MS810n, MS810dn, MS811n, MS811dn, MS812dn 47 When using optional trays: • Always use a caster base when the printer is configured with a 2100‑sheet tray. • The 2100‑sheet tray...
... the front USB port supports flash drives. Do the following to wake the printer from Sleep mode: • Press any order. Using MS810n, MS810dn, MS811n, MS811dn, MS812dn 47 When using optional trays: • Always use a caster base when the printer is configured with a 2100‑sheet tray. • The 2100‑sheet tray...

User's Guide
Page 48
... Sleep button light Off Solid amber Blinking amber Blinking amber for 1.9 seconds in pulsing pattern Printer status The printer is waking from or entering Hibernate mode. Using MS810n, MS810dn, MS811n, MS811dn, MS812dn 48 Understanding the colors of the indicator and Sleep button lights The colors of... paper and specialty media can affect how reliably documents print. The printer is idle or in Sleep mode. Loading...
... Sleep button light Off Solid amber Blinking amber Blinking amber for 1.9 seconds in pulsing pattern Printer status The printer is waking from or entering Hibernate mode. Using MS810n, MS810dn, MS811n, MS811dn, MS812dn 48 Understanding the colors of the indicator and Sleep button lights The colors of... paper and specialty media can affect how reliably documents print. The printer is idle or in Sleep mode. Loading...
User's Guide
Page 49
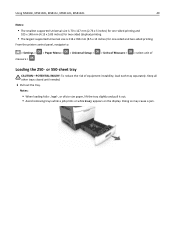
... and pull it out. • Avoid removing trays while a job prints or while Busy appears on the display. Doing so may cause a jam. From the printer control panel, navigate to: > Settings > measure > > Paper Menu > > Universal Setup > > Units of Measure > > select unit of Loading the 250‑ ...or 550‑sheet tray CAUTION-POTENTIAL INJURY: To reduce the risk of equipment instability, load each tray separately. Using MS810n, MS810dn, MS811n, MS811dn, MS812dn 49 Notes: • The smallest supported Universal size is 70 x 127 mm (2.76 x 5 inches) for one...
... and pull it out. • Avoid removing trays while a job prints or while Busy appears on the display. Doing so may cause a jam. From the printer control panel, navigate to: > Settings > measure > > Paper Menu > > Universal Setup > > Units of Measure > > select unit of Loading the 250‑ ...or 550‑sheet tray CAUTION-POTENTIAL INJURY: To reduce the risk of equipment instability, load each tray separately. Using MS810n, MS810dn, MS811n, MS811dn, MS812dn 49 Notes: • The smallest supported Universal size is 70 x 127 mm (2.76 x 5 inches) for one...
User's Guide
Page 54
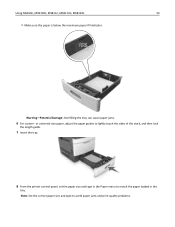
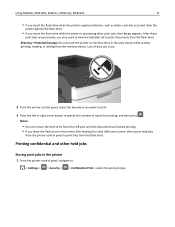
Warning-Potential Damage: Overfilling the tray can cause paper jams. 6 For custom‑ or universal‑size paper, adjust the paper guides to lightly touch the sides of the stack, and then lock the length guide. 7 Insert the tray. 8 From the printer control panel, set the paper size and type in the tray. Using MS810n, MS810dn, MS811n, MS811dn, MS812dn 54 • Make sure the paper is below the maximum paper fill indicator. Note: Set the correct paper size and type to match the paper loaded in the Paper menu to avoid paper jams and print quality problems.
Warning-Potential Damage: Overfilling the tray can cause paper jams. 6 For custom‑ or universal‑size paper, adjust the paper guides to lightly touch the sides of the stack, and then lock the length guide. 7 Insert the tray. 8 From the printer control panel, set the paper size and type in the tray. Using MS810n, MS810dn, MS811n, MS811dn, MS812dn 54 • Make sure the paper is below the maximum paper fill indicator. Note: Set the correct paper size and type to match the paper loaded in the Paper menu to avoid paper jams and print quality problems.
User's Guide
Page 62
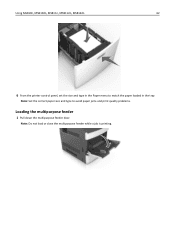
Note: Do not load or close the multipurpose feeder while a job is printing. Note: Set the correct paper size and type to match the paper loaded in the Paper menu to avoid paper jams and print quality problems. Loading the multipurpose feeder 1 Pull down the multipurpose feeder door. EXECB5 A4 A5 LTR Using MS810n, MS810dn, MS811n, MS811dn, MS812dn 62 6 From the printer control panel, set the size and type in the tray.
Note: Do not load or close the multipurpose feeder while a job is printing. Note: Set the correct paper size and type to match the paper loaded in the Paper menu to avoid paper jams and print quality problems. Loading the multipurpose feeder 1 Pull down the multipurpose feeder door. EXECB5 A4 A5 LTR Using MS810n, MS810dn, MS811n, MS811dn, MS812dn 62 6 From the printer control panel, set the size and type in the tray.
User's Guide
Page 66
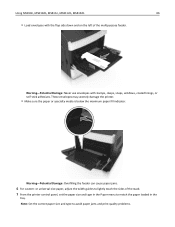
... lightly touch the sides of the multipurpose feeder. Note: Set the correct paper size and type to match the paper loaded in the tray. Using MS810n, MS810dn, MS811n, MS811dn, MS812dn 66 • Load envelopes with stamps, clasps, snaps, windows, coated linings, or self‑stick adhesives. LT R 5 A ...E X E B 5 Warning-Potential Damage: Never use envelopes with the flap side down and on the left of the stack. 7 From the printer control panel, set the paper size and type in the Paper menu to avoid paper jams and print quality problems. These envelopes may severely damage...
... lightly touch the sides of the multipurpose feeder. Note: Set the correct paper size and type to match the paper loaded in the tray. Using MS810n, MS810dn, MS811n, MS811dn, MS812dn 66 • Load envelopes with stamps, clasps, snaps, windows, coated linings, or self‑stick adhesives. LT R 5 A ...E X E B 5 Warning-Potential Damage: Never use envelopes with the flap side down and on the left of the stack. 7 From the printer control panel, set the paper size and type in the Paper menu to avoid paper jams and print quality problems. These envelopes may severely damage...
User's Guide
Page 67
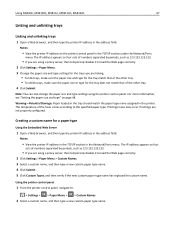
... paper size and type settings for a paper type Using the Embedded Web Server 1 Open a Web browser, and then type the printer IP address in the printer. Note: You can also change the paper size and type settings using a proxy server, then temporarily disable it to load the Web... type name. Creating a custom name for the trays you are using the printer control panel. Warning-Potential Damage: Paper loaded in the tray should match the paper type name assigned in the address field. Using MS810n, MS810dn, MS811n, MS811dn, MS812dn 67 Linking and unlinking trays Linking and unlinking...
... paper size and type settings for a paper type Using the Embedded Web Server 1 Open a Web browser, and then type the printer IP address in the printer. Note: You can also change the paper size and type settings using a proxy server, then temporarily disable it to load the Web... type name. Creating a custom name for the trays you are using the printer control panel. Warning-Potential Damage: Paper loaded in the tray should match the paper type name assigned in the address field. Using MS810n, MS810dn, MS811n, MS811dn, MS812dn 67 Linking and unlinking trays Linking and unlinking...
User's Guide
Page 68
... for all user‑defined custom names. 4 Click Submit. b Click Properties, Preferences, Options, or Setup. Notes: • View the printer IP address in the TCP/IP section in the address field. Using MS810n, MS810dn, MS811n, MS811dn, MS812dn 68 3 Press . 4 Press Custom Types, and then verify if the new custom paper type name...
... for all user‑defined custom names. 4 Click Submit. b Click Properties, Preferences, Options, or Setup. Notes: • View the printer IP address in the TCP/IP section in the address field. Using MS810n, MS810dn, MS811n, MS811dn, MS812dn 68 3 Press . 4 Press Custom Types, and then verify if the new custom paper type name...
User's Guide
Page 69
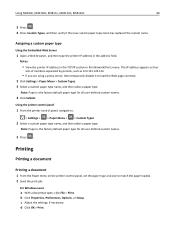
... File > Page Setup. 2 Choose a paper size or create a custom size to match the paper loaded. 3 Click OK. Using the printer control panel 1 From the printer control panel, navigate to match the paper loaded, or select the appropriate tray or feeder. 3 Click Print. b Customize the settings in the...and then type the IP address of numbers separated by periods, such as four sets of the printer in the Page Setup dialog if necessary: 1 With a document open , choose File > Print. Using MS810n, MS810dn, MS811n, MS811dn, MS812dn 69 For Macintosh users a Customize the settings in the address ...
... File > Page Setup. 2 Choose a paper size or create a custom size to match the paper loaded. 3 Click OK. Using the printer control panel 1 From the printer control panel, navigate to match the paper loaded, or select the appropriate tray or feeder. 3 Click Print. b Customize the settings in the...and then type the IP address of numbers separated by periods, such as four sets of the printer in the Page Setup dialog if necessary: 1 With a document open , choose File > Print. Using MS810n, MS810dn, MS811n, MS811dn, MS812dn 69 For Macintosh users a Customize the settings in the address ...
User's Guide
Page 70
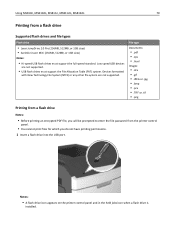
..., or 1GB sizes) Notes: • Hi‑speed USB flash drives must support the File Allocation Table (FAT) system. Using MS810n, MS810dn, MS811n, MS811dn, MS812dn 70 Printing from the printer control panel. • You cannot print files for which you do not have printing permissions. 1 Insert a flash drive into the ... system are not supported. • USB flash drives must support the full‑speed standard. Notes: • A flash drive icon appears on the printer control panel and in the held jobs icon when a flash drive is installed. Low-speed USB devices are not supported.
..., or 1GB sizes) Notes: • Hi‑speed USB flash drives must support the File Allocation Table (FAT) system. Using MS810n, MS810dn, MS811n, MS811dn, MS812dn 70 Printing from the printer control panel. • You cannot print files for which you do not have printing permissions. 1 Insert a flash drive into the ... system are not supported. • USB flash drives must support the full‑speed standard. Notes: • A flash drive icon appears on the printer control panel and in the held jobs icon when a flash drive is installed. Low-speed USB devices are not supported.
User's Guide
Page 71
...MS810n, MS810dn, MS811n, MS811dn, MS812dn 71 • If you insert the flash drive when the printer requires attention, such as when a jam has occurred, then the printer ignores the flash drive. • If you leave the flash drive in the printer after leaving the initial USB menu screen, then access held jobs from the printer...Printing confidential and other print jobs, then Busy appears. Warning-Potential Damage: Do not touch the printer or the flash drive in the printer 1 From the printer control panel, navigate to specify the number of copies for printing, and then press . After ...
...MS810n, MS810dn, MS811n, MS811dn, MS812dn 71 • If you insert the flash drive when the printer requires attention, such as when a jam has occurred, then the printer ignores the flash drive. • If you leave the flash drive in the printer after leaving the initial USB menu screen, then access held jobs from the printer...Printing confidential and other print jobs, then Busy appears. Warning-Potential Damage: Do not touch the printer or the flash drive in the printer 1 From the printer control panel, navigate to specify the number of copies for printing, and then press . After ...
User's Guide
Page 72
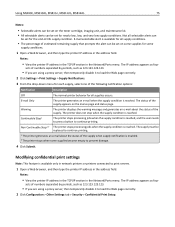
... It allows you to examine if the first copy is set the printer to : Held jobs > select your user name > select the print job > specify the number of times an invalid PIN can be entered. Using MS810n, MS810dn, MS811n, MS811dn, MS812dn 72 Print job type Description Max ...Invalid PIN Limits the number of copies > Print Confidential Job Expiration Lets you hold print jobs in the printer memory until you store print jobs for printing at ...
... It allows you to examine if the first copy is set the printer to : Held jobs > select your user name > select the print job > specify the number of times an invalid PIN can be entered. Using MS810n, MS810dn, MS811n, MS811dn, MS812dn 72 Print job type Description Max ...Invalid PIN Limits the number of copies > Print Confidential Job Expiration Lets you hold print jobs in the printer memory until you store print jobs for printing at ...
User's Guide
Page 73
...to: > Settings > Reports > > Print Directory > Note: The Print Directory menu item appears only when an optional flash memory or printer hard disk is activated. Using MS810n, MS810dn, MS811n, MS811dn, MS812dn 73 For Macintosh users 1 With a document open, choose File > Print. If necessary, click the disclosure... PPDS data stream is installed. For a confidential print job, also enter a four‑digit PIN. 4 Click OK or Print. 5 From the printer control panel, release the print job: • For confidential print jobs, navigate to: Held jobs > select your user name > Confidential Jobs > ...
...to: > Settings > Reports > > Print Directory > Note: The Print Directory menu item appears only when an optional flash memory or printer hard disk is activated. Using MS810n, MS810dn, MS811n, MS811dn, MS812dn 73 For Macintosh users 1 With a document open, choose File > Print. If necessary, click the disclosure... PPDS data stream is installed. For a confidential print job, also enter a four‑digit PIN. 4 Click OK or Print. 5 From the printer control panel, release the print job: • For confidential print jobs, navigate to: Held jobs > select your user name > Confidential Jobs > ...
User's Guide
Page 74
...c Press Enter, or click OK. 2 Double‑click the printer icon. 3 Select the print job you want to either of ‑life by periods, such as an actual display would work on the Lexmark Web site at http://support.lexmark.com. For Macintosh users 1 From the Apple Menu, navigate to ...on the Software and Documentation CD or the Embedded Web Server Administrator's Guide on a printer control panel. The virtual display works as 123.123.123.123. • If you are using the Embedded Web Server. Using MS810n, MS810dn, MS811n, MS811dn, MS812dn 74 Canceling a print job from the Embedded Web ...
...c Press Enter, or click OK. 2 Double‑click the printer icon. 3 Select the print job you want to either of ‑life by periods, such as an actual display would work on the Lexmark Web site at http://support.lexmark.com. For Macintosh users 1 From the Apple Menu, navigate to ...on the Software and Documentation CD or the Embedded Web Server Administrator's Guide on a printer control panel. The virtual display works as 123.123.123.123. • If you are using the Embedded Web Server. Using MS810n, MS810dn, MS811n, MS811dn, MS812dn 74 Canceling a print job from the Embedded Web ...
User's Guide
Page 75
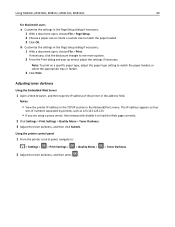
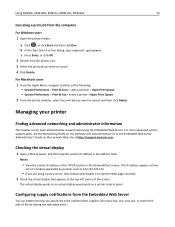
...correctly. 2 Click Configuration > Other Settings tab > Security > Confidential Print Setup. Notes: • View the printer IP address in the TCP/IP section in the Network/Ports menu. Using MS810n, MS810dn, MS811n, MS811dn, MS812dn 75 Notes: • Selectable alerts can be set on the toner cartridge, ...for the end‑of the supply appears on some supply conditions. 1 Open a Web browser, and then type the printer IP address in network printers or printers connected to prevent damage. 4 Click Submit. Not all selectable alerts can be set on the menus page and status page...
...correctly. 2 Click Configuration > Other Settings tab > Security > Confidential Print Setup. Notes: • View the printer IP address in the TCP/IP section in the Network/Ports menu. Using MS810n, MS810dn, MS811n, MS811dn, MS812dn 75 Notes: • Selectable alerts can be set on the toner cartridge, ...for the end‑of the supply appears on some supply conditions. 1 Open a Web browser, and then type the printer IP address in network printers or printers connected to prevent damage. 4 Click Submit. Not all selectable alerts can be set on the menus page and status page...
User's Guide
Page 76
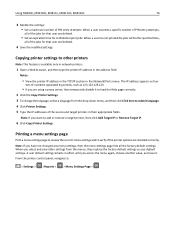
... of the jobs for that user are installed correctly. When you select and save it to load the Web page correctly. 2 Click the Copy Printer Settings. 3 To change the language, select a language from the menus, they replace the factory default settings as 123.123.123.123. •...; If you want to : > Settings > >Reports > > Menu Settings Page > Using MS810n, MS810dn, MS811n, MS811dn, MS812dn 76 3 Modify the settings: • Set a maximum number of the jobs for that user are using a proxy server, then temporarily...
... of the jobs for that user are installed correctly. When you select and save it to load the Web page correctly. 2 Click the Copy Printer Settings. 3 To change the language, select a language from the menus, they replace the factory default settings as 123.123.123.123. •...; If you want to : > Settings > >Reports > > Menu Settings Page > Using MS810n, MS810dn, MS811n, MS811dn, MS812dn 76 3 Modify the settings: • Set a maximum number of the jobs for that user are using a proxy server, then temporarily...


