User Manual
Page 2
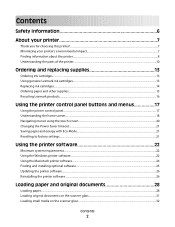
......8 Understanding the parts of the printer...10 Ordering and replacing supplies 13 Ordering ink cartridges...13 Using genuine Lexmark ink cartridges...13 Replacing ink cartridges...14 Ordering paper and other supplies...15 Recycling Lexmark products...16 Using the printer control panel buttons and menus 17 Using the printer control panel...17 Understanding......25 Updating the printer software...26 Reinstalling the printer software...26 Loading paper and original documents 28 Loading paper...28 Loading original documents on the scanner glass 31 Loading small media on the...
......8 Understanding the parts of the printer...10 Ordering and replacing supplies 13 Ordering ink cartridges...13 Using genuine Lexmark ink cartridges...13 Replacing ink cartridges...14 Ordering paper and other supplies...15 Recycling Lexmark products...16 Using the printer control panel buttons and menus 17 Using the printer control panel...17 Understanding......25 Updating the printer software...26 Reinstalling the printer software...26 Loading paper and original documents 28 Loading paper...28 Loading original documents on the scanner glass 31 Loading small media on the...
User Manual
Page 3
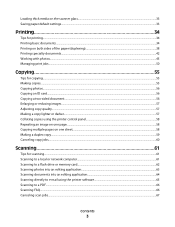
Loading thick media on the scanner glass...33 Saving paper default settings...33 Printing 34 Tips for printing...34 Printing basic documents...34 Printing on both sides of the paper (duplexing)......
Loading thick media on the scanner glass...33 Saving paper default settings...33 Printing 34 Tips for printing...34 Printing basic documents...34 Printing on both sides of the paper (duplexing)......
User Manual
Page 4
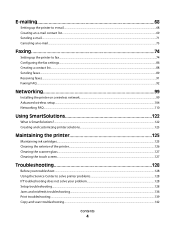
... SmartSolutions?...122 Creating and customizing printer solutions...123 Maintaining the printer 125 Maintaining ink cartridges...125 Cleaning the exterior of the printer...126 Cleaning the scanner glass...127 Cleaning the touch screen...127 Troubleshooting 128 Before you troubleshoot...128 Using the Service Center to solve printer problems 128 If Troubleshooting does...
... SmartSolutions?...122 Creating and customizing printer solutions...123 Maintaining the printer 125 Maintaining ink cartridges...125 Cleaning the exterior of the printer...126 Cleaning the scanner glass...127 Cleaning the touch screen...127 Troubleshooting 128 Before you troubleshoot...128 Using the Service Center to solve printer problems 128 If Troubleshooting does...
User Manual
Page 10
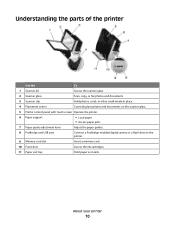
... Hold photos, cards, or other small media in place. 4 Placement corner Correctly place photos and documents on the scanner glass. 5 Printer control panel with touch screen Operate the printer. 6 Paper support • Load paper. • Access paper jams. 7 Paper guide adjustment lever Adjust the ...
... Hold photos, cards, or other small media in place. 4 Placement corner Correctly place photos and documents on the scanner glass. 5 Printer control panel with touch screen Operate the printer. 6 Paper support • Load paper. • Access paper jams. 7 Paper guide adjustment lever Adjust the ...

User Manual
Page 31
...guides rest against the edges of the paper. • You select Automatic, Normal, or Photo print quality. Loading original documents on the scanner glass 1 Open the scanner lid and place the document facedown on transfer packaging. • The print side of the transfer is faceup. • The paper ... such as heavyweight matte, labels, photo cards, and glossy paper. • You follow the loading instructions on the iron-on the scanner glass. 2 Close the scanner lid. Note: Draft mode is available but is faceup. • The paper guides rest against the edges of the transparencies.
...guides rest against the edges of the paper. • You select Automatic, Normal, or Photo print quality. Loading original documents on the scanner glass 1 Open the scanner lid and place the document facedown on transfer packaging. • The print side of the transfer is faceup. • The paper ... such as heavyweight matte, labels, photo cards, and glossy paper. • You follow the loading instructions on the iron-on the scanner glass. 2 Close the scanner lid. Note: Draft mode is available but is faceup. • The paper guides rest against the edges of the transparencies.

User Manual
Page 32
The Instant Preview screen appears. Loading paper and original documents 32 The Instant Preview screen appears. Close the scanner lid. Loading small media on the scanner glass 1 Open the scanner lid. 2 Place the small media facedown on the scanner glass. 3 Slip in additional photos, cards, or other small media in the scanner clip found in the upper part of the scanner glass.
The Instant Preview screen appears. Loading paper and original documents 32 The Instant Preview screen appears. Close the scanner lid. Loading small media on the scanner glass 1 Open the scanner lid. 2 Place the small media facedown on the scanner glass. 3 Slip in additional photos, cards, or other small media in the scanner clip found in the upper part of the scanner glass.

User Manual
Page 33
The Instant Preview screen appears. Close the scanner lid. 3 Touch Preview. Warning-Potential Damage: Loading media that you print. 1 From the home screen, navigate to: > Paper Setup 2 Choose the default settings: • If ... may cause damage to : Paper Type > select the default paper type > Accept Loading paper and original documents 33 Loading thick media on the scanner glass 1 Open the scanner lid. 2 Place the thick media facedown on the scanner glass. Saving paper default settings You can set the default paper type, then navigate to the...
The Instant Preview screen appears. Close the scanner lid. 3 Touch Preview. Warning-Potential Damage: Loading media that you print. 1 From the home screen, navigate to: > Paper Setup 2 Choose the default settings: • If ... may cause damage to : Paper Type > select the default paper type > Accept Loading paper and original documents 33 Loading thick media on the scanner glass 1 Open the scanner lid. 2 Place the thick media facedown on the scanner glass. Saving paper default settings You can set the default paper type, then navigate to the...
User Manual
Page 50
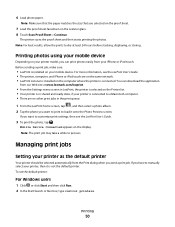
... Run box, type control printers. Note: Make sure that the paper matches the size that you send a print job. Mobile Device Connected appears on the scanner glass. 8 Touch Scan Proof Sheet > Continue. Note: The print job may take a while to a Macintosh computer. • There are no other print ...the application from your iPhone or iPod touch. Printing photos using your mobile device Depending on your printer model, you want to dry at www.lexmark.com/lexprint. • From the Settings menu screen in shared and ready state, if your printer, then it onto the Photo Preview screen. ...
... Run box, type control printers. Note: Make sure that the paper matches the size that you send a print job. Mobile Device Connected appears on the scanner glass. 8 Touch Scan Proof Sheet > Continue. Note: The print job may take a while to a Macintosh computer. • There are no other print ...the application from your iPhone or iPod touch. Printing photos using your mobile device Depending on your printer model, you want to dry at www.lexmark.com/lexprint. • From the Settings menu screen in shared and ready state, if your printer, then it onto the Photo Preview screen. ...

User Manual
Page 55
The Instant Preview home screen appears. This serves as a guide for the placement corner located on the scanner glass and close the scanner lid to keep photos, cards, or other small media in the upper part of the glass to avoid dark edges on the scanned image....original document. Copying 55 Tips for copying • When using the scanner glass, close the scanner lid. • To maximize scanning capacity of the printer, use the scanner clip found in place. Use the scanner clip when loading small media on the scanner glass. Note: From the printer control panel, you can press ...
The Instant Preview home screen appears. This serves as a guide for the placement corner located on the scanner glass and close the scanner lid to keep photos, cards, or other small media in the upper part of the glass to avoid dark edges on the scanned image....original document. Copying 55 Tips for copying • When using the scanner glass, close the scanner lid. • To maximize scanning capacity of the printer, use the scanner clip found in place. Use the scanner clip when loading small media on the scanner glass. Note: From the printer control panel, you can press ...

User Manual
Page 56
Copying an ID card 1 Load the front side of the ID card facedown on the scanner glass. Copying a two-sided document 1 Load the original document. Note: For best results, allow the prints to start printing. The Instant Preview home screen appears. 2 ... to: Copy > More Options > 2-Sided Copies 3 Select a two-sided copying option, and then touch Accept. • 2-Sided to 1-Sided-Make single-sided copies of the scanner glass. 5 Touch Continue to dry at least 24 hours before stacking, displaying, or storing. Copying photos 1 Load photo paper. 2 Place a photo facedown on the lower...
Copying an ID card 1 Load the front side of the ID card facedown on the scanner glass. Copying a two-sided document 1 Load the original document. Note: For best results, allow the prints to start printing. The Instant Preview home screen appears. 2 ... to: Copy > More Options > 2-Sided Copies 3 Select a two-sided copying option, and then touch Accept. • 2-Sided to 1-Sided-Make single-sided copies of the scanner glass. 5 Touch Continue to dry at least 24 hours before stacking, displaying, or storing. Copying photos 1 Load photo paper. 2 Place a photo facedown on the lower...
User Manual
Page 61
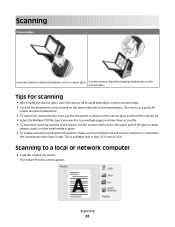
... the Multiple PDF file type if you want to scan multiple pages and save them as a guide for scanning • When using the scanner glass, close the scanner lid to a local or network computer 1 Load the original document. This serves as one file. • To maximize scanning capacity of ...8226; To initiate network scanning from the printer, make sure that "Enable network scan to computer" is available only in the General tab of the scanner glass. Tips for proper document placement. • To capture an instant preview scan, put the document or photo on the lower right side of...
... the Multiple PDF file type if you want to scan multiple pages and save them as a guide for scanning • When using the scanner glass, close the scanner lid to a local or network computer 1 Load the original document. This serves as one file. • To maximize scanning capacity of ...8226; To initiate network scanning from the printer, make sure that "Enable network scan to computer" is available only in the General tab of the scanner glass. Tips for proper document placement. • To capture an instant preview scan, put the document or photo on the lower right side of...
User Manual
Page 71
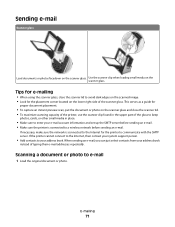
...server before sending an e-mail. • Make sure the printer is connected to the Internet for the printer to your address book instead of the scanner glass. Scanning a document or photo to avoid dark edges on the scanned image. • Look for proper document placement. • To capture ...on the lower right side of typing their e-mail addresses repeatedly. This serves as a guide for the placement corner located on the scanner glass and close the scanner lid to e-mail 1 Load the original document or photo. When sending an e-mail, you can just select contacts from your address ...
...server before sending an e-mail. • Make sure the printer is connected to the Internet for the printer to your address book instead of the scanner glass. Scanning a document or photo to avoid dark edges on the scanned image. • Look for proper document placement. • To capture ...on the lower right side of typing their e-mail addresses repeatedly. This serves as a guide for the placement corner located on the scanner glass and close the scanner lid to e-mail 1 Load the original document or photo. When sending an e-mail, you can just select contacts from your address ...
User Manual
Page 89
... when loading small media on the scanner glass. Note: To add contacts, you need to import contacts from the Address Book on your Macintosh computer. Faxing 89 Note: To add contacts, you ... then import it. 5 From the Address Book, click and drag the contacts that are supported by the fax software. Sending faxes Scanner glass Load documents or photos facedown on the scanner glass. For Macintosh users 1 From the Finder, navigate to: Applications > select your printer folder 2 Double-click Printer Settings. 3 Click the Contacts...
... when loading small media on the scanner glass. Note: To add contacts, you need to import contacts from the Address Book on your Macintosh computer. Faxing 89 Note: To add contacts, you ... then import it. 5 From the Address Book, click and drag the contacts that are supported by the fax software. Sending faxes Scanner glass Load documents or photos facedown on the scanner glass. For Macintosh users 1 From the Finder, navigate to: Applications > select your printer folder 2 Double-click Printer Settings. 3 Click the Contacts...

User Manual
Page 90
...is on the scanner glass and close the scanner lid to avoid dark edges on the scanned image. • Look for the placement corner located on the lower right side of the glass to Multiple, and then touch Add a Number. Sending faxes using the scanner glass, close the scanner lid. •...; To maximize scanning capacity of the printer, use the scanner clip found in the upper part of the scanner glass. b Touch . b Enter a fax number, or touch Address Book or History...
...is on the scanner glass and close the scanner lid to avoid dark edges on the scanned image. • Look for the placement corner located on the lower right side of the glass to Multiple, and then touch Add a Number. Sending faxes using the scanner glass, close the scanner lid. •...; To maximize scanning capacity of the printer, use the scanner clip found in the upper part of the scanner glass. b Touch . b Enter a fax number, or touch Address Book or History...
User Manual
Page 127
... before proceeding. 2 Wipe the touch screen with the touch-screen cloth that has accumulated on the scanner glass. Maintaining the printer 127 3 Dampen a clean, lint-free cloth with water. 2 Gently wipe the scanner glass clean. Cleaning the scanner glass 1 Dampen a clean, lint-free cloth with water. Warning-Potential Damage: Do not use household...
... before proceeding. 2 Wipe the touch screen with the touch-screen cloth that has accumulated on the scanner glass. Maintaining the printer 127 3 Dampen a clean, lint-free cloth with water. 2 Gently wipe the scanner glass clean. Cleaning the scanner glass 1 Dampen a clean, lint-free cloth with water. Warning-Potential Damage: Do not use household...

User Manual
Page 131
Troubleshooting 131 Note: Make sure the printer is not in Power Saver mode. Note: Make sure to close the scanner lid and the front door of the printer, and then slide the power supply cover. RECONNECT THE PRINTER POWER SUPPLY 1 Turn off the printer. 2 Unplug the power cord from the wall outlet, and then pull out the power cord from the power supply. 3 Turn over the printer to access the base of the printer. 4 Press the power supply latch. Press and hold for three seconds to turn off the printer.
Troubleshooting 131 Note: Make sure the printer is not in Power Saver mode. Note: Make sure to close the scanner lid and the front door of the printer, and then slide the power supply cover. RECONNECT THE PRINTER POWER SUPPLY 1 Turn off the printer. 2 Unplug the power cord from the wall outlet, and then pull out the power cord from the power supply. 3 Turn over the printer to access the base of the printer. 4 Press the power supply latch. Press and hold for three seconds to turn off the printer.
User Manual
Page 142
... with your computer manages resources and processes. For more of the following: SET YOUR PRINTER AS THE DEFAULT PRINTER REMOVE AND REINSTALL THE PRINTER SOFTWARE Scanner unit does not close " on page 142 • "Poor copy or scanned image quality" on page 142 • "Partial copies or scans of ...image quality If the "Before you troubleshoot" checklist does not solve the problem, then try one or more information on page 144 Copier or scanner does not respond If the "Before you troubleshoot" checklist does not solve the problem, then try one or more of the following: CLEAN THE...
... with your computer manages resources and processes. For more of the following: SET YOUR PRINTER AS THE DEFAULT PRINTER REMOVE AND REINSTALL THE PRINTER SOFTWARE Scanner unit does not close " on page 142 • "Poor copy or scanned image quality" on page 142 • "Partial copies or scans of ...image quality If the "Before you troubleshoot" checklist does not solve the problem, then try one or more information on page 144 Copier or scanner does not respond If the "Before you troubleshoot" checklist does not solve the problem, then try one or more of the following: CLEAN THE...

User Manual
Page 143
Troubleshooting 143 If the cable is marked with . MAKE SURE THE DOCUMENT OR PHOTO IS LOADED FACEDOWN ON THE SCANNER GLASS AND IN THE CORRECT CORNER Partial copies or scans of documents or photos If the "Before you troubleshoot" checklist does not solve the problem, ... CONNECTION 1 Check the USB cable for any obvious damage. For more of the following : MAKE SURE THE DOCUMENT OR PHOTO IS LOADED FACEDOWN ON THE SCANNER GLASS AND IN THE PLACEMENT CORNER SELECT A PAPER SIZE THAT MATCHES THE LOADED PAPER MAKE SURE THE ORIGINAL SIZE SETTING MATCHES THE SIZE OF THE...
Troubleshooting 143 If the cable is marked with . MAKE SURE THE DOCUMENT OR PHOTO IS LOADED FACEDOWN ON THE SCANNER GLASS AND IN THE CORRECT CORNER Partial copies or scans of documents or photos If the "Before you troubleshoot" checklist does not solve the problem, ... CONNECTION 1 Check the USB cable for any obvious damage. For more of the following : MAKE SURE THE DOCUMENT OR PHOTO IS LOADED FACEDOWN ON THE SCANNER GLASS AND IN THE PLACEMENT CORNER SELECT A PAPER SIZE THAT MATCHES THE LOADED PAPER MAKE SURE THE ORIGINAL SIZE SETTING MATCHES THE SIZE OF THE...
User Manual
Page 190
...run fax software 149 cannot scan to computer over a network 144 cannot send e-mail 145 cannot send faxes 146 cartridges, ink ordering 13 using genuine Lexmark 13 changing default printing mode 51 changing page order 35 changing Power Saver timeout 21 changing print order 35 changing printing mode 52 changing wireless... list, e-mail creating 70 setting up 69, 70 Continue button grayed out 158 Continue button not working 158 Continue button unavailable 158 copier or scanner does not respond 142 copies making 55 copy and scan troubleshooting cannot scan to computer over a network 144 copier or...
...run fax software 149 cannot scan to computer over a network 144 cannot send e-mail 145 cannot send faxes 146 cartridges, ink ordering 13 using genuine Lexmark 13 changing default printing mode 51 changing page order 35 changing Power Saver timeout 21 changing print order 35 changing printing mode 52 changing wireless... list, e-mail creating 70 setting up 69, 70 Continue button grayed out 158 Continue button not working 158 Continue button unavailable 158 copier or scanner does not respond 142 copies making 55 copy and scan troubleshooting cannot scan to computer over a network 144 copier or...
User Manual
Page 191
copy troubleshooting scanner unit does not close 142 copying 55 adjusting quality 57 collating copies 58 enlarging an image 57 ID cards 56 making a copy lighter or darker ... service fax setup 80 distinctive ring 94 documents attaching to e-mail 72 faxing using the computer 91 faxing using the control panel 90 loading on scanner glass 31 printing 34 scanning for editing 64 scanning to e-mail 71 scanning using the touch screen 61 DSL filter 78 duplex copying, automatic 59...
copy troubleshooting scanner unit does not close 142 copying 55 adjusting quality 57 collating copies 58 enlarging an image 57 ID cards 56 making a copy lighter or darker ... service fax setup 80 distinctive ring 94 documents attaching to e-mail 72 faxing using the computer 91 faxing using the control panel 90 loading on scanner glass 31 printing 34 scanning for editing 64 scanning to e-mail 71 scanning using the touch screen 61 DSL filter 78 duplex copying, automatic 59...


