
Quick Reference
Page 4
Understanding Setup mode and menu options 39 Using Setup mode...39 Changing menu settings (an example)...40 Main Menu options...41 Main menu options...41 Forms Macro options...42 Data options ...43 Control options...45 Emulation options ...46 Interface options...47 Maintaining the printer 48 Ordering supplies...48 Removing the ribbon cartridge...48 Cleaning the printer...48 Recycling Lexmark products...49 Contents 4
Understanding Setup mode and menu options 39 Using Setup mode...39 Changing menu settings (an example)...40 Main Menu options...41 Main menu options...41 Forms Macro options...42 Data options ...43 Control options...45 Emulation options ...46 Interface options...47 Maintaining the printer 48 Ordering supplies...48 Removing the ribbon cartridge...48 Cleaning the printer...48 Recycling Lexmark products...49 Contents 4
Quick Reference
Page 5
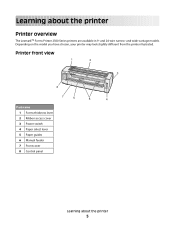
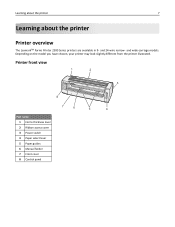
and wide-carriage models. Depending on the model you have chosen, your printer may look slightly different from the printer illustrated. and 24-wire narrow- Printer front view 1 2 A 3 8 7 6 5 4 Part name 1 Forms thickness lever 2 Ribbon access cover 3 Power switch 4 Paper select lever 5 Paper guides 6 Manual feeder 7 Front cover 8 Control panel Learning about the printer Printer overview The LexmarkTM Forms Printer 2500 Series printers are available in 9- Learning about the printer 5
and wide-carriage models. Depending on the model you have chosen, your printer may look slightly different from the printer illustrated. and 24-wire narrow- Printer front view 1 2 A 3 8 7 6 5 4 Part name 1 Forms thickness lever 2 Ribbon access cover 3 Power switch 4 Paper select lever 5 Paper guides 6 Manual feeder 7 Front cover 8 Control panel Learning about the printer Printer overview The LexmarkTM Forms Printer 2500 Series printers are available in 9- Learning about the printer 5
Quick Reference
Page 6
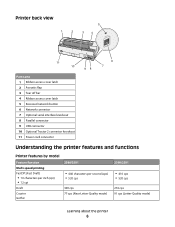
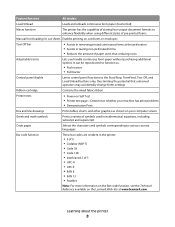
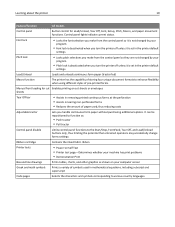
...Tear off bar 4 Ribbon access cover latch 5 Recessed network button 6 Network connector 7 Optional serial interface knockout 8 Parallel connector 9 USB connector 10 Optional Tractor 2 connector knockout 11 Power cord connector 98 6 7 Understanding the printer features and functions Printer features by model Feature/...function Multi-speed printing FastDft (Fast Draft) • 10 characters per inch (cpi) • 12 cpi Draft Courier Gothic 2580/2581 • 440 characters per second (...
...Tear off bar 4 Ribbon access cover latch 5 Recessed network button 6 Network connector 7 Optional serial interface knockout 8 Parallel connector 9 USB connector 10 Optional Tractor 2 connector knockout 11 Power cord connector 98 6 7 Understanding the printer features and functions Printer features by model Feature/...function Multi-speed printing FastDft (Fast Draft) • 10 characters per inch (cpi) • 12 cpi Draft Courier Gothic 2580/2581 • 440 characters per second (...
Quick Reference
Page 8
...Unload buttons only, thus limiting the potential that untrained operators may accidentally change forms settings Ribbon cartridge Contains the inked fabric ribbon Printer tests • Power-on Self Test • Printer test page-Determines whether your machine has print problems • Demonstration Print ...on the Lexmark Web site at the perforation • Assists in removing printed continuous forms at www.lexmark.com. Learning about the printer 8 Feature/function All models Load/Unload Loads and unloads continuous form paper (tractor fed) Macro function The printer has ...
...Unload buttons only, thus limiting the potential that untrained operators may accidentally change forms settings Ribbon cartridge Contains the inked fabric ribbon Printer tests • Power-on Self Test • Printer test page-Determines whether your machine has print problems • Demonstration Print ...on the Lexmark Web site at the perforation • Assists in removing printed continuous forms at www.lexmark.com. Learning about the printer 8 Feature/function All models Load/Unload Loads and unloads continuous form paper (tractor fed) Macro function The printer has ...

Quick Reference
Page 20
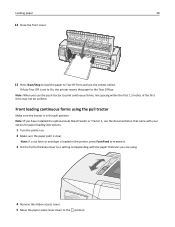
...you use the push tractor to the Tear Off bar. Loading paper 20 Front loading continuous forms using . 4 Remove the ribbon access cover. 5 Move the paper select lever down to Top-Of-Form and put the printer online. Note: When you are using the pull tractor Make sure the tractor is in... the printer, press FormFeed to remove it. 3 Set the forms thickness lever to a setting corresponding with your option ...
...you use the push tractor to the Tear Off bar. Loading paper 20 Front loading continuous forms using . 4 Remove the ribbon access cover. 5 Move the paper select lever down to Top-Of-Form and put the printer online. Note: When you are using the pull tractor Make sure the tractor is in... the printer, press FormFeed to remove it. 3 Set the forms thickness lever to a setting corresponding with your option ...
Quick Reference
Page 22
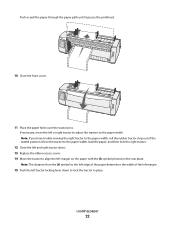
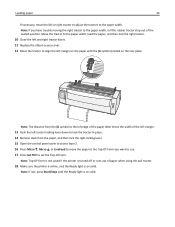
... tractor to the paper width, load the paper, and then lock the right tractor. 12 Close the left and right tractor doors. 13 Replace the ribbon access cover. 14 Move the tractor to align the left tractor locking lever down to the left edge of the paper determines the width of...
... tractor to the paper width, load the paper, and then lock the right tractor. 12 Close the left and right tractor doors. 13 Replace the ribbon access cover. 14 Move the tractor to align the left tractor locking lever down to the left edge of the paper determines the width of...
Quick Reference
Page 25
5 Remove the ribbon access cover. 6 Pull the left and right tractor locking levers up to unlock the tractors. Loading paper 25
5 Remove the ribbon access cover. 6 Pull the left and right tractor locking levers up to unlock the tractors. Loading paper 25
Quick Reference
Page 27
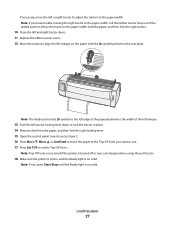
... the paper, and then lock the right tractor. 10 Close the left and right tractor doors. 11 Replace the ribbon access cover. 12 Move the tractor to align the left margin on the paper with the [A symbol printed on ... If you want to use. 17 Press Set TOF to set the Top-Of-Form. If necessary, move the paper to the Top-Of-Form you have trouble moving the right tractor to the paper width, roll the rubber tractor... or right tractor to adjust the tractors to the paper width. Note: Top-Of-Form is not saved if the printer is turned off or runs out of paper when using the pull tractor. 18 Make sure the...
... the paper, and then lock the right tractor. 10 Close the left and right tractor doors. 11 Replace the ribbon access cover. 12 Move the tractor to align the left margin on the paper with the [A symbol printed on ... If you want to use. 17 Press Set TOF to set the Top-Of-Form. If necessary, move the paper to the Top-Of-Form you have trouble moving the right tractor to the paper width, roll the rubber tractor... or right tractor to adjust the tractors to the paper width. Note: Top-Of-Form is not saved if the printer is turned off or runs out of paper when using the pull tractor. 18 Make sure the...

Quick Reference
Page 36
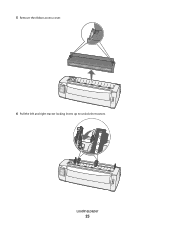
3 Pull the front cover up and out of the way. 4 Hold down the latching levers while you lift and pull the tractor unit out of the printer. 1 2 1 Tractor unit 2 Latching levers 5 Remove the ribbon access cover. 6 Turn the tractor unit around so that the latching levers are upright, facing you. 7 Place the tractor against the back slant of the printer along the tractor guides. Changing tractor positions 36
3 Pull the front cover up and out of the way. 4 Hold down the latching levers while you lift and pull the tractor unit out of the printer. 1 2 1 Tractor unit 2 Latching levers 5 Remove the ribbon access cover. 6 Turn the tractor unit around so that the latching levers are upright, facing you. 7 Place the tractor against the back slant of the printer along the tractor guides. Changing tractor positions 36
Quick Reference
Page 48
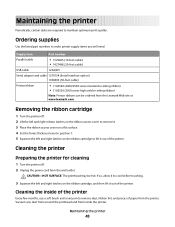
... order printer supply items you will need. Maintaining the printer 48 Cleaning the printer Preparing the printer for cleaning 1 Turn the printer off . 2 Lift the left and right release latches on the ribbon access cover to remove it. 3 Place the ribbon access cover on a flat surface. 4 Set the forms thickness... and right latches on the ribbon cartridge, and then lift it out of paper from the Lexmark Web site at www.lexmark.com. Ordering supplies Use the listed part numbers to maintain optimum print quality. Cleaning the inside the printer. CAUTION-HOT SURFACE: The printhead...
... order printer supply items you will need. Maintaining the printer 48 Cleaning the printer Preparing the printer for cleaning 1 Turn the printer off . 2 Lift the left and right release latches on the ribbon access cover to remove it. 3 Place the ribbon access cover on a flat surface. 4 Set the forms thickness... and right latches on the ribbon cartridge, and then lift it out of paper from the Lexmark Web site at www.lexmark.com. Ordering supplies Use the listed part numbers to maintain optimum print quality. Cleaning the inside the printer. CAUTION-HOT SURFACE: The printhead...
User Guide
Page 3
Main menu...49 Main menu options...49 Forms Macro options...50 Data options ...51 Control options ...52 Emulation options...54 Interface options...54 Maintaining the printer 56 Ordering supplies...56 Removing the ribbon cartridge...56 Cleaning the printer...56 Recycling Lexmark products...57 Administrative support 58 Restoring the factory default settings...58 Supporting IPSec...59 Supporting...
Main menu...49 Main menu options...49 Forms Macro options...50 Data options ...51 Control options ...52 Emulation options...54 Interface options...54 Maintaining the printer 56 Ordering supplies...56 Removing the ribbon cartridge...56 Cleaning the printer...56 Recycling Lexmark products...57 Administrative support 58 Restoring the factory default settings...58 Supporting IPSec...59 Supporting...
User Guide
Page 7
Depending on the model you have chosen, your printer may look slightly different from the printer illustrated. Printer front view 1 2 A 3 8 7 6 5 4 Part name 1 Forms thickness lever 2 Ribbon access cover 3 Power switch 4 Paper select lever 5 Paper guides 6 Manual feeder 7 Front cover 8 Control panel Learning about the printer 7 Learning about the printer Printer overview The LexmarkTM Forms Printer 2500 Series printers are available in 9‑ and 24‑wire narrow‑ and wide‑carriage models.
Depending on the model you have chosen, your printer may look slightly different from the printer illustrated. Printer front view 1 2 A 3 8 7 6 5 4 Part name 1 Forms thickness lever 2 Ribbon access cover 3 Power switch 4 Paper select lever 5 Paper guides 6 Manual feeder 7 Front cover 8 Control panel Learning about the printer 7 Learning about the printer Printer overview The LexmarkTM Forms Printer 2500 Series printers are available in 9‑ and 24‑wire narrow‑ and wide‑carriage models.
User Guide
Page 8
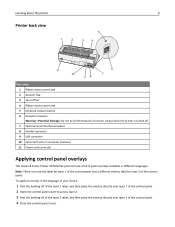
... 2 connector knockout 11 Power cord connector Applying control panel overlays The Lexmark Forms Printer 2500 Series printers have control panel overlays available in different languages. Learning about the printer 8 Printer back view 5 1 2 3 4 11 6 10 7 98 Part name 1 Ribbon access cover latch 2 Acoustic flap 3 Tear off bar 4 Ribbon access cover latch 5 Recessed network button 6 Network connector Warning-Potential Damage...
... 2 connector knockout 11 Power cord connector Applying control panel overlays The Lexmark Forms Printer 2500 Series printers have control panel overlays available in different languages. Learning about the printer 8 Printer back view 5 1 2 3 4 11 6 10 7 98 Part name 1 Ribbon access cover latch 2 Acoustic flap 3 Tear off bar 4 Ribbon access cover latch 5 Recessed network button 6 Network connector Warning-Potential Damage...
User Guide
Page 10
...using different styles of pre‑printed forms. Manual front loading for Load/Unload, Tear Off, Font, Setup, Pitch, Macro, and paper movement functions. Control panel lights indicate current status. Learning about the printer 10 Feature/function All models Control panel.../Unload buttons only, thus limiting the potential that untrained operators may accidentally change forms settings Ribbon cartridge Contains the inked fabric ribbon Printer tests • Power‑on Self Test • Printer test page-Determines whether your program • Pitch lock is deactivated when you...
...using different styles of pre‑printed forms. Manual front loading for Load/Unload, Tear Off, Font, Setup, Pitch, Macro, and paper movement functions. Control panel lights indicate current status. Learning about the printer 10 Feature/function All models Control panel.../Unload buttons only, thus limiting the potential that untrained operators may accidentally change forms settings Ribbon cartridge Contains the inked fabric ribbon Printer tests • Power‑on Self Test • Printer test page-Determines whether your program • Pitch lock is deactivated when you...
User Guide
Page 28
... tractor is clear. Front loading continuous forms using . 4 Remove the ribbon access cover. 5 Move the paper select lever down to a setting corresponding with your option for paper loading instructions. 1 Turn the printer on. 2 Make sure the paper path is in the printer, press FormFeed to remove it. 3 Set the forms thickness lever to the position.
... tractor is clear. Front loading continuous forms using . 4 Remove the ribbon access cover. 5 Move the paper select lever down to a setting corresponding with your option for paper loading instructions. 1 Turn the printer on. 2 Make sure the paper path is in the printer, press FormFeed to remove it. 3 Set the forms thickness lever to the position.

User Guide
Page 30
... tractor to the paper width, load the paper, and then lock the right tractor. 12 Close the left and right tractor doors. 13 Replace the ribbon access cover. 14 Move the tractor to align the left or right tractor to adjust the tractors to the paper width. Note: If you have...
... tractor to the paper width, load the paper, and then lock the right tractor. 12 Close the left and right tractor doors. 13 Replace the ribbon access cover. 14 Move the tractor to align the left or right tractor to adjust the tractors to the paper width. Note: If you have...

User Guide
Page 33
Loading paper 33 5 Remove the ribbon access cover. 6 Pull the left and right tractor locking levers up to unlock the tractors.
Loading paper 33 5 Remove the ribbon access cover. 6 Pull the left and right tractor locking levers up to unlock the tractors.
User Guide
Page 35
...11 Replace the ribbon access cover. 12 Move the tractor to align the left margin on the paper with the [A symbol printed on solid. Note: Top‑Of‑Form is not saved if the printer is turned off ...or runs out of paper when using the pull tractor. 18 Make sure the printer is online, and the Ready light is on...layer 2. 16 Press Micro , Micro , or LineFeed to move the paper to the Top‑Of‑Form you have trouble moving the right tractor to the paper width, roll the rubber tractor stop out of the ...
...11 Replace the ribbon access cover. 12 Move the tractor to align the left margin on the paper with the [A symbol printed on solid. Note: Top‑Of‑Form is not saved if the printer is turned off ...or runs out of paper when using the pull tractor. 18 Make sure the printer is online, and the Ready light is on...layer 2. 16 Press Micro , Micro , or LineFeed to move the paper to the Top‑Of‑Form you have trouble moving the right tractor to the paper width, roll the rubber tractor stop out of the ...

User Guide
Page 44
Changing tractor positions 44 Converting the push tractor to pull tractor position 1 Make sure the printer is off. 2 Make sure paper is not loaded in the printer. 3 Pull the front cover up and out of the way. 4 Hold down the latching levers while you lift and pull the tractor unit out of the printer. 1 2 1 Tractor unit 2 Latching levers 5 Remove the ribbon access cover. 6 Turn the tractor unit around so that the latching levers are upright, facing you. 7 Place the tractor against the back slant of the printer along the tractor guides.
Changing tractor positions 44 Converting the push tractor to pull tractor position 1 Make sure the printer is off. 2 Make sure paper is not loaded in the printer. 3 Pull the front cover up and out of the way. 4 Hold down the latching levers while you lift and pull the tractor unit out of the printer. 1 2 1 Tractor unit 2 Latching levers 5 Remove the ribbon access cover. 6 Turn the tractor unit around so that the latching levers are upright, facing you. 7 Place the tractor against the back slant of the printer along the tractor guides.

User Guide
Page 56
... CAUTION-HOT SURFACE: The printhead may be ordered from the Lexmark Web site at www.lexmark.com. Cleaning the inside the printer. Removing the ribbon cartridge 1 Turn the printer off . 2 Unplug the power cord from the printer. Vacuum any dust from around the printhead and from inside of... maintain optimum print quality. Cleaning the printer Preparing the printer for cleaning 1 Turn the printer off . 2 Lift the left and right release latches on the ribbon access cover to remove it. 3 Place the ribbon access cover on a flat surface. 4 Set the forms thickness lever to position 7. 5 Squeeze...
... CAUTION-HOT SURFACE: The printhead may be ordered from the Lexmark Web site at www.lexmark.com. Cleaning the inside the printer. Removing the ribbon cartridge 1 Turn the printer off . 2 Unplug the power cord from the printer. Vacuum any dust from around the printhead and from inside of... maintain optimum print quality. Cleaning the printer Preparing the printer for cleaning 1 Turn the printer off . 2 Lift the left and right release latches on the ribbon access cover to remove it. 3 Place the ribbon access cover on a flat surface. 4 Set the forms thickness lever to position 7. 5 Squeeze...

