
Quick Reference
Page 22
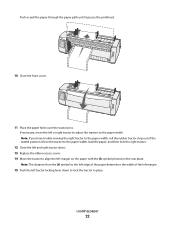
... left tractor locking lever down to the paper width. Loading paper 22 Push or pull the paper through the paper path until it passes the printhead. 10 Close the front cover. 11 Place the paper holes over the tractor pins. Note: If you have trouble moving the right tractor to align...
... left tractor locking lever down to the paper width. Loading paper 22 Push or pull the paper through the paper path until it passes the printhead. 10 Close the front cover. 11 Place the paper holes over the tractor pins. Note: If you have trouble moving the right tractor to align...
Quick Reference
Page 26
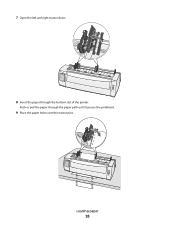
Loading paper 26 7 Open the left and right tractor doors. 8 Insert the paper through the paper path until it passes the printhead. 9 Place the paper holes over the tractor pins. Push or pull the paper through the bottom slot of the printer.
Loading paper 26 7 Open the left and right tractor doors. 8 Insert the paper through the paper path until it passes the printhead. 9 Place the paper holes over the tractor pins. Push or pull the paper through the bottom slot of the printer.
Quick Reference
Page 48
... surface. 4 Set the forms thickness lever to position 7. 5 Squeeze the left and right latches on the ribbon cartridge to cool before touching. 3 Squeeze the left and right latches on the ribbon cartridge, and then lift it out of paper from the Lexmark Web site at www.lexmark.com. Maintaining the printer 48 Cleaning the...
... surface. 4 Set the forms thickness lever to position 7. 5 Squeeze the left and right latches on the ribbon cartridge to cool before touching. 3 Squeeze the left and right latches on the ribbon cartridge, and then lift it out of paper from the Lexmark Web site at www.lexmark.com. Maintaining the printer 48 Cleaning the...

User Guide
Page 6
..., such as furniture and walls. Inspect the power cord regularly for the use of some parts may be obvious. The safety features of specific Lexmark components. If so, allow it . Safety information 6 Safety information Connect the power supply cord to cool before inspecting it to a properly grounded..., a risk of misuse. If the power cord is not responsible for signs of fire or electrical shock results. CAUTION-POTENTIAL INJURY: The printhead may not always be hot. Do not pinch the power cord between objects such as the power supply cord or telephone, during a lightning...
..., such as furniture and walls. Inspect the power cord regularly for the use of some parts may be obvious. The safety features of specific Lexmark components. If so, allow it . Safety information 6 Safety information Connect the power supply cord to cool before inspecting it to a properly grounded..., a risk of misuse. If the power cord is not responsible for signs of fire or electrical shock results. CAUTION-POTENTIAL INJURY: The printhead may not always be hot. Do not pinch the power cord between objects such as the power supply cord or telephone, during a lightning...

User Guide
Page 30
... adjust the tractors to lock the tractor in place. Loading paper 30 Push or pull the paper through the paper path until it passes the printhead. 10 Close the front cover. 11 Place the paper holes over the tractor pins. Move the tractor to the paper width, load the paper, and...
... adjust the tractors to lock the tractor in place. Loading paper 30 Push or pull the paper through the paper path until it passes the printhead. 10 Close the front cover. 11 Place the paper holes over the tractor pins. Move the tractor to the paper width, load the paper, and...
User Guide
Page 34
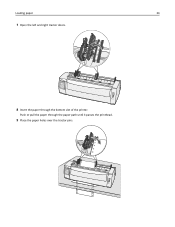
Push or pull the paper through the bottom slot of the printer. Loading paper 34 7 Open the left and right tractor doors. 8 Insert the paper through the paper path until it passes the printhead. 9 Place the paper holes over the tractor pins.
Push or pull the paper through the bottom slot of the printer. Loading paper 34 7 Open the left and right tractor doors. 8 Insert the paper through the paper path until it passes the printhead. 9 Place the paper holes over the tractor pins.

User Guide
Page 56
...the forms thickness lever to position 7. 5 Squeeze the left and right release latches on the ribbon cartridge to order printer supply items you will need. Cleaning the inside the printer. CAUTION-HOT SURFACE: The printhead ...may be ordered from the wall outlet. Cleaning the printer Preparing the printer for cleaning 1 Turn the printer off . 2 Lift the left and right latches on the ribbon access cover to remove it out of the printer. Removing the ribbon cartridge 1 Turn the printer off . 2 Unplug the power cord from the Lexmark...
...the forms thickness lever to position 7. 5 Squeeze the left and right release latches on the ribbon cartridge to order printer supply items you will need. Cleaning the inside the printer. CAUTION-HOT SURFACE: The printhead ...may be ordered from the wall outlet. Cleaning the printer Preparing the printer for cleaning 1 Turn the printer off . 2 Lift the left and right latches on the ribbon access cover to remove it out of the printer. Removing the ribbon cartridge 1 Turn the printer off . 2 Unplug the power cord from the Lexmark...
User Guide
Page 58
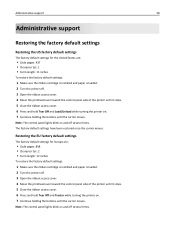
... off . 3 Open the ribbon access cover. 4 Move the printhead over toward the control panel side of the printer until it stops. 5 Close the ribbon access cover. 6 Press and hold Tear Off and Load/Unload while turning the printer on . 7 Continue holding the buttons until the carrier moves.... 1 • Form length: 11 inches To restore the factory default settings: 1 Make sure the ribbon cartridge is installed and paper is loaded. 2 Turn the printer off several times. Note: The control panel lights blink on and off . 3 Open the ribbon access cover. 4 Move the printhead over toward the ...
... off . 3 Open the ribbon access cover. 4 Move the printhead over toward the control panel side of the printer until it stops. 5 Close the ribbon access cover. 6 Press and hold Tear Off and Load/Unload while turning the printer on . 7 Continue holding the buttons until the carrier moves.... 1 • Form length: 11 inches To restore the factory default settings: 1 Make sure the ribbon cartridge is installed and paper is loaded. 2 Turn the printer off several times. Note: The control panel lights blink on and off . 3 Open the ribbon access cover. 4 Move the printhead over toward the ...
User Guide
Page 67
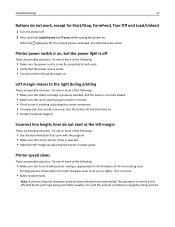
...following : • Make sure the forms thickness lever setting is appropriate for Start/Stop, FormFeed, Tear Off and Load/Unload 1 Turn the printer off These are possible solutions. This is set at 4 or higher. Note: Automatic thermal slowdown protects the printhead from overheating. When the light goes ... • If a paper jam has recently occurred, turn the printer off , the control panel is selected. • Adjust the left margin These are possible solutions. lines do not work, except for the thickness of the forms being used (letter quality, etc.) and the amount and density ...
...following : • Make sure the forms thickness lever setting is appropriate for Start/Stop, FormFeed, Tear Off and Load/Unload 1 Turn the printer off These are possible solutions. This is set at 4 or higher. Note: Automatic thermal slowdown protects the printhead from overheating. When the light goes ... • If a paper jam has recently occurred, turn the printer off , the control panel is selected. • Adjust the left margin These are possible solutions. lines do not work, except for the thickness of the forms being used (letter quality, etc.) and the amount and density ...
Technical Reference
Page 49
Double-strike print results in a darker print because the printhead strikes the character twice. To select double-strike mode: Format ESC G Decimal 27 71 Hexadecimal 1B 47 To cancel double-strike mode: Format ESC H Decimal ...
Double-strike print results in a darker print because the printhead strikes the character twice. To select double-strike mode: Format ESC G Decimal 27 71 Hexadecimal 1B 47 To cancel double-strike mode: Format ESC H Decimal ...
Technical Reference
Page 52
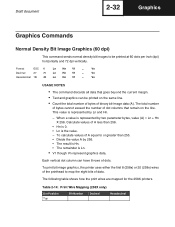
... and 72 dpi vertically. The following table shows how the print wires are mapped for the 258X printers. To print bit image graphics, the printer uses either the first 8 (258x) or 20 (259x) wires of the printhead to map the eight bits of binary bit-image data (A). Format ESC K Ln Hn V1 ... To...
... and 72 dpi vertically. The following table shows how the print wires are mapped for the 258X printers. To print bit image graphics, the printer uses either the first 8 (258x) or 20 (259x) wires of the printhead to map the eight bits of binary bit-image data (A). Format ESC K Ln Hn V1 ... To...


