User's Guide
Page 3
... quality test pages...61 Canceling a print job...62 Canceling a print job from the printer control panel ...62 Canceling a print job from the computer ...62 Clearing jams 64 Avoiding jams...64 Identifying jams in the paper path...65 Understanding jam messages and locations...65 200 paper jam...67 201 paper jam...69 202 paper jam...70 Contents 3
... quality test pages...61 Canceling a print job...62 Canceling a print job from the printer control panel ...62 Canceling a print job from the computer ...62 Clearing jams 64 Avoiding jams...64 Identifying jams in the paper path...65 Understanding jam messages and locations...65 200 paper jam...67 201 paper jam...69 202 paper jam...70 Contents 3

User's Guide
Page 4
231 paper jam...71 233 paper jam...72 234 paper jam...73 235 paper jam...74 242 paper jam...74 251 paper jam...75 Understanding printer menus 77 Menus list...77 Paper menu...78 Default Source menu...78 Paper Size/Type menu ...78 Configure MP menu...81 Substitute Size menu...82 Paper Texture menu ...82 Paper Weight menu ...83 Paper Loading menu ...85 Custom Types menu...86 Universal...
231 paper jam...71 233 paper jam...72 234 paper jam...73 235 paper jam...74 242 paper jam...74 251 paper jam...75 Understanding printer menus 77 Menus list...77 Paper menu...78 Default Source menu...78 Paper Size/Type menu ...78 Configure MP menu...81 Substitute Size menu...82 Paper Texture menu ...82 Paper Weight menu ...83 Paper Loading menu ...85 Custom Types menu...86 Universal...
User's Guide
Page 6
... after it is installed 146 Drawers...147 Flash memory card...147 Memory card ...147 Solving paper feed problems...148 Paper frequently jams ...148 Paper jam message remains after jam is cleared ...148 Page that jammed does not reprint after you clear the jam 148 Solving print quality problems...149 Isolating print quality problems...149 Blank pages...150 Characters...
... after it is installed 146 Drawers...147 Flash memory card...147 Memory card ...147 Solving paper feed problems...148 Paper frequently jams ...148 Paper jam message remains after jam is cleared ...148 Page that jammed does not reprint after you clear the jam 148 Solving print quality problems...149 Isolating print quality problems...149 Blank pages...150 Characters...

User's Guide
Page 67
... the front of the multipurpose feeder. • If it here. Clearing jams 67 Remove Tray 2. Lift the flap at the front of the printer, and then remove any jammed sheets. 200 paper jam 1 Remove the tray from the printer. 2 Remove the jam if you see it is not visible, open the rear door. • ...Remove Tray 1, and then depress the lever. Jam number 234 235 242 251 To access the jam Try one or more of the ...
... the front of the multipurpose feeder. • If it here. Clearing jams 67 Remove Tray 2. Lift the flap at the front of the printer, and then remove any jammed sheets. 200 paper jam 1 Remove the tray from the printer. 2 Remove the jam if you see it is not visible, open the rear door. • ...Remove Tray 1, and then depress the lever. Jam number 234 235 242 251 To access the jam Try one or more of the ...
User's Guide
Page 69
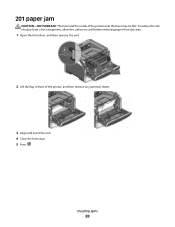
To reduce the risk of injury from a hot component, allow the surface to cool before removing paper from this area. 1 Open the front door, and then remove the unit. 2 Lift the flap in front of the printer near the fuser may be hot. Clearing jams 69 201 paper jam CAUTION-HOT SURFACE: The fuser and the inside of the printer, and then remove any jammed sheets. 3 Align and insert the unit. 4 Close the front door. 5 Press .
To reduce the risk of injury from a hot component, allow the surface to cool before removing paper from this area. 1 Open the front door, and then remove the unit. 2 Lift the flap in front of the printer near the fuser may be hot. Clearing jams 69 201 paper jam CAUTION-HOT SURFACE: The fuser and the inside of the printer, and then remove any jammed sheets. 3 Align and insert the unit. 4 Close the front door. 5 Press .
User's Guide
Page 70
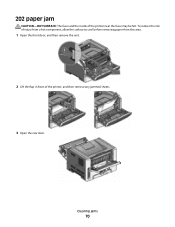
202 paper jam CAUTION-HOT SURFACE: The fuser and the inside of the printer, and then remove any jammed sheets. 3 Open the rear door. To reduce the risk of injury from a hot component, allow the surface to cool before removing paper from this area. 1 Open the front door, and then remove the unit. 2 Lift the flap in front of the printer near the fuser may be hot. Clearing jams 70
202 paper jam CAUTION-HOT SURFACE: The fuser and the inside of the printer, and then remove any jammed sheets. 3 Open the rear door. To reduce the risk of injury from a hot component, allow the surface to cool before removing paper from this area. 1 Open the front door, and then remove the unit. 2 Lift the flap in front of the printer near the fuser may be hot. Clearing jams 70
User's Guide
Page 71
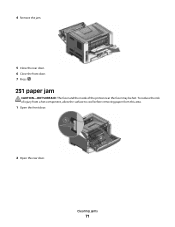
To reduce the risk of the printer near the fuser may be hot. 4 Remove the jam. 5 Close the rear door. 6 Close the front door. 7 Press . 231 paper jam CAUTION-HOT SURFACE: The fuser and the inside of injury from a hot component, allow the surface to cool before removing paper from this area. 1 Open the front door. 2 Open the rear door. Clearing jams 71
To reduce the risk of the printer near the fuser may be hot. 4 Remove the jam. 5 Close the rear door. 6 Close the front door. 7 Press . 231 paper jam CAUTION-HOT SURFACE: The fuser and the inside of injury from a hot component, allow the surface to cool before removing paper from this area. 1 Open the front door. 2 Open the rear door. Clearing jams 71

User's Guide
Page 72
If this does not clear the jam, complete the steps in "233 paper jam" on page 72. 233 paper jam 1 Remove the tray from the printer. Clearing jams 72 3 Remove the jam. 4 Close the rear door. 5 Close the front door. 6 Press .
If this does not clear the jam, complete the steps in "233 paper jam" on page 72. 233 paper jam 1 Remove the tray from the printer. Clearing jams 72 3 Remove the jam. 4 Close the rear door. 5 Close the front door. 6 Press .

User's Guide
Page 73
If this does not clear the jam, complete the steps in "231 paper jam" on page 71. 234 paper jam A single jam or multiple jams are in : • "231 paper jam" on page 71 • "233 paper jam" on . To locate and remove the jammed sheets, complete all the steps in the duplex area of the printer when the printer is turned on page 72 Clearing jams 73 2 Locate the lever shown. Pull the lever down to release the jam. 3 Pull the jammed sheets from the duplex area. 4 Insert the tray. 5 Press .
If this does not clear the jam, complete the steps in "231 paper jam" on page 71. 234 paper jam A single jam or multiple jams are in : • "231 paper jam" on page 71 • "233 paper jam" on . To locate and remove the jammed sheets, complete all the steps in the duplex area of the printer when the printer is turned on page 72 Clearing jams 73 2 Locate the lever shown. Pull the lever down to release the jam. 3 Pull the jammed sheets from the duplex area. 4 Insert the tray. 5 Press .

User's Guide
Page 74
235 paper jam A duplex print job was sent to the printer using a size of the standard exit bin. 2 Press . 242 paper jam 1 Remove the optional tray from the printer. A sheet is jammed in the standard exit bin. 1 To remove the jam, gently pull the jammed sheet out of paper not supported for duplex printing. Clearing jams 74
235 paper jam A duplex print job was sent to the printer using a size of the standard exit bin. 2 Press . 242 paper jam 1 Remove the optional tray from the printer. A sheet is jammed in the standard exit bin. 1 To remove the jam, gently pull the jammed sheet out of paper not supported for duplex printing. Clearing jams 74
User's Guide
Page 75
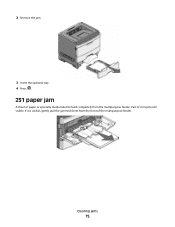
If it may be still visible. Clearing jams 75 Part of the multipurpose feeder. 2 Remove the jam. 3 Insert the optional tray. 4 Press . 251 paper jam A sheet of paper or specialty media failed to feed completely from the front of it is visible, gently pull the jammed sheet from the multipurpose feeder.
If it may be still visible. Clearing jams 75 Part of the multipurpose feeder. 2 Remove the jam. 3 Insert the optional tray. 4 Press . 251 paper jam A sheet of paper or specialty media failed to feed completely from the front of it is visible, gently pull the jammed sheet from the multipurpose feeder.
User's Guide
Page 127
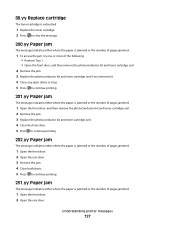
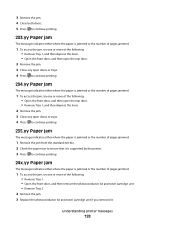
...The toner cartridge is exhausted. 1 Replace the toner cartridge. 2 Press to clear the message. 200.yy Paper jam The message indicates either where the paper is jammed or the number of pages jammed. 1 To access the jam, try one or more of the following: • Remove Tray 1. • Open the front door,... unit if you removed it. 4 Close any open doors or trays. 5 Press to continue printing. 201.yy Paper jam The message indicates either where the paper is jammed or the number of pages jammed. 1 Open the front door, and then remove the photoconductor kit and toner cartridge unit. 2 Remove the...
...The toner cartridge is exhausted. 1 Replace the toner cartridge. 2 Press to clear the message. 200.yy Paper jam The message indicates either where the paper is jammed or the number of pages jammed. 1 To access the jam, try one or more of the following: • Remove Tray 1. • Open the front door,... unit if you removed it. 4 Close any open doors or trays. 5 Press to continue printing. 201.yy Paper jam The message indicates either where the paper is jammed or the number of pages jammed. 1 Open the front door, and then remove the photoconductor kit and toner cartridge unit. 2 Remove the...
User's Guide
Page 128
... to ensure that it is supported by the printer. 3 Press to continue printing. 24x.yy Paper jam The message indicates either where the paper is jammed or the number of pages jammed. 1 To access the jam, try one or more of the following: • Remove Tray 1. • Open the front door, and then remove the photoconductor...
... to ensure that it is supported by the printer. 3 Press to continue printing. 24x.yy Paper jam The message indicates either where the paper is jammed or the number of pages jammed. 1 To access the jam, try one or more of the following: • Remove Tray 1. • Open the front door, and then remove the photoconductor...
User's Guide
Page 129
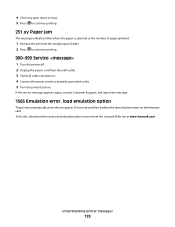
... 1 Turn the printer off. 2 Unplug the power cord from the Lexmark Web site at www.lexmark.com. 4 Close any open doors or trays. 5 Press to continue printing. 251.yy Paper jam The message indicates either where the paper is jammed or the number of pages jammed. 1 Remove the jam from the multipurpose feeder. 2 Press to a properly grounded outlet...
... 1 Turn the printer off. 2 Unplug the power cord from the Lexmark Web site at www.lexmark.com. 4 Close any open doors or trays. 5 Press to continue printing. 251.yy Paper jam The message indicates either where the paper is jammed or the number of pages jammed. 1 Remove the jam from the multipurpose feeder. 2 Press to a properly grounded outlet...

User's Guide
Page 147
... SURE THE OPTION IS SELECTED From the program you are aligned against the edges of the following: MAKE SURE THE PAPER IS LOADED CORRECTLY 1 Pull the tray completely out. 2 Check for paper jams or misfeeds. 3 Make sure the guides are using, select the option. Drawers These are possible solutions. Flash memory card Make...
... SURE THE OPTION IS SELECTED From the program you are aligned against the edges of the following: MAKE SURE THE PAPER IS LOADED CORRECTLY 1 Pull the tray completely out. 2 Check for paper jams or misfeeds. 3 Make sure the guides are using, select the option. Drawers These are possible solutions. Flash memory card Make...
User's Guide
Page 148
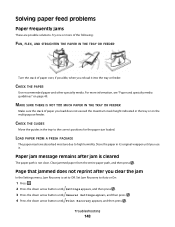
...Paper jam message remains after you use it into the tray or feeder. Clear jammed paper from the entire paper path, and then press . Troubleshooting 148 CHECK THE GUIDES Move the guides in the tray to Off. Page that jammed does not reprint after jam is cleared The paper path is set to the correct positions for the paper... size loaded. CHECK THE PAPER Use recommended paper and other specialty media. LOAD PAPER FROM A FRESH PACKAGE The paper may have absorbed ...
...Paper jam message remains after you use it into the tray or feeder. Clear jammed paper from the entire paper path, and then press . Troubleshooting 148 CHECK THE GUIDES Move the guides in the tray to Off. Page that jammed does not reprint after jam is cleared The paper path is set to the correct positions for the paper... size loaded. CHECK THE PAPER Use recommended paper and other specialty media. LOAD PAPER FROM A FRESH PACKAGE The paper may have absorbed ...

User's Guide
Page 174
Index Numerics 1565 Emulation error, load emulation option 129 200.yy Paper jam 127 201.yy Paper jam 127 202.yy Paper jam 127 231.yy Paper jam 127 233.yy Paper jam 128 234.yy Paper jam 128 235.yy Paper jam 128 24x.yy Paper jam 128 250-sheet drawer installing 25 251.yy Paper jam 129 30.yy Invalid refill, change cartridge 123 31.yy Replace...
Index Numerics 1565 Emulation error, load emulation option 129 200.yy Paper jam 127 201.yy Paper jam 127 202.yy Paper jam 127 231.yy Paper jam 127 233.yy Paper jam 128 234.yy Paper jam 128 235.yy Paper jam 128 24x.yy Paper jam 128 250-sheet drawer installing 25 251.yy Paper jam 129 30.yy Invalid refill, change cartridge 123 31.yy Replace...
User's Guide
Page 175
...Windows 27 Ethernet port 26 exterior of the printer cleaning 130 e-mail notice of low supply level 142 notice of paper jam 142 notice of paper needed 142 notice that different paper is needed 142 F factory defaults, restoring printer control panel menus 142 FCC notices 162, 163 fiber optic network ...29 Invalid Engine Code 118 Invalid Network Code 118 IPv6 menu 92 J jams accessing 65 avoiding 64 identifying 65 paper path 65 understanding messages 65 jams, avoiding cutting paper and specialty media 50 selecting paper and specialty media 50 jams, clearing 200 67 201 69 202 70 231 71 233 72 234 ...
...Windows 27 Ethernet port 26 exterior of the printer cleaning 130 e-mail notice of low supply level 142 notice of paper jam 142 notice of paper needed 142 notice that different paper is needed 142 F factory defaults, restoring printer control panel menus 142 FCC notices 162, 163 fiber optic network ...29 Invalid Engine Code 118 Invalid Network Code 118 IPv6 menu 92 J jams accessing 65 avoiding 64 identifying 65 paper path 65 understanding messages 65 jams, avoiding cutting paper and specialty media 50 selecting paper and specialty media 50 jams, clearing 200 67 201 69 202 70 231 71 233 72 234 ...
User's Guide
Page 176
... 37 setting type 37 storing 51 unacceptable 50 Universal Paper Size 86 Universal size setting 37 paper capacities trays 54 paper capacity multipurpose feeder 54 paper feed troubleshooting message remains after jam is cleared 148 page that jammed does not reprint 148 paper jams avoiding 64 identifying 65 paper path 65 paper jams, clearing 200 67 201 69 202 70 231...
... 37 setting type 37 storing 51 unacceptable 50 Universal Paper Size 86 Universal size setting 37 paper capacities trays 54 paper capacity multipurpose feeder 54 paper feed troubleshooting message remains after jam is cleared 148 page that jammed does not reprint 148 paper jams avoiding 64 identifying 65 paper path 65 paper jams, clearing 200 67 201 69 202 70 231...

User's Guide
Page 177
... 14 factory defaults, restoring 142 printer message 201.yy Paper jam 127 printer messages 1565 Emulation error, load emulation option 129 200.yy Paper jam 127 202.yy Paper jam 127 231.yy Paper jam 127 233.yy Paper jam 128 234.yy Paper jam 128 235.yy Paper jam 128 24x.yy Paper jam 128 251.yy Paper jam 129 30.yy Invalid refill, change cartridge 123...
... 14 factory defaults, restoring 142 printer message 201.yy Paper jam 127 printer messages 1565 Emulation error, load emulation option 129 200.yy Paper jam 127 202.yy Paper jam 127 231.yy Paper jam 127 233.yy Paper jam 128 234.yy Paper jam 128 235.yy Paper jam 128 24x.yy Paper jam 128 251.yy Paper jam 129 30.yy Invalid refill, change cartridge 123...


