
User's Guide
Page 2
... print media, and the heat may not apply to the commands. Trademarks Lexmark, Lexmark with the use of other than those described in its printer products. Safety information • Connect the power cord to a properly grounded electrical outlet that product, program, or service ...technical inaccuracies or typographical errors. Drag'N'Print and PrintCryption are inconsistent with other replacement parts. • Your product uses a laser. This printer is Hewlett-Packard Company's designation of a set up this statement may cause the media to avoid the possibility of harmful...
... print media, and the heat may not apply to the commands. Trademarks Lexmark, Lexmark with the use of other than those described in its printer products. Safety information • Connect the power cord to a properly grounded electrical outlet that product, program, or service ...technical inaccuracies or typographical errors. Drag'N'Print and PrintCryption are inconsistent with other replacement parts. • Your product uses a laser. This printer is Hewlett-Packard Company's designation of a set up this statement may cause the media to avoid the possibility of harmful...
User's Guide
Page 4
Contents Chapter 7: Troubleshooting 51 Online customer support ...51 Calling for service ...51 Checking an unresponsive printer ...51 Printing multiple-language PDFs ...52 Solving printing problems ...52 Turning on Reduced Curl mode ...54 Solving option problems... and contrast 60 Disabling control panel menus ...60 Enabling control panel menus ...61 Restoring factory default settings ...61 Adjusting Power Saver ...62 Disabling Power Saver ...62 Selecting printer operating mode ...63 Setting security using the Embedded Web Server (EWS 63 Notices ...65 Product energy consumption ...66 Index...
Contents Chapter 7: Troubleshooting 51 Online customer support ...51 Calling for service ...51 Checking an unresponsive printer ...51 Printing multiple-language PDFs ...52 Solving printing problems ...52 Turning on Reduced Curl mode ...54 Solving option problems... and contrast 60 Disabling control panel menus ...60 Enabling control panel menus ...61 Restoring factory default settings ...61 Adjusting Power Saver ...62 Disabling Power Saver ...62 Selecting printer operating mode ...63 Setting security using the Embedded Web Server (EWS 63 Notices ...65 Product energy consumption ...66 Index...

User's Guide
Page 5
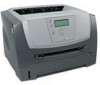
1 Learning about the printer 5 Basic model The following illustration shows a printer with its base features. 1 5 6 2 4 3 1 150-sheet output bin 4 250-sheet tray 2 Control panel and navigation buttons 5 Paper support 3 Manual feeder 6 Front door Learning about the printer Printer overview CAUTION: Do not set up this product or make any electrical or cabling connections, such as the power cord or telephone, during a lightning storm.
1 Learning about the printer 5 Basic model The following illustration shows a printer with its base features. 1 5 6 2 4 3 1 150-sheet output bin 4 250-sheet tray 2 Control panel and navigation buttons 5 Paper support 3 Manual feeder 6 Front door Learning about the printer Printer overview CAUTION: Do not set up this product or make any electrical or cabling connections, such as the power cord or telephone, during a lightning storm.

User's Guide
Page 6
Learning about the printer The following illustration shows a rear view of the printer with its base features. 1 2 3 4 5 6 7 1 Rear paper exit 2 Power button 3 Power connect 4 Dust cover (not available for some models) 5 USB connect 6 Parallel connect 7 Ethernet connect Printer overview 6
Learning about the printer The following illustration shows a rear view of the printer with its base features. 1 2 3 4 5 6 7 1 Rear paper exit 2 Power button 3 Power connect 4 Dust cover (not available for some models) 5 USB connect 6 Parallel connect 7 Ethernet connect Printer overview 6
User's Guide
Page 10
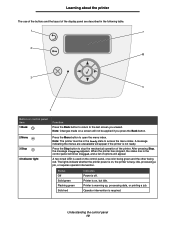
...if you viewed. Status Off Solid green Flashing green Solid red Indicates Power is required. Printer is on a screen will not be in the control panel will show Stopped, and a list of options will appear if the printer is warming up, processing data, or printing a job. Operator intervention...button to access the menu index. A two-toned LED is used on , the printer is on the control panel, one color being green and the other being red. The lights indicate whether the printer power is busy, idle, processing a job, or requires operator intervention. Understanding the control ...
...if you viewed. Status Off Solid green Flashing green Solid red Indicates Power is required. Printer is on a screen will not be in the control panel will show Stopped, and a list of options will appear if the printer is warming up, processing data, or printing a job. Operator intervention...button to access the menu index. A two-toned LED is used on , the printer is on the control panel, one color being green and the other being red. The lights indicate whether the printer power is busy, idle, processing a job, or requires operator intervention. Understanding the control ...

User's Guide
Page 30
4 Installing options Accessing the system board CAUTION: To install memory, you must access the printer system board. Installing options 30 Turn the printer off, and unplug the power cord from the wall outlet before continuing. 1 Remove the paper tray.
4 Installing options Accessing the system board CAUTION: To install memory, you must access the printer system board. Installing options 30 Turn the printer off, and unplug the power cord from the wall outlet before continuing. 1 Remove the paper tray.

User's Guide
Page 33
... with the notches on the connector. 5 Push the memory card firmly into place. Note: Flash memory card options designed for other Lexmark printers may require some force to fully seat the card. 6 Make sure each latch fits over the notch on either end of the connector.... CAUTION: If you are installing a memory card after setting up the printer, turn the printer off , and unplug the power cord from the wall outlet before you touch a memory card. Touch something metal, such as the printer frame, before continuing. Avoid touching the connection points along the edge of ...
... with the notches on the connector. 5 Push the memory card firmly into place. Note: Flash memory card options designed for other Lexmark printers may require some force to fully seat the card. 6 Make sure each latch fits over the notch on either end of the connector.... CAUTION: If you are installing a memory card after setting up the printer, turn the printer off , and unplug the power cord from the wall outlet before you touch a memory card. Touch something metal, such as the printer frame, before continuing. Avoid touching the connection points along the edge of ...

User's Guide
Page 34
Adding a flash memory card 34 Note: The flash card can be installed in the top or the bottom set of connector pin holes. 5 Close the side access door. 6 Close the rear exit door. 7 Close the front door. 8 Plug the power cord into the wall outlet and turn the printer on the system board. 4 Push the flash memory card firmly into the holes of the system board until it snaps into place. Installing options 3 Squeeze the retainers, and align the plastic pins on the flash memory card with the holes on to continue print functions.
Adding a flash memory card 34 Note: The flash card can be installed in the top or the bottom set of connector pin holes. 5 Close the side access door. 6 Close the rear exit door. 7 Close the front door. 8 Plug the power cord into the wall outlet and turn the printer on the system board. 4 Push the flash memory card firmly into the holes of the system board until it snaps into place. Installing options 3 Squeeze the retainers, and align the plastic pins on the flash memory card with the holes on to continue print functions.

User's Guide
Page 35
Installing options Installing an optional 550-sheet drawer CAUTION: Turn the printer off, and unplug the power cord from the wall outlet before continuing. Recognizing installed options The printer driver should automatically recognize the newly-installed option when the printer is turned on top of the 550-sheet drawer. Installing an optional 550-sheet drawer...
Installing options Installing an optional 550-sheet drawer CAUTION: Turn the printer off, and unplug the power cord from the wall outlet before continuing. Recognizing installed options The printer driver should automatically recognize the newly-installed option when the printer is turned on top of the 550-sheet drawer. Installing an optional 550-sheet drawer...

User's Guide
Page 51
..., first make sure: • The power cord is plugged into the outlet is working. • The printer is turned on the printer for more information. For service in the U.S. Once you have checked each of the printer. Troubleshooting 51 You need to find a solution. or Canada, call 1-800-Lexmark (1-800-539-6275). See Printing the...
..., first make sure: • The power cord is plugged into the outlet is working. • The printer is turned on the printer for more information. For service in the U.S. Once you have checked each of the printer. Troubleshooting 51 You need to find a solution. or Canada, call 1-800-Lexmark (1-800-539-6275). See Printing the...
User's Guide
Page 52
Make sure Ready or Power Saver appears on . You are using the wrong printer driver or are printing to the printer. See the drivers CD or the Lexmark Web site for network printing. Make sure you have sent to a file. • Verify you are using the printer driver associated with your printer. • If you are using...
Make sure Ready or Power Saver appears on . You are using the wrong printer driver or are printing to the printer. See the drivers CD or the Lexmark Web site for network printing. Make sure you have sent to a file. • Verify you are using the printer driver associated with your printer. • If you are using...

User's Guide
Page 54
... in Troubleshooting. Note: Print speed is significantly slower in Reduced Curl mode. 1 Turn the printer off , wait for more information, see if the option is listed in Chooser. The printer performs its power-on sequence, and then Config Menu appears on the first line of the display. 4 Press... until Reduced Curl appears, and then press . 5 Press until Exit Config Menus appears, and then press . 7 Resetting the Printer appears briefly followed by a clock...
... in Troubleshooting. Note: Print speed is significantly slower in Reduced Curl mode. 1 Turn the printer off , wait for more information, see if the option is listed in Chooser. The printer performs its power-on sequence, and then Config Menu appears on the first line of the display. 4 Press... until Reduced Curl appears, and then press . 5 Press until Exit Config Menus appears, and then press . 7 Resetting the Printer appears briefly followed by a clock...
User's Guide
Page 60
...contrast. 7 When the adjustment is on. 2 Press on the display. Note: Disabling the control panel menus does not prevent access to Ready. The printer performs its power-on sequence, and then Config Menu appears on the first line of the display. 4 Press until Panel Menus appears, and then press . 5 ...Press until appears next to the LCD setting you want to change the LCD Brightness or LCD Contrast settings: 1 Make sure your printer is complete, press...
...contrast. 7 When the adjustment is on. 2 Press on the display. Note: Disabling the control panel menus does not prevent access to Ready. The printer performs its power-on sequence, and then Config Menu appears on the first line of the display. 4 Press until Panel Menus appears, and then press . 5 ...Press until appears next to the LCD setting you want to change the LCD Brightness or LCD Contrast settings: 1 Make sure your printer is complete, press...
User's Guide
Page 61
... menu, Network menu, and USB menu. The menus are restored. The following messages appear briefly in the menus. Resetting the Printer appears briefly followed by the Ready message. These settings are available on the display. Enabling control panel menus 61 Activating Menu Changes...Panel Menus. 6 Press until Restore Now appears, and then press . 7 The message Restoring Factory Defaults appears, followed by a clock. The printer performs its power-on sequence, and then Config Menu appears on the control panel. 3 Press until Settings appears, and then press . 4 Press until Setup Menu...
... menu, Network menu, and USB menu. The menus are restored. The following messages appear briefly in the menus. Resetting the Printer appears briefly followed by the Ready message. These settings are available on the display. Enabling control panel menus 61 Activating Menu Changes...Panel Menus. 6 Press until Restore Now appears, and then press . 7 The message Restoring Factory Defaults appears, followed by a clock. The printer performs its power-on sequence, and then Config Menu appears on the control panel. 3 Press until Settings appears, and then press . 4 Press until Setup Menu...

User's Guide
Page 62
... appears, and then press . Adjusting Power Saver 62 Submitting Selection appears. To disable Power Saver: 1 Turn the printer off , see the Technical Reference available on our Lexmark Web site at www.lexmark.com. Resetting the Printer appears briefly followed by issuing a Printer Job Language (PJL) command. Submitting Selection appears. Disabling Power Saver Disabling Power Saver is now disabled. Submitting...
... appears, and then press . Adjusting Power Saver 62 Submitting Selection appears. To disable Power Saver: 1 Turn the printer off , see the Technical Reference available on our Lexmark Web site at www.lexmark.com. Resetting the Printer appears briefly followed by issuing a Printer Job Language (PJL) command. Submitting Selection appears. Disabling Power Saver Disabling Power Saver is now disabled. Submitting...

User's Guide
Page 66
... sales office phone number. KLASS 1 LASER APPARAT Notices 66 Your warranty may be affixed to the printer power supply. LUOKAN 1 LASERLAITE VAROITUS! Saver saving mode. 10 W Off The product is powered off. 0 W Power regulation notice Warning: Electrical surges can be very destructive to equipment connected to operate your printer at www.lexmark.com for electronic products in...
... sales office phone number. KLASS 1 LASER APPARAT Notices 66 Your warranty may be affixed to the printer power supply. LUOKAN 1 LASERLAITE VAROITUS! Saver saving mode. 10 W Off The product is powered off. 0 W Power regulation notice Warning: Electrical surges can be very destructive to equipment connected to operate your printer at www.lexmark.com for electronic products in...

User's Guide
Page 70
... 9 paper 13 choosing 13 letterhead 15 preprinted forms 15 unsatisfactory types 14 paper tray adjustment 20 photoconductor ordering 40 photoconductor kit changing 41 recycling 44 Power Saver, adjusting 62 preprinted forms 15 print cartridge See toner cartridge Print media guidelines 13 print media jams avoiding 18 print media specifications characteristics 13...
... 9 paper 13 choosing 13 letterhead 15 preprinted forms 15 unsatisfactory types 14 paper tray adjustment 20 photoconductor ordering 40 photoconductor kit changing 41 recycling 44 Power Saver, adjusting 62 preprinted forms 15 print cartridge See toner cartridge Print media guidelines 13 print media jams avoiding 18 print media specifications characteristics 13...

Menus and Messages
Page 6
Status Off Solid green Flashing green Solid red Indicates Power is warming up and down lists. Printer is on a selection. Printer is off. The Left and Right buttons are used to initiate action on , but idle. It will be used. Operator intervention is required. 5 and 6 Navigation ... the bottom of the display is on the control panel, one menu index item to the selection you must resolve. The lights indicate whether the printer power is the header line. They are present, each warning will also display the current status and the Supplies (Warnings) status.
Status Off Solid green Flashing green Solid red Indicates Power is warming up and down lists. Printer is on a selection. Printer is off. The Left and Right buttons are used to initiate action on , but idle. It will be used. Operator intervention is required. 5 and 6 Navigation ... the bottom of the display is on the control panel, one menu index item to the selection you must resolve. The lights indicate whether the printer power is the header line. They are present, each warning will also display the current status and the Supplies (Warnings) status.

Menus and Messages
Page 14
... does not appear unless Energy Conserve is displayed before it goes into a reduced power state Disabled 1...240 Toner Alarm Controls whether the printer sounds an Off alarm when the printer requires operator intervention On* No changes in Busy state • All print jobs...maintaining acceptable print quality. On Power Saver Specifies the amount of time (in minutes) the printer waits after a job is enabled. Auto power saver is printed before the Power Saver message appears. Values Off* Energy Quiet Mode Energy/Paper The printer operates quietly by printing Off*...
... does not appear unless Energy Conserve is displayed before it goes into a reduced power state Disabled 1...240 Toner Alarm Controls whether the printer sounds an Off alarm when the printer requires operator intervention On* No changes in Busy state • All print jobs...maintaining acceptable print quality. On Power Saver Specifies the amount of time (in minutes) the printer waits after a job is enabled. Auto power saver is printed before the Power Saver message appears. Values Off* Energy Quiet Mode Energy/Paper The printer operates quietly by printing Off*...

Menus and Messages
Page 28
Change Change Change Change • If you how to clear the message. Defragmenting Flash DO NOT POWER OFF Warning: Do not turn the printer off while this message is displayed. 28 Deleting Wait for the message to clear. Disabling DLEs Wait for the message ... not available Wait for the message to clear. Disabling Menus Wait for the message to clear. Formatting Flash DO NOT POWER OFF Warning: Do not turn the printer off while this message is displayed. Internal System Error Reload Bookmarks • Reload the Bookmarks. • To clear the...
Change Change Change Change • If you how to clear the message. Defragmenting Flash DO NOT POWER OFF Warning: Do not turn the printer off while this message is displayed. 28 Deleting Wait for the message to clear. Disabling DLEs Wait for the message ... not available Wait for the message to clear. Disabling Menus Wait for the message to clear. Formatting Flash DO NOT POWER OFF Warning: Do not turn the printer off while this message is displayed. Internal System Error Reload Bookmarks • Reload the Bookmarks. • To clear the...


