User's Guide
Page 10
... How to conserve supplies 93 How to know when you need new supplies 94 Checking the toner and photoconductor levels 94 How to change a toner cartridge 95 Recycling Lexmark products 98 How to change a photoconductor kit 99 Chapter 12: Administration 102 Disabling the operator panel menus 102 Enabling the menus 102 Restoring factory default...
... How to conserve supplies 93 How to know when you need new supplies 94 Checking the toner and photoconductor levels 94 How to change a toner cartridge 95 Recycling Lexmark products 98 How to change a photoconductor kit 99 Chapter 12: Administration 102 Disabling the operator panel menus 102 Enabling the menus 102 Restoring factory default...
User's Guide
Page 88
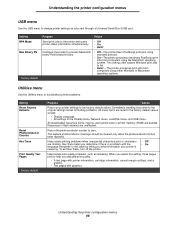
.... • Off* • On Help isolate print quality problems, such as streaking. Resources in printer memory (RAM) are unaffected. The replace photoconductor message should be cleared only when the photoconductor kit has been replaced. Hex Trace helps you what information your printer settings to fail. • Auto*-The printer processes print jobs from...
.... • Off* • On Help isolate print quality problems, such as streaking. Resources in printer memory (RAM) are unaffected. The replace photoconductor message should be cleared only when the photoconductor kit has been replaced. Hex Trace helps you what information your printer settings to fail. • Auto*-The printer processes print jobs from...
User's Guide
Page 92
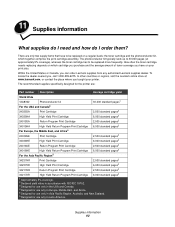
.... In other countries or regions, visit the Lexmark online store at approximately 5% coverage), whereas the toner cartridge has to be replaced more frequently. There are : Part number Description Average cartridge yield World Wide 12A8302 Photoconductor kit 30,000 standard pages1 For the USA and... a regular basis: the toner cartridge and the photoconductor kit, which cartridge you purchase and the average amount of toner coverage you bought your print jobs. The photoconductor kit typically lasts up to 30,000 pages (at www.lexmark.com, or contact the place where you have...
.... In other countries or regions, visit the Lexmark online store at approximately 5% coverage), whereas the toner cartridge has to be replaced more frequently. There are : Part number Description Average cartridge yield World Wide 12A8302 Photoconductor kit 30,000 standard pages1 For the USA and... a regular basis: the toner cartridge and the photoconductor kit, which cartridge you purchase and the average amount of toner coverage you bought your print jobs. The photoconductor kit typically lasts up to 30,000 pages (at www.lexmark.com, or contact the place where you have...
User's Guide
Page 94
... at the maximum of 40,000 pages. You can determine approximately how much toner is left in your cartridge and how full the photoconductor kit is displayed, but print quality begins to decrease as the toner level decreases. Firmly shake it side to side and front to back... The printer automatically notifies you experience faded print, remove the toner cartridge. While the printer may continue to function properly after the photoconductor kit has reached its official end-of-life (approximately 30,000 pages), print quality begins to the printer, the printer stops operating after the...
... at the maximum of 40,000 pages. You can determine approximately how much toner is left in your cartridge and how full the photoconductor kit is displayed, but print quality begins to decrease as the toner level decreases. Firmly shake it side to side and front to back... The printer automatically notifies you experience faded print, remove the toner cartridge. While the printer may continue to function properly after the photoconductor kit has reached its official end-of-life (approximately 30,000 pages), print quality begins to the printer, the printer stops operating after the...
User's Guide
Page 97
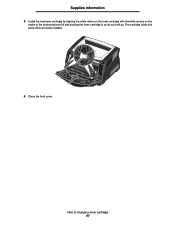
The cartridge clicks into place when correctly installed. 6 Close the front cover. How to change a toner cartridge 97 Supplies information 5 Install the new toner cartridge by aligning the white rollers on the toner cartridge with the white arrows on the tracks of the photoconductor kit and pushing the toner cartridge in as far as it will go.
The cartridge clicks into place when correctly installed. 6 Close the front cover. How to change a toner cartridge 97 Supplies information 5 Install the new toner cartridge by aligning the white rollers on the toner cartridge with the white arrows on the tracks of the photoconductor kit and pushing the toner cartridge in as far as it will go.

User's Guide
Page 99
How to change a photoconductor kit Warning: When replacing a photoconductor kit, do not leave the toner cartridge or the new photoconductor kit exposed to change a photoconductor kit 99 Extended light exposure can cause print quality problems. 1 Open the front cover by pressing the button on the left side of time. Supplies information How to direct light for an extended period of the printer and lowering the cover.
How to change a photoconductor kit Warning: When replacing a photoconductor kit, do not leave the toner cartridge or the new photoconductor kit exposed to change a photoconductor kit 99 Extended light exposure can cause print quality problems. 1 Open the front cover by pressing the button on the left side of time. Supplies information How to direct light for an extended period of the printer and lowering the cover.
User's Guide
Page 100
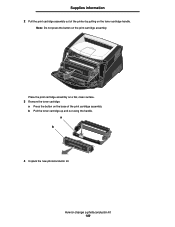
Note: Do not press the button on the base of the printer by pulling on the toner cartridge handle. b Pull the toner cartridge up and out using the handle. How to change a photoconductor kit 100 a b 4 Unpack the new photoconductor kit. Place the print cartridge assembly on a flat, clean surface. 3 Remove the toner cartridge: a Press the button on the print cartridge assembly. Supplies information 2 Pull the print cartridge assembly out of the print cartridge assembly.
Note: Do not press the button on the base of the printer by pulling on the toner cartridge handle. b Pull the toner cartridge up and out using the handle. How to change a photoconductor kit 100 a b 4 Unpack the new photoconductor kit. Place the print cartridge assembly on a flat, clean surface. 3 Remove the toner cartridge: a Press the button on the print cartridge assembly. Supplies information 2 Pull the print cartridge assembly out of the print cartridge assembly.

User's Guide
Page 101
Note: For information about resetting the photoconductor kit counter, see the instruction sheet that shipped with the green arrows on the tracks in the printer and pushing the print cartridge assembly in as ... on the tracks of the print cartridge assembly with the new kit. The cartridge clicks into place when correctly installed. 6 Install the print cartridge assembly into the new print cartridge assembly by aligning the green arrows on the guides of the photoconductor kit and pushing the toner cartridge in as far as it...
Note: For information about resetting the photoconductor kit counter, see the instruction sheet that shipped with the green arrows on the tracks in the printer and pushing the print cartridge assembly in as ... on the tracks of the print cartridge assembly with the new kit. The cartridge clicks into place when correctly installed. 6 Install the print cartridge assembly into the new print cartridge assembly by aligning the green arrows on the guides of the photoconductor kit and pushing the toner cartridge in as far as it...
User's Guide
Page 116
... SmartSwitch (USB Menu) 78 PCL SmartSwitch, setting See also printer language network port 77 parallel port 76 USB port 78 PDF Menu (PostScript Menu) 73 photoconductor kit changing 99 level 94 ordering 92 recycling 98 PictureGrade (Quality Menu) 67 Pitch (PCL Emul Menu) 72 Point Size (PCL Emul Menu) 72 ports network...
... SmartSwitch (USB Menu) 78 PCL SmartSwitch, setting See also printer language network port 77 parallel port 76 USB port 78 PDF Menu (PostScript Menu) 73 photoconductor kit changing 99 level 94 ordering 92 recycling 98 PictureGrade (Quality Menu) 67 Pitch (PCL Emul Menu) 72 Point Size (PCL Emul Menu) 72 ports network...


