
User's Guide
Page 12
... are in English only. Online documents The Drivers, MarkVision and Utilities CD that came with the CD for Windows 95, Windows 98, Windows 2000 and Windows NT 4.0. Once you have launched the CD, click the View Online Documentation icon to display a list of information about your printer or about Lexmark products and services. xi Refer to the...
... are in English only. Online documents The Drivers, MarkVision and Utilities CD that came with the CD for Windows 95, Windows 98, Windows 2000 and Windows NT 4.0. Once you have launched the CD, click the View Online Documentation icon to display a list of information about your printer or about Lexmark products and services. xi Refer to the...
User's Guide
Page 18
...the My Computer shortcut in the Browse window, double-click on the CD icon, and double-click on the setup application (setup.exe). 9 Click OK to start the printer driver installation program. 10 Follow the installation instructions in the printer drivers dialog box. 11 In the Print to...Wizard screen appears, select Cancel to close the wizard. 6 Insert the Drivers, MarkVision, and Utilities CD that came with a USB (Universal Serial Bus) cable, we recommend Lexmark part number 12A2405 (2 m). Connecting the printer to your printer's functions. Using a USB cable If you are turned off. 2 ...
...the My Computer shortcut in the Browse window, double-click on the CD icon, and double-click on the setup application (setup.exe). 9 Click OK to start the printer driver installation program. 10 Follow the installation instructions in the printer drivers dialog box. 11 In the Print to...Wizard screen appears, select Cancel to close the wizard. 6 Insert the Drivers, MarkVision, and Utilities CD that came with a USB (Universal Serial Bus) cable, we recommend Lexmark part number 12A2405 (2 m). Connecting the printer to your printer's functions. Using a USB cable If you are turned off. 2 ...
User's Guide
Page 19
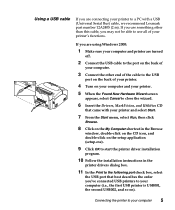
...drives, CD-ROM drive and Microsoft Windows Update check boxes are turned off. 2 Connect the USB cable to the port on the back of your computer. 3 Connect the other end of the cable to the USB port on the back of your printer. 5 When the Add New Hardware... Wizard screen appears: a Select Next to begin searching for the correct driver. h Select Next again. i When the hardware is loaded, click Finish. The printer driver installation program automatically launches after a few moments. 6 Chapter 1: The basics 12 When you finish, exit the setup program and remove...
...drives, CD-ROM drive and Microsoft Windows Update check boxes are turned off. 2 Connect the USB cable to the port on the back of your computer. 3 Connect the other end of the cable to the USB port on the back of your printer. 5 When the Add New Hardware... Wizard screen appears: a Select Next to begin searching for the correct driver. h Select Next again. i When the hardware is loaded, click Finish. The printer driver installation program automatically launches after a few moments. 6 Chapter 1: The basics 12 When you finish, exit the setup program and remove...
User's Guide
Page 20
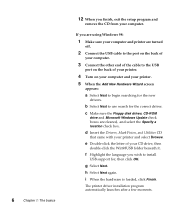
... sure the parallel cable or USB cable is firmly plugged in the printer drivers dialog box. 7 In the Print to the following port check box, select the USB port that contains the name of the printer. • Make sure you finish, exit the setup program and ...9 Restart your computer 7 Connecting the printer to your computer. Troubleshooting Tips Problem: Unexpected characters print or characters are using Windows 98 or Windows 2000. 6 Follow the installation instructions in at the back of the printer you are currently installing as your default printer port. 8 When you are missing....
... sure the parallel cable or USB cable is firmly plugged in the printer drivers dialog box. 7 In the Print to the following port check box, select the USB port that contains the name of the printer. • Make sure you finish, exit the setup program and ...9 Restart your computer 7 Connecting the printer to your computer. Troubleshooting Tips Problem: Unexpected characters print or characters are using Windows 98 or Windows 2000. 6 Follow the installation instructions in at the back of the printer you are currently installing as your default printer port. 8 When you are missing....

User's Guide
Page 34
... the CD program for online Help at http://www.lexmark.com to download a printer driver to your operating system. Printer drivers Printer drivers for the following operating systems and applications are included on the CD: • Windows 95 • Windows 98 • Windows 2000 • Windows NT 4.0 • Windows for Workgroups 3.11 • Windows 3.1x • Macintosh OS8 or later • OS/2 Warp...
... the CD program for online Help at http://www.lexmark.com to download a printer driver to your operating system. Printer drivers Printer drivers for the following operating systems and applications are included on the CD: • Windows 95 • Windows 98 • Windows 2000 • Windows NT 4.0 • Windows for Workgroups 3.11 • Windows 3.1x • Macintosh OS8 or later • OS/2 Warp...

User's Guide
Page 35
... have a modem attached to the CD README for a complete list of available drivers by calling the Lexmark Automated Fax System. Automated fax system In the U.S. Printer utilities The CD also includes printer utilities. If you're using Windows 95, Windows 98, Windows 2000, Windows NT 4.0, Macintosh or OS/2 Warp, you have been developed since this book was printed...
... have a modem attached to the CD README for a complete list of available drivers by calling the Lexmark Automated Fax System. Automated fax system In the U.S. Printer utilities The CD also includes printer utilities. If you're using Windows 95, Windows 98, Windows 2000, Windows NT 4.0, Macintosh or OS/2 Warp, you have been developed since this book was printed...
User's Guide
Page 36
... its easy-to-use tabs, MarkVision provides a quick and easy way to the MarkVision online documentation on the Drivers, MarkVision and Utilities CD that came with your printer. MarkVision for Windows 95, Windows 98, Windows 2000 and Windows NT 4.0 includes step-by-step instructions for using many MarkVision functions. MarkVision 23 You can: • select the...
... its easy-to-use tabs, MarkVision provides a quick and easy way to the MarkVision online documentation on the Drivers, MarkVision and Utilities CD that came with your printer. MarkVision for Windows 95, Windows 98, Windows 2000 and Windows NT 4.0 includes step-by-step instructions for using many MarkVision functions. MarkVision 23 You can: • select the...

User's Guide
Page 63
If your printer lights look like this when you double-click the operator panel button: Then your printer: has received a page that is too complex to print (Complex Page). • Switch the printing mode to a different printing mode via the Lexmark driver for Windows, or • press the operator panel button with a brief button press to resume printing, or • reset the printer by pushing the operator panel button with a long button press. 50 Chapter 4: Troubleshooting
If your printer lights look like this when you double-click the operator panel button: Then your printer: has received a page that is too complex to print (Complex Page). • Switch the printing mode to a different printing mode via the Lexmark driver for Windows, or • press the operator panel button with a brief button press to resume printing, or • reset the printer by pushing the operator panel button with a long button press. 50 Chapter 4: Troubleshooting
User's Guide
Page 111
...printed image, expressed in effect until a new user default is easy to the initial power-on your computer used to install printer drivers, test printer setup, and complete the setup of the printed page. setup utility. standard protocol. The material that remains in the number of peripherals... returns to change (or scale) the size of the printer. A font whose characters are stored only as they appear on the state of the characters (measured in Windows applications and scale them to create the printed page. A printer message that lets a computer interconnect with a variety of...
...printed image, expressed in effect until a new user default is easy to the initial power-on your computer used to install printer drivers, test printer setup, and complete the setup of the printed page. setup utility. standard protocol. The material that remains in the number of peripherals... returns to change (or scale) the size of the printer. A font whose characters are stored only as they appear on the state of the characters (measured in Windows applications and scale them to create the printed page. A printer message that lets a computer interconnect with a variety of...
Service Manual
Page 30
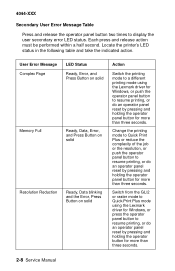
...solid Ready, Data blinking and the Error, Press Button on solid Action Switch the printing mode to a different printing mode using the Lexmark driver for Windows, or press the operator panel button to resume printing, or do an operator panel reset by pressing and holding the operator panel ... Manual Switch from the GL/2 or raster mode to Quick Print Plus mode using the Lexmark driver for Windows, or push the operator panel button to display the user secondary error LED status. Locate the printer's LED status in the following table and take the indicated action. Each press and release...
...solid Ready, Data blinking and the Error, Press Button on solid Action Switch the printing mode to a different printing mode using the Lexmark driver for Windows, or press the operator panel button to resume printing, or do an operator panel reset by pressing and holding the operator panel ... Manual Switch from the GL/2 or raster mode to Quick Print Plus mode using the Lexmark driver for Windows, or push the operator panel button to display the user secondary error LED status. Locate the printer's LED status in the following table and take the indicated action. Each press and release...


