

Quick Reference
Page 1
.... Setting the paper size and paper type Make sure the settings for the paper size being loaded. If you are loading a longer size of the printer, then print a network setup page and locate the IP address in the trays. Proper paper loading prevents jams and facilitates trouble-free printing. 1 Pull the tray completely out. It also includes information about setting the Paper Size and Paper Type. Access the Paper menu through the Printer Settings. The width guides move in the address field of your printer is connected to override the Paper Size and Type settings...
.... Setting the paper size and paper type Make sure the settings for the paper size being loaded. If you are loading a longer size of the printer, then print a network setup page and locate the IP address in the trays. Proper paper loading prevents jams and facilitates trouble-free printing. 1 Pull the tray completely out. It also includes information about setting the Paper Size and Paper Type. Access the Paper menu through the Printer Settings. The width guides move in the address field of your printer is connected to override the Paper Size and Type settings...

Maintenance Guide
Page 5
... this procedure multiple times until the print remains faded, and then replace the cartridge. Ordering toner cartridges When 88 Toner is near its end of the toner cartridge: 1 Remove the toner cartridge. 2 Firmly shake the cartridge side‑to‑side and front‑to‑back several times to extend the life of life. The recommended toner cartridges specifically designed for printer supplies assume printing on your printer model, the printer issues a message or a light sequence to...
... this procedure multiple times until the print remains faded, and then replace the cartridge. Ordering toner cartridges When 88 Toner is near its end of the toner cartridge: 1 Remove the toner cartridge. 2 Firmly shake the cartridge side‑to‑side and front‑to‑back several times to extend the life of life. The recommended toner cartridges specifically designed for printer supplies assume printing on your printer model, the printer issues a message or a light sequence to...

User Guide
Page 38
On - Blinking - On - Blinking - Blinking - On Interpreting the printer control panel lights 38 On • Ensure that is suitable for your region. Light sequences What you loaded is small - On - On - For more information, see "Replacing the toner cartridge" on page 86. On Paper size is large enough. • Clear any print jobs previously sent. Host interface disabled - Replace the toner cartridge with one that the paper you can do Press to clear the code and...
On - Blinking - On - Blinking - Blinking - On Interpreting the printer control panel lights 38 On • Ensure that is suitable for your region. Light sequences What you loaded is small - On - On - For more information, see "Replacing the toner cartridge" on page 86. On Paper size is large enough. • Clear any print jobs previously sent. Host interface disabled - Replace the toner cartridge with one that the paper you can do Press to clear the code and...

User Guide
Page 40
... a time. Setting the paper size and type Ensure that lets you reset factory default settings. If the printer is connected to select from the print dialog and pop-up menus. The factory default paper type setting is a user-defined setting that the settings for all of a Web browser. Configuring Universal paper settings The Universal Paper Size is plain paper, so the paper type setting must be set manually for the trays reflect the size and type of these utilities installs with your operating system: • For Windows users, access the Paper menu...
... a time. Setting the paper size and type Ensure that lets you reset factory default settings. If the printer is connected to select from the print dialog and pop-up menus. The factory default paper type setting is a user-defined setting that the settings for all of a Web browser. Configuring Universal paper settings The Universal Paper Size is plain paper, so the paper type setting must be set manually for the trays reflect the size and type of these utilities installs with your operating system: • For Windows users, access the Paper menu...

User Guide
Page 48
..., paper feeds from a network printer, access the Embedded Web Server by typing the IP address of the printer in the address bar of the following: • For Windows users, access the Paper menu through the Printer Settings. Assigning a custom paper type name to a tray Assign a Custom Type name to a tray to link or unlink it. Then, change the Paper Type and Paper Size settings of that tray so that they do not match the settings of any other tray. Loading paper and specialty media 48...
..., paper feeds from a network printer, access the Embedded Web Server by typing the IP address of the printer in the address bar of the following: • For Windows users, access the Paper menu through the Printer Settings. Assigning a custom paper type name to a tray Assign a Custom Type name to a tray to link or unlink it. Then, change the Paper Type and Paper Size settings of that tray so that they do not match the settings of any other tray. Loading paper and specialty media 48...

User Guide
Page 50
... A6-size paper 1 transparency 1 sheet of paper that can contact the paper guides. For paper smaller than 60 g/m2 (16 lb) might not be loaded depends on whether you have an optional 250- Note: Duplex printing is supported only for laser printers are not supported. The maximum amount of card stock 1 envelope Notes Vinyl, pharmacy, or dual-sided labels are supported for occasional use . Use paper labels only. The manual feeder can automatically feed paper...
... A6-size paper 1 transparency 1 sheet of paper that can contact the paper guides. For paper smaller than 60 g/m2 (16 lb) might not be loaded depends on whether you have an optional 250- Note: Duplex printing is supported only for laser printers are not supported. The maximum amount of card stock 1 envelope Notes Vinyl, pharmacy, or dual-sided labels are supported for occasional use . Use paper labels only. The manual feeder can automatically feed paper...
User Guide
Page 66
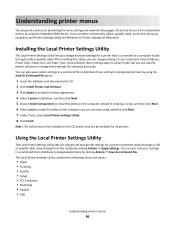
... utility, you can also save settings for individual print jobs. Access the menus from the toolbar by printing the menu settings and network setup pages. Once selected, these settings to install the utility on the computer instead of such controls as Toner Darkness, Power Saver, Paper Size, and Paper Type. Save settings from a networked printer by using the Save As Command File option. 1 Insert the Software and Documentation CD. 2 Click Install Printer and Software. 3 Click Agree to accept the...
... utility, you can also save settings for individual print jobs. Access the menus from the toolbar by printing the menu settings and network setup pages. Once selected, these settings to install the utility on the computer instead of such controls as Toner Darkness, Power Saver, Paper Size, and Paper Type. Save settings from a networked printer by using the Save As Command File option. 1 Insert the Software and Documentation CD. 2 Click Install Printer and Software. 3 Click Agree to accept the...

User Guide
Page 67
...; Duplex Binding • Copies • Blank Pages • Collation • Separator Sheets • Separator Source • Multipage (pages/side) • Multipage Ordering • Orientation • Multipage Border Quality • Print Resolution • Small Font Enhancer • Toner Darkness • Picture Grade Setup • Printer Language • Jam Recovery • Display Language • Print Area • Alarm Control • Toner Alarm • Download Target • Power Saver • Print Timeout • Auto Continue...
...; Duplex Binding • Copies • Blank Pages • Collation • Separator Sheets • Separator Source • Multipage (pages/side) • Multipage Ordering • Orientation • Multipage Border Quality • Print Resolution • Small Font Enhancer • Toner Darkness • Picture Grade Setup • Printer Language • Jam Recovery • Display Language • Print Area • Alarm Control • Toner Alarm • Download Target • Power Saver • Print Timeout • Auto Continue...

User Guide
Page 111
... printer software. CHECK THE PAPER TAB SETTINGS IN YOUR OPERATING SYSTEM Open Print Properties in a Windows operating system or the print dialog in the address bar of a Web browser. Troubleshooting 111 Make sure the Input options settings for Macintosh. Job takes longer than expected to print The job is connected to print in the job. Job prints from the wrong tray or on a network, access the Embedded Web Server by eliminating the number and size of fonts, the number and complexity of images...
... printer software. CHECK THE PAPER TAB SETTINGS IN YOUR OPERATING SYSTEM Open Print Properties in a Windows operating system or the print dialog in the address bar of a Web browser. Troubleshooting 111 Make sure the Input options settings for Macintosh. Job takes longer than expected to print The job is connected to print in the job. Job prints from the wrong tray or on a network, access the Embedded Web Server by eliminating the number and size of fonts, the number and complexity of images...

User Guide
Page 115
... problems. 1 Turn the printer off, and then open the Local Printer Settings Utility for Windows or Printer Settings for print quality test pages, as indicated on . 3 Release . 4 Close the front door. On - On 5 Press and release until all lights cycle. From the Setup menu, make sure Jam Recovery is set to Auto or On. On - Troubleshooting 115 One of these suggestions still do not know the IP address of the printer, print a network setup page and locate...
... problems. 1 Turn the printer off, and then open the Local Printer Settings Utility for Windows or Printer Settings for print quality test pages, as indicated on . 3 Release . 4 Close the front door. On - On 5 Press and release until all lights cycle. From the Setup menu, make sure Jam Recovery is set to Auto or On. On - Troubleshooting 115 One of these suggestions still do not know the IP address of the printer, print a network setup page and locate...
User Guide
Page 139
... menu 67 configurations printer 11 conserving supplies 26 contacting Customer Support 124 control panel, printer 36 buttons 14 lights 14 Custom Types menu 73 D Default Source menu 68 documents, printing from Macintosh computer 56 from Windows 56 duplex printing 57 manual 57 E Embedded Web Server administrator settings 93 networking settings 93 Embedded Web Server Administrator's Guide 93 emission notices 126, 127, 130, 131 envelopes loading 46 tips 60 environmental settings 26 Ethernet port 22 exterior of the printer cleaning 84 F factory defaults, restoring using Printer Settings 93 using...
... menu 67 configurations printer 11 conserving supplies 26 contacting Customer Support 124 control panel, printer 36 buttons 14 lights 14 Custom Types menu 73 D Default Source menu 68 documents, printing from Macintosh computer 56 from Windows 56 duplex printing 57 manual 57 E Embedded Web Server administrator settings 93 networking settings 93 Embedded Web Server Administrator's Guide 93 emission notices 126, 127, 130, 131 envelopes loading 46 tips 60 environmental settings 26 Ethernet port 22 exterior of the printer cleaning 84 F factory defaults, restoring using Printer Settings 93 using...
User Guide
Page 140
... Paper Loading menu 73 paper sizes supported by the printer 53 paper stop, using 47 Paper Texture menu 70 paper types duplex support 54 supported by printer 54 where to load 54 Paper Weight menu 72 parallel port 22 PCL Emul menu 81 photoconductor kit ordering 86 PostScript menu 81 Power Saver adjusting 27 print job canceling from Macintosh 64 canceling from the printer control panel 64 canceling from Windows 64 print quality test pages printing 63, 115 print quality troubleshooting blank pages 116 characters have jagged edges 116 clipped images...
... Paper Loading menu 73 paper sizes supported by the printer 53 paper stop, using 47 Paper Texture menu 70 paper types duplex support 54 supported by printer 54 where to load 54 Paper Weight menu 72 parallel port 22 PCL Emul menu 81 photoconductor kit ordering 86 PostScript menu 81 Power Saver adjusting 27 print job canceling from Macintosh 64 canceling from the printer control panel 64 canceling from Windows 64 print quality test pages printing 63, 115 print quality troubleshooting blank pages 116 characters have jagged edges 116 clipped images...
User Guide
Page 141
... tray 109 88 Replace toner 109 Close front door 107 Load with 107 Load with 107 Load with 107 Load with 107 Load manual feeder with 108 Load manual feeder with 108 Load manual feeder with 107 Remove paper from standard output bin 108 printer options troubleshooting drawers 113 memory card 114 option not working 113 printer problems, solving basic 109 printer settings configuration sheet printing 22 printing booklet 62 duplex (2-sided) 57 duplex, manual 57 from Macintosh computer 56 from Windows 56 installing printer software 23 menu settings page 62 network setup page...
... tray 109 88 Replace toner 109 Close front door 107 Load with 107 Load with 107 Load with 107 Load with 107 Load manual feeder with 108 Load manual feeder with 108 Load manual feeder with 107 Remove paper from standard output bin 108 printer options troubleshooting drawers 113 memory card 114 option not working 113 printer problems, solving basic 109 printer settings configuration sheet printing 22 printing booklet 62 duplex (2-sided) 57 duplex, manual 57 from Macintosh computer 56 from Windows 56 installing printer software 23 menu settings page 62 network setup page...
Service Manual
Page 38
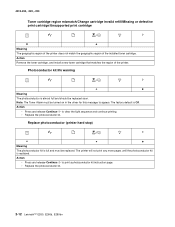
Action Remove the toner cartridge, and install a new toner cartridge that matches the region of the installed toner cartridge. Action • Press and release Continue to print a photoconductor kit instruction page. • Replace the photoconductor kit. 2-12 Lexmark™ E260, E260d, E260dn Replace photoconductor (printer hard stop) Meaning The photoconductor kit is replaced. Action • Press and release Continue to clear the light sequence and continue printing. • Replace the photoconductor kit. Note...
Action Remove the toner cartridge, and install a new toner cartridge that matches the region of the installed toner cartridge. Action • Press and release Continue to print a photoconductor kit instruction page. • Replace the photoconductor kit. 2-12 Lexmark™ E260, E260d, E260dn Replace photoconductor (printer hard stop) Meaning The photoconductor kit is replaced. Action • Press and release Continue to clear the light sequence and continue printing. • Replace the photoconductor kit. Note...
Service Manual
Page 62
.... The media is too loose. 200.06 Imaged page not expected page (bouncy passthru sensor) Remove the toner cartridge/PC kit. Paper jam error codes (200-series) Error Description Action 200.00 Paper jam around input sensor. This topic provides a list of the printer and indicates possible printer problems that must be visible only in the print event log in the source tray. See "Diagnostics mode selections" on page 4-39. 2-36 Lexmark™ E260, E260d...
.... The media is too loose. 200.06 Imaged page not expected page (bouncy passthru sensor) Remove the toner cartridge/PC kit. Paper jam error codes (200-series) Error Description Action 200.00 Paper jam around input sensor. This topic provides a list of the printer and indicates possible printer problems that must be visible only in the print event log in the source tray. See "Diagnostics mode selections" on page 4-39. 2-36 Lexmark™ E260, E260d...

Service Manual
Page 68
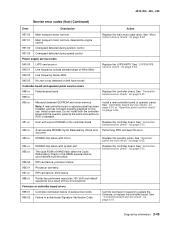
... recover from the error condition. See "Controller board service check" on page 2-53. 920.02 920.03 Fuser fell too far below desired temperature while printing. Service error codes (9xx) Error Description Action Engine software service errors 902.xx Engine software error DC pick motor errors 914.00 DC pick motor error Replace the controller board. This can be put into POR to new enhanced mode. See "Transfer roll service check" on page 2-65. Under temperature...
... recover from the error condition. See "Controller board service check" on page 2-53. 920.02 920.03 Fuser fell too far below desired temperature while printing. Service error codes (9xx) Error Description Action Engine software service errors 902.xx Engine software error DC pick motor errors 914.00 DC pick motor error Replace the controller board. This can be put into POR to new enhanced mode. See "Transfer roll service check" on page 2-65. Under temperature...
Service Manual
Page 71
... card failure: ASIC failure 958.xx Printer has performed more than 100 "shift and reflash" operations as a result of ECC bit corrections Firmware or controller board errors 959.01 Controller verification failure of pensive boot code 959.02 Failure to update the firmware, or replace the controller board. See "Controller board service check" on page 2-55. 951.xx Error with system part. 4513-200, -220, -230 Service error codes (9xx) (Continued) Error...
... card failure: ASIC failure 958.xx Printer has performed more than 100 "shift and reflash" operations as a result of ECC bit corrections Firmware or controller board errors 959.01 Controller verification failure of pensive boot code 959.02 Failure to update the firmware, or replace the controller board. See "Controller board service check" on page 2-55. 951.xx Error with system part. 4513-200, -220, -230 Service error codes (9xx) (Continued) Error...
Service Manual
Page 88
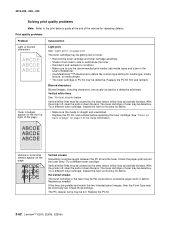
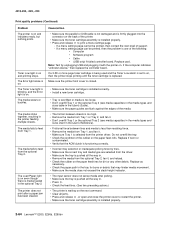
.... • Make sure to use the recommended print media (see media types and sizes in the User's Reference). • Use MarkVision™ Professional to define the custom type setting for media type, media texture, or media weight. • The toner cartridge or PC Kit may be defective. Vertical white lines may be caused by the laser beam, which may be incorrectly set. With the printer off , clear the path or clean the lens...
.... • Make sure to use the recommended print media (see media types and sizes in the User's Reference). • Use MarkVision™ Professional to define the custom type setting for media type, media texture, or media weight. • The toner cartridge or PC Kit may be defective. Vertical white lines may be caused by the laser beam, which may be incorrectly set. With the printer off , clear the path or clean the lens...
Service Manual
Page 90
... optional Tray 2 (see media capacities in the media types and sizes table in the User's Guide). • Make sure the paper guides are selected from the driver. • Make sure the tray is pushed all jams. • Press and release , or open and close the printer cover to print a menu settings page. - If a 3.5K or more page toner cartridge is being used and the Toner Low alarm is set to on, then the printer stops printing until the toner cartridge is on the paper feed...
... optional Tray 2 (see media capacities in the media types and sizes table in the User's Guide). • Make sure the paper guides are selected from the driver. • Make sure the tray is pushed all jams. • Press and release , or open and close the printer cover to print a menu settings page. - If a 3.5K or more page toner cartridge is being used and the Toner Low alarm is set to on, then the printer stops printing until the toner cartridge is on the paper feed...

Service Manual
Page 96
... has been replaced. 3-4 Lexmark™ E260, E260d, E260dn Turn off the printer. Utilities Use the Utilities menu to troubleshoot printer problems. Setting Reset Factory Defaults Hex Trace Print Quality Test Pages Reset Photoconductor Maintenance Counter Use setting to Values Return the printer settings to zero. Resources in printer memory (RAM) are missing. Help isolate printing problems when unexpected characters print or characters are deleted. To exit Hex Trace, turn off the printer. 2. Print menus by providing information about what the printer is blank. Turn on the...
... has been replaced. 3-4 Lexmark™ E260, E260d, E260dn Turn off the printer. Utilities Use the Utilities menu to troubleshoot printer problems. Setting Reset Factory Defaults Hex Trace Print Quality Test Pages Reset Photoconductor Maintenance Counter Use setting to Values Return the printer settings to zero. Resources in printer memory (RAM) are missing. Help isolate printing problems when unexpected characters print or characters are deleted. To exit Hex Trace, turn off the printer. 2. Print menus by providing information about what the printer is blank. Turn on the...


