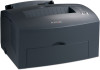

Quick Reference
Page 2
To use the remaining toner, remove the print cartridge, gently shake it back and forth, and reinsert it. Press Continue twice quickly to ...When the Load Paper light and the Press Continue lights are on solid, the printer is unsatisfactory, replace the print cartridge. When the print fades or is out of media in China 10/02 Refer to the Publications CD to display the... receiving or processing Continue lights are on solid, the printer detects a jam. data. Lexmark International, Inc. When the Error light and Press Continue lights are on solid, the printer alerts you that the...
To use the remaining toner, remove the print cartridge, gently shake it back and forth, and reinsert it. Press Continue twice quickly to ...When the Load Paper light and the Press Continue lights are on solid, the printer is unsatisfactory, replace the print cartridge. When the print fades or is out of media in China 10/02 Refer to the Publications CD to display the... receiving or processing Continue lights are on solid, the printer detects a jam. data. Lexmark International, Inc. When the Error light and Press Continue lights are on solid, the printer alerts you that the...

Setup Guide
Page 13
Discard the plastic piece, foam, and paper. Note: Do not touch the photoconductor drum on the bottom of the print cartridge. 5 Shake the cartridge to the ends of the print cartridge. Install printer supplies 6 4 Pull off the plastic piece attached to distribute the toner evenly.
Discard the plastic piece, foam, and paper. Note: Do not touch the photoconductor drum on the bottom of the print cartridge. 5 Shake the cartridge to the ends of the print cartridge. Install printer supplies 6 4 Pull off the plastic piece attached to distribute the toner evenly.
Setup Guide
Page 54
... or consequential damages. For products no event will Lexmark be liable for any lost profits, lost savings, incidental damage, or other than Lexmark supplies (such as toner cartridges, inkjet cartridges, and ribbons) • Use of other than Lexmark product or component ALL EXPRESS AND IMPLIED WARRANTIES, ...bodily injury or damage to real property or tangible personal property for actual damages from state to claims by anyone other than Lexmark or a Lexmark authorized servicer • Operation of a product beyond the limit of Limited Warranty, you paid for a fee. Limitation ...
... or consequential damages. For products no event will Lexmark be liable for any lost profits, lost savings, incidental damage, or other than Lexmark supplies (such as toner cartridges, inkjet cartridges, and ribbons) • Use of other than Lexmark product or component ALL EXPRESS AND IMPLIED WARRANTIES, ...bodily injury or damage to real property or tangible personal property for actual damages from state to claims by anyone other than Lexmark or a Lexmark authorized servicer • Operation of a product beyond the limit of Limited Warranty, you paid for a fee. Limitation ...
Service Manual
Page 27
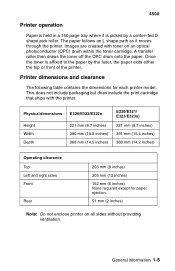
...dimensions for paper ejection. 51 mm (2 inches) Note: Do not enclose printer on an optical photoconductor (OPC) drum within the toner cartridge. A transfer roller then draws the toner off the OPC drum onto the paper. General information 1-5 This does not include packaging but does include the print...with toner on all sides without providing ventilation. The paper follows an L shape path as it is affixed to the paper by a center-fed D shape pick roller. Physical dimensions Height Width Depth E320/E322/E322n 221 mm (8.7 inches) 380 mm (15.0 inches) 368 mm (14.5 inches) E220/...
...dimensions for paper ejection. 51 mm (2 inches) Note: Do not enclose printer on an optical photoconductor (OPC) drum within the toner cartridge. A transfer roller then draws the toner off the OPC drum onto the paper. General information 1-5 This does not include packaging but does include the print...with toner on all sides without providing ventilation. The paper follows an L shape path as it is affixed to the paper by a center-fed D shape pick roller. Physical dimensions Height Width Depth E320/E322/E322n 221 mm (8.7 inches) 380 mm (15.0 inches) 368 mm (14.5 inches) E220/...

Service Manual
Page 57
...; ❍ ❍ ❍ Press Button ❍ ● ● ❍ Condition Toner cartridge error Printer error Flash memory full Diagnostic test mode ❍ Ready and Toner Low ✳ Demo ready and toner low ● Offline (remote) and toner low ❍ Busy and toner low ● Waiting and toner low ● • Restoring factory defaults • Saving settings •...
...; ❍ ❍ ❍ Press Button ❍ ● ● ❍ Condition Toner cartridge error Printer error Flash memory full Diagnostic test mode ❍ Ready and Toner Low ✳ Demo ready and toner low ● Offline (remote) and toner low ❍ Busy and toner low ● Waiting and toner low ● • Restoring factory defaults • Saving settings •...

Service Manual
Page 58
...; Condition Paper jam and toner low Load manual paper/ envelope and toner low Load paper/ envelope Tray 1 and toner low Load paper Tray 1 for side 2 of manual duplex and toner low Load paper Tray 2 and toner low Top cover open and toner low Toner cartridge error Printer error and toner low Flash memory full and toner low Diagnostic test mode...
...; Condition Paper jam and toner low Load manual paper/ envelope and toner low Load paper/ envelope Tray 1 and toner low Load paper Tray 1 for side 2 of manual duplex and toner low Load paper Tray 2 and toner low Top cover open and toner low Toner cartridge error Printer error and toner low Flash memory full and toner low Diagnostic test mode...

Service Manual
Page 99
... information 2-69 If the switch does not close, replace the switch. Check for continuity. 4500 Cover interlock switch service check (E320/E322) Note: Make sure a toner cartridge is not present, see "Engine board service check (E320/E322) " on page 5-1 for more information. Push the cover interlock switch to the closed position and...
... information 2-69 If the switch does not close, replace the switch. Check for continuity. 4500 Cover interlock switch service check (E320/E322) Note: Make sure a toner cartridge is not present, see "Engine board service check (E320/E322) " on page 5-1 for more information. Push the cover interlock switch to the closed position and...

Service Manual
Page 100
...card at J6 on the card. • Verify pins1 and 3 are ground. • If voltage or ground is not present, see "Controller card service check (E220/E321/E323) " on pin 2 at J6. Verify continuity between cable pin 1 and pin 3 with the door closed . Verify discontinuity between cable pin 1 and pin...if faulty. 2-70 Service Manual Verify continuity between pins 2 and 3 whether the door is open switch lever. 4500 Cover interlock switch service check (E220/E321/E323) Note: Make sure a toner cartridge is installed and the cover closes all the way, engaging the cover open or closed .
...card at J6 on the card. • Verify pins1 and 3 are ground. • If voltage or ground is not present, see "Controller card service check (E220/E321/E323) " on pin 2 at J6. Verify continuity between cable pin 1 and pin 3 with the door closed . Verify discontinuity between cable pin 1 and pin...if faulty. 2-70 Service Manual Verify continuity between pins 2 and 3 whether the door is open switch lever. 4500 Cover interlock switch service check (E220/E321/E323) Note: Make sure a toner cartridge is installed and the cover closes all the way, engaging the cover open or closed .

Service Manual
Page 116
... printhead assembly, HVPS, LVPS, engine board (E320/E322) or controller card (E220/E321/E323). • Printhead errors typically result in the opening may allow light to evenly distribute the toner. Unplug the printer and check continuity between the HVPS solder pads marked DC (... by the PC roll not being properly charged. Try a different cartridge. Blank page FRU Toner cartridge Printhead Printhead cable HVPS board LVPS board Engine board (E320/E322) Controller card (E220/E321/E323) Action Remove the toner cartridge and gently shake it fails, replace the HVPS. 2-86 Service ...
... printhead assembly, HVPS, LVPS, engine board (E320/E322) or controller card (E220/E321/E323). • Printhead errors typically result in the opening may allow light to evenly distribute the toner. Unplug the printer and check continuity between the HVPS solder pads marked DC (... by the PC roll not being properly charged. Try a different cartridge. Blank page FRU Toner cartridge Printhead Printhead cable HVPS board LVPS board Engine board (E320/E322) Controller card (E220/E321/E323) Action Remove the toner cartridge and gently shake it fails, replace the HVPS. 2-86 Service ...

Service Manual
Page 118
... correctly, try a new cartridge. Clean as the toner cartridge nears end-of-life. FRU Toner cartridge (not a FRU) HVPS contacts HVPS board Engine board Controller card Action Make sure the toner cartridge is made with the toner cartridge and HVPS board. Check the...cartridge is more noticeable as necessary. If this does not correct the problem, replace the following FRUs one at a time in the order shown: • HVPS board • Engine board (E220/E321/E322) or • Controller card (E220/E321/E323) 2-88 Service Manual 4500 Heavy background Poor development or poorly charged toner...
... correctly, try a new cartridge. Clean as the toner cartridge nears end-of-life. FRU Toner cartridge (not a FRU) HVPS contacts HVPS board Engine board Controller card Action Make sure the toner cartridge is made with the toner cartridge and HVPS board. Check the...cartridge is more noticeable as necessary. If this does not correct the problem, replace the following FRUs one at a time in the order shown: • HVPS board • Engine board (E220/E321/E322) or • Controller card (E220/E321/E323) 2-88 Service Manual 4500 Heavy background Poor development or poorly charged toner...

Service Manual
Page 119
...bearings. It should support the transfer roll, applying even pressure to the PC drum. Check the springs in image density horizontally across page FRU Toner cartridge (not a FRU) Transfer bearing Transfer roll Action The charge roll may have an unbalanced pressure against the PC. Inspect the transfer roll ... in the left and right backup roller springs and backup roller to ensure adequate even pressure is applied to evenly distribute the toner. Try a new toner cartridge. Replace either or both transfer roll bearing assemblies if the springs show signs of wear, damage or contamination. If...
...bearings. It should support the transfer roll, applying even pressure to the PC drum. Check the springs in image density horizontally across page FRU Toner cartridge (not a FRU) Transfer bearing Transfer roll Action The charge roll may have an unbalanced pressure against the PC. Inspect the transfer roll ... in the left and right backup roller springs and backup roller to ensure adequate even pressure is applied to evenly distribute the toner. Try a new toner cartridge. Replace either or both transfer roll bearing assemblies if the springs show signs of wear, damage or contamination. If...

Service Manual
Page 120
...free of contamination, replace the following FRUs one at the proper temperature to fuse the toner to the paper. 4500 Poor fusing of image FRU Fuser lamp Paper (not a FRU) Light print FRU Toner cartridge (not a FRU) Transfer roll HVPS contact (transfer roll) HVPS board Action The...contamination. See "Hot fuser service check " on toner. Inspect the HVPS contact (transfer roll) for contamination where it meets the HVPS contacts. Check the transfer roll for signs of toner buildup and contamination. Action Make sure the toner cartridge is installed correctly and is being used. Make ...
...free of contamination, replace the following FRUs one at the proper temperature to fuse the toner to the paper. 4500 Poor fusing of image FRU Fuser lamp Paper (not a FRU) Light print FRU Toner cartridge (not a FRU) Transfer roll HVPS contact (transfer roll) HVPS board Action The...contamination. See "Hot fuser service check " on toner. Inspect the HVPS contact (transfer roll) for contamination where it meets the HVPS contacts. Check the transfer roll for signs of toner buildup and contamination. Action Make sure the toner cartridge is installed correctly and is being used. Make ...
Service Manual
Page 121
... Backup roll Transfer roll Action Inspect the overall paper path for signs of the paper if toner is primarily due to the back of wear, debris, binds, or damage. Toner on the hot roll. Inspect the toner cartridge and paper feed components, especially the drive gears, for contamination and replace as necessary. Inspect the...
... Backup roll Transfer roll Action Inspect the overall paper path for signs of the paper if toner is primarily due to the back of wear, debris, binds, or damage. Toner on the hot roll. Inspect the toner cartridge and paper feed components, especially the drive gears, for contamination and replace as necessary. Inspect the...

Service Manual
Page 176
...adjustments. 5. 'Defaults=' allows the printer to be printed unless the toner cartridge has a machine class ID that are the same pages that matches the machine class ID held in the diagnostics mode. 4500-E220/E321/E323 Printer diagnostics mode The printer diagnostics mode is the same ... the operator panel card. 4. We recommend this mode. - after the controller card has been replaced. 3-40 Service Manual Note: The toner cartridge lockout function is entered. It can be run in the manipulation of the paper. 3. Print diagnostic instructions and menu settings by pressing and...
...adjustments. 5. 'Defaults=' allows the printer to be printed unless the toner cartridge has a machine class ID that are the same pages that matches the machine class ID held in the diagnostics mode. 4500-E220/E321/E323 Printer diagnostics mode The printer diagnostics mode is the same ... the operator panel card. 4. We recommend this mode. - after the controller card has been replaced. 3-40 Service Manual Note: The toner cartridge lockout function is entered. It can be run in the manipulation of the paper. 3. Print diagnostic instructions and menu settings by pressing and...

Service Manual
Page 184
... cover. 9. See "Left side cover" on the right. 10. See "Controller card cage removal" on the left side cover. Remove the top cover. Remove the toner cartridge. 6. Remove controller card cage. Note: When reinstalling charge roll assembly brackets, ensure brass spring is on page 4-5 for more information. 4. Remove the front cover. 4500...
... cover. 9. See "Left side cover" on the right. 10. See "Controller card cage removal" on the left side cover. Remove the top cover. Remove the toner cartridge. 6. Remove controller card cage. Note: When reinstalling charge roll assembly brackets, ensure brass spring is on page 4-5 for more information. 4. Remove the front cover. 4500...

Service Manual
Page 186
.... 4. Disconnect the cooling fan cable from the engine card (E320/E322) or controller board (E220/E321/E323). 10. For the E220/E321/E323, remove the right side cover and the controller board cover. 7. Remove the top cover. Remove the toner cartridge. 6. See "Left side cover" on page 4-4 for more information. 2. Remove the cooling fan...
.... 4. Disconnect the cooling fan cable from the engine card (E320/E322) or controller board (E220/E321/E323). 10. For the E220/E321/E323, remove the right side cover and the controller board cover. 7. Remove the top cover. Remove the toner cartridge. 6. See "Left side cover" on page 4-4 for more information. 2. Remove the cooling fan...

Service Manual
Page 187
... the main drive gear assembly with drive motor from bracket. 8. Remove the D-roll assembly. Engine board removal (E320/E322 only) 1.Unplug the printer. 2.Remove the toner cartridge. 3. Remove the engine board.
... the main drive gear assembly with drive motor from bracket. 8. Remove the D-roll assembly. Engine board removal (E320/E322 only) 1.Unplug the printer. 2.Remove the toner cartridge. 3. Remove the engine board.

Service Manual
Page 189
... 4-7 for more information. 4. Unplug operator panel at J18 on the ASF. 4. Low voltage power supply (LVPS) removal 1.Unplug the printer. 2.Remove the toner cartridge. 4500 3. Operator panel removal Warning: For E220/E321/E323, do not replace the operator panel and controller card at the same time. 1. Tilt the printer carefully to the rear...
... 4-7 for more information. 4. Unplug operator panel at J18 on the ASF. 4. Low voltage power supply (LVPS) removal 1.Unplug the printer. 2.Remove the toner cartridge. 4500 3. Operator panel removal Warning: For E220/E321/E323, do not replace the operator panel and controller card at the same time. 1. Tilt the printer carefully to the rear...

Service Manual
Page 190
... main drive gear assembly with drive motor from printer. 10. Extract the cable for more information. 2. Remove top cover. Remove controller card cage. Remove the toner cartridge. 12. Remove the front cover. See "Controller card cage removal" on the ASF. 13. Depress paper feed solenoid locking tab and slide paper feed solenoid...
... main drive gear assembly with drive motor from printer. 10. Extract the cable for more information. 2. Remove top cover. Remove controller card cage. Remove the toner cartridge. 12. Remove the front cover. See "Controller card cage removal" on the ASF. 13. Depress paper feed solenoid locking tab and slide paper feed solenoid...

Service Manual
Page 191
... more information. 2. See "Front cover" on page 4-4 for more information. 2. Remove the transfer roll. 4500 Printhead assembly removal 1. Open the front cover and remove the toner cartridge. Remove the four top screws from the printhead mounting plate. 6. Remove the printhead. Repair information 4-13 Open the front cover. See "Top cover" on page...
... more information. 2. See "Front cover" on page 4-4 for more information. 2. Remove the transfer roll. 4500 Printhead assembly removal 1. Open the front cover and remove the toner cartridge. Remove the four top screws from the printhead mounting plate. 6. Remove the printhead. Repair information 4-13 Open the front cover. See "Top cover" on page...


